[FIX] This Copy of the Install OS X El Capitan Application Can’t be Verified
Installing a new version of the macOS operating system is always exciting and intriguing. However, when the installation does not go as planned, it can become tedious especially if you are aware of what the error message means. One of the errors that users face while upgrading to the OS X El Capitan is the “This copy of the Install OS X El Capitan application can’t be verified“. This error message occurs when your Mac device reboots in order to begin the installation phase. The error message suggests that this copy of the installer may be corrupted due to which the issue is occurring.

While that can be the case in some scenarios, it does not always hold true. There is another major reason why this error message can occur and that is the digital signature that comes with the installer. We will be discussing the causes in detail down below. Users have tried downloading the installer again but in most cases, it does not work out either. The solution to this issue is pretty simple and can be easily implemented. However, before we get into that, let us go through the causes.
- Expired Digital Certificate — The main reason why this error message appears is when the digital certificate associated with the installer expires. This happens when you use the installer at quite a later date from the time when you actually downloaded it. As a result, the certificates are expired and you are shown the mentioned error message. This can be easily fixed by just changing the current date of your Mac device.
- Corrupted Installer — Lastly, the reason why this error message may occur could be a corrupted installer as suggested by the error message itself. In case the download process was interrupted or interfered with, it may result in the said error message. As a result, you will have you redownload the installer to fix this issue.
With the causes of the error message now out of the way, we can get into the different methods that you can implement to install OS X El Capitan successfully. Follow through.
Method 1: Change Date and Time Through Terminal
The first thing that you should do when you face the error message is to change your date and time. As it turns out, you will have to change your date and time to the time when you actually downloaded the installer. That way, the certificate will still be valid and you will be able to complete the installation.
Now, there are two ways that you can do this. First, if you are able to boot into your current version of macOS, you can just go to the System Preferences and do it from there. In case you can’t, don’t worry as you can still achieve through the macOS Recovery menu. We will go through both of them, so just follow through. It is important to note that when you change your date, please make sure that your Mac device does not have an active internet connection. This is because if you are connected to the internet, the date and time will just revert and you won’t be able to achieve what you want to. Once you have made sure that you do not have an active connection, follow the steps given down below:
- If you are able to boot into macOS, you can easily change the date and time through the System Preferences window.
- To do this, open up the System Preferences through the Apple menu.
- Then, go to the Date and Time option.
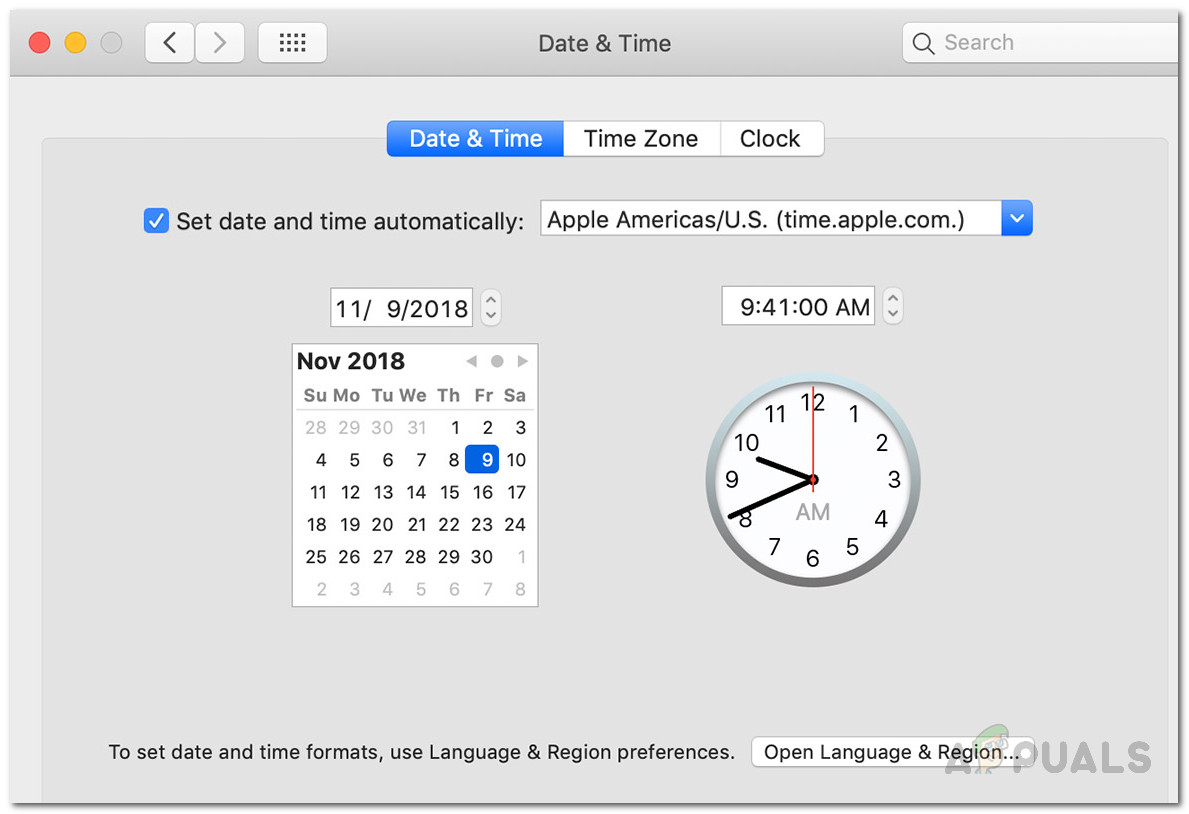
Mac Date and Time Settings - There, change the date and time to the time you downloaded the installer. If you do not remember, you can go to where the installer is located and just check its details.
- Make sure that the Set date and time automatically box is unchecked.
- Try installing the OS again and you should be good to go.
In case you are not able to boot into macOS, you can still change the date through a Terminal window from the macOS Recovery menu. To do this, just follow the steps down below:
- First of all, power off your Mac device.
- Power it back on but immediately press and hold the Command + R keys.
- Once you see the Apple logo on the screen, release the keys.
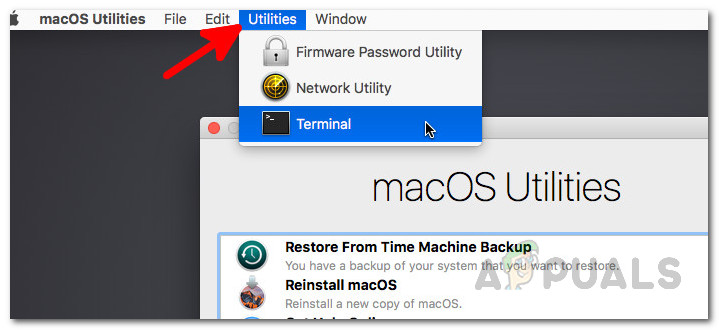
- Now, on the macOS Utilities screen, click on the Utilities option at the top and then from the drop-down menu, select Terminal.
Accessing a Terminal - Once the terminal window opens up, navigate to where the installer is by using the cd command.
- Now, you will have to change the date. To find out the date when the installer was downloaded, use the stat Install OS X El Capitan.app command. This will list down the date.
- After that, use the date command to change the date and time of your Mac. You will have to something near the download date. Preferably the same date or maybe a day or two later. The command uses the following syntax:
date [mm][dd][HH][MM][YY]
- Here, mm is the month, dd is the day, HH is the hour, MM is the minute, and YY is the year. There are no spaces in between. Use the below picture for reference.

Changing Date and Time Through Terminal - After that, exit the Terminal window and reboot. Try installing the OS again to see if the issue has been resolved.
Method 2: Force Install through the Terminal
Another way that you can get rid of the said error message is to just force install the operating system. This can be done by using the Terminal to use the installer and perform a force installation. You should only do this if you are sure that the installer is not corrupted. The method only works if you have a bootable USB stick. Follow the instructions down below to do this:
- First of all, plug in your bootable USB stick and power off your Mac.
- Then, power it back on while pressing and holding the Command + R keys.

Booting into MacOS Recovery - After that, on the macOS Recovery screen, click on the Utilities option at the top and launch a Terminal.
Accessing a Terminal - In the Terminal window, type in the following command:
installer -pkg /path/to/installer -target /Volumes/"XXX"
- Here, in front of the parameter target, specify the volume where you wish to install the OS.
- Wait for the installation to say that it is completed. You won’t be shown any display but you will know once the installation is complete.
- Once this is done, you have successfully installed OS X El Capitan.
Method 3: Upgrade through Safe Mode
Finally, if the above solutions do not work out for you, what you can do is download and install the operating system in macOS Safe Mode. This is only for the users that are trying to upgrade from their current version to El Capitan. This means, if you do not have macOS installed already, this will not work for you. To do this, follow the instructions down below:
- First of all, power off your Mac.
- After that, power it back on while pressing the Shift key on your keyboard.

Mac Keyboard - Once you see the Apple logo on the screen of your Mac, let go of the Shift key.
- You will see Safe Boot written in the top menu in red color.

Mac Safe Boot - Login to your macOS. After that, go ahead and delete the current installer from your Applications folder.
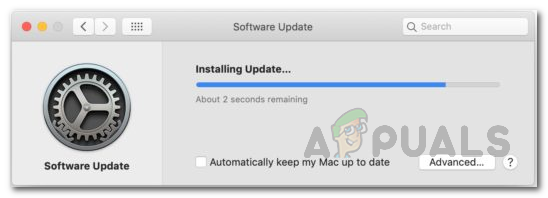
- Once you have done that, go ahead and download the updates from the Software Update screen again.

Mac Software Update - After it is finished downloading, install the updates.
- In case it gets stuck, go ahead and reboot into Safe Mode again.
Mac Installing Update - Let it run until you are prompted to the login screen.
- Once you get into your Desktop, restart once more. You have successfully installed El Capitan at this point.


Thanks Kevin Arrows! The download date has to be close to the system date – thats impossible to guess without your hint.
I ve had the battery changed when I switched to the new harddisk (kind of obvious once the case is open) and therefore the date/clock resetted. The apple installer gives a misleading error information.
Thumbs up for your article 😉