Fix: Steam Update Queued
Steam has a very efficient updating system where it queues updates until some specific conditions are met and then it starts to download the updates. However, it is not new to know that the update might get stuck in the queue for a long period of time with no activity at all.

This happens either because of a bad internet connection or because of internet problems with your computer or Steam itself.
Solution 1: Restart your computer
It’s likely that you didn’t restart your client after Steam got updated or if you installed a fresh game. Whenever an installation or download takes place, a lot of configurations occur and it is necessary to restart your PC for them to take place.
Simple reboot your PC and try running the game again. If the problem still persists, we can follow the solutions below.
Solution 2: Checking your date and time
Like we mentioned before, Steam has a date counter. A download or update doesn’t start unless it has a correct time check. If your date or time is wrong according to your region, the time check won’t be possible; hence Steam will not download any game.
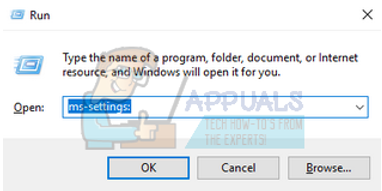
- Press Windows + R button to launch the Run application. In the dialogue box type “ms-settings:”. This will launch the Settings applications.
- Once in the Settings application, look for the option named “Time & Language”. It should be somewhere in the middle.

- After clicking the option, you will be taken to the Date and Time menu. By default, your pc will have “Set time automatically” and “Set time zone automatically” checked. If you are getting wrong time and date because of automatic settings, Uncheck them and click on the option which says “Change date and time”.
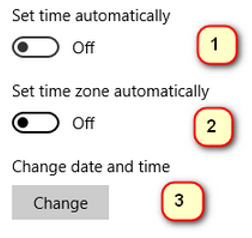
- After you click Change, a new window will pop up where you can change the date as well as time. Change the date to the correct one and save changes. If this still doesn’t work, we try changing the date back and forth a bit. I know this is a wild guess, but it is worth a shot as it worked for some of the users. If this fails too, move on to the next solution.
Solution 3: Changing Download Region
Steam has divided its services into different geographical regions. There are different servers implemented at these locations and by default, the server closest to you is set as your download server.
There are millions of players online in Steam every day and it not new that the servers may sometimes reject a client or two in order to serve the ones already in the queue. Or it might be the case that your server is overloaded/down for maintenance. We can try changing your download region and see if this fixes the problem at hand. Steam may ask you to restart your client in order for the changes to take place. If asked, press Ok and after restarting the Steam client, check if the problem got fixed.
You can view our detailed guide on how to change your download region from here.
Solution 4: Cancel all other download queues
If there are more than one download/update queues present in your Steam library, you should cancel them and try to update/download only one game at a time. This is very important as your Steam client can get overwhelmed by a number of requests it has to process.
Do note that there is specific queue system in the Library for this purpose but sometimes it may fail to work as expected. Try canceling all the other download queues and restart Steam.
Solution 5: Logout and then login
We can try logging your Steam account out and then log back in. This is a simple solution and if your client is in a bugged state, it will restart it.
Note: If you don’t have access to your account credentials or don’t have access to your mobile (if you have enabled Steam Mobile Authenticator), it is not advised to follow this method. You will be required to log into your account by entering your username and password. You will be also asked to verify your account if you have authentication enabled.
- Launch your Steam client using Steam.exe
- Log out of Steam by clicking on the option of “Change User” present if you click your account title on the top right corner of the Steam client.
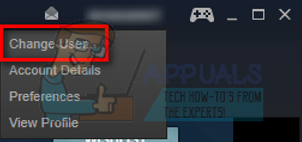
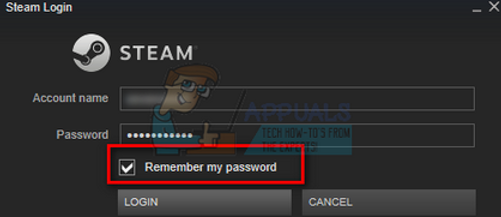
- After clicking the option, you will be given a login screen where you have to enter your credentials. After inputting your credentials, check the box which says Remember my password. Click the button Login.
- Run the game you were trying to play and check if the error got fixed.
Solution 6: Change maximum bandwidth
There can be another conflict between your internet connection and your disk write speed. Your internet connection might be too fast while disk write speeds always have their limitations. We can try reducing your bandwidth to something acceptable and restarting Steam.
- Open the Steam client. Navigate to its Settings by pressing the Steam button present at the top left side of the screen.
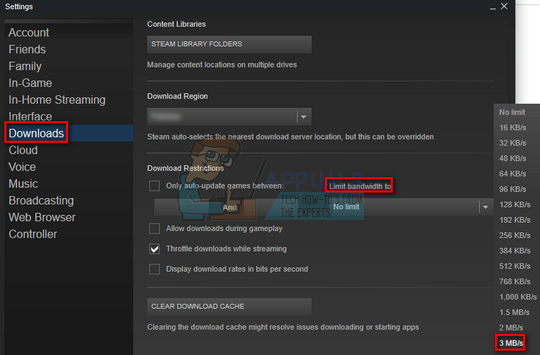
- Once in the Settings, navigate to the Downloads tab.
- Here you will see an option which says Limit Bandwidth to. Limit your bandwidth to a reasonable speed to check if it solves the problem.
Solution 7: Flushing Steam config files and DNS
We can try resetting your internet settings and config to see if the problem gets resolved. Flushconfig flushes and reloads the configurations for each of the applications/games installed in your PC.
Most operating systems are designed to cache the DNS records. It is generally a good practice as it allows an application to process faster requests/data transfer to a website. However, if the DNS frequently changed, it is necessary to flush it so the new DNS can be retrieved and you can resume the data transfer you were doing. It removes the local cache from your computer and obtains the most recent cache that your Internet Service Provider is using.
- Press Windows + R to bring up the run application.
- In the dialogue box type “steam://flushconfig”.
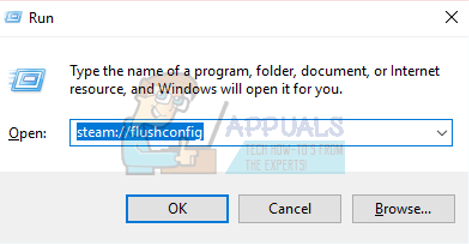
- Steam will pop up a small window to confirm your action. Press Ok. No note that after this action, Steam will ask you to log in again using your credentials. Don’t follow this method if you don’t have access to your login details.
- After performing the above actions, press Windows + R button to pop up the Run window again. In the dialogue box type “cmd” to bring up the command prompt.
- Once in the command prompt, type “ipconfig /flushdns”. Press Enter.

- Restart your PC and re-launch Steam to see if the problem is resolved.
Solution 8: Adding an exception to your antivirus and disabling Firewall
It is a well-known fact that Steam conflicts with the Windows Firewall. As we all know, Steam tends to download updates and games over the background while you are using Windows for something else. It tends to do so you don’t have to wait for the download to finish when you want to play your game or use the Steam client. Steam also has access to a number of system configuration and it alters it so you can get the best experience available for your gaming. Windows Firewall sometimes marks some of these processes as malicious and tends to block Steam. There may even be a conflict going where the Firewall is blocking Steam’s actions in the background. This way you won’t know it’s even happening so it’ll be hard to pinpoint it out. We can try disabling your Firewall temporarily and checking if the error dialogue goes away or not.
You can check our guide on how to disable the firewall.
Like in the case of Firewall, sometimes your antivirus can also quarantine some of Steam’s actions as potential threats. The obvious solution would be to uninstall your antivirus but it isn’t wise to do so. If you uninstall your antivirus, you will be exposing your computer to a number of different threats. The best way is to add steam to the list of applications which are exempted from scanning. The antivirus will treat Steam as if it wasn’t even there.
You can read our guide on how to add Steam as an exception to your antivirus.
Solution 9: Restarting your router manually
It can be possible that your internet router may be saved in the wrong configuration. Or any recent settings may have caused it not to work properly. Of course, you should try to restart the router first and check, but, if that doesn’t work, we can try resetting the router (hard-reset) manually and see if it improves our situation.
- Pick up your router and turn it back so all the ports are in front of you.
- Look for any button named “reset” on its back. Most routers don’t have these buttons so you don’t accidentally reset it to factory defaults, instead, you have to use something thin like a pin to press inwards towards the hole which says “reset”.

- Reset your router and connect your computer again to the WiFi network. Launch Steam again and check if the problem gets fixed.
Note: It is worth noting that after you manually reset your router, your router won’t have any SSID (password) and the name of your WiFi will be set to default (something like TPlink121). Furthermore, any internet settings that your internet provider have set on it will be removed. Do not perform this method unless you know those settings or your router works as a plug and play. It can be a real pain to call up the provider and ask them to guide how to make the internet working again so always keep this factor in mind. All the connected devices will be disconnected and you will have to re-connect all the devices one by one again.
Solution 10: Resetting settings of your router through the web page
There is also an option to reset your router settings through the web page using your default gateway IP address. You can use this method if solution 9 is proving troublesome for you due to any reason. Once again, the note written above applies to this solution too so it’s best to keep all of those things in mind.
- Open your web browser and type in the IP address of the router (if you don’t know this, it will most probably be written on the back of your router or in its box/manual). It will look something like 192.168.1.1
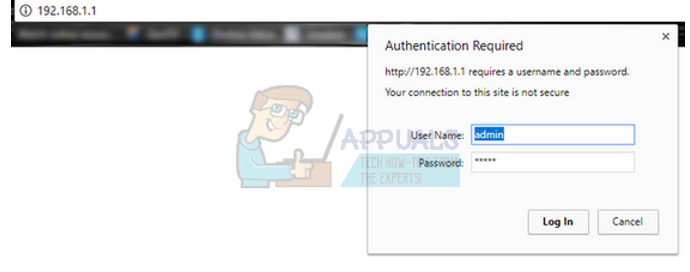
- Press enter. Now the router will ask you for the username and password before it allows you access. The default ones are admin/admin. If this isn’t working and you don’t remember the credentials, you can always contact your internet provider and ask them.
- Click on the Tools tab on the top and the System Commands on the left.
- Here you will be seeing a button named Restore. Click it. You will be disconnected with your router and it will resort back to factory settings.
Note: Do note that the menu configuration may be different for each router. You can easily type in your model number in Google and see how to reset the router (if you are unable to reach the factory reset button yourself).
- After connecting back to the internet, launch Steam again.
Solution 11: Update your Wireless device
We can try our luck by updating your wireless device on your computer. You should also try downloading/updating the game over some different network to check if there is a problem with your internet connection or is the problem with your PC.
- Press Windows + R to bring up the Run application. In the dialogue box, type “devmgmt.msc”.
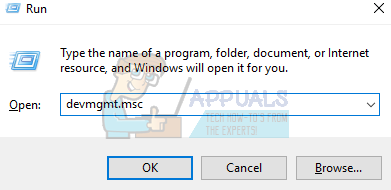
- This command will bring up your computer’s device manager. Once in the device manager, select the network adapter you are using and right click it. Select the option “Update driver”.
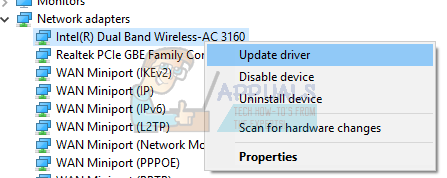
- Now Windows will ask you whether you want to update it automatically or manually. Select automatic. Now Windows will check for available updates and implement them if it finds any.
- Restart Steam and try downloading/updating the game again.