Fixing the Starbound ‘NetworkException’ Error
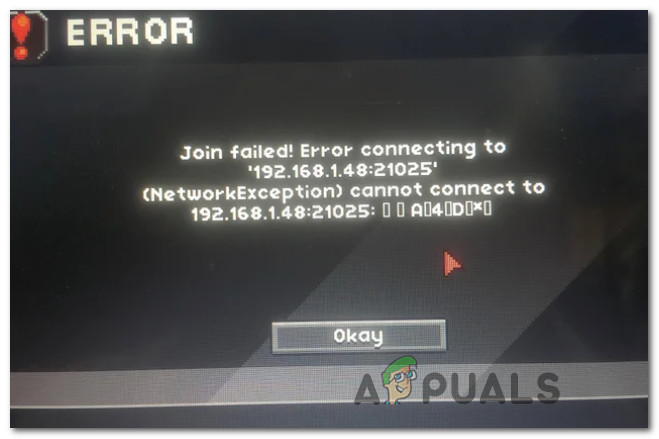
Some Starbound users are reportedly seeing the ‘NetworkException’ (Join Failed)’ error when attempting to connect to a multiplayer server. This issue is reported to occur on Windows 7, Windows 8.1, and Windows 10.
After investigating this issue thoroughly, it turns out that there are several different common scenarios that might cause the game client to behave in this way when trying to connect to an existing multiplayer server. Here’s a list of culprits that might trigger the NetworkException’ (Join Failed) error with Starbound:
- UPnP is Disabled – If you’re using a newer router model, you can expect to see this error if you previously disabled Universal Plug and Play (UPnP). This feature is essential in allowing you to connect to different Starnbound servers since it will automatically forward the ports used by the game.
- Starbound ports are not forwarded – If you’re using an older router model (one that doesn’t support UPnP), you will need to go through the trouble of forwarding the required ports manually from your router settings according to the platform you’re attempting to playing the game on.
- Game file corruption – According to some affected users launching the game through Steam, you can also expect to see this error occurring in those instances where a game file or associated dependency is missing or corrupted. In this case, you can resolve the issue by triggering an integrity check from Steam’s menu.
- Starbound connection is blocked by a firewall – A false positive might convince your security suite to block incoming and outgoing connections with the Starbound server. In this case, you can resolve the issue by whitelisting Starbound as well as the launcher you use to launch the game.
- Underlying Network Restriction – There are some instances where a network restriction (related to the IPv4 connection) imposed at an ISP level is preventing the connection with the Starbound server. Situations like this can typically be resolved by using a VPN tunneling app like Hamachi when connecting to the game server.
Now that you are aware of every potential culprit that might be responsible for this issue, here’s a list of methods that other Starbound games have used to fix this particular issue:
1. Enabling UPnP (if applicable)
One of the most common signaled issues that will produce this Starbound error is a case where the ports used by the game are not forwarded, so the connection with the game server cannot be established by your computer.
Nowadays, the vast majority of routers are perfectly capable of forwarding the ports used by the games we play automatically – via a feature called UPnP (Universal Plug and Play).
So if your router supports Universal Plug and Play, the solution is extremely easy – Simply access your router settings and enable UPnP to allow your router to automatically forward the ports used by the game you play.
Even though the instructions on how to do this are different from router to router, you need to follow a series of generic instructions to enable UPnP on your router.
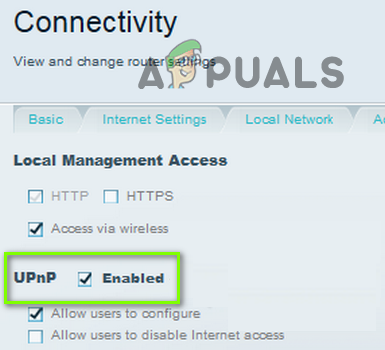
Once you have ensured that UPnP is enabled, reboot both your router and the PC you play the game on and see if the issue is now fixed.
In case your router does not support Universal Plug and Play, move down to the next potential fix below.
2. Forwarding StarBound’s Ports Manually
In case you’re using an older router model that doesn’t support UPnP, you’ll need to take some additional steps to forward the ports used by the game manually (depending on the platform you’re playing Starbound on).
Several affected users that we’re dealing with the same kind of issue have reported that the problem was finally fixed after they accessed their router settings manually and forwarded the ports used by Starbound.
Note: Every situation will be slightly different depending on your router manufacturer, but we’ve created a series of generic steps that should walk you through the entire process.
Follow the instructions below to forward the required StarBound ports manually from your router settings:
- On a PC that is connecting to the same network you use when playing Starbound, open your default browser, type one of the following addresses and press Enter to open your router settings:
192.168.0.1
192.168.1.1
- After you’re at the initial login screen, enter the login credentials to access your router settings.
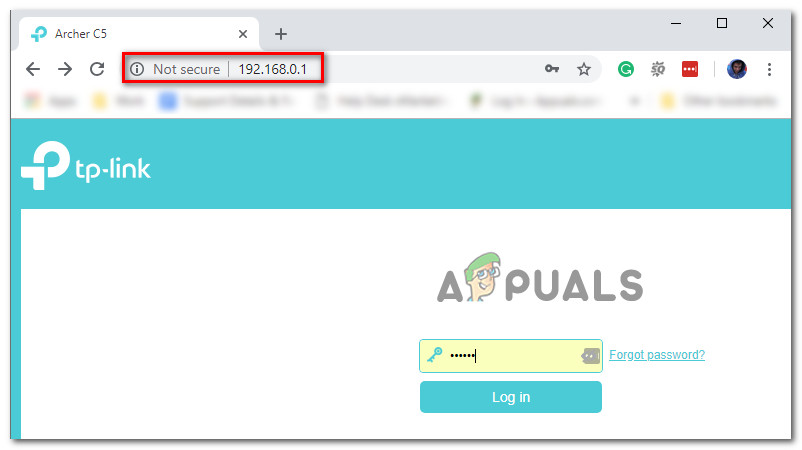
Accessing the Router settings Note: With most router models, you’ll be able to get in with the default login credentials – admin as username and 1234 as password. If these generic credentials don’t work, look on the back of your router or search online for the default login credentials according to your router model.
- After you have successfully arrived inside your router settings, expand the Advanced / Expert menu, and look for an option named Port Forwarding / NAT Forwarding.
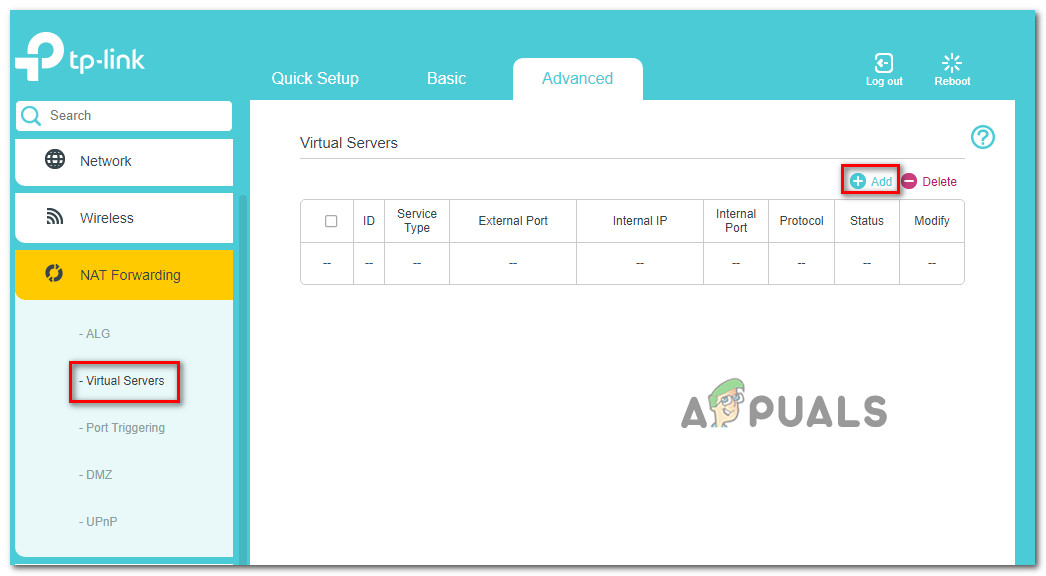
Forwarding the required ports - Next, go ahead and manually open the ports below to ensure that your network will accept incoming connections from the Starbound according to the platform that you’re playing on:
Starbound - PC
TCP: 21025
UDP:

Starbound - Playstation 4
TCP: 1935,3478-3480
UDP: 3074,3478-3479

Starbound - Xbox One
TCP: 3074
UDP: 88,500,3074,3544,4500

Starbound - Steam
TCP: 21025,27015-27030,27036-27037
UDP: 4380,27000-27031,27036
- Once every port is successfully forwarded, restart your computer, launch the game again, and see if the problem is now fixed.
If the same kind of issue is still occurring even after you forwarded the required ports manually, move down to the next potential fix below.
3.Checking the Game File’s Integrity (Steam Only)
According to some affected users, this issue can also be related to some type of system file corruption that is affecting the local installation of Starbound.
If you’re encountering this issue while launching the game through Steam, you should take the time to perform a file integrity check and repair your Steam installation of Starbound. This operation will check every game file individually and replace every corrupted item with a healthy equivalent – In case an item is missing, this operation will also replace it.
Follow the instructions below to verify the Starbound’s file inside Steam with a file integrity check:
- Start by launching your Steam client, then sign with your Steam account credentials.
- Once you have successfully signed in with your Steam account, right-click on the listing associated with Starbound from the Library tab, then click click on Properties from the newly appeared context menu.
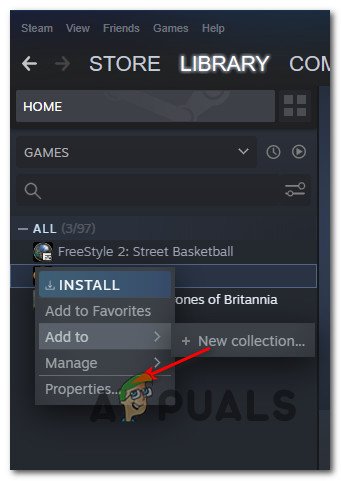
Accessing Properties screen of Starbound - Inside the Properties screen of the affected games, go ahead and click on Local Files, then click on Verify Integrity of Game Cache.
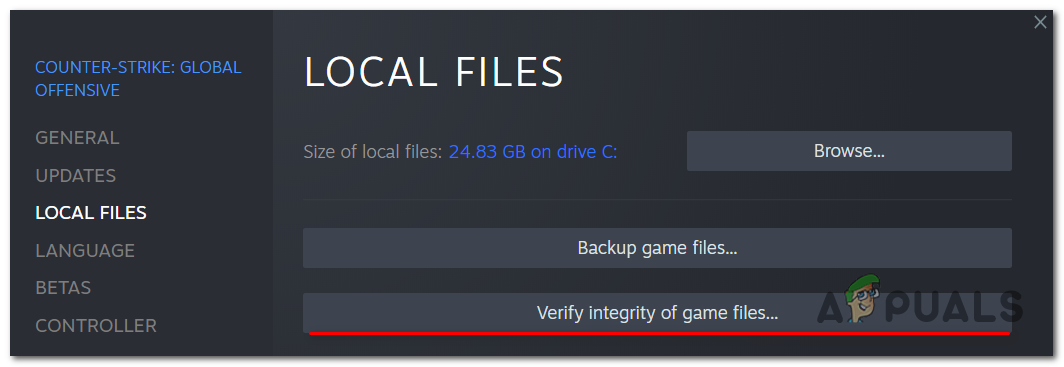
Triggering an integrity check - Finally, confirm the integrity check, then wait until the operation is complete before restarting your computer and launching the game once again to see if the problem is now fixed.
If you still see the same NetworkException error when attempting to connect to a Starbound server, move down to the next fix below.
4. Whitelist Starbound inside Windows Firewall
If none of the other methods above have worked for you and you’re using the Windows Security suite (Windows Defender + Windows Firewall), it’s likely that this issue appears due to an instance where the connection with the game server is treated as a potential security breach and it’s actively being blocked.
If this is a suitable scenario, the fix is simple – You need to whitelist both the main executable and the Steam launcher (if you’re launching through Steam) inside your AV / Firewall settings.
Note: In case you’re using a 3rd party security suite, the instructions you’ll need to follow to create a whitelisting rule will be different from app to app. Search online for instructions on your specific security app.
But if you’re using Windows Defender + Windows Firewall, follow the step-by-step instructions below to create a whitelisting rule for Starbound and the Steam launcher to fix the issue:
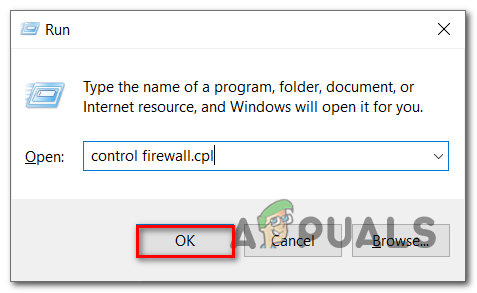
- Press the Windows key + R to open up a Run dialog box. Next, type ‘control firewall.cpl’ and press Enter to open up the Windows Firewall window.
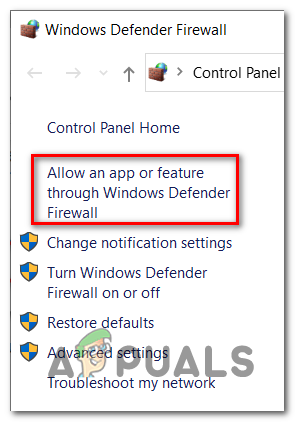
Accessing the Windows firewall screen - Next, go to the left side menu inside the main menu of the Windows Defender Firewall and click on Allow an app or feature through Windows Defender firewall.
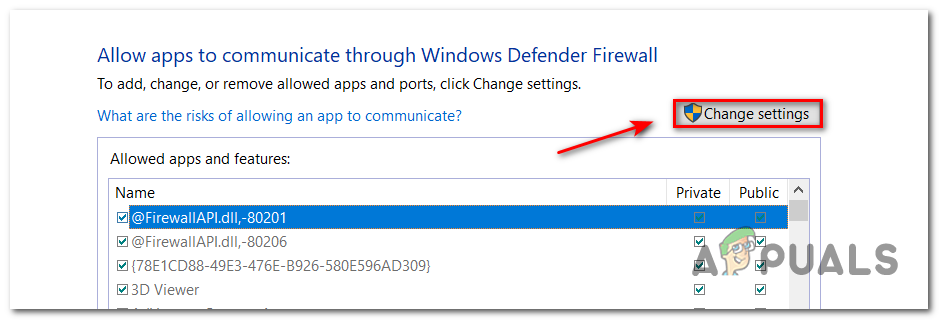
Allowing an app through Windows Firewall - Inside the Allowed apps menu, click on the Change Settings button.
Making Changes to Windows Firewall - Click on Allow another app below, then click on Browser and find the location where the game is installed.
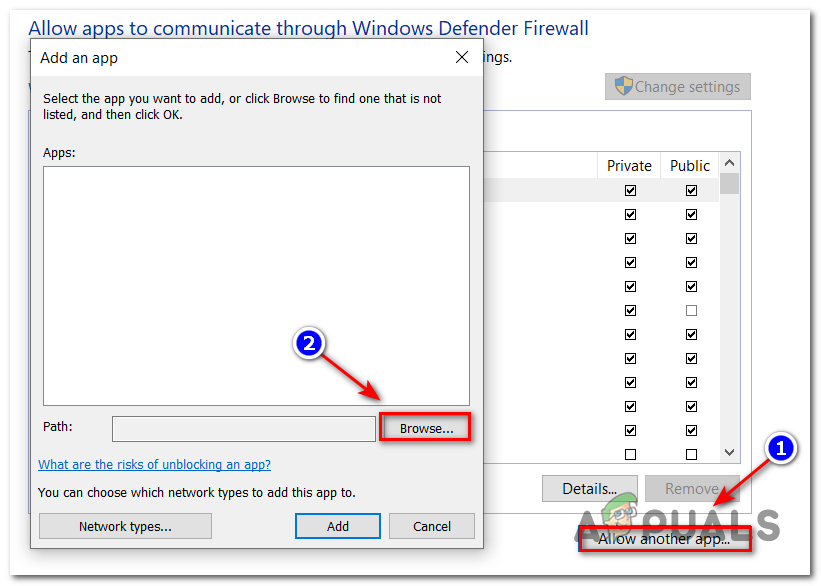
Allowing Starbound - After you manage to find the main executable for Starbound, add it to the whitelist, then repeat the operation with the Steam executable.
- Finally, inside the list of Allowed apps, make sure that both the Private and Public checkboxes of the two items you added previously are checked.
- Now just save the changes, then try to download the game again to see if the error still occurs.
If you’re seeing the same disk write error even if you followed the steps, go to the next possible fix for this error.
5. Using a Hamachi VPN
If none of the methods above have allowed you to connect to a Starbound server normally, chances are you’re dealing with some type of network restriction that is somehow restricting the data exchanges your PC makes with Starbound’s server.
In this case, you should be able to fix the problem by using a VPN to make it seem that you’re not using a shared IPv4 connection. The easiest way to do this is to simply install a conventional gaming VPN.
But if you want to maximize your chances of success, the proper way to do it is to use Hamachi (or a similar VPN tunneling app) to create a dedicated VPN network that you and all your friends are connected to when joining a Starbound server.
Note: This might make your ping higher, but it’s still better than not being able to play the game at all.
Follow the instructions below to install hamachi and set up a VPN network to use with your friends when playing Starbond:
- Open your default browser and visit the official download page of Hamachi. Once inside, click on Download now to download the latest version of Hamachi VPN.
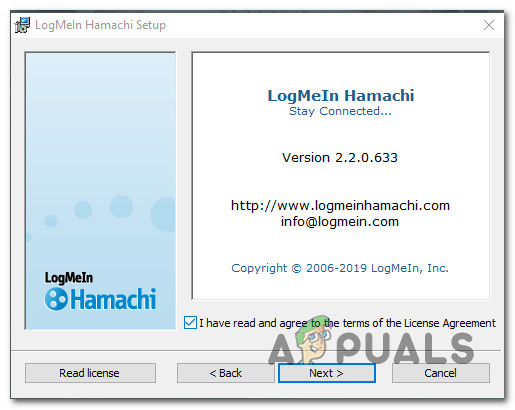
- After the download is complete, double-click on hamachi.msi, then follow the on-screen instructions to complete the installation of the Hamachi application.
- When prompted by the UAC (User Account Control) prompt, click Yes to grant admin access.
Installing Hamachi VPN - Once the installation is complete, reboot your computer and wait for the next startup to complete before opening Hamachi once again.
- Next, inside the main Hamachi screen, click on the power button and wait for the connection to succeed.
- After the connection is established, log in (or sign in if you don’t already have an account) with Hamachi.
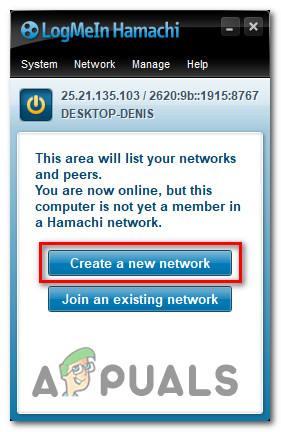
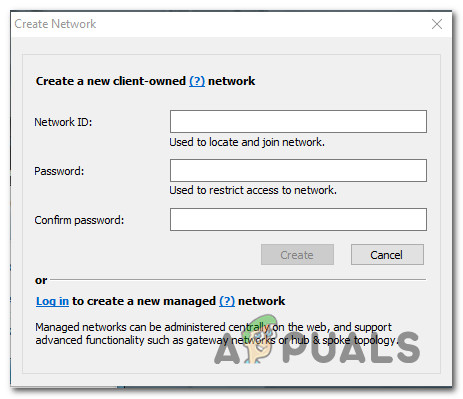
- After you successfully connect with Hamachi, click on Create a New network from the LogMeIn Hamachi menu.
Creating a Network in Hamachi - Once you get to the next screen, set a network ID and password for your Hamachi VPN network and remember it or note it down.
Setting up a new network in Hamachi - After the network is successfully created, go ahead and send the credentials you just established to the friend you’re trying to use GameStream with and ask him to install Hamachi as well and click on Join an existing network before inserting your credentials.
- After you and your friend/s are connected to the same Hamachi network, join the same Starbound server once again and see if the issue is now fixed.


