How to Fix the Steam Client Bootstrapper High CPU Problem on Windows?
The Steam Client Bootstrapper app shouldn’t take up plenty of CPU resources on your computer. It’s a background app used to download and install updates or replace missing files. When an update is being downloaded or installed, it’s okay to expect a higher CPU usage.
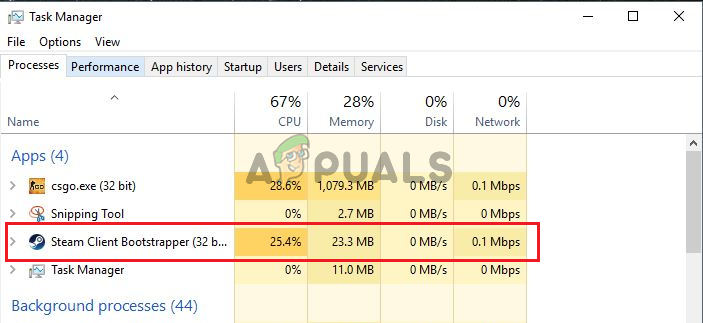
However, users have reported that this process takes up CPU resources even when Steam is idle. In some cases, it happens even when Steams has been completely closed. There have been several different methods people used to resolve this problem so we recommend you check them out below, step by step!
What Causes the Steam Client Bootstrapper High CPU Problem on Windows?
There are quite a few distinct causes which can trigger this problem on your Windows PC. We highly recommend you check out the list we have created below in order to find your own scenario because it can help you resolve your issue more quickly!
- Steam Overlay – Using Steam Overlay is almost always a risk as many games tend to experience instability when using this overlay alongside. However, it appears that even Steam itself struggles because of this overlay so make sure you disable it.
- Different skins – Changing the skin of your Steam client can cause the Steam Client Bootstrapper high CPU anomaly so we highly recommend you revert to the original skin!
- Default window set to Store – If your Steam client opens the Store tab by default, consider switching it to Library and see if the CPU usage problem is resolved. It’s a weird fix but it has worked for plenty of users!
- Red Shell spyware – This piece of spyware used to be installed alongside several Steam games. Even though the problem has since been resolved, the spyware may have remained and it gathers data while causing high CPU usage by Steam Client Bootstrapper.
Solution 1: Disable Steam Overlay
There is something about Steam Overlay which causes high CPU usage by Steam Client Bootstrapper. Users have experienced that the process’ CPU usage increases vastly when running a game and they managed to figure out that the culprit was Steam Overlay. It’s a strange problem as this overlay is sometimes quite useful for in-game features but you might want to consider disabling it for the current version of Steam.
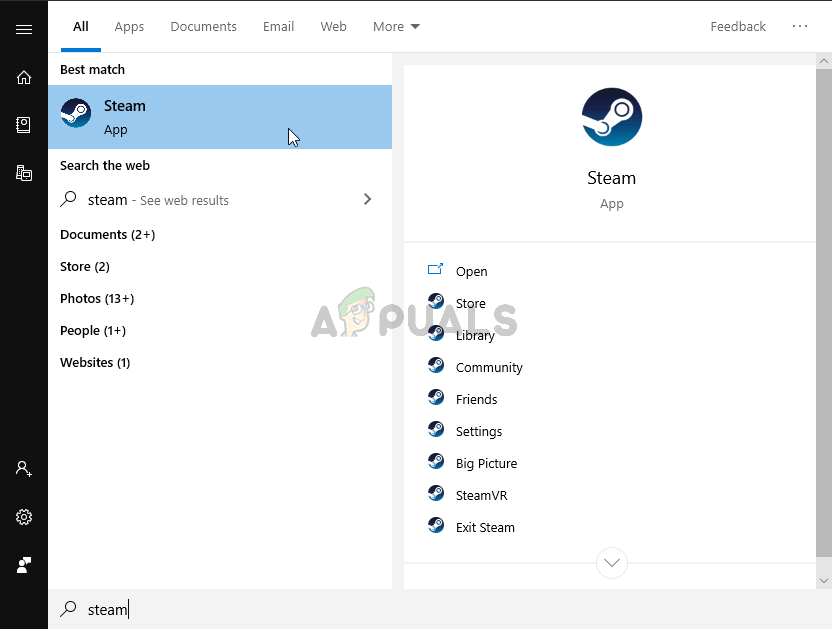
- Open Steam by double-clicking its entry on the Desktop or by searching for it in the Start menu. Windows 10 OS users can also search for it using Cortana or the search bar, both of them next to the Start menu at the left part of your taskbar!
- Click the Steam option from the menu at the top of the client’s screen and choose Settings. In the Settings window make sure you navigate to the In-Game tab and check The Steam Overlay section at the top of the window.
- Uncheck the box next to the Enable the Steam Overlay while in-game option and click the OK button at the bottom of the window in order to apply the changes you have made.
- Click the Steam option at the top left part of the Steam client and choose Exit to exit Steam completely (don’t just click the x button at the top right corner). Reopen Steam, launch any game on your PC and check to see if the Steam Client Bootstrapper high CPU problem persists!
Solution 2: Change the Client’s Skin to Default
Changing the client’s default skin was reported to bring issues such as high CPU usage by Steam Client Bootstrapper. It’s nice having a different skin but it’s better to have a stable and functional Steam installation. Make sure you follow the steps below to revert the Steam client’s skin to the default.
- Open Steam by double-clicking its entry on the Desktop or by searching for it in the Start menu. Windows 10 OS users can also search for it using Cortana or the search bar, both of them next to the Start menu at the left part of your taskbar!
- Click the Steam option from the menu at the top of the client’s screen and choose Settings. In the Settings window make sure you navigate to the Interface tab and check the Select the skin you wish Steam to use (requires Steam to restart) option at the top of the window.
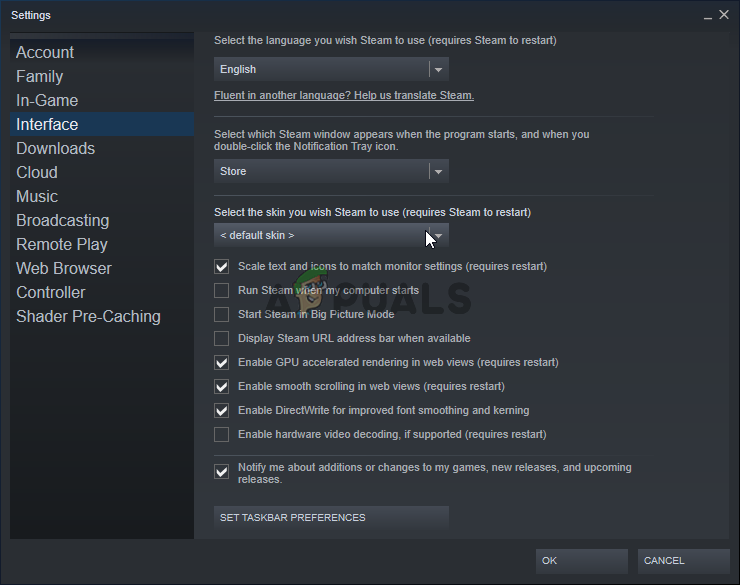
- Click the arrow icon underneath and choose the “< default skin >” option from the menu which will appear.
- Click the Steam option at the top left part of the Steam client and choose Exit to exit Steam completely (don’t just click the x button at the top right corner). Reopen Steam, launch any game on your PC and check to see if the Steam Client Bootstrapper high CPU problem persists!
Solution 3: Change the Favorite Window to Library
This is quite a weird glitch which occurs in Steam. If your default window is set to Store, Steam Bootstrapper Client uses a large amount of CPU power. However, when the same default page is set to the Library page, the CPU usage goes back to normal. It’s an interesting issue which was discovered by users so make sure you follow the steps below to perform it!
- Open Steam by double-clicking its entry on the Desktop or by searching for it in the Start menu. Windows 10 OS users can also search for it using Cortana or the search bar, both of them next to the Start menu at the left part of your taskbar!
- Click the Steam option from the menu at the top of the client’s screen and choose Settings. In the Settings window make sure you navigate to the Interface tab and check the Select which Steam window appears when the program starts, and when you double-click the Notification Tray icon option at the top of the window.
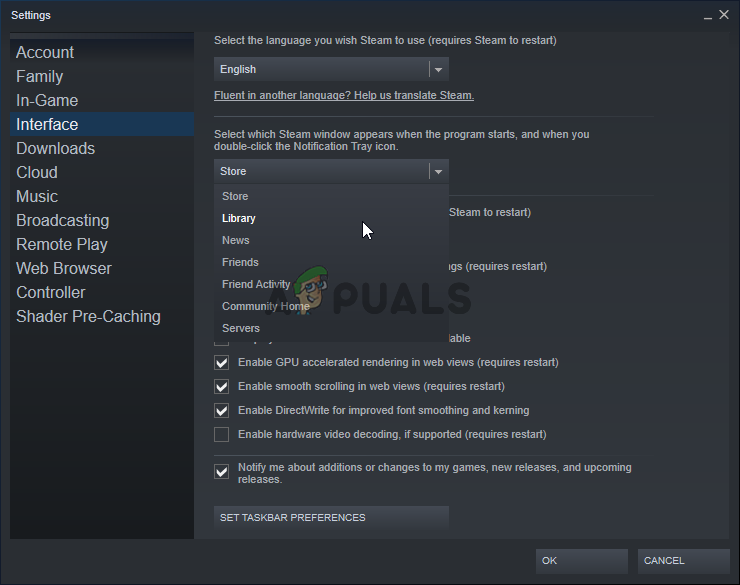
- Click the arrow icon underneath and choose the Library option from the menu which will appear.
- Click the Steam option at the top left part of the Steam client and choose Exit to exit Steam completely (don’t just click the x button at the top right corner). Reopen Steam, launch any game on your PC and check to see if the Steam Client Bootstrapper high CPU problem persists!
Solution 4: Try Using the Beta Steam Client
Until Steam fixes the issue with a new update, you can try using the Beta client to get rid of the problem! It has worked for several users online and we highly recommend you try out this method. It’s easy to opt out if you encounter other problems with the beta client. Check out the steps below
- Make sure you start the Steam client by double-clicking it on the Desktop or by searching for it with your Start menu open and clicking on the first result.
- Click the Steam option from the menu at the top of the client’s screen and choose Settings. In the Settings window make sure you stay in the Account tab and click the Change button under the Beta participation
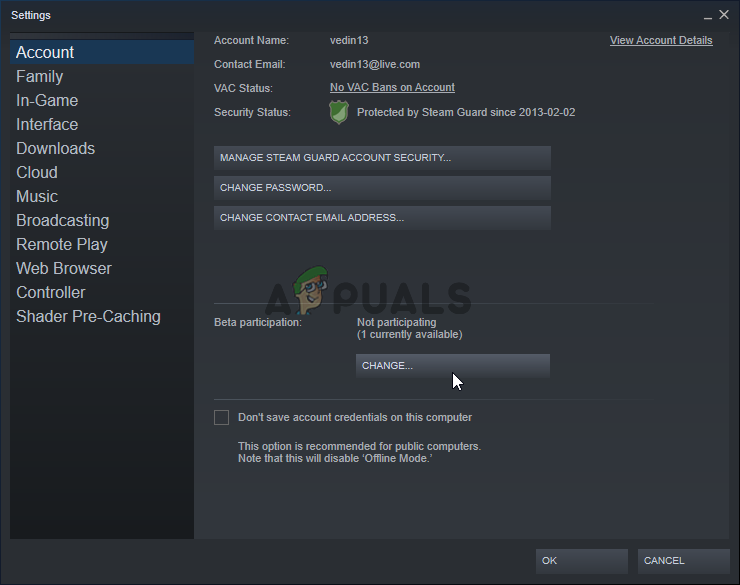
- A new window should open so look again under Beta participation and click to open the drop-down menu. Choose the “Steam Client Candidate” setting and Apply the changes you have made.
- Click the Steam option at the top left part of the Steam client and choose Exit to exit Steam completely (don’t just click the x button at the top right corner). Reopen Steam and check whether the same problem still appears!
Solution 5: Check for the Red Shell Spyware
Red Shell spyware tracks data on your PC and shares it with third parties. It was reported to be installed alongside certain Steam games. The problem has, since then, been almost completely resolved but the tracker may have remained after installing the game. There is a useful way of resolving the problem by creating a script which will block the tracker inside the ‘hosts’ file.
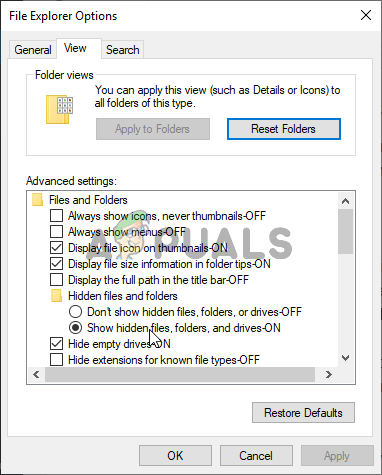
- Click the Start menu button and search for ‘File Explorer Options’. Click the first option which will appear as a result to open it. Navigate to the View tab and switch the radio button under the Hidden files and folders option to Show hidden files, folders, and drives. Click the OK button to apply the changes.
Enabling the view of hidden files in File Explorer Options - Open Notepad by searching for it after clicking the Start menu button or the search bar right next to it. You can also use the Windows Key + R key combination and type “notepad.exe” in the Run box to open Notepad.

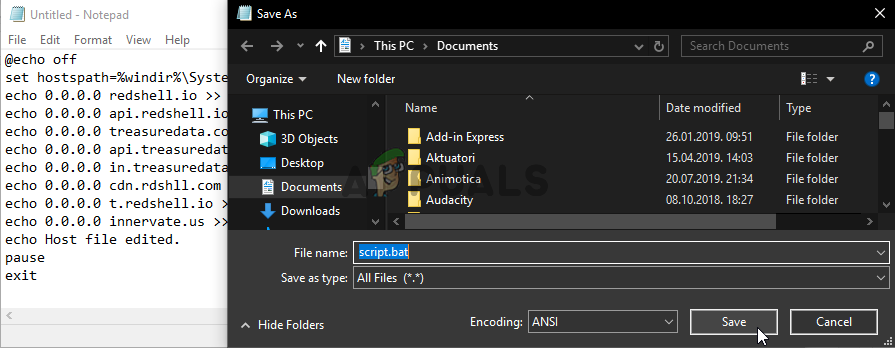
Running Notepad - Copy and paste the code displayed below:
@echo off set hostspath=%windir%\System32\drivers\etc\hosts echo 0.0.0.0 redshell.io >> %hostspath% echo 0.0.0.0 api.redshell.io >> %hostspath% echo 0.0.0.0 treasuredata.com >> %hostspath% echo 0.0.0.0 api.treasuredata.com >> %hostspath% echo 0.0.0.0 in.treasuredata.com >> %hostspath% echo 0.0.0.0 cdn.rdshll.com >> %hostspath% echo 0.0.0.0 t.redshell.io >> %hostspath% echo 0.0.0.0 innervate.us >> %hostspath% echo Host file edited. pause exit
- Use the Ctrl + S key combination to save the file. In the ‘Filename’ section simply type ‘script.bat’ but make sure the Save as type option is set to All files. Save it anywhere on your computer.
Saving the script - Locate the script file on your PC, right-click on it, and choose the Run as administrator option from the context menu which will appear. Check to see if the problem is gone!
Solution 6: Repair the Steam Service
There is a useful executable used to repair the Steam Service. This can effectively reduce the CPU usage by Steam Client Bootstrapper and it has helped countless users resolve this issue. Make sure you check it out below!
- Use the Windows Logo Key + R key combination to bring up the Run dialog box. Type in the command below in the dialog box which appears and use the Ctrl + Shift + Enter key combination to provide administrator access to the command:
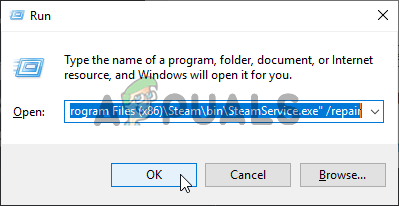
"C:\Program Files (x86)\Steam\bin\SteamService.exe" /repair
- Reopen Steam and check to see if the CPU usage has gone back to normal!
Solution 7: Workaround with Big Picture Mode
If none of the fixes above helped you at all it’s possible that your Steam is facing a problem with Big Picture Mode. You can try this workaround and if it works for you, you can report this issue to Steam so that they can directly help you. It’s also worth mentioning that people started facing this issue after Windows 10 1903 Update. To fix this issue, follow the steps shown below:-
- First of all, click on the Steam written in the title bar and click “Settings”.
- Head over to the “Controller” tab and then click on “General Controller Settings”.
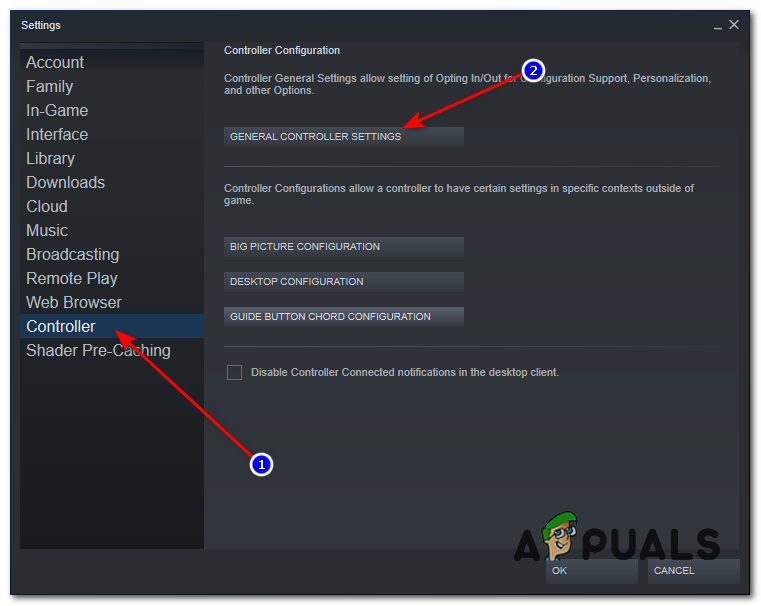
Opening General Controller Settings - Untick all the options and then click “Back”.
- Now you will have to open all these configurations one by one.
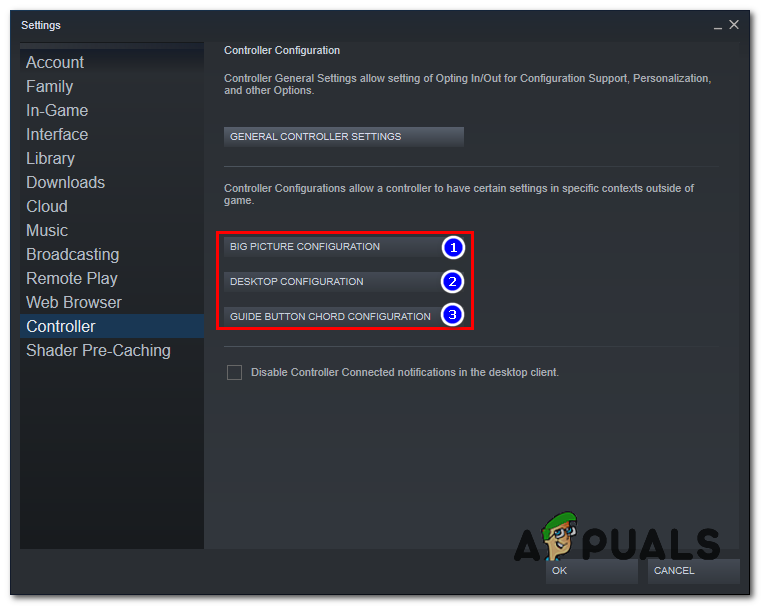
Opening all the Configurations - So first click “Big Picture Configuration” press ok and then close it. Do this for all the configurations.
- Once you have done that check to see if the usage is Stable now.
If the usage is stable and you are having no issues with your performance you can simply enjoy your gaming session now. However, if the problem is still there or it comes back after restarting your computer. You can try to re-install the Steam client. If that doesn’t work as well. Then you will have to reach out to Steam Support so that they can help you with this issue properly.


Thanks bud Steam and me have had issues lately … did these and at least I can update shit again. Now to see if Warframe is still laggy as shit.