Fix: Sound not Working on macOS
You may fail to hear sound on a Mac due to corrupt SMC or PRAM/NVRAM. Moreover, corrupt or outdated macOS may also cause sound not to output properly. The affected user encounters the error when he tries to play audio on his system. Nearly all models of MacBooks are reported to be affected by this issue. In some cases, users faced the issue after an OS update.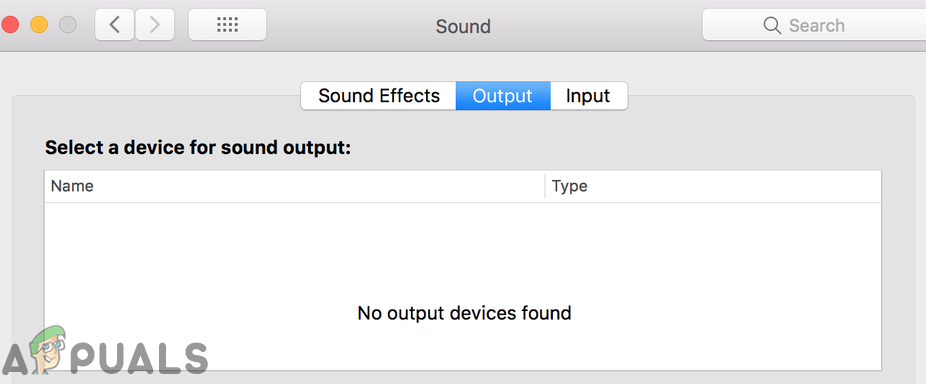
Sound Not Working on MacBefore proceeding with the solutions, restart your system. Also, make sure nothing is muted in the sound preferences of your system. Additionally, check if the sound can be played through headphones, AirPlay, or Bluetooth. Moreover, make sure no 3rd party peripherals are attached to your system (it will be a good idea to remove their support software like plug-ins or drivers as well).
Solution 1: Force Quit the CoreAudioD Process
You may encounter the error at hand if the CordAudioD process (that is handling all the audio of your Mac) is in an error state. This is a very common scenario that occurs usually when process runs into an exception when operating. In this context, force quitting the CoreAudioD process of your Mac may solve the problem.
- Open Finder and then in the left pane of the window, click on Applications.
- Now click on the Utilities and then open the Activity Monitor.
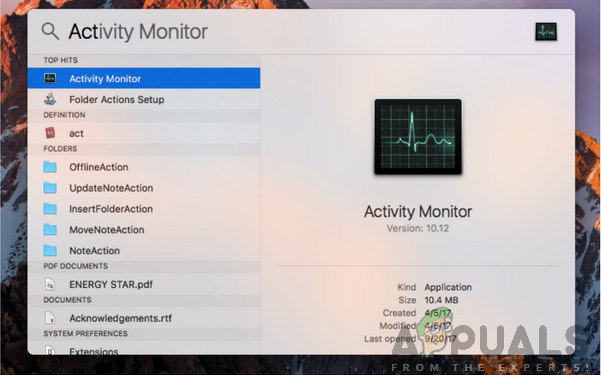
Searching for Activity Monitor – Mac OS - Then in the search box, type CoreAudiod. Now click on the X button to close the process.
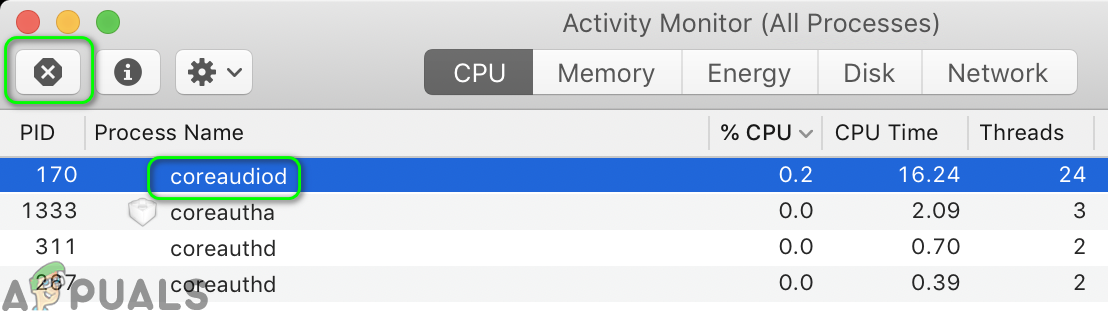
End CoreAudioD Process in the Activity Monitor - Now click on Force Quit.
- Then open the sound preference pane and change the volume level to check if Mac’s sound is working fine.
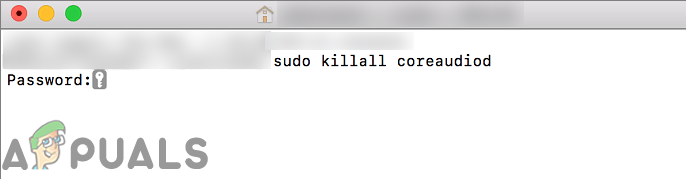
- You can also use the following command in the terminal to forcefully quit the CoreAudiod process:
sudo killall coreaudiod
Solution 2: Select the Different Audio Output Device
The sound issue could be a result of a temporary software glitch due to which the system could not communicate to the audio device. The glitch can be cleared by selecting another output device and then reverting to the internal speakers.
- Open System Preferences and click on Sound.
- Now open Output and then select an output device (not internal speakers). If you do not have any other device, then try to install and use a virtual device (like Sun Flower or Loopback, etc.).
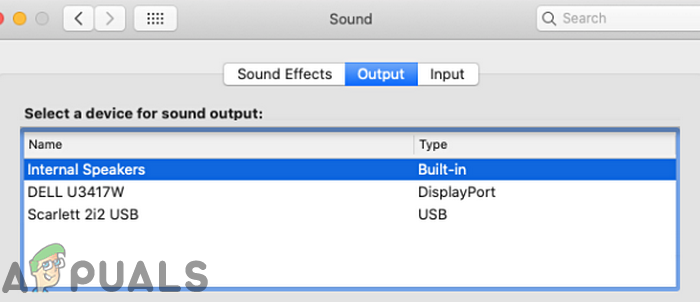
Change Audio Output Device - Then restart your system and upon restart, revert the audio output to internal speakers and check if the audio is working fine.
Solution 3: Re-Load the Audio Driver
You may encounter the error under discussion if the audio driver is in the error state. Drivers are the main components that run the sound mechanism in your computer and communicate at the hardware level. If they themselves are in an error state, you will experience issues like the current one under discussion. In this scenario, unloading and then loading the audio driver may solve the problem.
- Create a file as Desktop/fix_audio.sh with the following commands:
sudo kextunload /System/Library/Extensions/AppleHDA.kext

sudo kextload /System/Library/Extensions/AppleHDA.kext
- Now launch the terminal and issue the following command to check if the sound issue is resolved:
chmod +x Desktop/fix_audio.sh
Solution 4: Delete the Audio Preferences Files
This issue might also occur if the audio preferences of your system are corrupt. In this case, deleting the audio preferences may solve the problem (no need to worry, preferences will be recreated on the next system startup).
- Open Finder and navigate to the following path:
/Library/Preferences/Audio
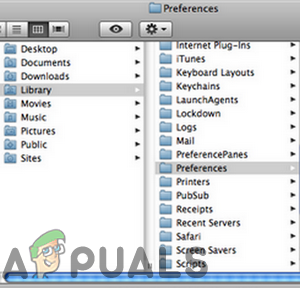
Open Audio Preferences of Mac - Now delete all the files on this location (usually, 2 or 3 files) and then empty the trash of your system.
- Now restart your system and then check if the sound issue is resolved.
Solution 5: Clear the Audio Port from Lint/Debris
Over time, lint and debris can build inside the headphone port, which can make Mac “think” that the headphone is plugged-in (if the red light is visible inside the port) and macOS routes the sound to that port. In this scenario, cleaning the audio port may solve the problem.
- Blow some air into the headphone port. You may use compress air can or air blower.
- If that does not do the trick, try to spray a tiny bit of electrical contact cleaner in the headphone jack.
- Now use a q tip/paper clip/toothpick to clear out the port (so that the red light in the jack is off) and then check if the issue is resolved.
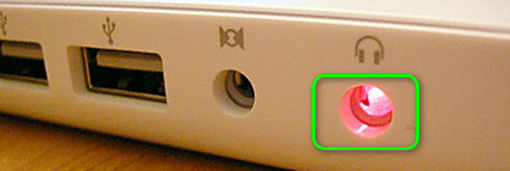
Clear the Audio Port So Red Light in the Port is Off - If not, plug headphones in the port and wait for a few seconds. Now twist the headphones jack once clockwise and then anti-clockwise. Then unplug the headphones and check if Mac’s audio is working fine.
- If not, insert the headphone jack into the port but not fully, where it clicks. Now wiggle the headphone jack into the port and then check if the Mac is clear of the sound issue.
Solution 6: Reset SMC to Default
System Management Controller (SMC) is a chip responsible for several system operations like thermal management, keyboard backlighting, battery management, etc. The sound problem may also occur if the SMC is not functioning properly. In this scenario, resetting the SMC to its defaults may solve the problem.
- Power off your Mac machine.
- Now press and hold Shift, Control and Option keys on the built-in keyboard and then press the Power key (hold all the 4 keys for at least 10 seconds).
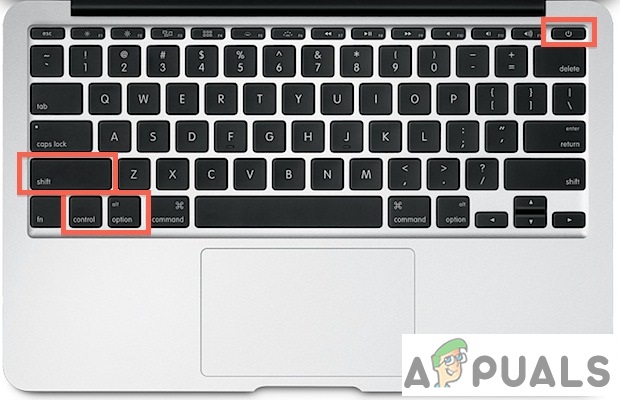
Resetting your SMC - Release all the 4 keys after 10 seconds and then check if the sound issue is resolved.
Solution 7: Reset PRAM and NVRAM to Default
NVRAM (Non-Volatile Random-Access Memory) and PRAM (Parameter RAM) are two types of memories used to store all the system configurations. These can get into error states quite often as mentioned in the Official Apple website. In this scenario, resetting these memories to defaults may solve the problem. Keep in mind that temporary or customizable configurations will be lost.
- Backup your Mac machine (steps 1 to 4 of solution 8).
- Power off your Mac computer.
- Now press and hold the following keys while powering on your machine:
option (alt) + command + P + R

Reset PRAM/NVRAM - Your Mac will start to power on (keep hold of the 4 keys) and release the keys on hearing the start-up sound for the second time. For Mac computers with Apple T2 Security Chip, you should release the 4 keys after the Apple Logo appears and disappears for the second time. In both scenarios, you may have to hold the keys for around 20-30 seconds.
- Now, when the system is powered on, check if the sound of your Mac is working fine.
Solution 8: Update the macOS of Your System to the Latest Build
Apple updates macOS regularly to patch the known bugs and cater to the latest technological advancements. Sometimes, not having an updated operated system might cause problem with outputting sound. In this case, updating the OS of your system to the latest build (compatibility issues will be ruled out) may solve the problem.
- Open System Preferences of your Mac and then select Time Machine.
- Then, enable “Show Time Machine in the menu bar.”
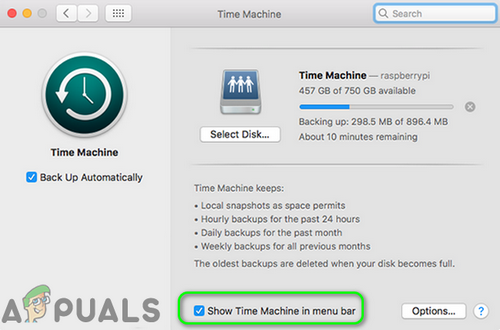
Show Time Machine in the Menu Bar - Now click on the Time Machine icon (near the right corner of your menu bar) and then select Back Up Now.
- Then wait for the completion of the Time Machine backup.
- Again, launch System Preferences of your Mac and click on Software Update.
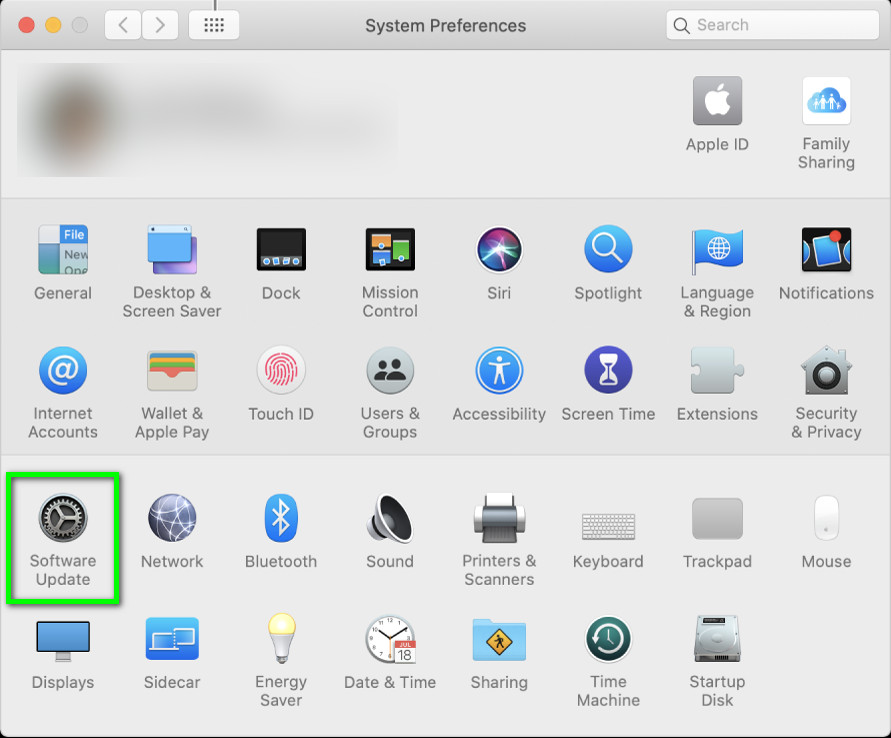
Open Software Update in System Preferences - If an update is available, then click on the Update Now button and let the update process to complete.
- Then restart your system and then check if the sound problem is solved.
Solution 9: Remove Conflicting Applications
Applications share system resources in a macOS environment. You may encounter the error at hand if another application is interfering in the operation of audio modules of the system. In this context, removing the conflicting applications may solve the problem.
- Exit all the applications on your system.
- Now launch Finder and then open the Applications folder.
- Now Move to Trash all the applications one be one that can cause the issue. Boom 2, Parallels, Clean My Mac (check if CoreAudiod service is deactivated by Clean My Mac) and audio-related applications (recording applications, etc.) are known to create the sound issue on a Mac.
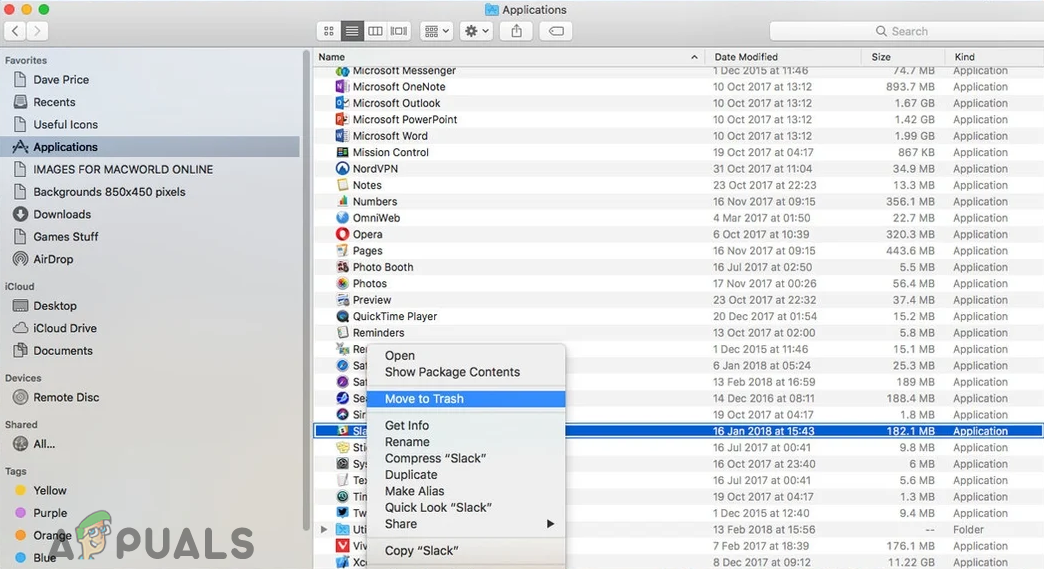
Remove Applications from Mac - After removing the conflicting applications, restart your system and then check if the Mac is clear of the error.
Solution 10: Login Through Another User Account
Usually, the user account on a Mac machine does not get corrupt, but there are always exceptions. The sound issue could be a result of a corrupt user account. In this context, logging-in through another user account may solve the problem. If another user account is already setup on your machine, then use it to log in to the system. If not, then follow the instructions below to create another user account on your Mac.
- Open System Preferences and then navigate to Users & Groups.
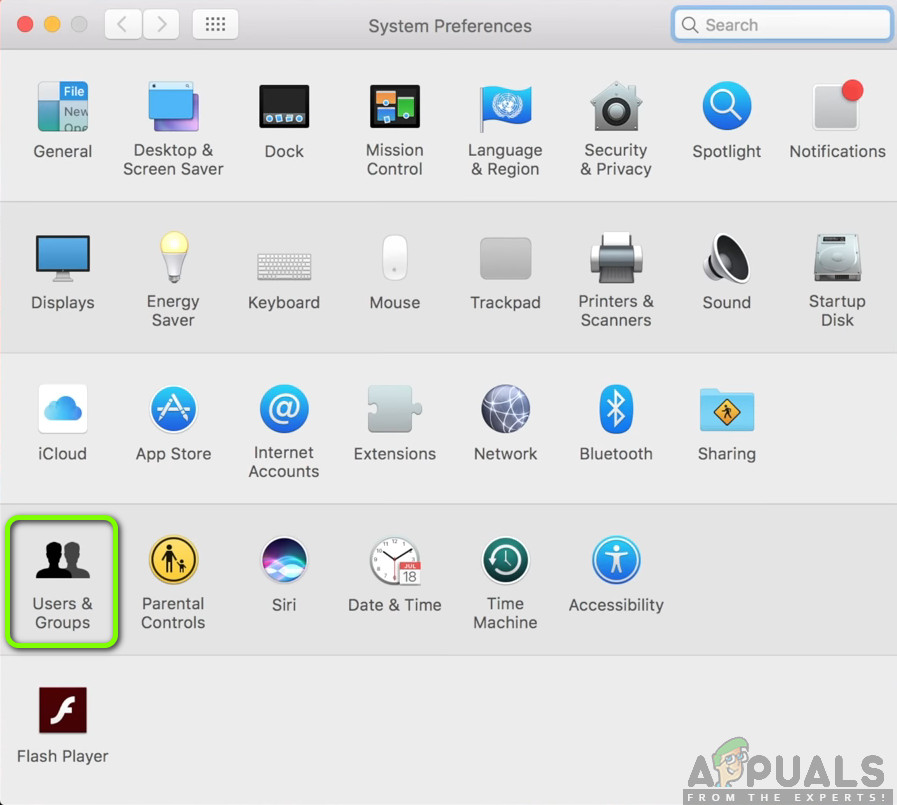
Users & Groups in System Preferences – macOS - Now click on the plus button (at the bottom-left side of the screen) and in the new window, add the details as per your requirements.
- Then click on Create User and log off from the current account.
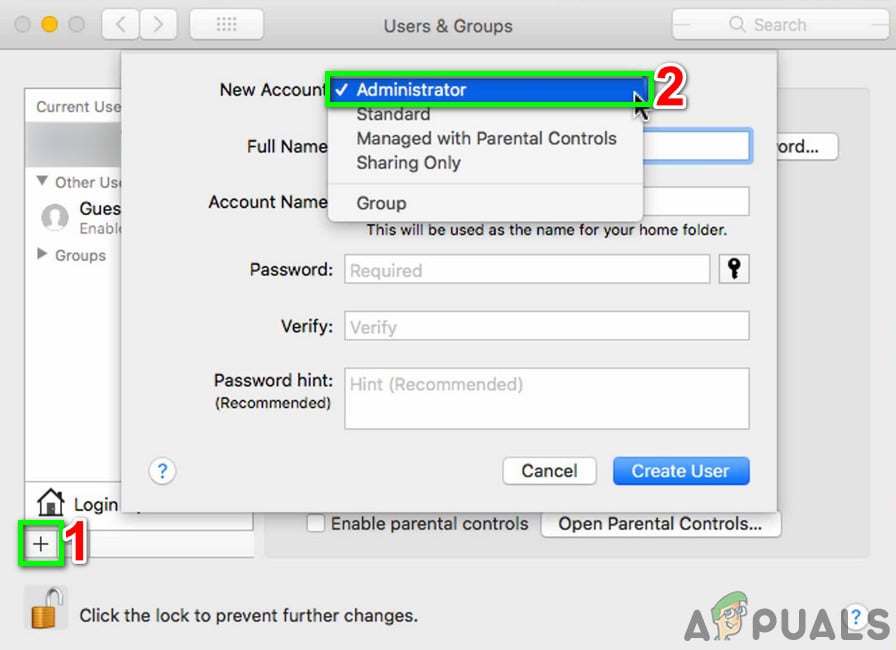
Create a New User in MacBook - Now restart your machine and upon restart, log into the newly created account and check if the sound issue is resolved. If so, then log back into your primary account and check if it is clear of the error.
Solution 11: Reinstall the OS of Your System
If nothing has helped you so far, then the issue is most probably a result of corrupt OS installation. In this case, reinstalling the OS may solve the problem.
- Create a backup of your system (steps 1 to 4 of solution 8).
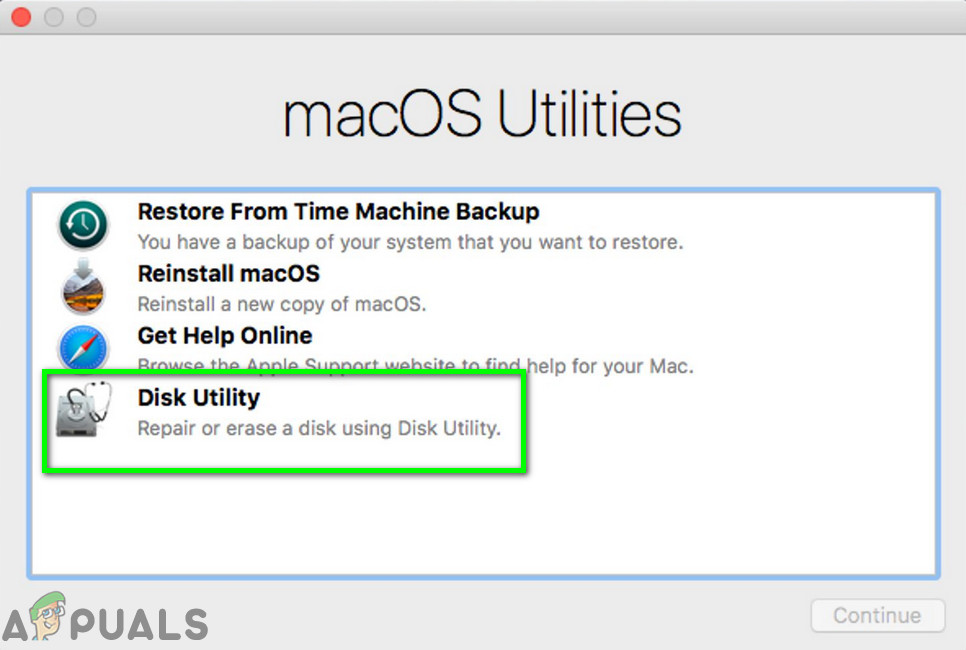
- Power off your system and immediately after the startup sound, press & hold Command-R keys until the Apple logo is displayed.
- Now, in the Utilities Menu, select the Disk Utility and then click on the Continue button.
Open Disk Utility - Then in the Disk Utility, select the drive (usually, the out-dented entry) from the Device list.
- Now, on the Disk Utility toolbar, click the Erase icon.
- Now a panel will open up. In the panel, set the format type as per your requirements.
- Then click on the Apply button and wait for the completion of the process.
- Now click on the Done button and quit the Disk Utility.
- Then return to the Utilities Menu and select Reinstall macOS.

Reinstall macOS - Now click on the Continue button and then follow the instructions on your screen to complete the reinstallation process. Keep in mind to not restore from a backup (including Time Machine).
- After completion of the reinstallation of macOS, hopefully, the sound issue is resolved.
If nothing has worked for you, then the sound issue could be a result of a hardware issue and you have to visit the Genius bar. But it will be a good idea to repair the system permissions before visiting the Genius bar.


