How to Fix Sony Error 800101
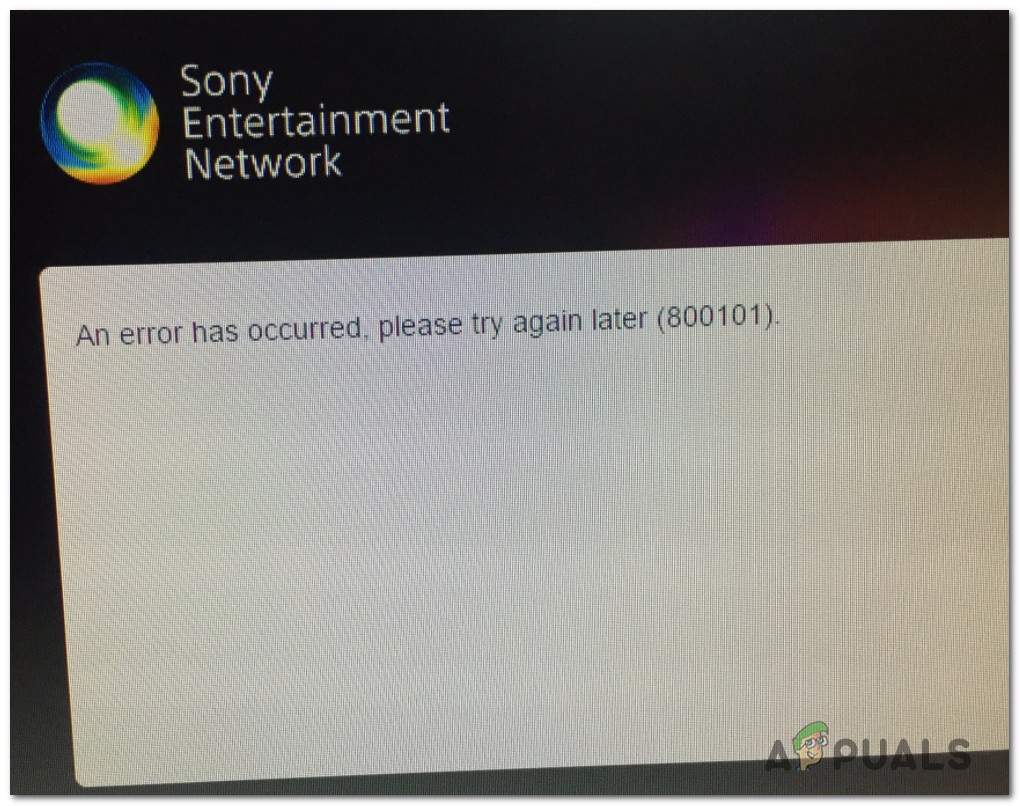
Some users are encountering the ‘An error has occurred, please try again later (800101) error‘ while trying to create an account for PlayStation or for a different Sony product. This issue is reported with Playstation 4, Playstation 5, Sony Bravia, and certain Smart Bluray models.
After investigating this particular issue, it turns out that there are several different underlying causes that might trigger this particular error code with Sony’s services. Here’s a list of potential culprits:
- Sony Server issue – More often than not, this problem will be caused by a server issue that is preventing users from creating new accounts or interacting with certain Sony’s services. In this case, the only thing you can do is identify the server issue and wait until they finally fix it.
- Inconsistency with account creation – As it turns out, there are several Sony smart devices (Sony Bravia TVs and smart BluRay players) that have issues with creating a Sony account where the email verification is not being sent out. In this case, you can complete the verification process from a PC.
- TCP or IP network inconsistency – If you’re encountering errors of this kind with several services, it’s also possible that you’re dealing with some type of network inconsistency that is affecting the connection with Sony. In this case, you can resolve the issue by restarting or resetting your router.
- Administrator restriction – If you’re trying to access Sony’s service from some type of restricted network (work, home, or public network), chances are you’re seeing this error due to a restriction imposed by your network administrator. In this case, you can resolve the issue by getting in contact with the network administrator or by using a VPN to avoid the roadblock imposed by the network administrator.
Now that you are familiar with every potential scenario that might cause the ‘An error has occurred, please try again later (800101) error‘, here’s a list of verified methods that should allow you to fix the issue:
Method 1: Checking for a Server Issue
If you are encountering this issue while trying to create a Sony Entertainment account on Playstation 4 or Playstation 5, the first thing you should investigate is the status of the Playstation Network server.
This 800101 error code has happened several times in the past when the PlayStation Network infrastructure was down for certain areas – During these occurrences, the creation of new accounts was affected and some users were unable to access their accounts at all.
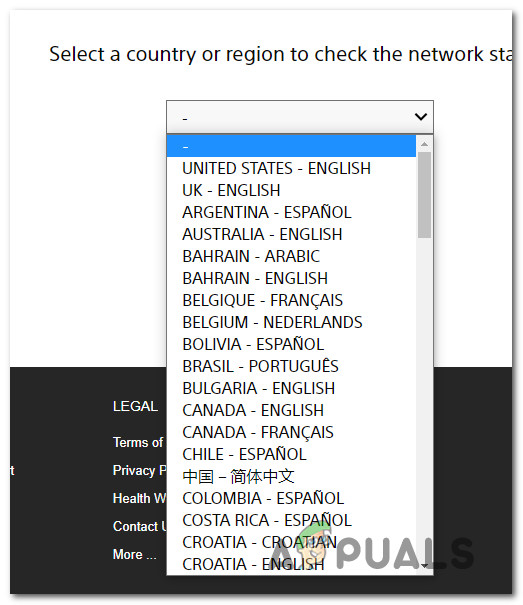
To make sure that’s not the case with your situation, visit the PlayStation Network screen from PC or mobile and start by selecting your country or region using the associated drop-down menu.
Once you’re inside the status page dedicated to the region where you’re accessing Sony’s services, check to see if there’s an issue with Account Management.
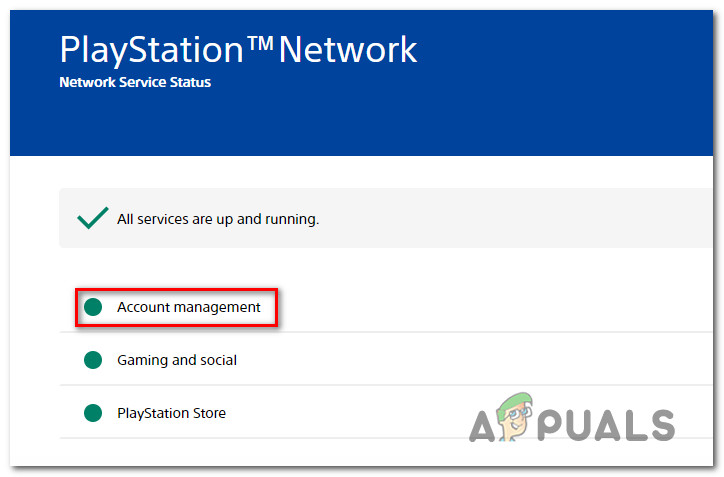
If the PSN status page reports no underlying issue with Account Management, you can safely conclude that the issue is not being caused by an issue with Sony’s servers – If this scenario is applicable, move down to the first potential fix below.
Method 2: Complete the Account Registration via PC
If you’re encountering this issue while trying to create a Sony account from a Playstation, Sony Bravia, smart Bluray Player, etc, chances are you’ll have better luck completing the account creation from a PC.
Certain Sony devices are notoriously known for being very sketchy when it comes to allowing you to create a Sony Entertainment account directly from the device – This is quite common with Sony Bravia and certain Smart Blu-Ray players brought to market by Sony.
Most commonly you can get to the part where the confirmation email is sent to your account, but the email does not apply via email.
If this scenario is applicable, follow the instructions below to complete the account creation from the Account Settings menu on PC:
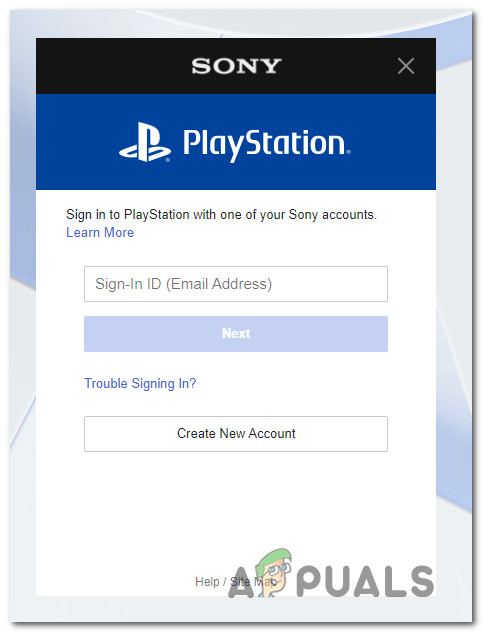
- Move over to a PC, then access the PlayStation page from your favorite browser and click on the Sign In button from the top-right corner.
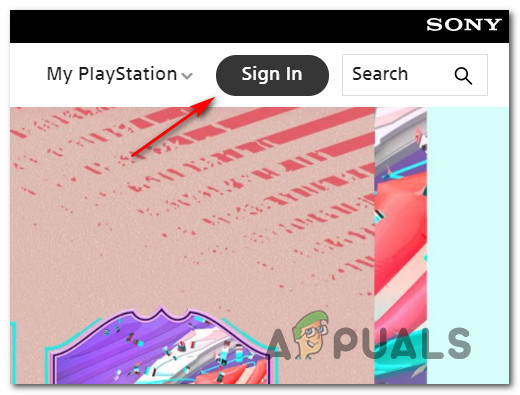
Accessing the PlayStation login page - Once you’re inside the My.Account.Sony page, enter the email that’s associated with your Sony account (if the account was created but not verified) or click on Create New Account (if the account was not created).
Sign in with Sony Account or Create a New Sony account - When prompted by the verification page, solve it to prove that you’re a real human being.

Verifying that you are a human being with Sony account - If you previously enabled 2-step verification, this is the moment where you will be prompted to insert the code you receive via SMS.
- Once you are successfully signed in to your account, click on My Playstation from the top-right section of the screen, then click on Account Settings from the list of available options.
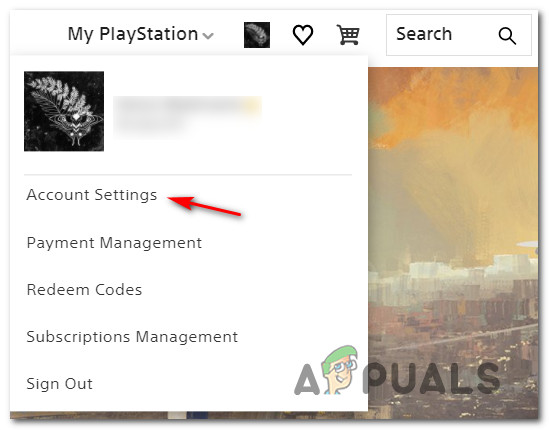
Accessing the Account Settings menu in Sony - If your account is not verified yet, you will be prompted by a button at the top of the screen that will resent the confirmation email. Press it, then access your inbox and complete the activation of your Sony account.
- Return to the device that was previously showing the ‘An error has occurred, please try again later (800101) error‘ and see if the problem is now fixed.
In case the same problem is still occurring, move down to the next potential fix below.
Method 3: Restarting / Resetting your Router
If the 800101 error during Sony’s account creation is not the only problem you’re dealing with (if you’re also dealing with similar errors with other services) it’s likely that the issue is ISP related.
Looking at other user reports, ISP-related issues that might cause this problem range from a generic case of badly cached IP / TCP data to a situation where the ISP has changed the connection protocol from NAT to PAT.
Depending on the origin of this issue, the viable fix that will actually allow you to prevent the ‘An error has occurred, please try again later (800101) error’ from appearing again when you attempt to create or sign in with a Sony account.
If the problem is related to badly cached TCP and IP data, you should be able to fix the issue by performing a router restart or reset procedure.
To accommodate both potential scenarios, we’ve put together 2 separate guides. If the issue is caused by badly cached TCP or IP data, follow sub-guide A and sub guide B (if A is unsuccessful)
A. Restarting your Router
The easiest way to start troubleshooting for a TCP issue is to go for a simple network reboot. This will achieve the purpose of clearing the currently cached data for Internet Protocol and Transmission Control Protocol data.
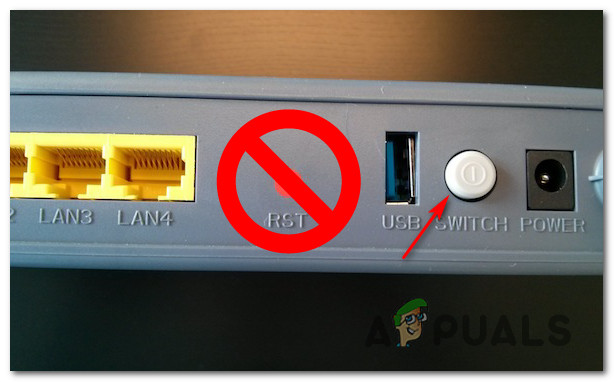
To perform a simple router reboot on your network device, look for the power button (typically located on the back of the device). When you see it, press it once to cut off the power to your device.
Once the power is interrupted, go ahead and disconnect the power cable from the power outlet and wait for a full minute or so before plugging it back. This is done in order to allow the power capacitors enough time to drain themselves.
Once the time period has passed, start your router once again and repeat the action that was previously causing the ‘An error has occurred, please try again later (800101) error‘.
If the same problem is still occurring, move down to the next potential fix below.
B. Resetting your Router configuration
If the router restart didn’t resolve the ‘An error has occurred, please try again later (800101) error‘ for you, the next logical step is to go for a complete network device reset to ensure that no network-related setting or cached data is currently causing the issue.
VERY IMPORTANT: Before you go ahead and reset your network device, you need to understand that this operation will affect your current network setup. On top of reverting every network setting back to their factory defaults, this operation will also clear any forwarded ports, blocked items, and any other type of custom settings. On top of this, if you’re using PPPoE, you will need to insert your PPPoE credentials before you’ll be able to access the internet from your local network once again.
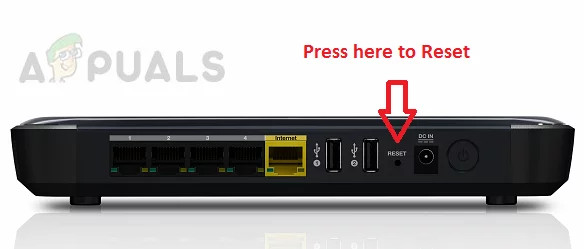
If you understand what this operation will do for you, you can initiate a router reset by founding the reset button on the back of your router.
Note: This is a built-in button that can only be reached with a sharp object (needle, toothpick, etc.) in order to prevent the accidental process.
Once you manage to locate the reset button, press and hold it for about 10 seconds or until you notice that the front LEDs all flash at the same time.
After the router is successfully reset, go ahead and re-establish the connection by re-inserting your PPPoE credentials and see if the problem is now fixed.
Method 4: Using a VPN network (if applicable)
If you’re attempting to create a Sony account or sign in with it from a restricted network such as a school network, work network, or a public network, it’s also possible that the network administrator has enforced some type of restrictions that is restricting communications with Sony servers.
If this scenario is applicable, you really have 2 ways forward:
- Option 1: Get in contact with your Network Administrator and ask them to lift the Sony-related restrictions
- Option 2: Use a VPN connection to make it seem like you’re accessing Sony’s infrastructure from a different location.
If contacting your administrator is not an option and you’re comfortable with using a virtual private network, follow the instructions below to install, set up, and use a free VPN on your PC:
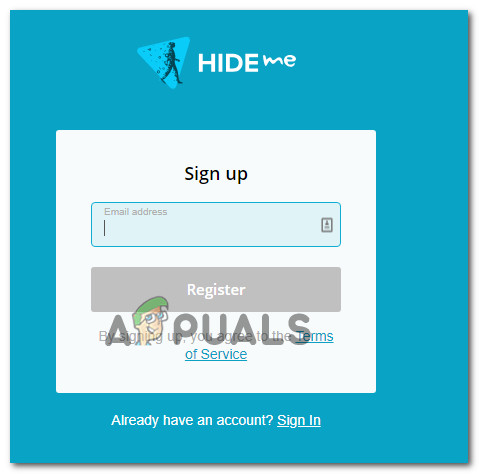
- Visit this official download page of Hide.Me and click the Download Now button. Next, click on Register (under Free) to download the free version of Hide.me.

Downloading the free VPN tool - Next, go ahead and enter your email address at the next prompt. Make sure it’s a valid one because you will receive a verification email later on.
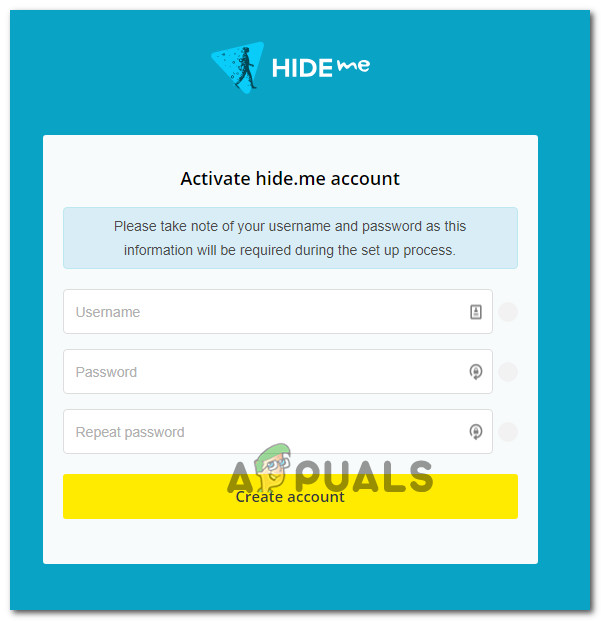
Registering for the service - Next, open your email provider and navigate to the verification email. When you see it, click on Activate my account to get started.
- On the next screen, choose a Username and a Password for your future Hide.Me account and press Create account.
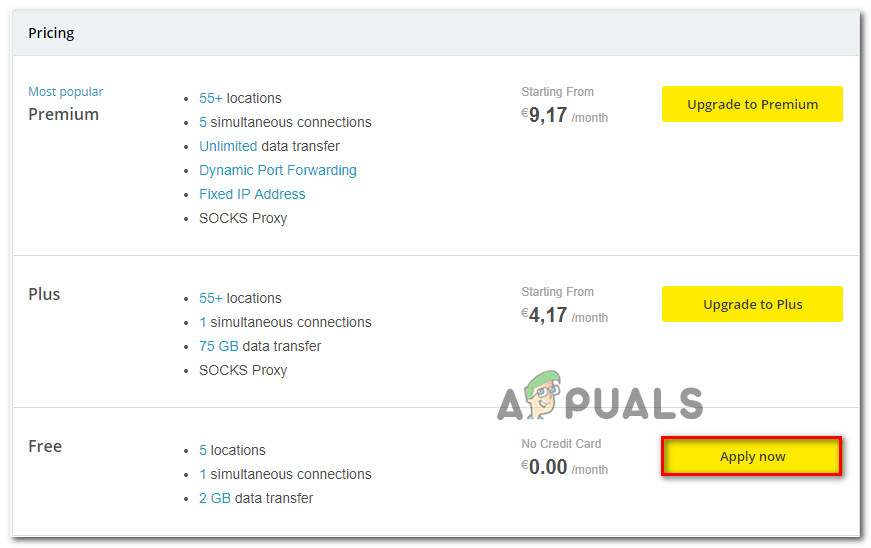
Creating an account with Hide.me - Once you have successfully signed into your account, go to Pricing > Free and click on Apply now.
Applying for the free account in Hide.me - Next, move over to the Download clients tab and click on the Download button associated with your operating system.

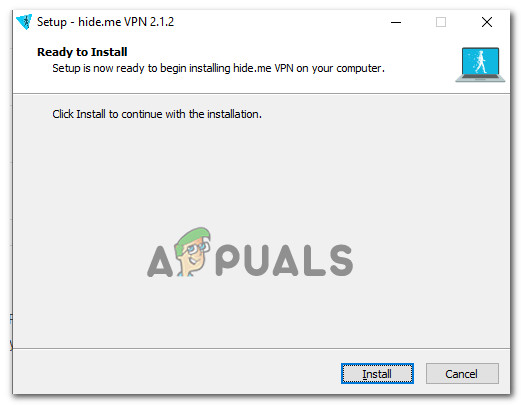
Downloading the Windows client - After the download is finally complete, open the installation executable and install the Hide.me application after clicking Yes at the UAC prompt. Finally, follow the on-screen prompts to complete the installation.
Installing the Hide.Me VPN application - Once the installation is complete, sign in to your account you previously created and press Start your free trial.
- Finally, click the Change button (bottom-right) corner to set the location that works for you. Then, simply click on Enable VPN to change your IP.
- Once the VPN is active, repeat the action that was previously triggering the ‘An error has occurred, please try again later (800101) error‘ and see if the issue is now fixed.


