How to Setup Ubuntu Server as a Router using PPPoE
Ubuntu Server is technically designed as a CLI prompt only operating system for use with large big iron servers, but there’s no reason it can’t work in routers and embedded systems that manage Point-to-Point Protocol over Ethernet as well. It’s assumed that a project like this needs either a small fanless PC or some sort of router box that you can modify via a NAND flash chip. More than likely you’re going to install a decent amount of RAM as well as a solid-state disk in order to eliminate noise as well as moving parts. You might be interested in using an SDHC-to-SATA converter so that you could run the entire operating system off an SD card. SD cards inserted into side slots on legacy-free hardware can also boot the operating system. This works when using it with a PPPoE system just fine.
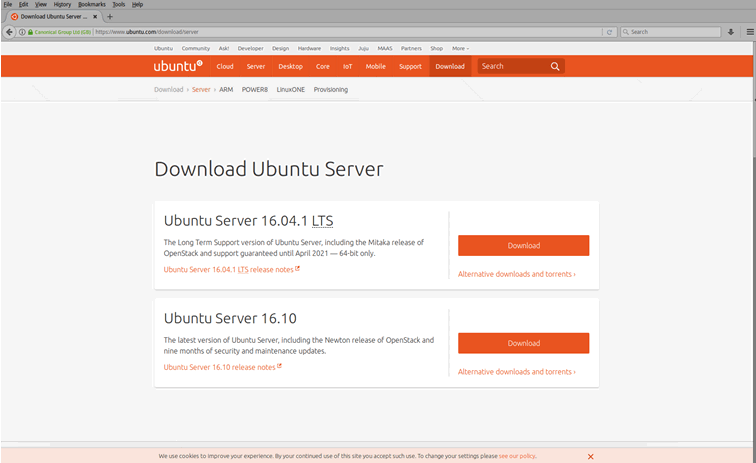
While you might think that using this kind of a configuration can be slow without a proper electromechanical hard disk, you’d actually theoretically reduce the access time. Ubuntu Server is so small it boots quickly anyway. Once you have your router in place, you’ll probably not actually turn it on and off very often. Regardless of which configuration you choose, you’ll want to point your browser to https://ubuntu.com/download/server in order to download an ISO. The newest version at the time of this writing, Ubuntu Server 16.04.1 LTS, is designed only for use with 64-bit architectures. Most modern router and thin client devices fulfill this requirement just fine, but this may be a problem if you were attempting something truly exotic like using a netbook as a router.
Configuring Ubuntu Server as a PPPoE Router
Several major ISP networks still require PPPoE authentication. Almost all DSL networks use this, and even though it’s unnecessary when working with a fiber connection, some of them still actually use it as well. Netgear routers offer a login prompt that allows you to connect to these types of networks easily, but it will take some work to get a home-built Linux router to interface correctly with this sort of technology.
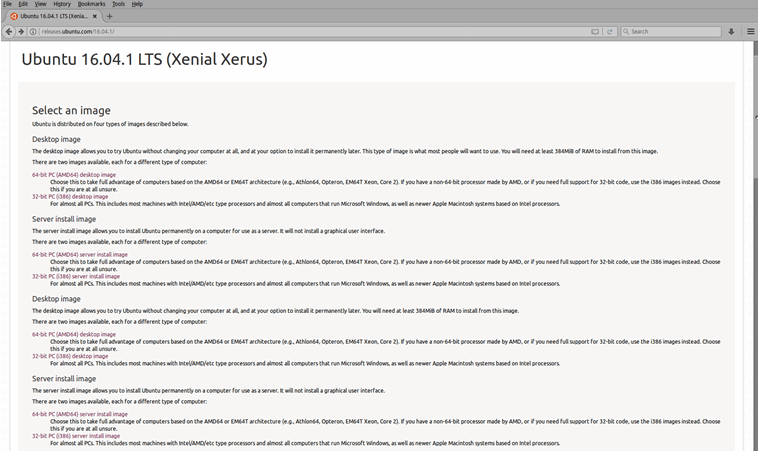
If you aren’t there already in your browser, then head to http://releases.ubuntu.com/16.04.1/. You could have downloaded the ISO from this page if you didn’t have it, but once you do have it scroll down to the link that reads MD5SUMS and select it.
From the CLI prompt, run md5sum on the Ubuntu Server ISO and make sure that it matches the number next to ubuntu-16.04-desktop-amd64.iso in the listing.

If it does, then get a completely blank USB memory stick or SD card ready and type sudo if=ubuntu-16.04-desktop-amd64.iso of=/dev/sdLetter bs=8M, replacing the of= prompt with the name of the device in question. You can use sudo fdisk -l to find all the devices attached to your system. Once you’ve done so, properly remove the drive and attach it to the router system. Reboot it, and push whatever key is needed to boot said system from removable storage. Ubuntu Server installs relatively easily based on a number of text-based ncurses prompts.
One problem with installing it in this fashion, however, is that the removable media will require you to be connected to the Internet during installation, and connecting a box like this directly to a network poses some security issues. Plug it into one of the network ports of your old router in order to provide firewall services until you get it up and running. As soon as you do, you’ll need to make some edits to the GRUB boot loader. If possible, then unplug your Linux router from your existing machine as soon as possible to continue the installation offline. This will prevent strange DHCP issues you might get on your existing connection otherwise.
More than likely, you won’t want to install any addition software during the operating system configuration process. GRUB silently boots on a default Ubuntu Server installation, which means you won’t see any debug messages. If you see a blinking cursor with nothing else after it boots, then hold down Ctrl, Alt and F1 to get to a virtual console. Log into your account, and then type ![]() though you might also wish to use vi instead. Find a line that reads GRUB_CMDLINE_LINUX_DEFAULT=”quiet splash” and delete the quiet splash words in quotes. You’ll also want to edit a line that reads GRUB_CMDLINE_LINUX=”” to include net.ifnames=0 biosdevname=0 in the double quotes to properly name your networking cards. Save the file and then run sudo update-grub to update your boot loder, since the grub file is probably actually on some sort of UEFI partition.
though you might also wish to use vi instead. Find a line that reads GRUB_CMDLINE_LINUX_DEFAULT=”quiet splash” and delete the quiet splash words in quotes. You’ll also want to edit a line that reads GRUB_CMDLINE_LINUX=”” to include net.ifnames=0 biosdevname=0 in the double quotes to properly name your networking cards. Save the file and then run sudo update-grub to update your boot loder, since the grub file is probably actually on some sort of UEFI partition.
Find a line that reads GRUB_CMDLINE_LINUX_DEFAULT=”quiet splash” and delete the words “quiet splash” that are in quotes. fsafa
That be a pirate.
Type sudo nano ![]() to open your interfaces file for editing, and then change the names of the network cards you find there back to the traditional eth0 and eth1, then save the file and exit. Once you’re out of the file you can reboot the system to ensure that the changes take effect properly.
to open your interfaces file for editing, and then change the names of the network cards you find there back to the traditional eth0 and eth1, then save the file and exit. Once you’re out of the file you can reboot the system to ensure that the changes take effect properly.
Now you’ll need to install the proper PPPoE and OpenSSL software to complete the installation. You can install DNS, DHCP, PPPoE and OpenSSL with a single command line issue:
sudo apt-get install bind9 isc-dhcp-server openssl pppoeconf
This might take a few moments, and it could ask if you’re ready to approve the changes. Make sure to tell it that you are. As soon as it completes everything, you can actually disconnect from the Internet and continue offline. You might want to use the sync command a few times to make sure all the buffers are synced together in case something bad happens.
Your ISP provides you with a username and password, which you’ll need to enter into the chap-secrets file. Type ![]() but remember that you could still use vi if you prefer. Your user name and password need to be quoted. For example, you’ll potentially want:
but remember that you could still use vi if you prefer. Your user name and password need to be quoted. For example, you’ll potentially want:
“billy” * “mypass3”
Save the file and now navigate to the ![]() You’ll find a file called provider in this directory. Open it up with nano like you were doing with the other configuration files, or create a new one in the same way. Put each of these commands on a separate line in the file:
You’ll find a file called provider in this directory. Open it up with nano like you were doing with the other configuration files, or create a new one in the same way. Put each of these commands on a separate line in the file:
noipdefault
defaultroute
replaceddefaultroute
persist
plugin rr-pppoe.so eth0
user “billy”
You can also put in hide-password and noauth if you’d rather not use login prompts, since you’re going to be using this as a router and not as an actual production machine with a regular interface. Replace the name billy with the actual user name you have, and then run pon provider or the name of the file you create to connect. It should give you any relevant error messages in the process, but you can use ifconfig to find the ppp0 or ppp1 network interface. You’ll need to reference this later. You could add usepeerdns if you want to ask the peer for a couple of DNS server addresses, which are then passed to ![]() as environment variables labeled DNS2 and DNS1. You’ll also force an environment variable called USEPEERDNS to set itself to 1 as well. If you’d rather use your own DNS servers and not ones assigned to you by your ISP, you can add lines to your
as environment variables labeled DNS2 and DNS1. You’ll also force an environment variable called USEPEERDNS to set itself to 1 as well. If you’d rather use your own DNS servers and not ones assigned to you by your ISP, you can add lines to your ![]() file such as:
file such as:
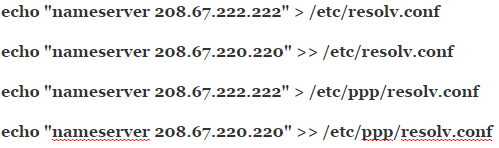
These need to be here since each time you reboot the server or establish a new PPPoE connection, the ![]() files are overwritten.
files are overwritten.
In most cases, your MTU is set at around 1500, but the highest you’ll be able to get it around 1492 or perhaps even less since you’re using the PPPoE interface. Assuming you’ve determined the maximum MTU for your ppp0 or ppp1 system, you’ll need to use ![]() to open the ip-up file and then add the line /sbin/ifconfig ppp0 mtu #### at the very bottom, replacing #### with your correct value. It might be somewhere around 1480 if you’re unsure.
to open the ip-up file and then add the line /sbin/ifconfig ppp0 mtu #### at the very bottom, replacing #### with your correct value. It might be somewhere around 1480 if you’re unsure.
Many tutorials will tell you to set the eth0 WAN connection to DHCP, but you need to set it to manual due to the PPPoE connection you’re working behind. Use ![]() and edit it so that the code block under # The WAN network interface reads auto eth0 and iface eth0 inet manual and then the code block underneath it should read:
and edit it so that the code block under # The WAN network interface reads auto eth0 and iface eth0 inet manual and then the code block underneath it should read:
# The LAN network interface
auto eth1
iface eth1 inet static
address 192.168.1.1
netmask 255.255.255.0
Routers need packet forwarding activated in order to act as a router, so use ![]() and then remove the octothorpe in front of net.ipv4.ip_forward=1 before saving. You’ll find it under a quote that reads # Uncomment the next line to enable packet forwarding for IPv4, but you might also want to remove the mark in front of net.ipv6.conf.all.forwarding=1 if you plan on using IPv6 routing, which may be a challenge under a PPPoE system.
and then remove the octothorpe in front of net.ipv4.ip_forward=1 before saving. You’ll find it under a quote that reads # Uncomment the next line to enable packet forwarding for IPv4, but you might also want to remove the mark in front of net.ipv6.conf.all.forwarding=1 if you plan on using IPv6 routing, which may be a challenge under a PPPoE system.
Open the iptables file for editing with the ![]() command and then add these lines to it:
command and then add these lines to it:

Save the file, and then exit nano or whatever other text editor that you’ve been using before you proceed. The iptables constitute the main firewall for the Linux kernel, so it’s a good idea to have these tables in order before you actually start the ISP connection.
You’ll need to now change the permissions on the file in question, so you might want to use sudo -i or sudo bash to get a root prompt. Once you have use:
![]()
Once these permissions are applied, you can type exit and push the enter key to get out of the elevated prompt.
The next configuration file we need to open with ![]() and you’ll edit it in the same exact fashion. You need to add the following settings, replacing the octothorpes with the right IP address for your router:
and you’ll edit it in the same exact fashion. You need to add the following settings, replacing the octothorpes with the right IP address for your router:
subnet ###.###.##.# netmask 255.255.255.0 {
range ###.###.##.### ###.###.##.###;
option routers ###.###.##.#;
option domain-name-servers ###.###.##.#;
option broadcast-address ###.###.##.###;
}
Save and close the file. If you’re working with an SD card or something similar, then this is another good time to issue the sync command as well.
You’ll need to use sudo nano once more to open the ![]() file to include your own custom rules. We’re still working with a PPPoE connection, so we’ll use the ppp0 device file instead of the eth0 default.
file to include your own custom rules. We’re still working with a PPPoE connection, so we’ll use the ppp0 device file instead of the eth0 default.
Under a code block that starts with the comment “# Clamp the MSS to MTU size,” include the following line:
-A FORWARD -p tcp –tcp-flags SYN,RST SYN -j TCPMSS –clamp-mss-to-pmtu
This rule is required to prevent Web pages from loading only half way or timing out. It instead pins the MTU and MSS together, so you’re not going to have these problems. Now this allows the Linux kernel to guess about the correct sizes, but you can actually specify them if required. Under a code block that starts with “# Specify MSS size,” you’ll need to add:
-A FORWARD -p tcp –tcp-flags SYN,RST SYN -j TCPMSS –set-mss ####
Replace the #### section with the correct MSS value. You can figure it out with a simple bit of math. Subtract the PPPoE header size from your MTU, and then subtract the IP header and the TCP header. The difference is the total MSS size.
You may need to modify the SSH service rule in order to add the –syn option that will allow you to access SSH to this router from another computer that’s registered on your LAN. Commenting out the ICMP service rule will make your machine not reply to any pings. This will actually make your computer quite stealthy, though you shouldn’t consider this some sort of end-all treatment that makes your browsing habits through this router invisible. It won’t, but it is one more layer of security to protect you.
Sometimes the interfaces or PPPoE connections you’re working with won’t actually connect right away when you boot up the router, so you might want to create a short startup scrip to ensure that it works properly when the system boot s up. It only adds around 8-10 seconds to the total boot time, so it’s actually worth it. Edit the ![]() file with sudo nano once again, and then add
file with sudo nano once again, and then add
sleep 3
ifup eth0
sleep 3
ifup eth1
sleep 3
pon provider
You’ll need to replace provider with the name of a custom file if you created one to replace the default provider file. Many routers only need a 1-2 second sleep time, so you might want to experiment with that in order to improve boot up performance. It shouldn’t be taking much time to restart at all in the first place anyway.
This should run the pon and ifup commands after the system is totally booted, but before the actual virtual console’s log in prompts appear. If the connection is up, then nothing at all happens, but if one of the connections isn’t working properly then this script will ensure that it’s initialized properly. The last pon command relies on eth0 and eth1, so you must always position it as the final step or otherwise the script might actually fail.
As soon as you reboot the machine after making all these changes you’ll have a fully functioning router working on Ubuntu Server. You may wish to occasionally use sudo iptables-L if you need to check their status from time to time, but otherwise everything will work as well if not better than a commercially manufactured router. Your new router will run any other Ubuntu packages necessary, but you shouldn’t need to install an X Server or anything else, because the system should function correctly without any need for additional user interface software.
I’ve seen this post practically verbatim a few months back, which leads me to think you copied this guide and have portrayed it as your own work :-/