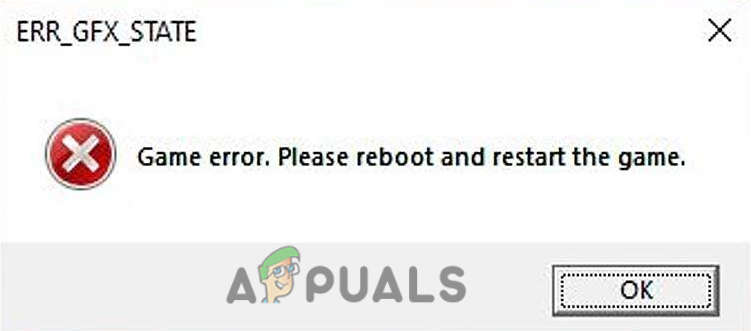
How to Fix Game Error “ERR_GFX_STATE” on Red Dead Redemption 2?
Several players have reported that they are getting crashed while playing or launching Red Dead Redemption 2 and also they had an ERR_GFX_STATE error that appears on their screen when the game gets crashed. We had a look into this and discovered the most common cause that is the game files that have sga_ attached in the name might be interrupted you to play that game because these files are belongs to your game graphics cache.
Although there are multiple causes for this error to occur, we have listed most of them below:-
- Outdated video drivers- Having outdated video drivers, generally is not a good idea because it can cause several errors not just in games but even in the applications that required a graphics interface.
- Overclocking Graphics Card– If you increase your GPU performance by Overclocking the graphics card then you might face errors because the overclocking process is loaded with more failure than the success of that.
- Overclocking Ram- Overclocking Ram is the same as GPU overclocking, you can boost your Ram Megahertz (MHZ) to the maximum by overclocking it but it also can cause ERR_GFX_STATE error in Red Dead Redemption 2.
- Outdated DirectX- The DirectX is also the graphics driver component, if you don’t update your Windows and GPU drivers then your DirectX might not be updated and it can cause an ERR_GFX_STATE error.
Check your system Requirements
Before we start fixing and making changes in the system or in the game we suggest you match your system requirements with those mentioned below because if your graphics card is weak and does not able to endurance the Red Dead Redemption 2 then you may face the ERR_GFX_STATEerror.
It is also possible that your graphics card does not support DirectX then simply you can follow the below step on switching DirectX to Vulkan.
Match your system requirements with the minimum requirements of Red Dead Redemption 2
- Operating System: Windows 7 – Service Pack 1
- Processor: Intel Core i5-2500K / AMD FX-6300
- Memory: 8GB OF RAM
- Graphics Card: AMD Radeon R9 280 3GB or Nvidia GeForce GTX 770 2GB
- Hard disk Space: 150GB
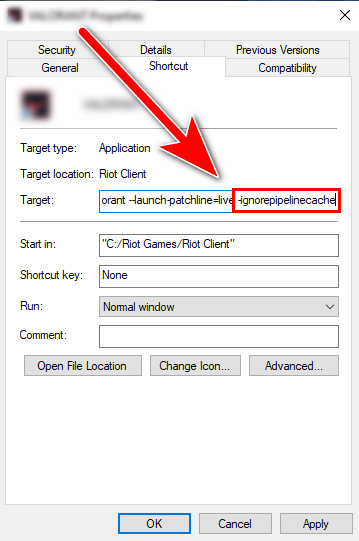
Add command in the launch argument
We discover another solution to the problem that prevents the game from launching with the ERR_GFX_STATE error, so you can add the -ignorepipelinecache command in the launch argument to your launcher.
There are multiple launchers available on the internet that have Red Dead Redemption 2, and every launcher has a different way to add launch arguments into the game.
Follow the steps according to your launcher to add a command in the launch argument:-
Steam launcher
- Open your launcher, I have steam so I will open it.
- Go to the library, Right-click on the Red Dead Redemption 2, and select Properties.
- Insert -ignorepipelinecache in the launch argument, close the properties Windows.
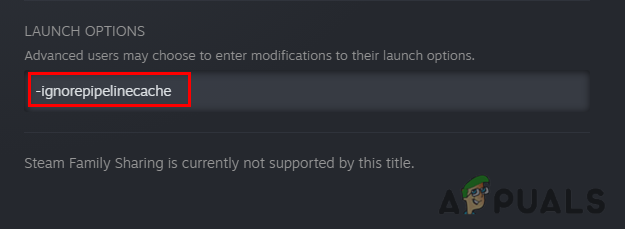
Insert -ignorepipelinecache in the launch argument, - Launch the game and check if the error persists.
Rockstar Games Launcher
- Open the Rockstar Games, and click on the Settings button on the top to view the options.
- On the left sidebar, you will see My installed games.
- Select Red Dead Redemption 2 under My installed games.
- Scroll down to the bottom, you should see launch arguments.
- Insert the below command in the text box.
-ignorepipelinecache
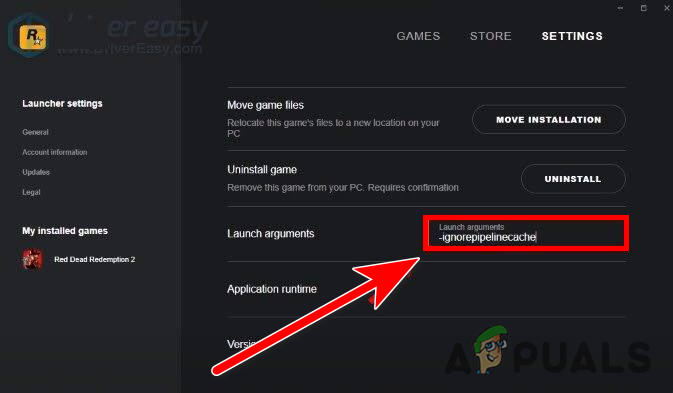
Insert -ignorepipelinecache in the launch option of Red Dead Redemption 2 in Rockstar Games - Once done, launch the Red Dead Redemption 2 and check if the error is resolved.
Epic Games Launcher
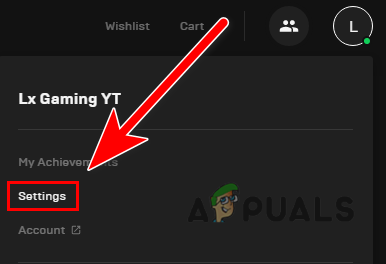
- Open the Epic Games Launcher, Click on your Logo on the top right.
- Select the Settings option, then scroll down to Red Dead Redemption 2.
Click on Settings - Click on Red Dead Redemption 2, then check the Additional Command Line Arguments.
- Insert the below command in the box.
-ignorepipelinecache

Add -ignorepipelinecache in launch argument of Red Dead Redemption 2 in Epic Games - Once done, go to the library and launch the Red Dead Redemption 2 then check if the error persists.
Pirated Versions
In case you have pirated version, you can follow the below steps to add the launch argument:-
- Go to your game directory, and Right-click on the Red Dead Redemption 2.
- Hover your mouse on Send to option, and select Desktop (Shortcut).
- Go to the desktop, right-click on the shortcut and select Properties.
- Add the below command to the target value.
-ignorepipelinecache
Add -ignorepipelinecache in the target value of Red Dead Redemption 2 - Once done, launch the Red Dead Redemption 2 and check if the error persists.
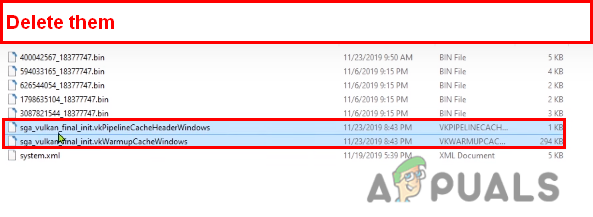
Delete SGA_ Files
SGA files are game graphics cache files that contain data about graphics, and they also contain settings, scripts of the game, crashing errors can be fixed by deleting SGA files and also the several users have reported in forums that deleting the files that have sga_ at the start of their name fixed their ERR_GFX_STATE error.
Here is how you can delete them by following the below steps:-
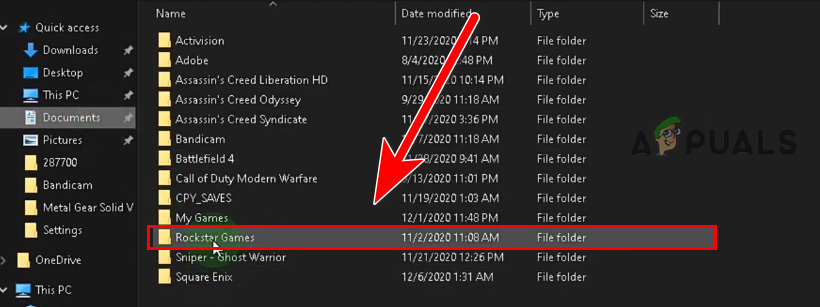
- Open This pc, go to the following directory
Documents>Rockstar Games> Red Dead Redemption 2>Settings. - Here delete the files that have sga_ at the starting of the file name.
Delete SGA_ files - Once done, launch the game and check if the error persists.
Reinstall Graphics Drivers
There is a chance that the error is occurring because of some specific optimization of the graphics driver or your graphics driver might get corrupted and it can interrupt you to play the game to fix this, we have to clean the installation of your graphics driver.
Having an Outdated video driver actually is not a good idea because it can prevent your hardware to run at the best performance. keep your drivers updated is not just advice but in most cases, it performs actually so good, if we compare it to the outdated drivers.
Note- If you have a laptop then we recommend you install your graphics drivers from your laptop manufacturer’s website because it gives you better performance instead of downloading manually from the manufacturer’s website.
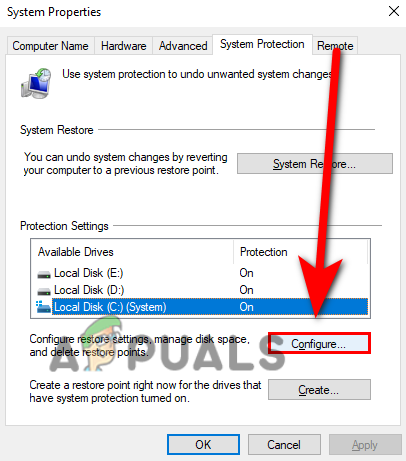
Create a Restore Point ( Optional )
Before you start uninstalling your drivers, we recommend you create a restore point just for safety if something happened with your drivers while uninstalling drivers with DDU then you can easily restore all the previous Windows files.
Follow the steps to create a restore point.
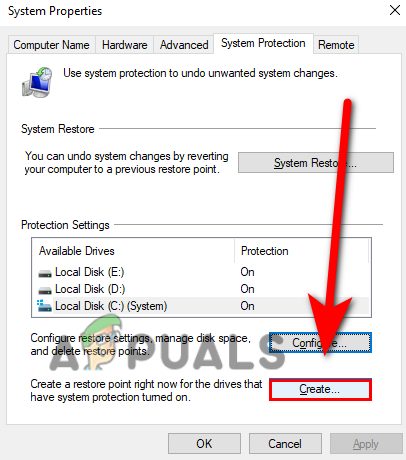
- Press the Windows key and type create a restore point in the search bar and click on it.
- Select the hard drive where the Windows has been installed.
- Click on Configure button to view the advanced options
 Click on Turn on system protection.
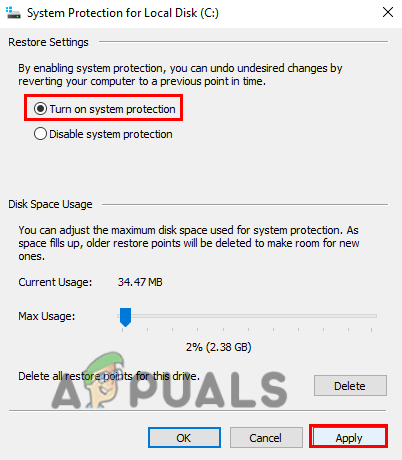
- Select Apply to save the changes and press Ok.
- After that, click on Create button. Now type your restore point name here it could be anything.
- Click on Create and you should receive the success message of the restore point.
If something happens with your Graphics driver you can easily restore your files from the Advanced system repair.
Uninstall Graphics Drivers with DDU
DDU or display driver uninstaller is used to uninstall drivers completely from your computer let’s suppose your graphics drivers get corrupted and you reinstall your drivers manually from the browser or with the vendor. Because you did not delete the previous driver’s files that were corrupted for that reason it is obvious that your game crashing and you have to restart the game but it does not fix the error.
Follow the steps to uninstall Graphics drivers
First, you have to get in the Safe Mode because the DDU recommends “uninstalling your graphics drivers in safe mode”.
In case you are unable to start Windows 10 in Safe Mode, there are various methods to start Windows 10 in safe mode, we have a full-guide article on How to start windows in safe mode.
- Download the Display Driver Uninstaller.
- Press the Windows key and click on the power button.
- Hold shift and then click on the Restart button to get in the Safe Mode.
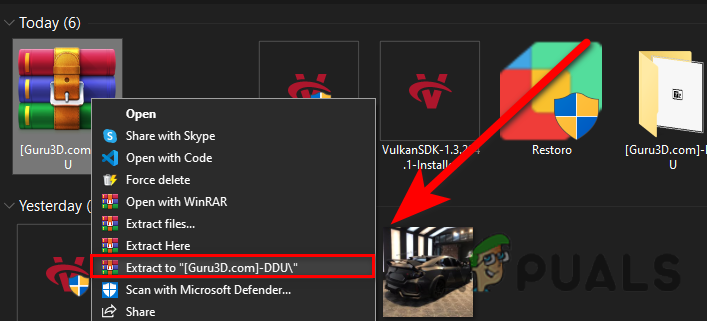
- Navigate to the Download folder, Right-click on the DDU zip folder and select Extract to extract it.
- Once done, navigate to the folder and double-click on DDU v18.0.4.9.
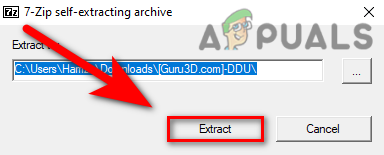
- Click on Extract then navigate to the extracted DDU v18.0.4.9 folder.
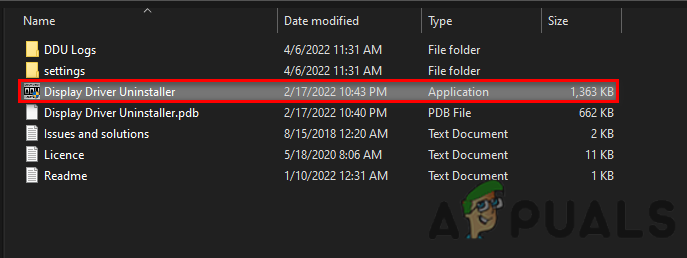
- Double-click on the Display Driver Uninstaller to run it.
- Select your GPU type on the top-right menu.
- Select your Graphics card manufacturer which is below the device type. Then click on clean and Restart.
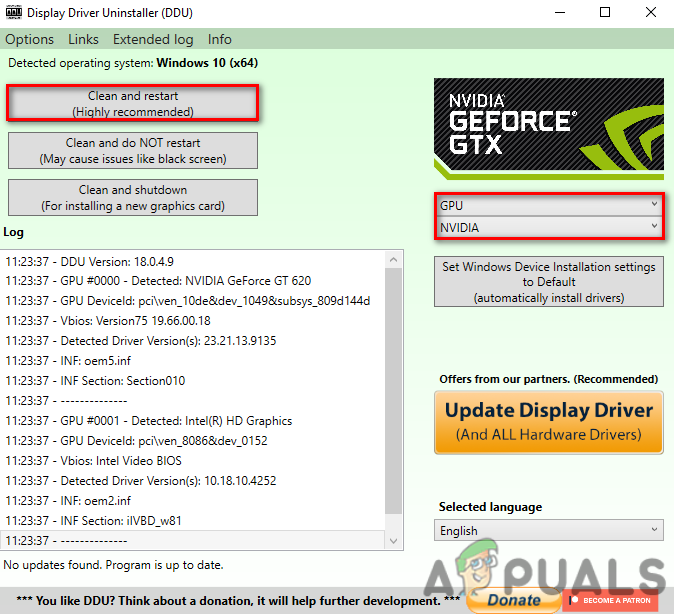
- It will uninstall the previous drivers and restart your computer in Windows Mode.
Install Graphics Drivers
Now you have to install your Graphics drivers according to your manufacturer.
Follow the below steps to install your Graphics drivers:-
Nvidia Drivers
- Go to the official website of Nvidia drivers.
- Take your time to select your Graphics Card according to its specs.
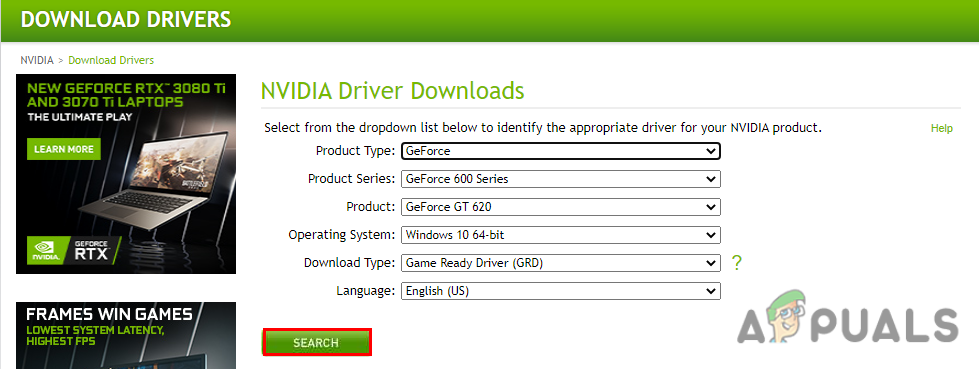
Select your Graphics Card then click on the Search button to find the latest Drivers - Once you selected Graphics Card, click on the Search button.
- It should start searching your Graphics card drivers.
- Once done click on the Download button to download it.
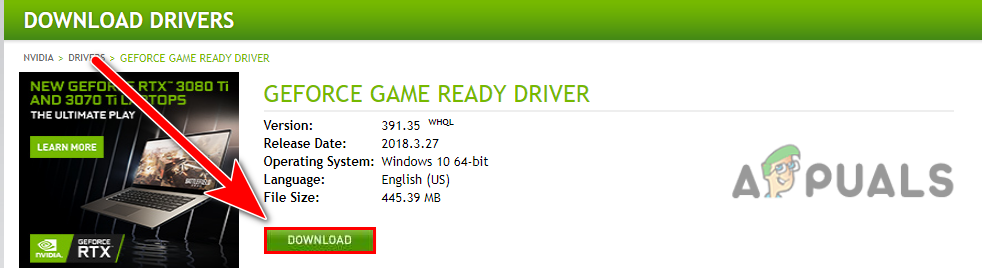
Click on Download to download the drivers - After that, double click on the installer to open it.
- Now just follow the instruction to install your drivers.
- Once done restart your computer and check if the error persists.
AMD Drivers
- Go to the official website of AMD RADEON.
- Choose your Graphics Card according to its specs and click on the Submit button to find the latest drivers.
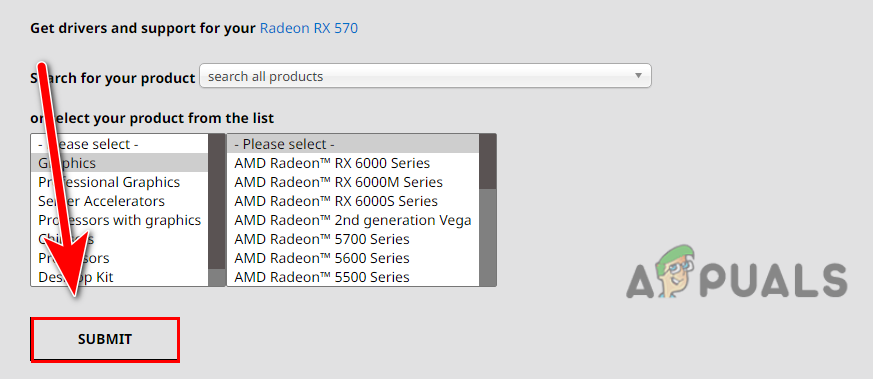
Select Your Graphics Card then click on Submit button to find the latest Drivers - Choose your operating system in the next step then click on the Download button in the expand tray.
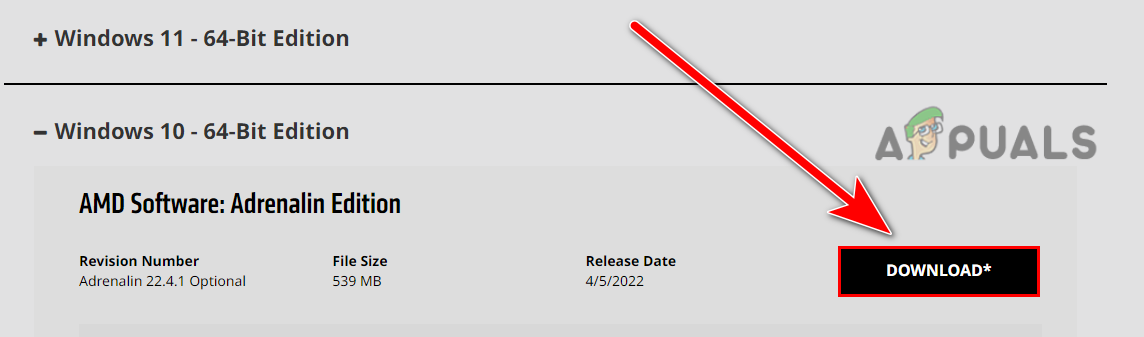
Choose the Operating System then click on the Download button to download the Graphics Drivers - The download process of the graphics driver should start once done, open it and follow the further instruction to install your graphics driver.
- Once done restart your computer and check if the error is resolved.
Switch to DirectX Graphics API
Vulkan is a collection of API (Application programming interface) that is used for rendering real-time 3d graphics in applications such as video games and multimedia software. Although the Vulkan API is set by default in Red Dead Redemption 2 that does not mean it gives you the best performance.
Note- If the Vulkan is set by default then kindly try DirectX if IDrextX is set then you can try Vulkan because both itineraries are good, you can test them one by one.
If your game is not launching and you receive ERR_GFX_STATE then you can change Graphics API from the configuration file as follows.
- Open file explorer, Go to Documents and Navigate to Rockstar Games.
- Click on Red Dead Redemption 2 then navigate to Settings.
- Right-click on Settings.XML and open it with notepad.
- Under the advancedGraphics, replace this <API>kSettingAPI_Vulkan</API> from the below command
<API>kSettingAPI_DX12</API>

Switch Vulkan to DirectX - If the DirectX is set then replace it with this one
<API>kSettingAPI_Vulkan</API>
- Once done, launch the game and check if the error persists.
If your Game is launching for some time then you can change Graphics API through the game settings as follows
- Go to settings, then Click on Graphics.
- Scroll down to the Advanced settings option and make sure it is unlocked otherwise you don’t see the advanced option.
- Change Graphics API to DirectX by clicking on the arrows.
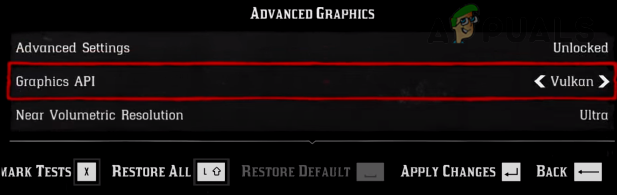
Switch to DirectX by clicking on the arrows button - Hit Enter to save the changes.
- Restart your game and check if the error persists.
Install or Update Your DirectX
DirectX is also a collection of API (Application programming interface) that is used to manage tasks related to 3d graphics. videos and sounds. In simple words, it is a library that is required by almost every application and game which claims the graphics interface.
If you don’t update your Windows or video card drivers then there is a chance that your DirectX is outdated updating the DirectX might help you to fix the ERR_GFX_STATE error.
Follow the steps to update your DirectX:-
- Go to the link from here to download DirectX.
- Click on the Download button to start the download process.
- Once downloading is finished, double click on the installer and follow the further instruction to install or update DirectX.
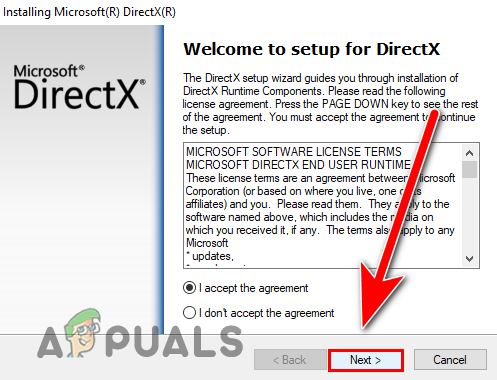
Click on Next and follow the further instruction to install DirectX - Once done, open the game and check if the error is resolved.
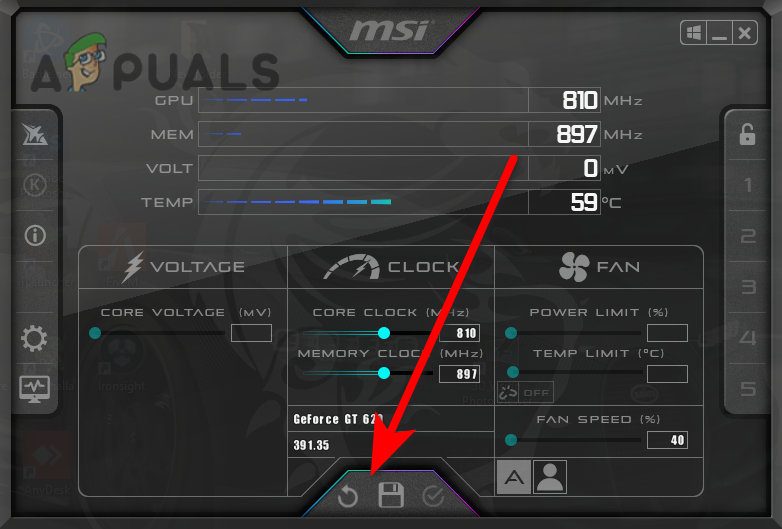
Disable GPU Overclocking
Overclocking a Graphics card increases the core frequency that speeds up the graphical processor which can help to boost graphics performance and gaming performance. However, the overclocking can cause problems like overheating and more because all GPUs are set to run at a certain speed for that reason you may receive ERR_GFX_STATE.
So the best approach is to reset the graphics card overclocking by following the below steps:-
- Open MSI Afterburner, Click on the reset button to reset the overclock settings to default.
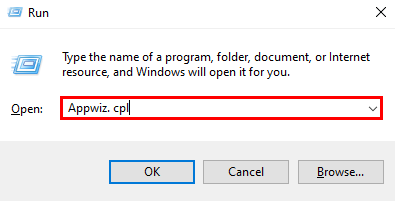
 The other way is uninstalling the MSI afterburner, and it will automatically revert to default settings
- . Press the Windows + R keys together and type Appwiz.cpl then press enter.
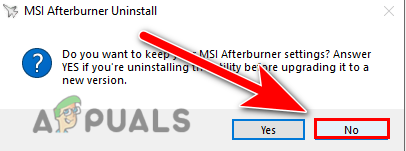
- Find the MSI Afterburner and double-click on it to uninstall
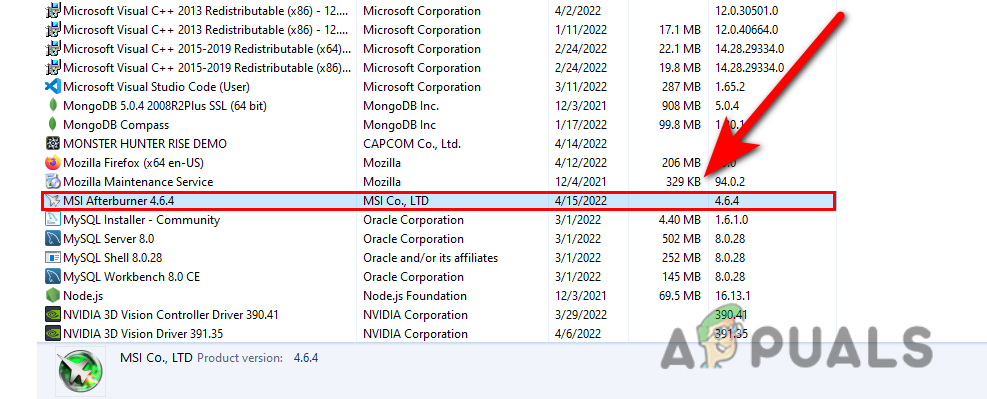
Uninstall MSI Afterburner from the control panel - Make sure to click on the NO button in the next Window to reset MSI Afterburner settings.
Disable Ram XMP from Bios
XMP or Extreme Memory Profiles which come with the standardized ram. XMP is a beneficial option to overclock your Ram by just selecting different profiles, although, it can cause crashing errors because if your Ram clock speed gets unstable due to XMP then your game might crash and you receive errors.
Follow the steps to disable XMP from bios:-
- Press the Windows key click on the Power button and select Restart.
- Waite until you see the Logo screen then press the key that will let you access bio settings.
- If you don’t know the key, it should be written on the bottom right or left of the logo screen.
- Press the key to get into the bios settings.
- Here you have to find the XMP option and disable it.
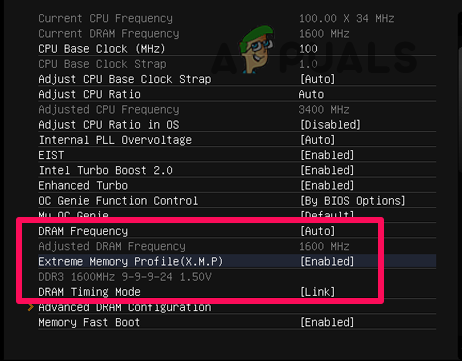
Disable XMP from Bios - If you cant find the XMP option then simply press the f9 key to reset the bios settings it should automatically turn off the XMP.
- Once done restart your computer, launch the game and check if the error persists.
Low your Graphics settings
Your Graphics card might not able to handle the Graphics settings which are applied by you before or if the error is occurring due to some specific Graphics settings then you can reset your graphics settings or modify them as follows
In case your game is not launching then you have to delete the configuration file to reset the graphics settings to the default.
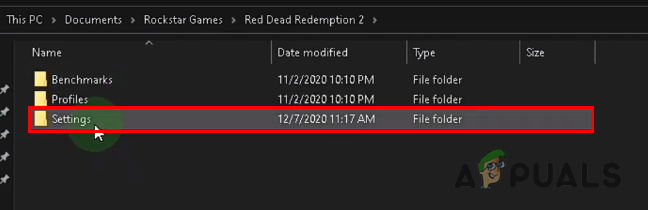
- Open the explorer, and navigate to Documents.
- Click on Rockstar Games>Red Dead Redemption 2.
Navigate to Rockstar Games - Then click on the Settings folder.
Click on the Settings folder to navigate it - Here delete the System.XML.
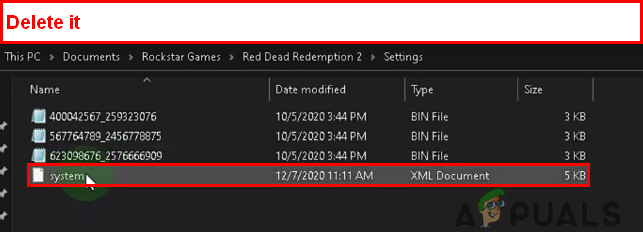
Delete the System file that configuration file of Red Dead Redemption 2 - Launch the game, and your Graphics settings will reset to default.
- Play the game for some time to check if the error persists.
- If the error is still occurring then you can lower your graphics settings from below
In case the game is launching for some time then you can follow the below steps to lower your graphics settings:-
- Go to the settings>Graphics settings.
- Scroll down to the Graphics.
- We recommend you decrease all the settings temporary to test if the error persists.

Best settings for low-end computers - After decreasing the Graphics settings, launch the game and increase the Graphics settings one by one till you get the error.
- If you encountered the error, launch the game and revert the last Graphics setting that you applied.
Verify Game Files
There is a possibility that the problem is related to your game files that can cause the ERR_GFX_STATE error, although verifying the game files fixes various problems and might fix the ERR_GFX_STATE error on launching.
Verify your game files according to your launcher:-
Verify with Steam Launcher
- Open Steam, and click on the Library option on the top nav.
- Find the Red Dead Redemption 2 here, right-click on it and select Properties.
- Go to the Local files tab by clicking on it, which is on the top.
- Click on Verify Integrity of game files option to verify the game files.
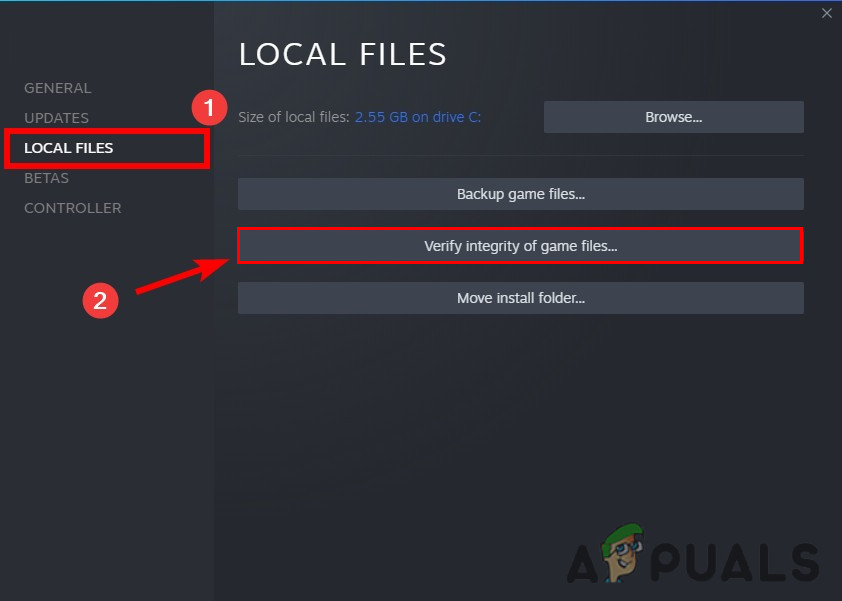
Click on Verify integrity of game files
Verify with Rockstar Games
- Open Rockstar Games, and click on the Settings option on the top right.
- Find Red Dead Redemption 2 under the installed apps.
- Click on Verify integrity option on the right pane.
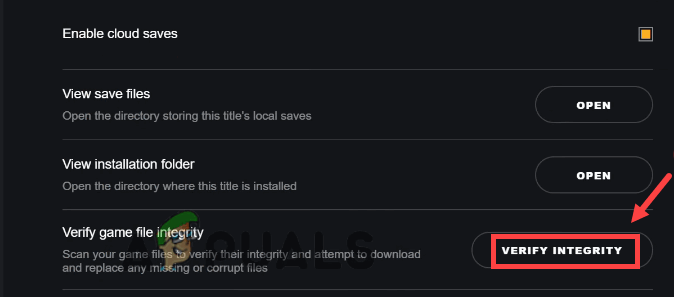
Click on Verify integrity to verify the game files in Rockstar Games
Verify with Epic Games
- Open Epic Games Launcher, and click on the Library option on the left sidebar.
- Find the Red Dead Redemption 2 here, click on the three dots.
- Select the Verify option, and.
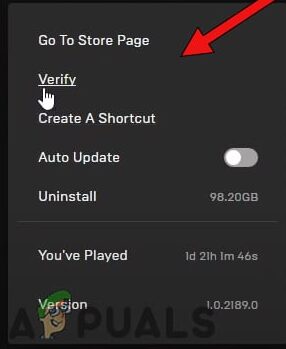
Select verify to verify the game files
Hopefully, you have successfully solved the ERR_GFX_STATE error, if you are stuck somewhere or if you have any doubts, we would like to hear in the comments.


