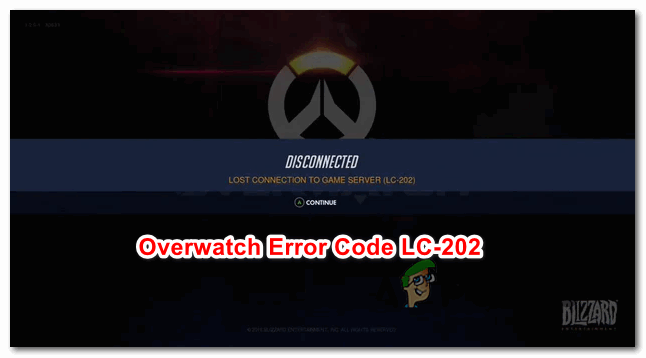
[FIX] Overwatch Error Code LC-202
LC-202 Error Code is short for ‘Lost Connection to the Server‘. This problem occurs for Overwatch users on PC, PlayStation 4, Xbox One, and Nintendo Switch. Most affected users are saying that upon trying again, the game loads, but they are unable to use voice chat in-game.
When troubleshooting for this particular issue, you should start by seeing if you’re not actually experiencing the effects of a widespread server issue.
In case your investigations reveal that the problem is only restricted to your current configuration, your first troubleshooting attempt should be to either restart or reset your router in order to clear any TCP / IP inconsistency that might facilitate this error.
However, chances are you might actually be dealing with a NAT (Network address translation) issue instead. If you’re using an older router, you might need to forward the ports used by Overwatch manually in order to fix the problem. But if you’re using a newer router that supports UPnP, all you need to do is enable this option in the Settings menu.
In some cases, a DNS (Domain Name System) inconsistency can also be responsible for the apparition of the LC-202 Error Code. In this case, all you need to do is make the switch to Google’s public DNS (either IPV4 or IPV6). But keep in mind the exact steps of doing this will be different depending on if you’re encountering the problem on a console (PS4 or Xbox One) or PC.
In case you’re using an overprotective Antivirus suite, you should also investigate to see if the problem occurs due to the fact that the game is not allowed to communicate with the game server due to a false positive. In this case, you should be able to fix the problem either by whitelisting the game + game launcher (Battle.net) in your AV settings or by uninstalling the overprotective 3rd party suite.
In the event that you’re seeing the error on console and none of the fixes end up working for you, you should attempt to reinstall the game along with every add-on and update. Some affected users have confirmed that this operation finally allowed them to connect to online games without seeing the same error code.
Checking for a Server issue
Before you move towards trying to fix a local issue, you should start by troubleshooting for a server problem to make sure that the problem is not beyond your control. In the past, people have dealt with the LC-202 Error in situations where Overwatch game servers in their area were affected by an outage period.
If you suspect this might be the underlying cause of the problem, you should use services like DownDetector or Outage.report to see if other users in your area are facing the same error code as you.
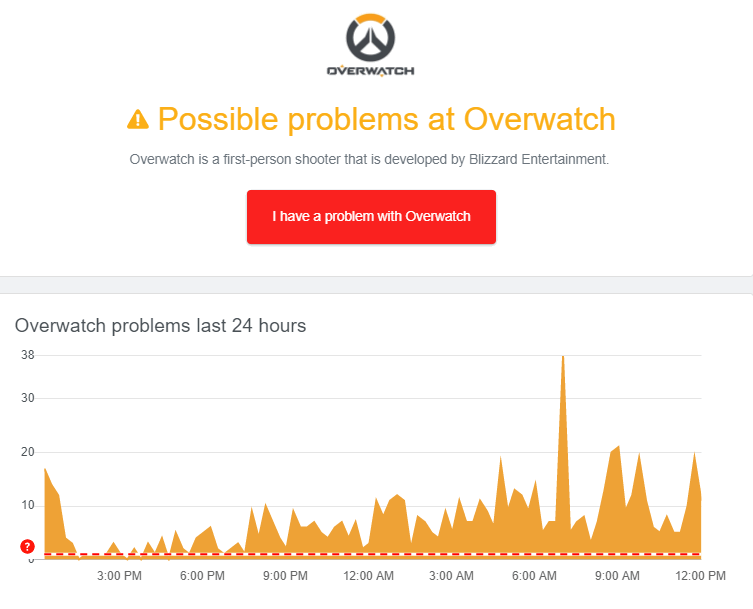
If you uncover recent reports by other users struggling with the same LC-202 error, you should also take a look at the two official accounts where Blizzard typically posts updates related to game issues – @PlayOverwatch and @BlizzardCS).
Take a look at the recent posts and see if the if there’s an official announcement related to this error code.
Note: In case the investigations you just performed did reveal a server issue that is beyond your control, there are no available repair strategies other than waiting for the problem to be fixed by Blizzard’s devs.
However, in case you’ve just confirmed that the problem is not widespread seems to only occur for you, there’s a high chance that one of the fixes below should allow you to fix the problem. in this case, move down to the next potential fix below.
Resetting your Network Device
If you previously confirmed that Blizzard is not currently dealing with a widespread issue, the most common culprit that might be responsible for the LC-202 Error is an inconsistency with the network device that you’re actively using.
According to affected users reports, end-user routers working with limited bandwidth are likely to become flooded with data, determining the game client to trigger the error after being unable to connect properly – This typically occurs when multiple devices are connected to the same network and so a lot of data exchange is going around.
If this scenario is applicable, there are two different strategies that should allow you to fix the LC-202 Error if it’s caused by a router inconsistency – A. Rebooting the Router and B. Resetting the Router.
A. Rebooting the Router
If you think your router might be to blame for this problem, you should start with a simple router reboot. This operation is quite simple to perform and it will not cause any custom data loss.
Rebooting should be enough in case you’re using an older router model – This is confirmed to be effective by several affected users that were previously struggling with the LC-202 Error.
To perform a simple router reboot, press the Off button on the rear of the device. Once you turn it off, leave it like this for a full minute before even considering to start it again. While you wait, you can also disconnect the power cable physically in order to ensure that you drain the power capacitors.
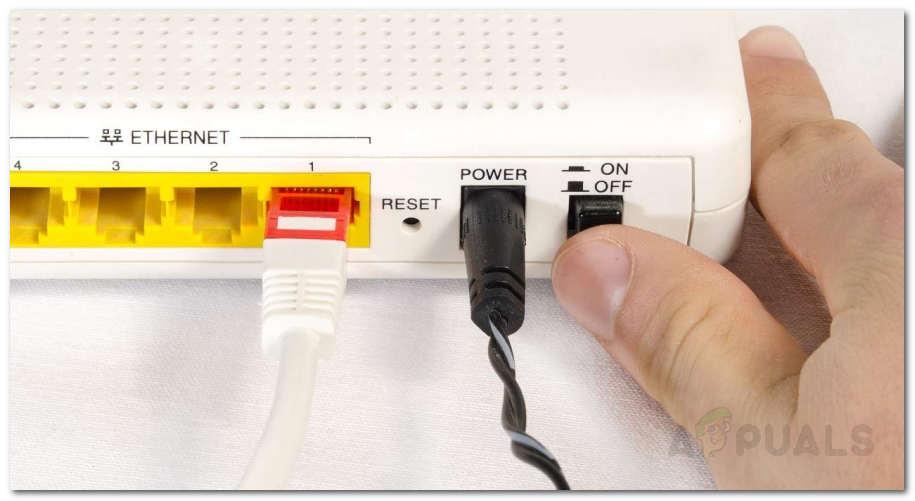
After you have successfully rebooted your router, wait for the internet connection to be re-established, then repeat the action that was previously causing the error in Overwatch and see if the problem is now fixed.
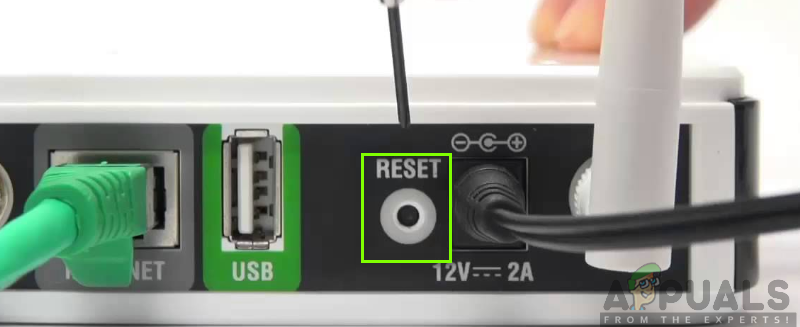
B. Resetting the Router
If rebooting your router didn’t fix the problem for you since you’re still seeing the LC-202 Error, the next logical step would be to perform a router reset.
But before you go ahead with this, consider the fact that this operation will also end up cleaning any personalized settings that you previously established – This included any custom login credentials, whitelisted ports and IP ranges, blocked items, forwarded ports, and more.
If you understand the consequence sand you still want to press ahead with this operation, you need to reach the reset button on the back of your router. But keep in mind that with the vast majority of models, you will need a toothpick or a small screwdriver to reach that button since it’s likely built inside the case. Most manufacturers make it this way in order to avoid accidental presses.
IMPORTANT: Some router models will ‘forget’ the previously-stored ISP credentials once a reset is performed. That’s why it’s important to ensure that you have your ISP credentials at the ready before initiating a router reset.
To perform a router reset, press and hold the Reset button for 10 seconds or more or until you see the front LEDs flashing at the same time. Once you see this behavior occurring, release the reset button and wait for the Internet connection to be re-established or reinsert the credentials supplied by your ISP if necessary.
After the reset is complete, repeat the action that was previously causing the LC-202 Error and see if the problem is now fixed.
In case you are still seeing the same error code, move down to the next potential fix below.
Forwarding the Ports used by Overwatch
If none of the potential fixes above have worked for you, one potential cause that might end up causing this problem is an instance in which the game server isn’t agreeing with the information your machine is sending them.
And in most cases, this problem occurs if a selection of specific ports used by Overwatch is not open and cannot be used by the game. If this scenario is applicable, you should be able to fix the issue either by forwarding the required ports automatically (only if UPnP is supported by the router) or by manually forwarding the ports via the router settings menu.
In case you have a router that supports UPnP (Universal Plug and Play) and you’re suspecting that this feature might be disabled, you can fix the problem by facilitating automated port forwarding by enabling UPnP in your router settings (sub guide A).
In the event that you’re using an older router that doesn’t support UPnP, follow sub guide B to forward the ports used by Overwatch automatically.
A. Using UPnP to forward Overwatch ports automatically
- On a PC connected to the same network as the machine that you play the game on, open any browser and type one of the following IP address inside the navigation bar and press Enter:
192.168.0.1
192.168.1.1

Accessing your router settings Note: If none of these addresses work for you, search online for specific steps on accessing the settings menu of your router.
- At the initial login screen of your router, enter your custom credentials if you previously established any. If this is the first time you’re accessing your router settings menu, try the generic login credentials – admin as user and 1234 as password.
Note: There’s a consensus between most manufacturers regarding the generic credentials, but in case these don’t work, search online for the default credentials according to the router model you’re using. - Once you’re finally inside your router settings, look for the Advanced menu and see if there’s any menu named NAT Forwarding or similar. Inside the NAT Forwarding menu, you should find an option that will allow you to enable UPnP. When you see it, make sure it’s enabled, then save the current configuration.
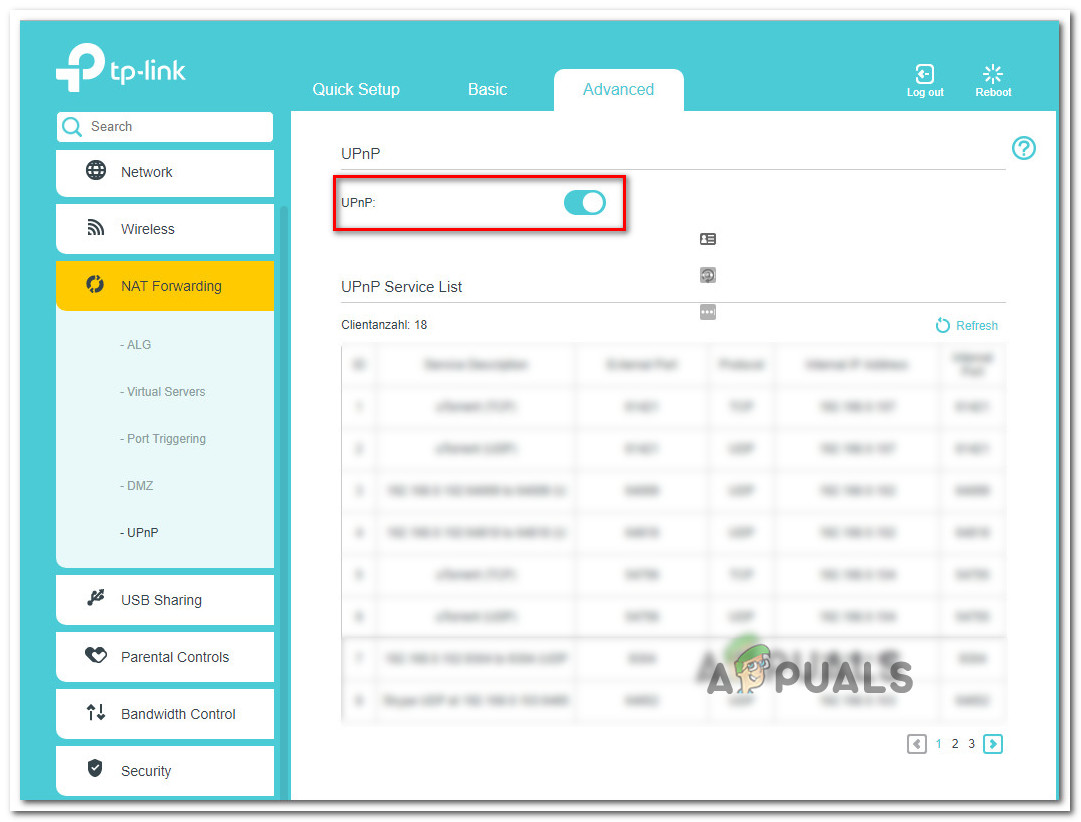
Enabling UPnP from your Router settings - Once you’ve made sure that UPnP is enabled, restart both your router and the console / PC where you’re playing the game and see if you successfully managed to fix the error.
In case this scenario was not applicable or you weren’t able to enable UPnP from your router settings, move down to the next potential fix below.
B. Forwarding the ports used by Overwatch manually
- Follow step 1 and step 2 from the guide above in order to access your router settings menu.
- Once inside, access the Advanced menu and look for an option called Port Forwarding or similar.
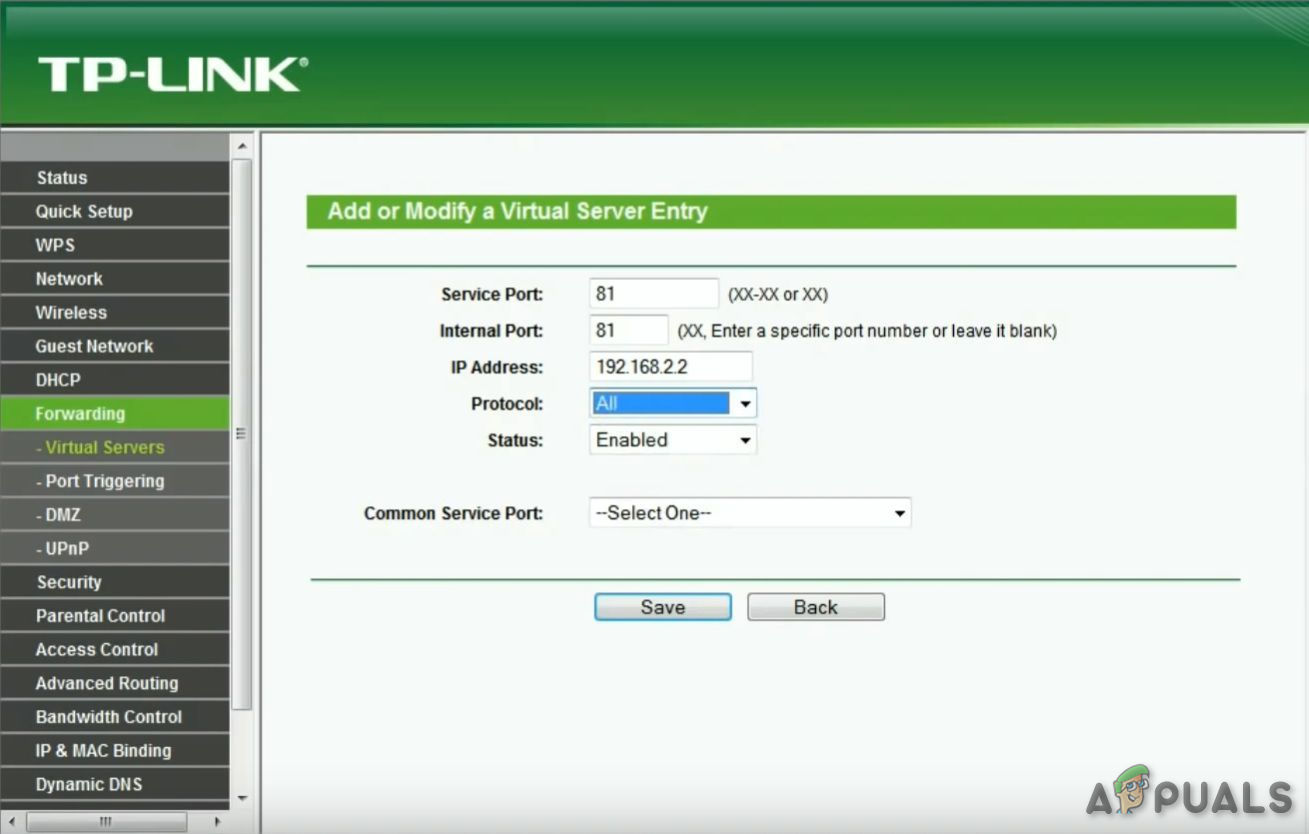
Port Forwarding Note: The exact names of these options and the screens you see will be different depending on your router manufacturer.
- After you find the menu that allows you to forward the ports manually, start adding the ports that Overwatch requires depending on your platform of choice:
Overwatch - Playstation 4

TCP: 1935, 3478-3480
UDP: 3074, 3478-3479

Overwatch - Xbox One

TCP: 3074
UDP: 88, 500, 3074, 3544, 4500

Overwatch - PC

TCP: 1119, 3724, 6113
UDP: 5060, 5062, 6250, 3478-3479, 12000-64000
- Once you successfully forwarded the required ports, restart both your router and your computer, then see if the problem is now resolved.
In case you’re still seeing the same error code occurring or the required ports were already forwarded, move down to the next potential fix below.
Migrating to Google’s DNS
As it turns out, an inconsistency with the default DNS can also be responsible for the apparition of the LC-202 Error. Some affected users have managed to fix the problem by migrating to the DNSs (Domain Name Systems) provided by Google and according to them, since they did it, the error stopped occurring altogether.
But keep in mind that depending on if you’re seeing this error on a PC, Xbox One, or PlayStation 4, the exact steps of changing the default DNS to Google’s equivalents will be different – this is why we’ve created 3 separate sub-guides that will show you how to set the Google DNS on PC, Xbox one and Ps4.
A. Using Google DNS on PC
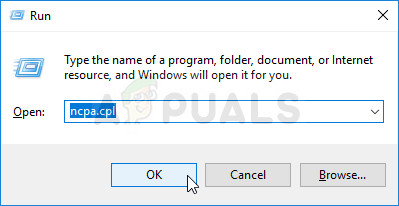
- Press Windows key + R to open up a Run dialog box. Next, type ‘ncpa.cpl’ and press Enter to open up the Network Connections window.
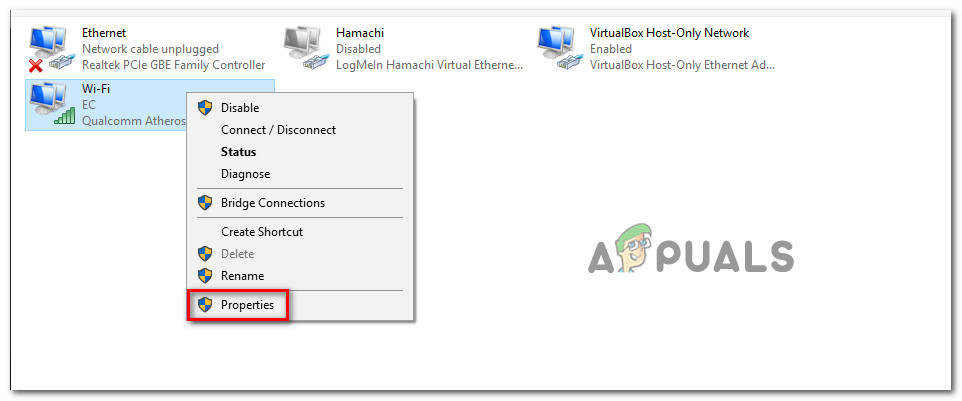
Run this in the Run dialog box - Once you’re inside the Network Connections window, right-click on Wi-Fi (Wireless Network Connection) and choose Properties if you’re using a wireless connection. In case you’re using a wired connection, right-click on Ethernet (Local Area Connection) instead.
Opening the Properties screen of your network - Once you’re inside the Wi-Fi or Ethernet Properties screen, go over to the Networking tab and then navigate to the This connection uses the following items section. Once you’re there, check the box associated with Internet Protocol Version 4 (TCP/IPv4) and then click on the Properties button.
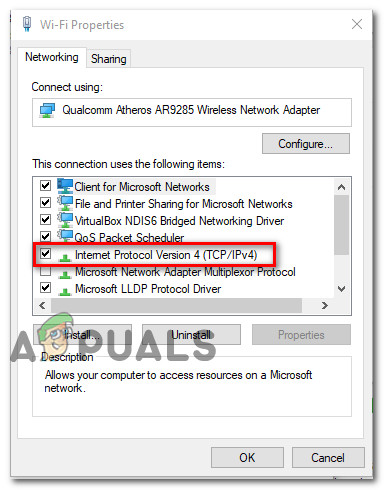
Accessing the Internet Protocol Version 4 settings - Once you’re inside the Internet Protocol Version 4 (TCP/IPv4) Properties screen, select the General tab, then check the box associated with Use the following DNS server address.
- Next, replace the Preffered DNS server and Alternate DNS server with the following values:
8.8.8.8
8.8.4.4
- Once you manage to modify the settings for TCP/IPv4, do the same thing for TCP/IPv6 by accessing the Internet Protocol Version 6 menu and setting the Preferred DNS server and Alternate DNS server to the following values:
2001:4860:4860::8888
2001:4860:4860::8844
- After you make the changes and save the current configuration, restart your PC, open Overwatch once the next startup is complete and see if the problem is now fixed.
B. Using Google DNS on Xbox One
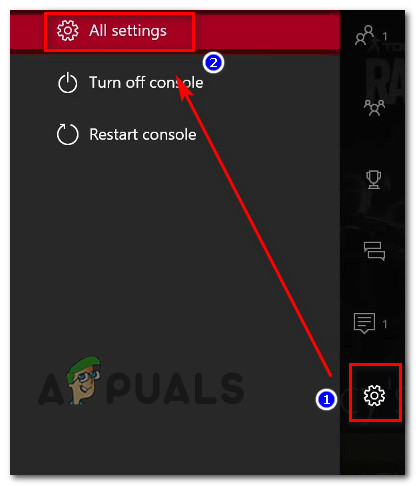
- From the main dashboard of your Xbox One menu, press the Xbox button on your controller to bring up the guide menu. Once inside, access the All Settings menu.
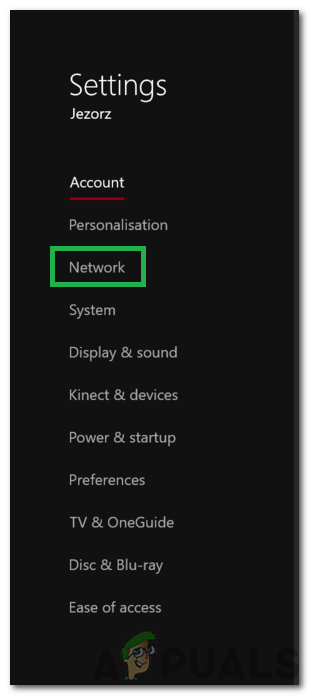
Accessing the Settings menu on Xbox One - Inside the Settings menu, look for the Network tab on the vertical menu on the right, then access the Advanced Settings sub-menu.
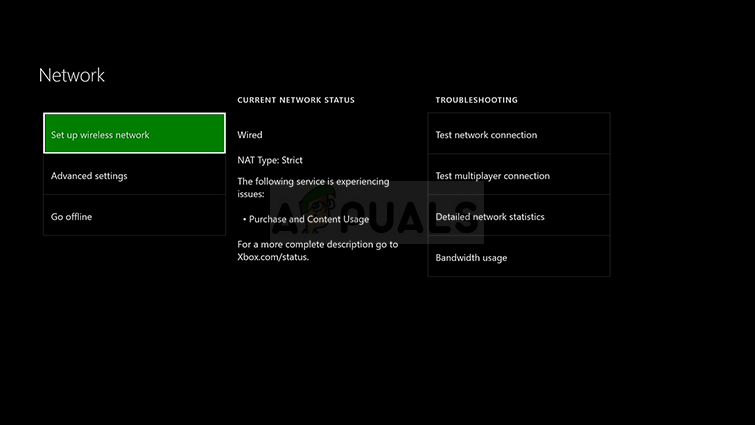
Accessing the Network menu - Inside the Network menu of your Xbox One console, select Advanced Settings from the section on the left.
Xbox ONE advanced network settings - Inside the Advanced Settings menu, choose DNS settings, then choose Manual at the next prompt.
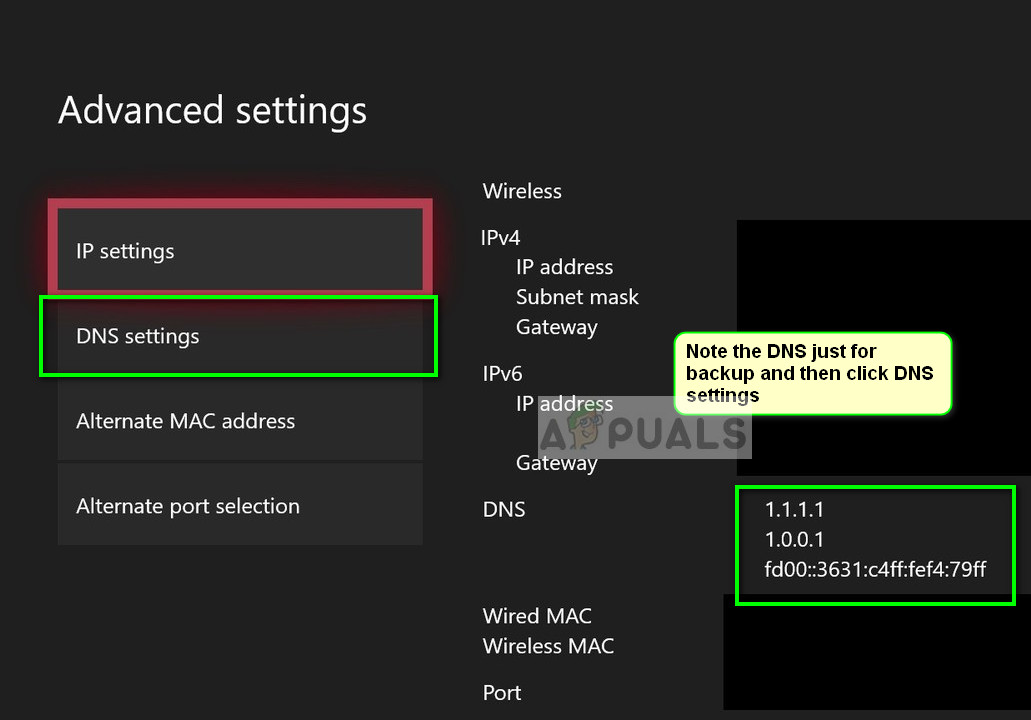
DNS Settings – Xbox - At the next screen, change the default DNS values to the following:
Primary DNS: 8.8.8.8
Secondary DNS: 8.8.4.4
Note: If you want to use IPV6, use these values instead:
Primary DNS: 208.67.222.222
Secondary DNS: 208.67.220.220
- Save the changes, restart your console and see if the problem is now fixed.
C. Using Google DNS on PlayStation 4
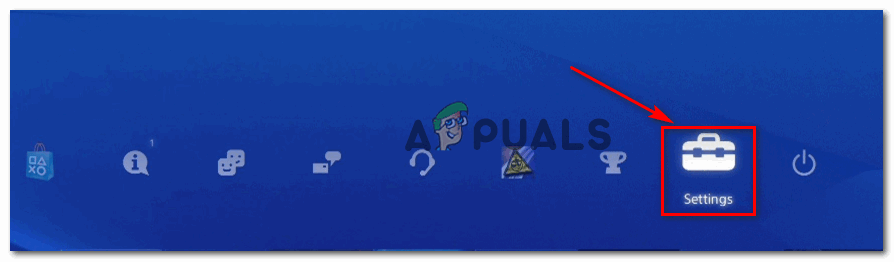
- From the main dashboard of your PS4 console, navigate to the Settings icon and press X to access the menu.
Accessing the Settings menu on PS4 - Inside the Settings menu, navigate to Settings > Network and then choose Set Up Internet Connection from the list of available options.

Clicking on the Setup Internet Connection Option - At the next screen, choose either Wi-Fi or LAN, depending on if you’re currently connected to a wireless or wired (ethernet) network.
- Next, choose Custom from the list of options and choose Automatic when you get asked about your IP Address.
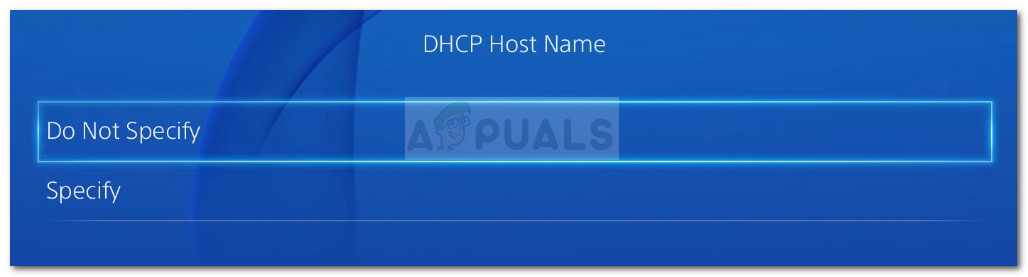
- When asked to set the DHCP Host Name, choose Do Not Specify.
DHCP Host Name - Once you finally get to the DNS settings, set them to Manual. Then, set the Primary DNS to 8.8.8.8 and the Secondary DNS to 8.8.4.4.
Note: If you want to use the Google DNS for IPV6, use the following values instead:Primary DNS - 208.67.222.222 Secondary DNS - 208.67.220.220
- Save the changes, restart your PS4 console, and see if the problem is fixed at the next computer startup.
In case the same problem is still occurring even after you modified the default DNS, move down to the next potential fix below.
Whitelisting Overwatch in Firewall settings (PC Only)
As it turns out, depending on your security settings that your Antivirus is currently configured with, this error might be facilitated by an overprotective AV suite that ends up blocking the connection between your PC and the game’s server.
If this scenario is applicable, you should be able to fix the problem by whitelisting the Overwatch executable in order to ensure that your security suite is not interfering with it. Several affected users have confirmed that the LC-202 Error was resolved after they whitelisted the main Overwatch executable and Battle.net launcher in Windows Defender.
Note: The instructions below will show you how to whitelist Overwatch + Battle.net from Windows Defender. If you’re using a 3rd party suite, search online for specific steps on adding the game to the exception list or follow the next guide below for instructions on uninstalling it altogether.
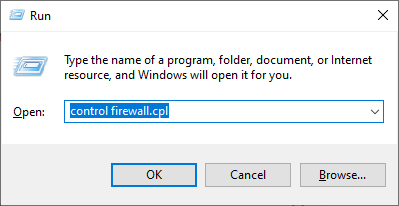
- Press Windows key + R to open up a Run dialog box. Next, type ‘control firewall.cpl’ to open up the classic Windows Firewall interface.
Accessing the Windows Defender Firewall - Once you’re inside the main menu of Windows Defender Firewall, click on Allow an app or feature through Windows Defender Firewall from the left side menu.
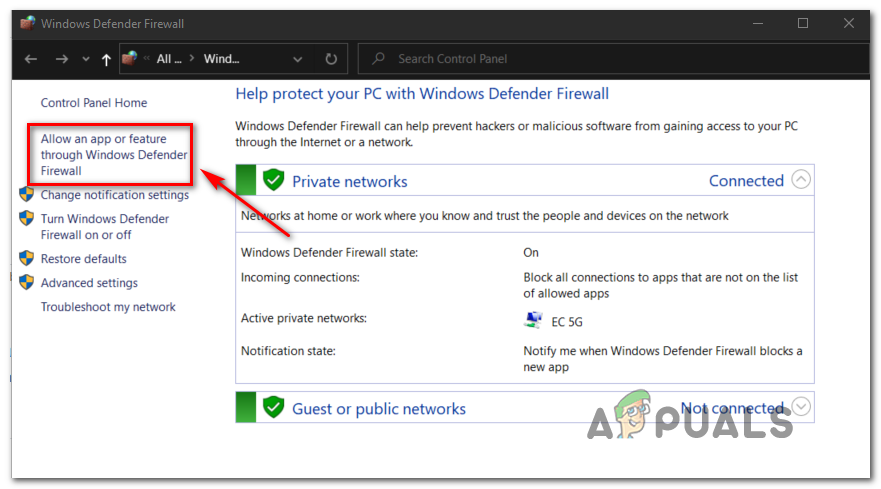
Allowing an app or feature through Windows Defender - Inside the Allowed apps menu, click on Change settings button, then click Yes at the UAC (User Account Control) prompt.
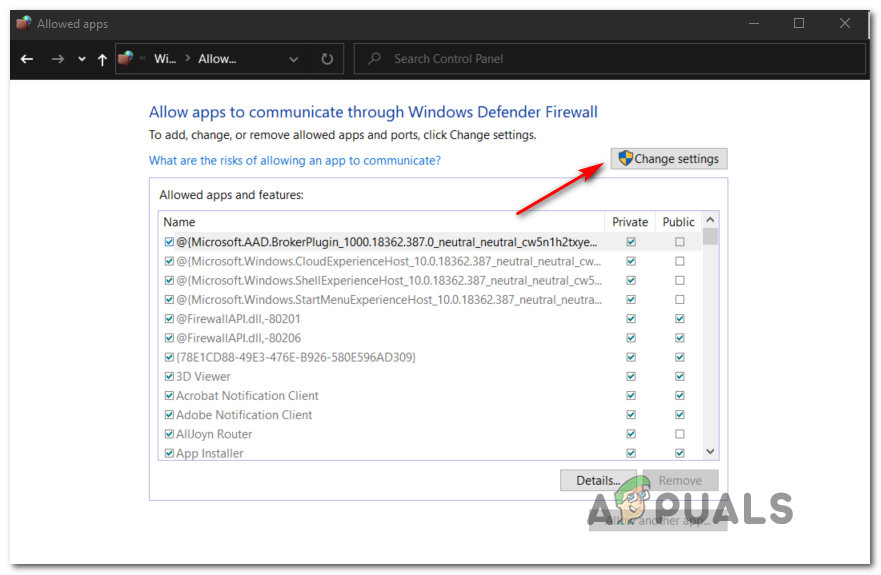
Changing the Settings of the Allowed Items in Windows Firewall - Once you have full access, scroll down through the list of allowed items and see if Overwatch and Battle.net both have dedicated entries. If you do manage to locate them, ensure that both boxes (Private and Public) are checked, then click Ok to save the changes.
Note: In case there aren’t any entries for Overwatch and Battle.net in this list, add them manually by clicking on Allow another app and clicking the Browse button. Next, navigate to the location of the game executable and add every entry manually.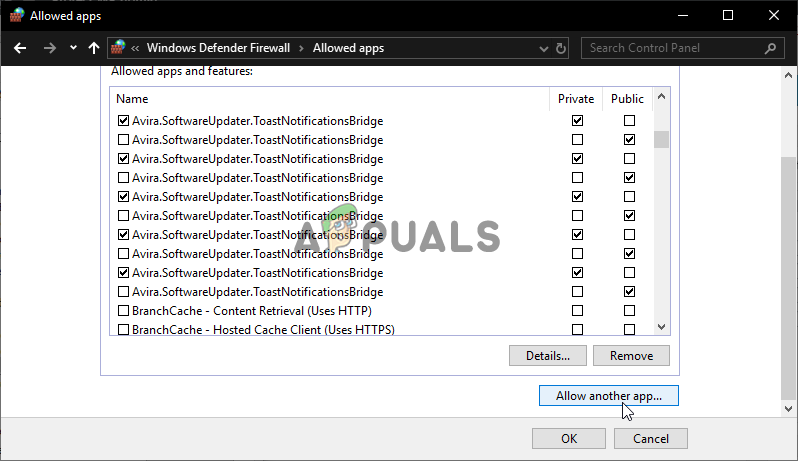
Allow another app - Once both Overwatch’s main executable and the game’s launcher (Battle.net) are whitelisted in Windows Firewall, restart your computer and see if the problem is fixed at the next computer startup.
In case you’re using a 3rd party suite or whitelisting didn’t make any difference, move down to the next potential fix below.
Uninstalling Overprotective Firewall (PC Only)
In case you’re using a 3rd party AV suite and whitelisted didn’t work for various reasons, the most efficient way of making sure that you’re not dealing with some type of interference is to simply uninstall the antivirus altogether.
If the LC-202 Error issue is still occurring even after you do this, you can safely reinstall the AV suite as you have successfully eliminated it from the potential culprit list.
Here’s a quick guide on uninstalling an overprotective firewall:
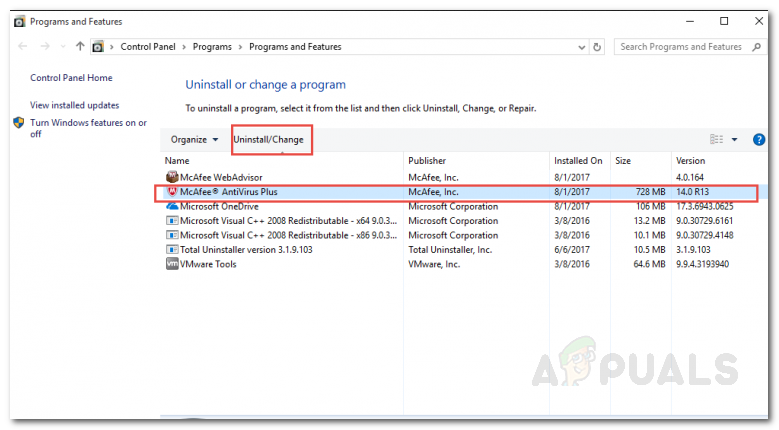
- Press Windows key + R to open a Run dialog box. Next, type ‘appwiz.cpl’ inside the text box and press Enter to open up the Programs and Files menu.

Typing in “appwiz.cpl” in the Run prompt - Once you are finally inside the Programs and Features menu, scroll down through the list of installed applications and locate the 3rd party AV suite that you want to uninstall. To start this process, right-click on the program you want to get rid of and click on Uninstall from the newly appeared context menu.
Uninstalling 3rd party Antivirus suite - At the next screen, follow the on-screen instructions to complete the uninstallation, then restart your computer.
- Once you have successfully removed your 3rd party suite, launch Overwatch once again and see if the problem is still occurring.
In case this scenario was not applicable as you’re encountering the problem on a consol, follow the next method below.
Reinstalling the game (Console Only)
As it turns out, a lot of affected users that we’re encountering the LC-202 Error on a console have confirmed that the issue stopped occurring after they reinstalled Overwatch on Xbox One or Ps4.
Of course, the steps of doing this will be different depending on the console that you’re encountering the issue on. Because of this, we’ve put together two different sub-guides – one for PS4 and one for Xbox One. Follow the one applicable to your console of choice.
A. Reinstalling Overwatch on Xbox One
- On the main dashboard of your console, press the Xbox button on your controller, then use the guide menu to navigate to the My games & Apps menu.
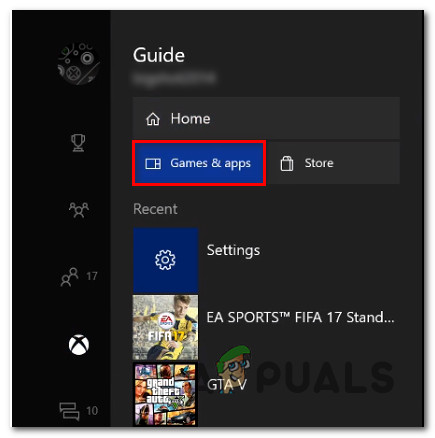
Accessing the Game & apps menu - Inside the Game & Apps menu, scroll down through the list of installed applications and locate Overwatch.
- Next, select Overwatch and press the Start button to choose Manage game from the newly appeared context menu.
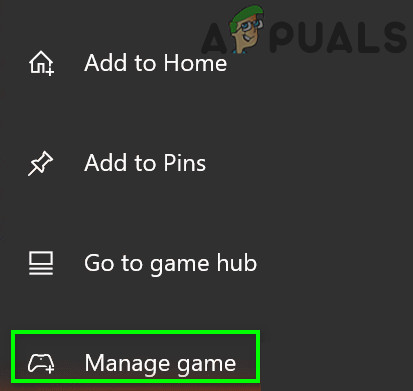
Manage Overwatch game - Once you get to the next menu, select Uninstall all and follow the on-screen instructions to ensure that you’re uninstalling both the base game along with every add-on and installed update.
Note: Keep in mind that this operation will not end up affecting your saved games. - After the uninstallation is complete, reboot your console, then go ahead and reinstall Overwatch from scratch.
- When the installation is complete, launch Overwatch again and see if the problem is now fixed.
B. Reinstalling Overwatch on Ps4
- From the main dashboard menu of your PS4, access the Library menu.

Accessing the Library menu on your PS4 - From the next menu, select Games (from the left-hand side of the screen), then move over to the right-hand section, locate the entry associated with Overwatch and press the Options button on your controller.
Next, select the Delete option from the newly appeared context menu.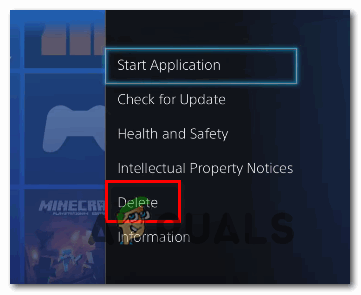
Deleting the game via the context menu on Ps4 - Once the uninstallation is complete, reboot your console, then reinstall the game once the next startup is complete.
- Access your Library once again, re-download and install Overwatch once again and see if the problem is now fixed.


