Fix: Netflix Error 139 (Nferr_Mc_Authfailure) on Apple Devices
The Netflix Error 139 usually indicates a network connectivity issue that prevents Apple devices from accessing Netflix. It’s often preceded by the following message: “A problem occurred while playing this item” and will occur on iOS devices (iPhone, iPad) and on macOS devices (MacBook, Apple PC), and on Apple TV.
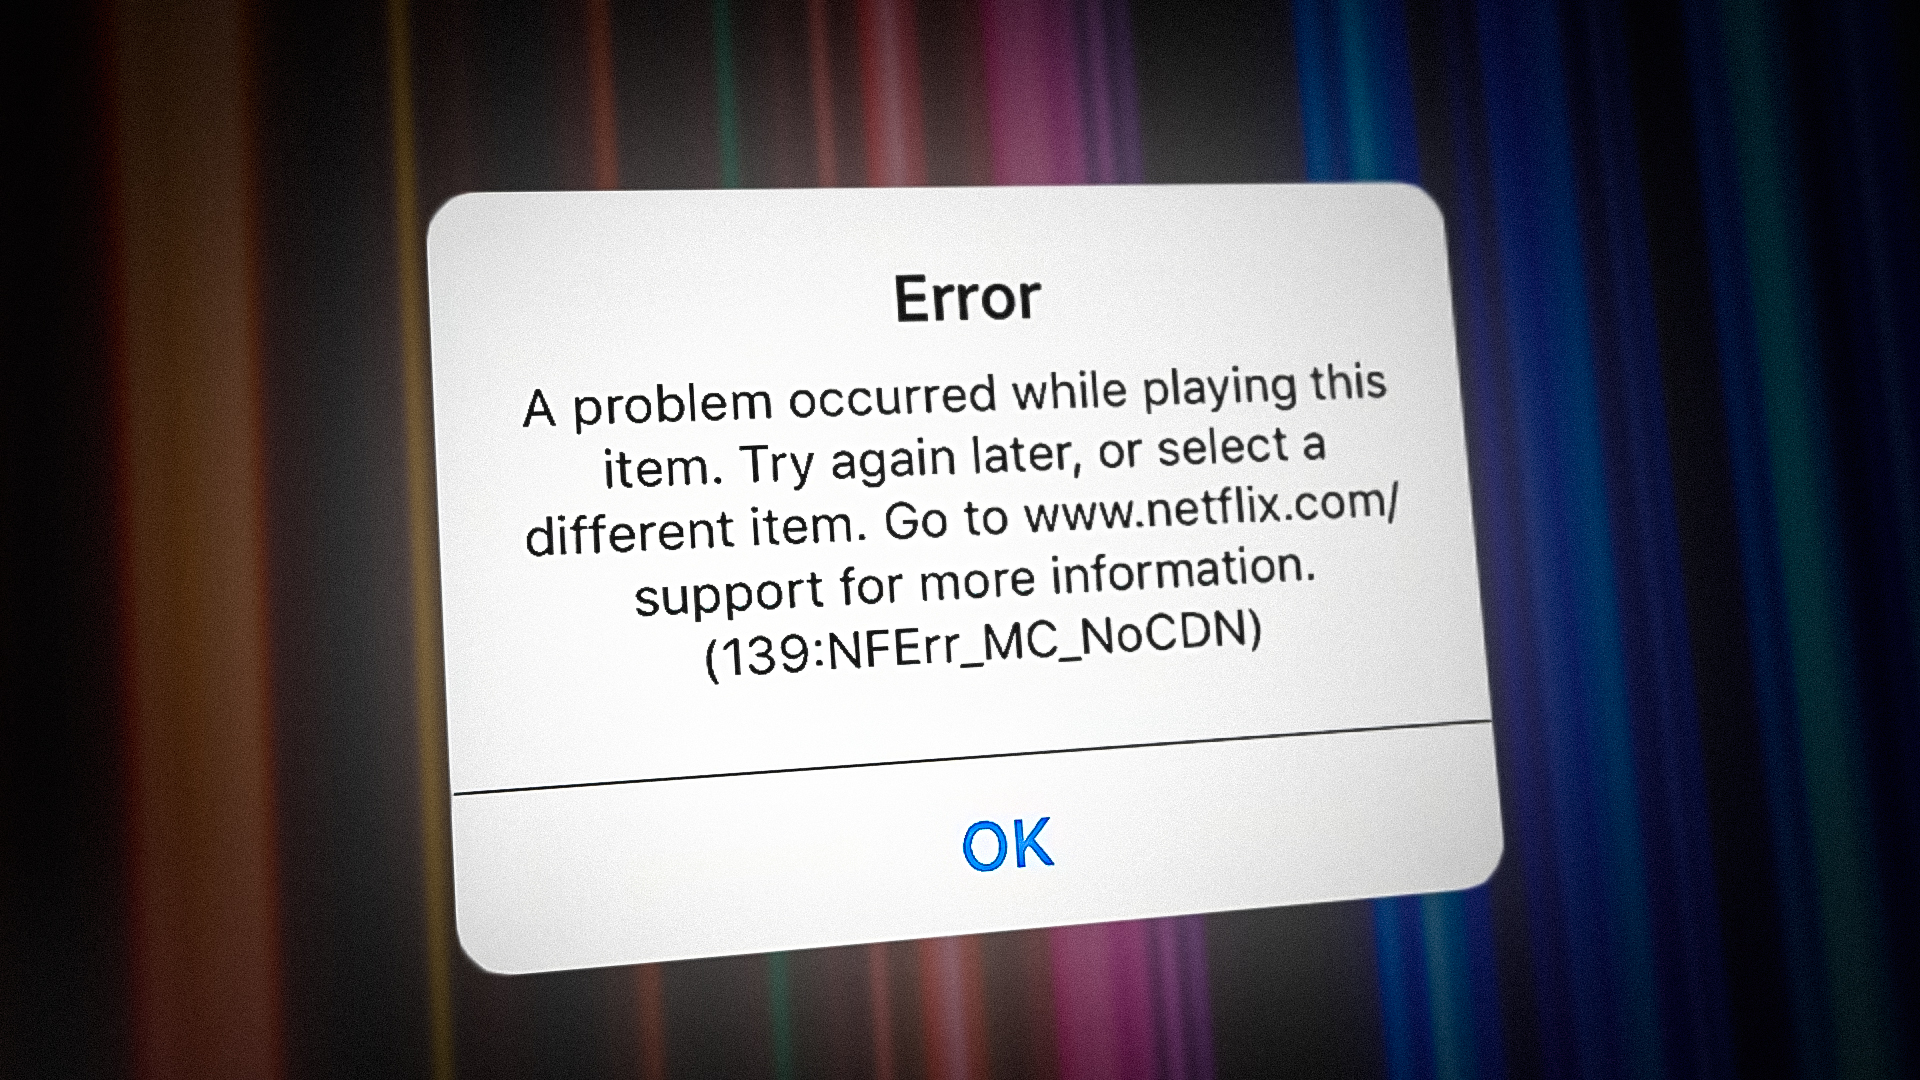
If you see this error on every device connected to your home network, the most likely cause is an account permission issue. Other potential reasons you might see the “A problem occurred while playing this item” (error 139) include a network inconsistency, a timezone mismatch, or an account problem that can only be resolved by a Netflix support agent.
Here’s a list of confirmed methods that other affected Apple users have successfully used to bypass the Error 139 (Nferr_Mc_Authfailure) when streaming content from Netflix:
1. Sign out from all devices
If you experience this issue on every Apple device that’s using this Netflix account, the first thing you need to do is sign out from all devices before logging back in and initiating streaming once again.
Note: This method is even more likely to work if all devices are connected to the same Wi-Fi Network.
To fix this particular instance of the 139 error, sign in with your Netflix account on a web browser and trigger an account-wide sign-out from all devices from the Account tab.
Here’s a quick step-by-step guide on how to do this:
Note: If possible, follow the instructions below on a desktop device. If you are forced to use a mobile device, make sure you’re using desktop view.
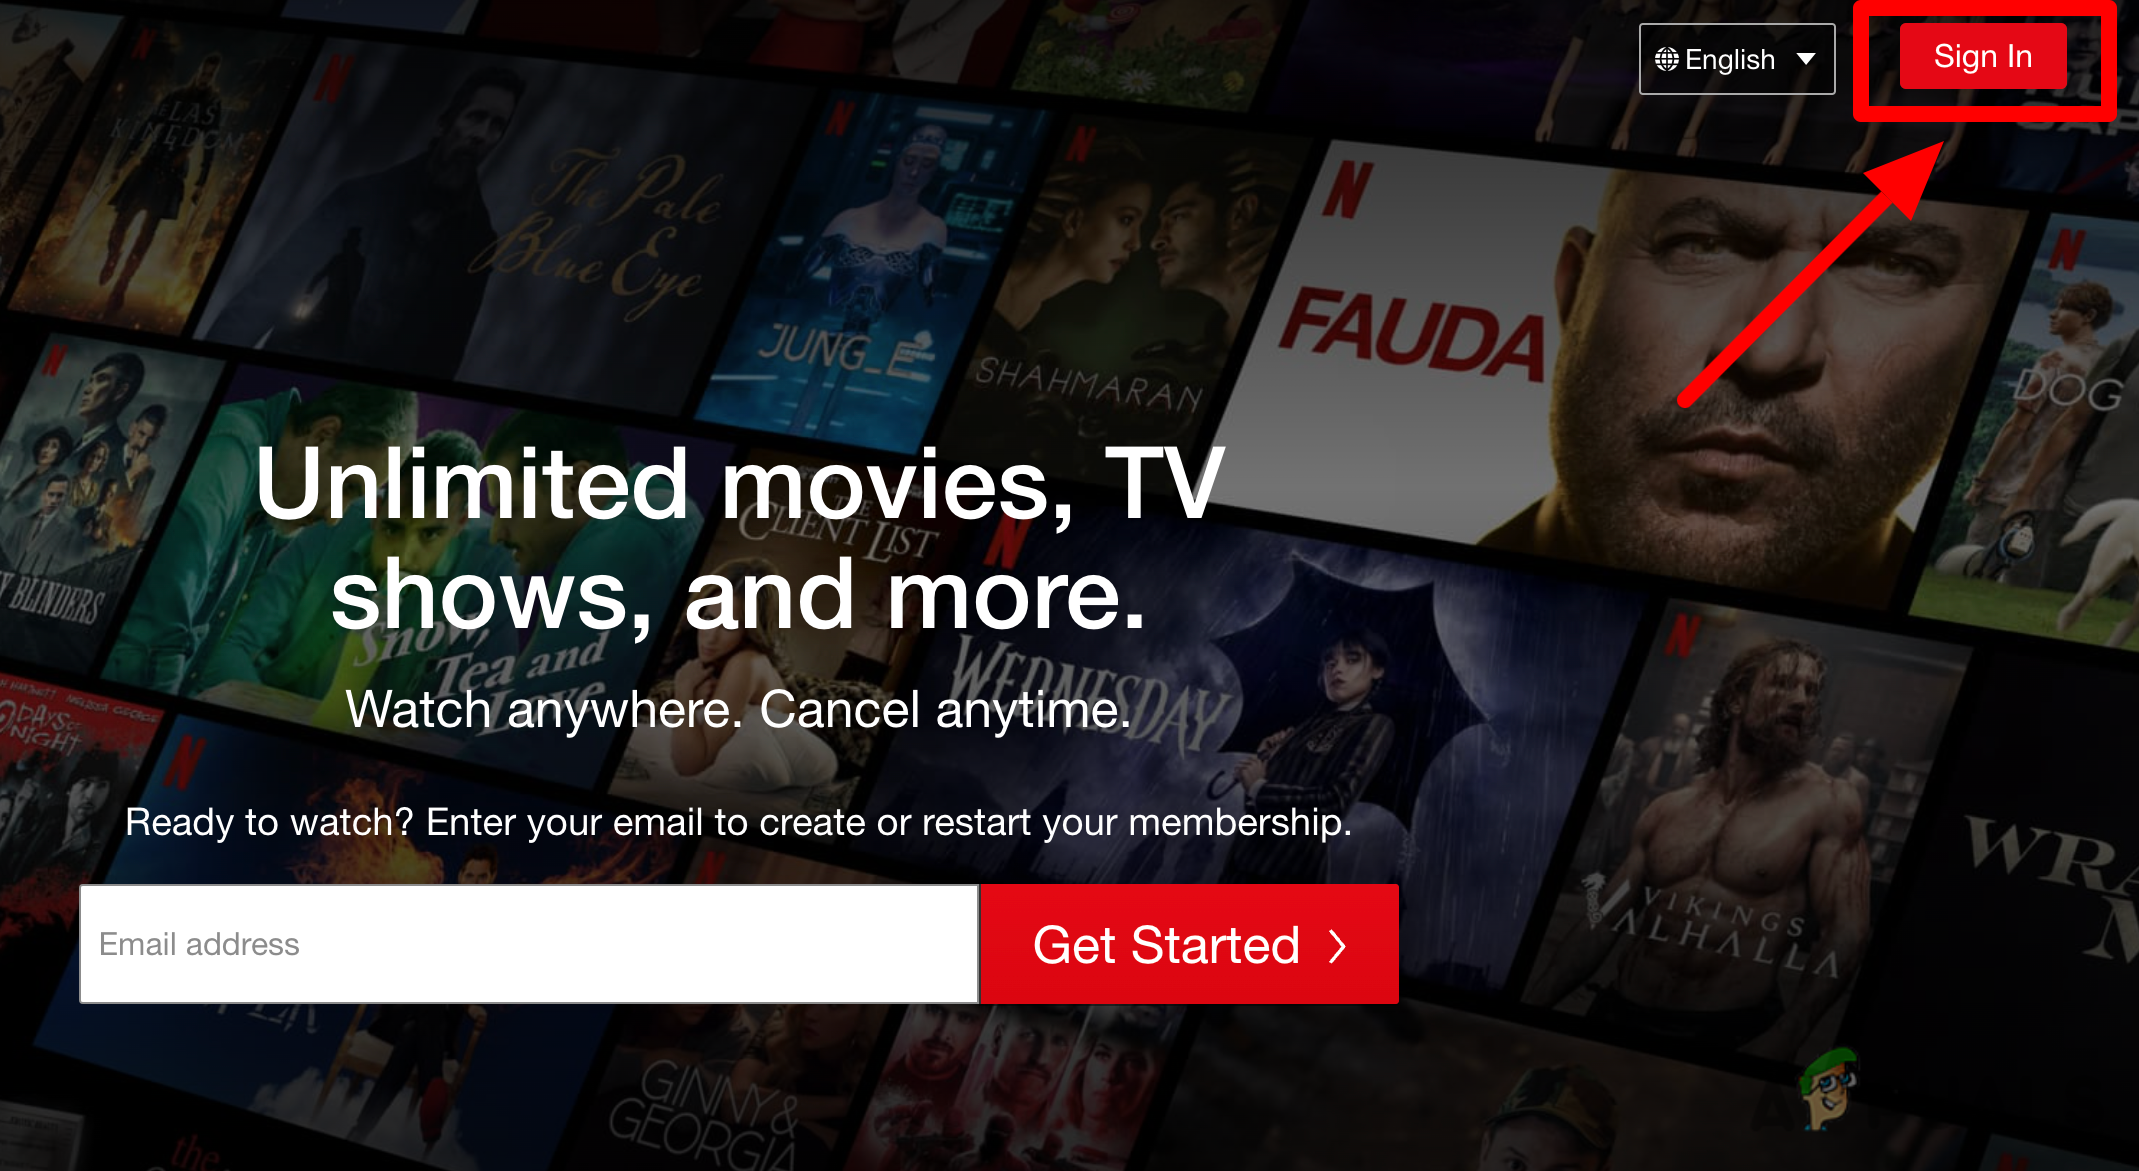
- Open your browser and open the root page of Netflix.
- Click the Sign In button at the top right corner of your screen and sign in to your Netflix account with your credentials.

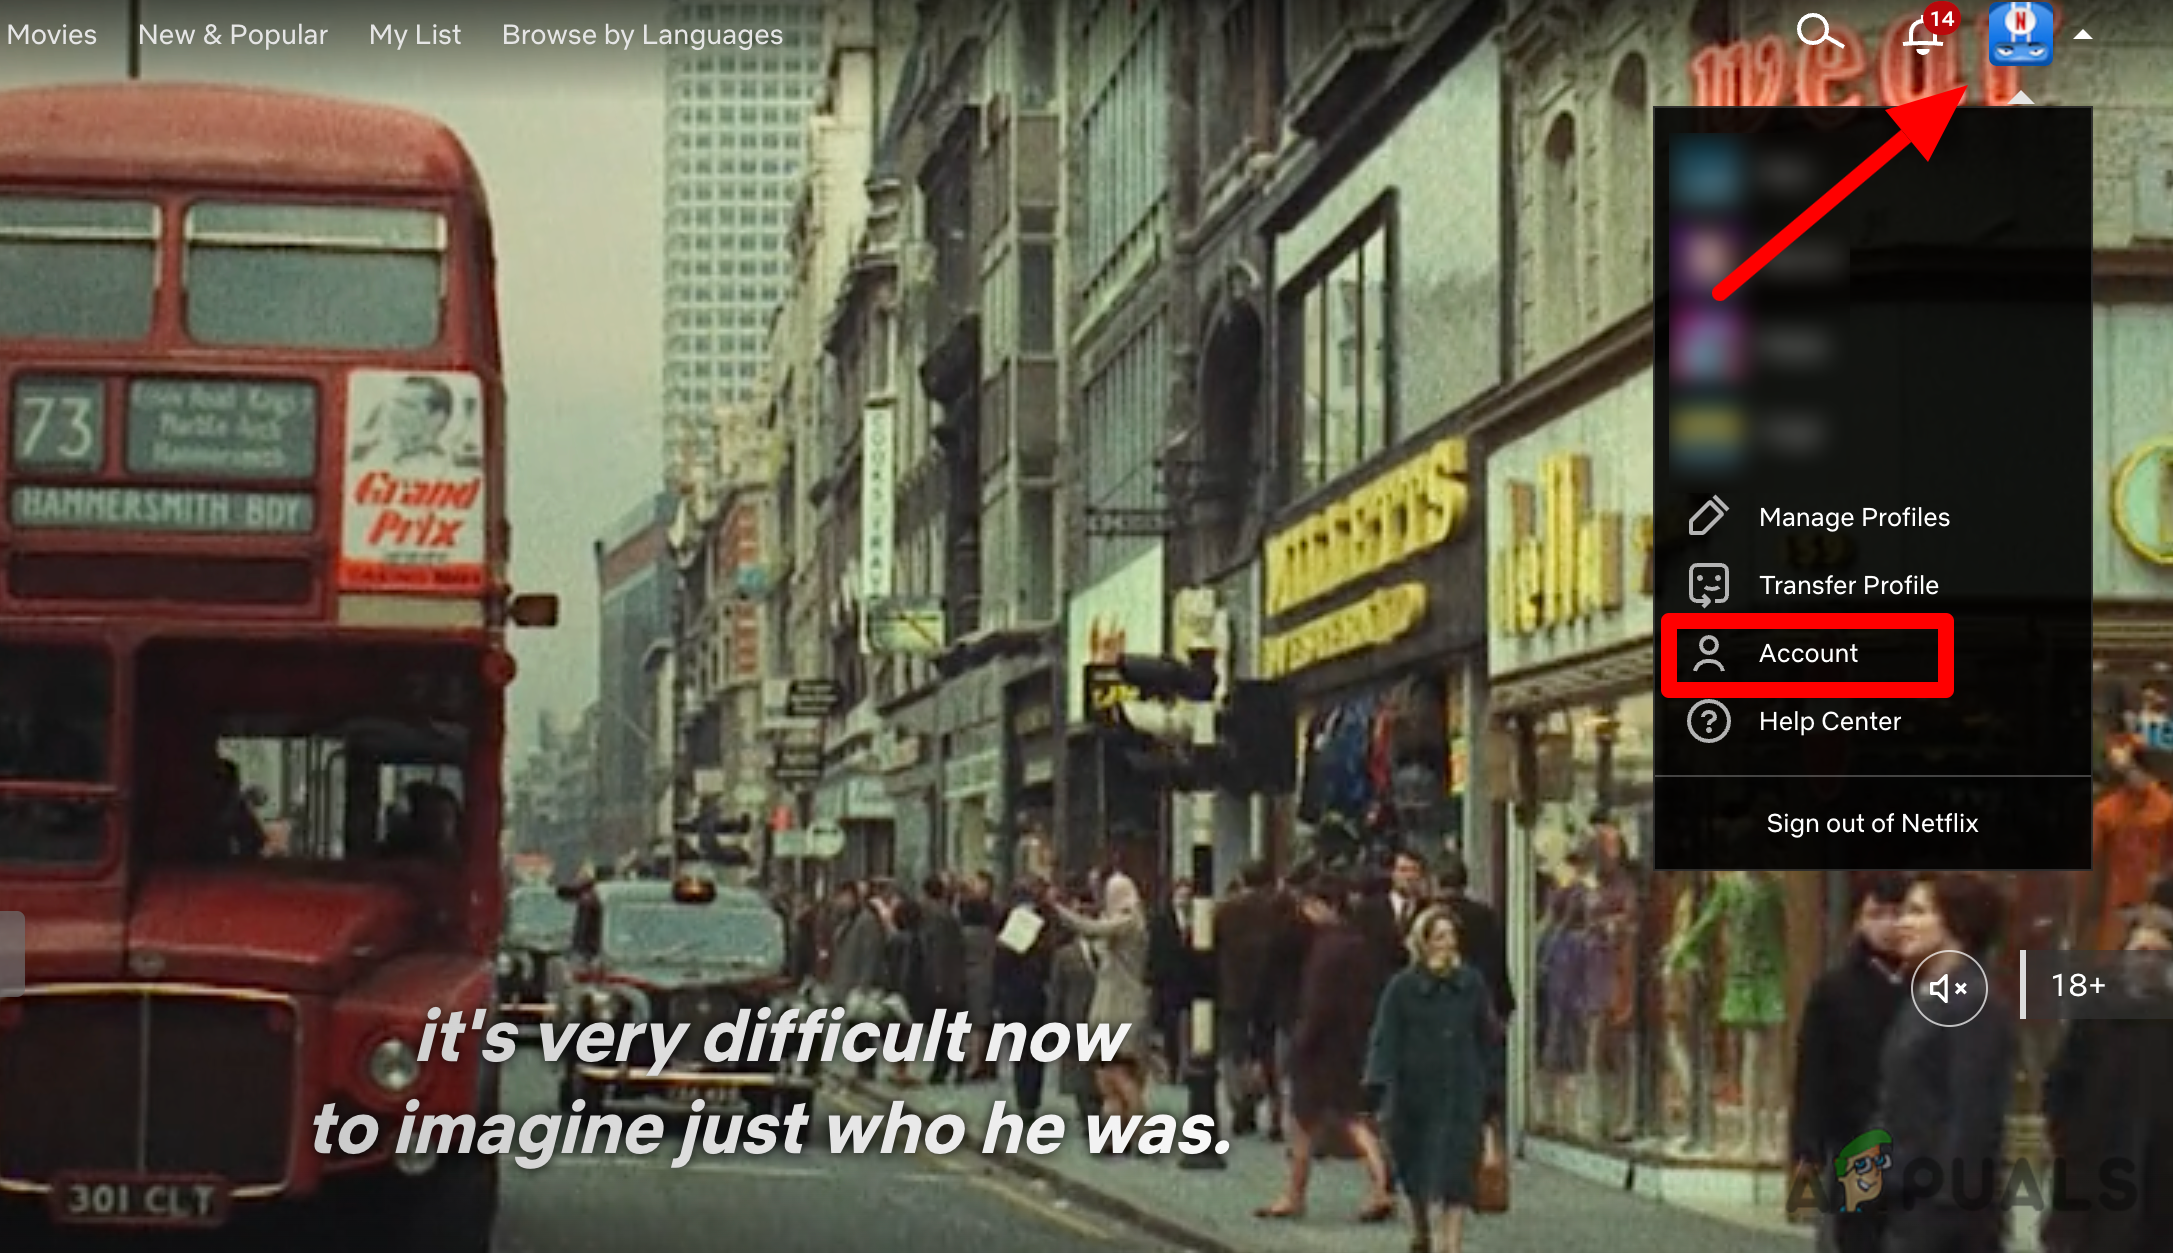
Signing in with your Netflix account - Once you are logged in to your account, click your account icon at the top-right corner of the screen.
- From the drop-down menu that just appeared, click (or tap) on Account.
Click on Account from the context menu - Once you are on the Account page, go under Security and click on the Sign out of all devices hyperlink.
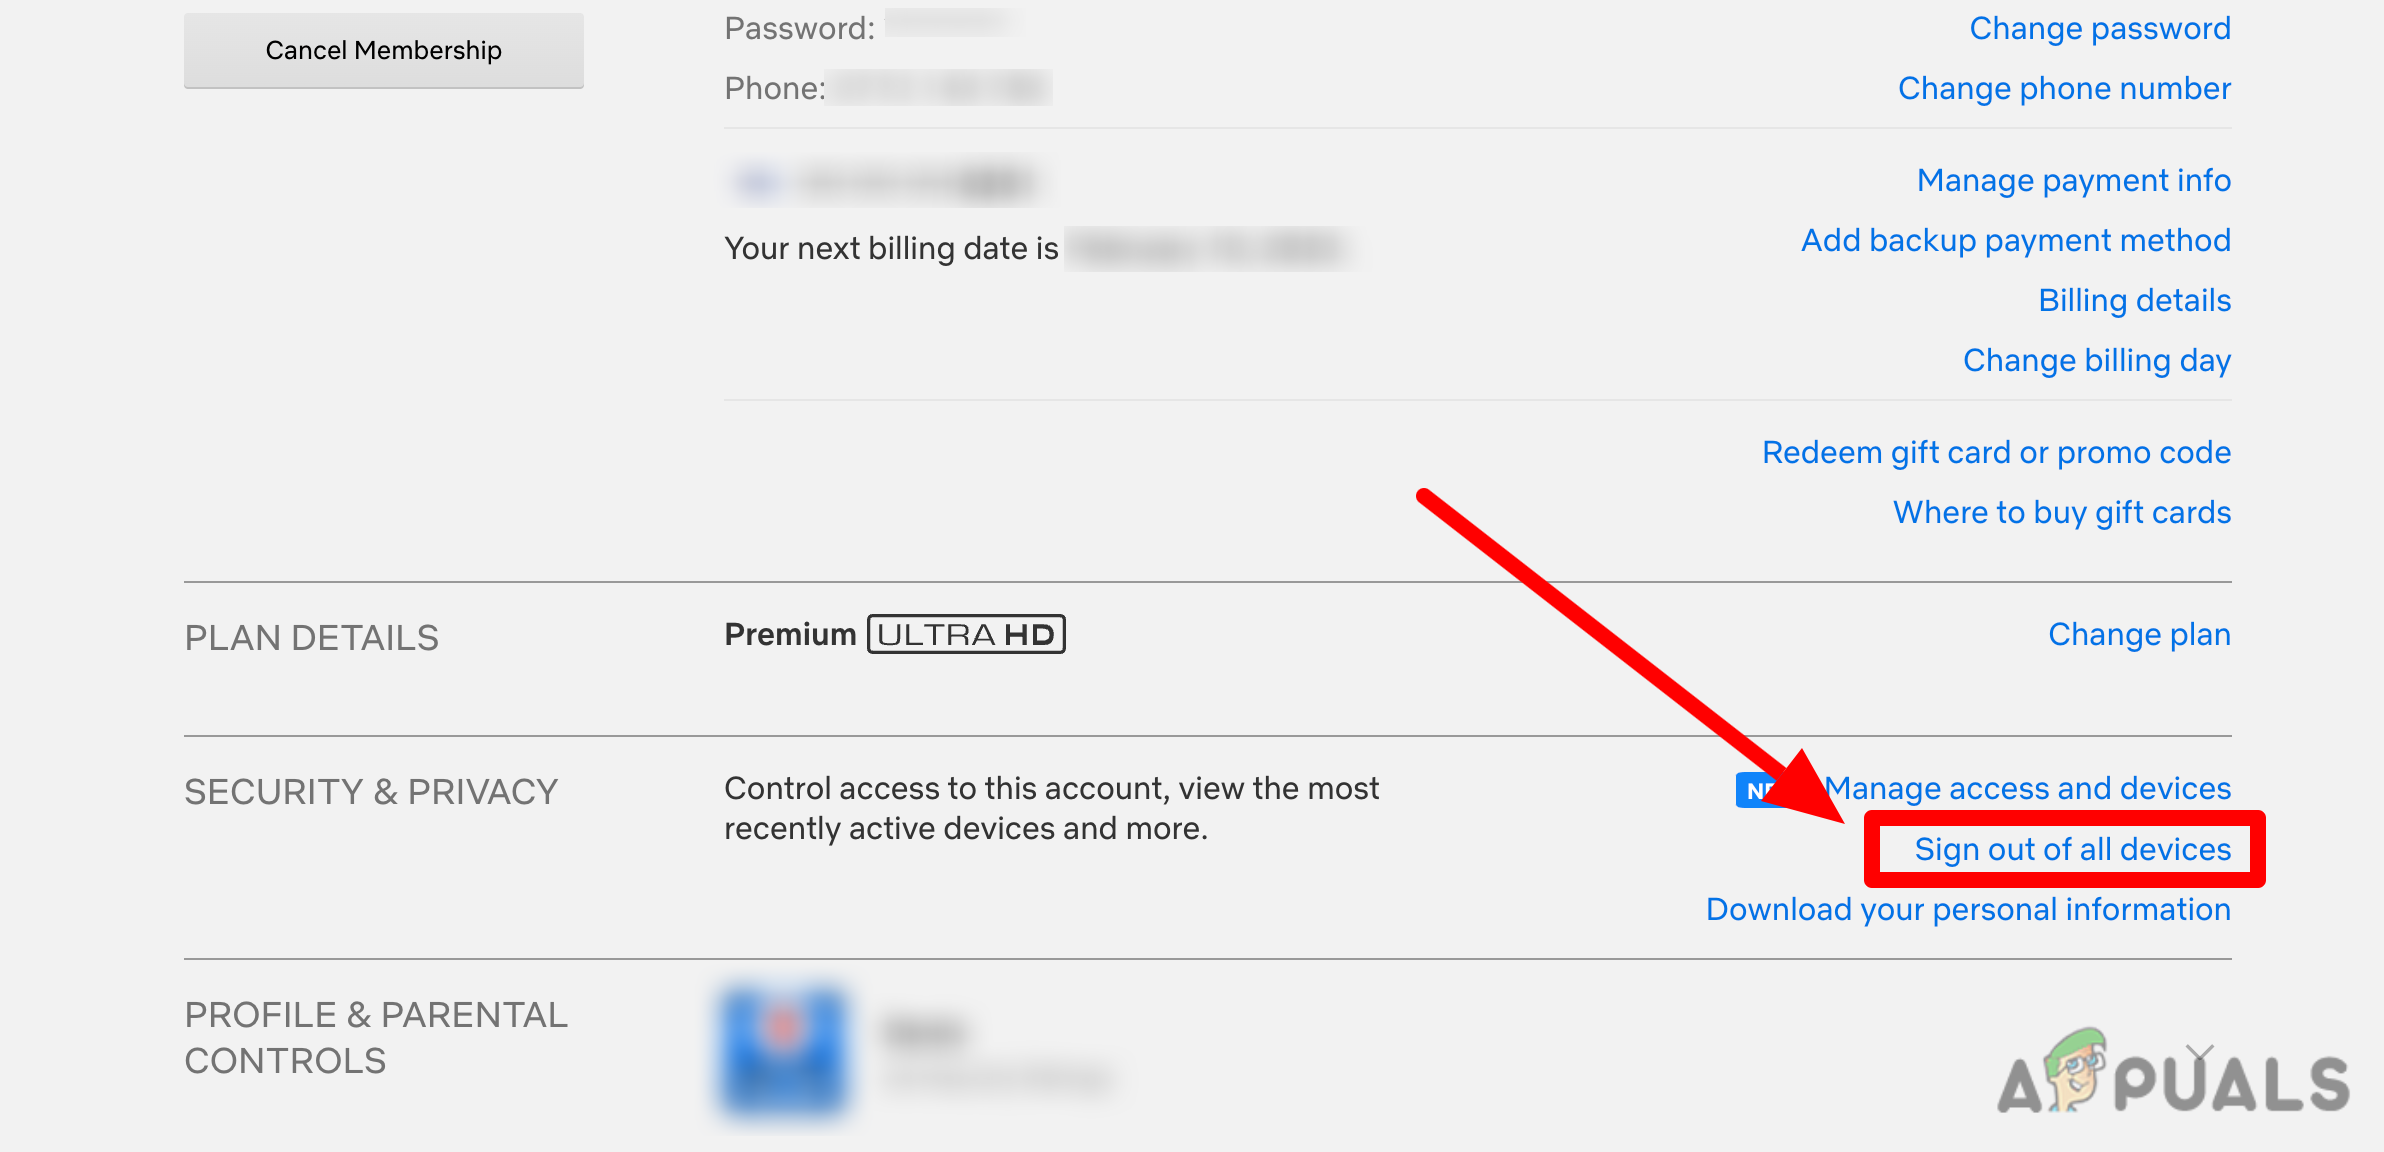
Clicking on the ‘Sign out of all devices’ hyperlink - Click on Sign out again to confirm your choice, then wait until the screen refreshes.
- Return to the device that was throwing the error and check if the problem is now fixed.
2. Stream Netflix from Wi-Fi Hotspot (if applicable)
In case you only see this error on your macOS while connected to the home network, a quick workaround will be to create a Hotspot from your Apple device and connect your desktop to it.
Note: This will be effective in situations where the problem is occurring due to network inconsistency.
You can use this workaround even if your iPhone doesn’t have mobile data and is also connected to the same home network. Filtering the connection through a mobile device will bypass most ISP-side Level 3 nodes that might cause this problem.
Here’s how to create a Wi-Fi Hotspot on your iOS device, then connect your macOS device to it:
- Unlock your iPhone and tap on Settings from the home screen.
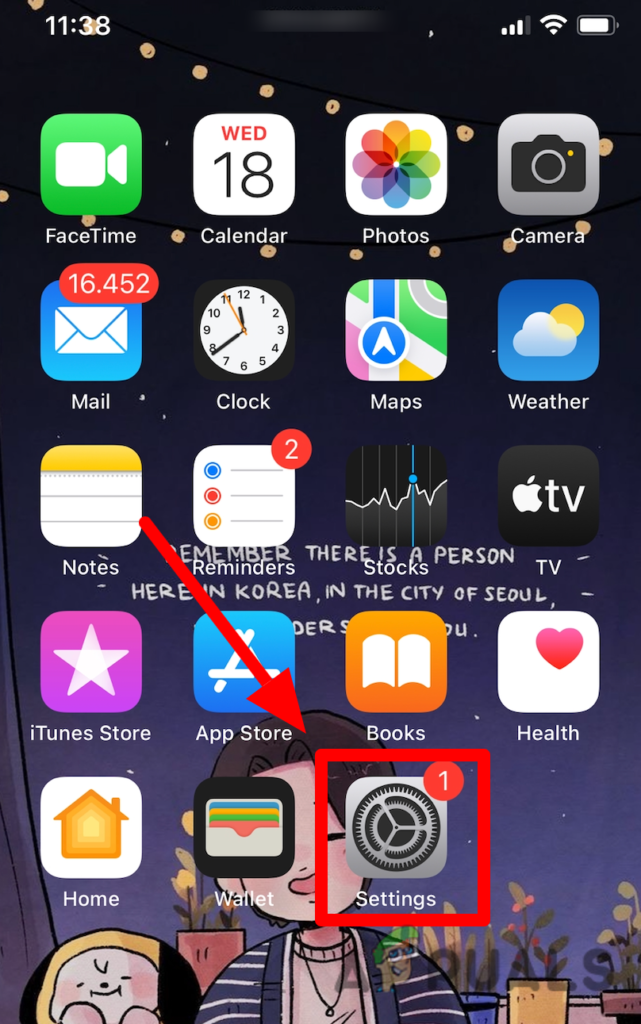
Go to the Settings menu - Inside the settings menu, scroll down to Personal Hotspot and tap on it.
- Turn on the Allow others to join toggle from the Personal Hotspot tab.
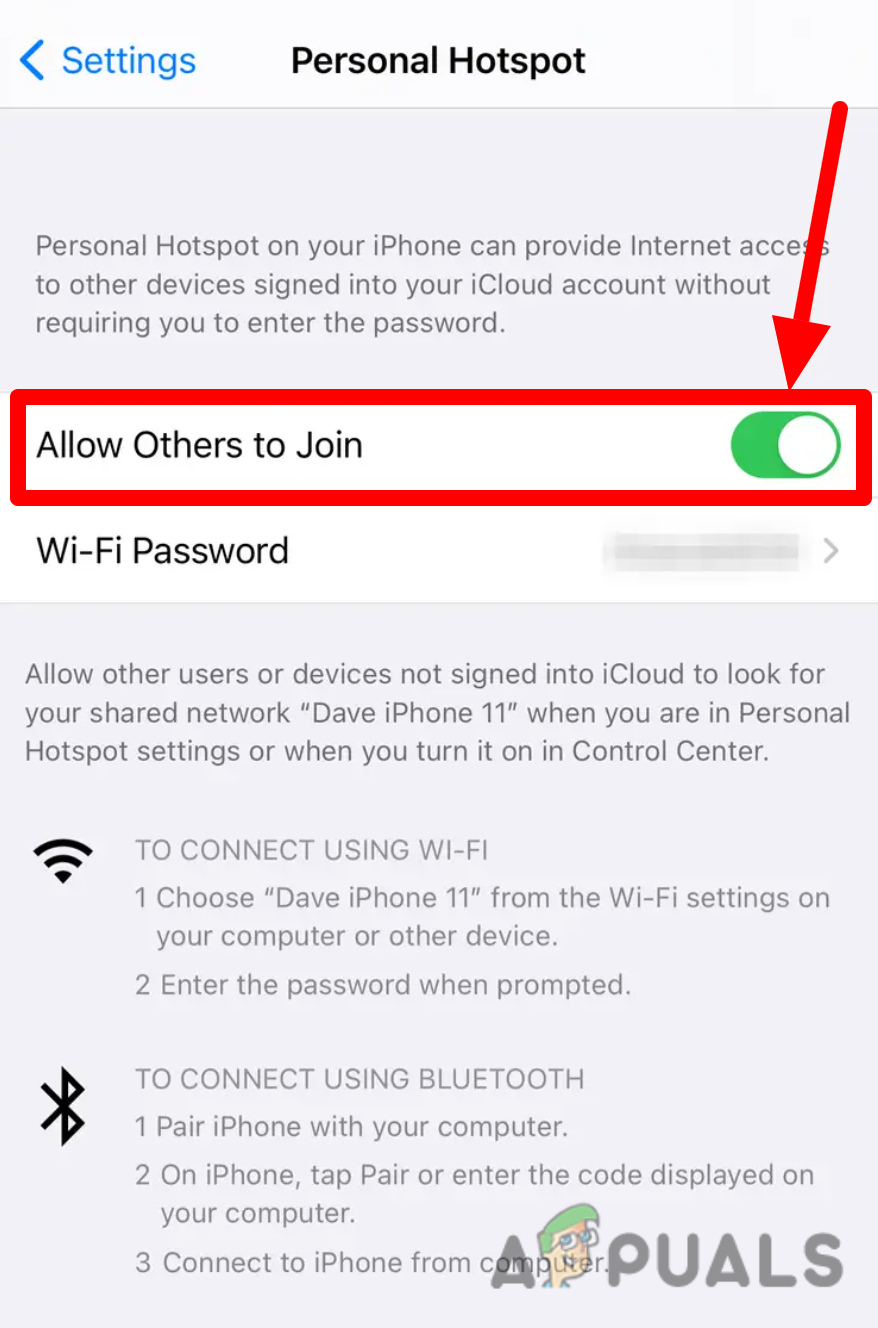
Turn on the ‘Allow others to Join’ toggle Note: If you can’t find Personal Hotspot on the Settings menu, tap Cellular and then on Personal Hotspot. This is highly dependent on your iOS version.
- From the next screen, create the hotspot and take note of the Wi-fi Password.
- Once the Hotspot is created, move over to your Mac.
- Use the Menu bar click on the Wi-fi status Icon and choose the same hotspot that you previously created on your iPhone.
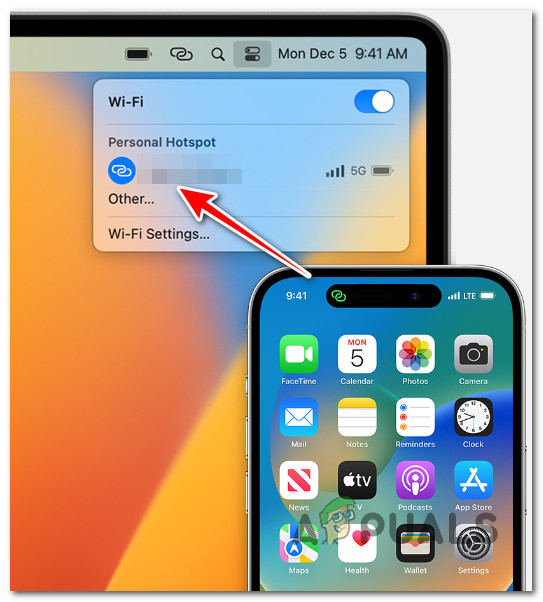
Connect to the iPhone hotspot - Type in the Password that you previously took note of at step 4 and press the Return key to connect.
- Now that your Mac is connected to the iPhone’s hotspot, start streaming from Netflix once again and see if the 139 error is now fixed. Note: When you’re done with the Wi-Fi hotspot, you can disable it by picking up your iPhone and going to Settings > Personal Hotspot or Settings > Cellular> Hotspot.
3. Set the Timezone to Apple TV to Automatic (if applicable)
If you see this error occurring on an Apple TV but all your other Apple devices are capable of streaming Netflix without throwing the 139 error, check the currently assigned timezone in your Apple TV settings.
Note: TvOS is very aggressive with DRM checks. If you previously overridden the timezone settings on your Apple TV, there’s a chance streaming is affected because you are in a physically different location than the one set under Apple TV Settings > General.
If the issue is occurring due to a timezone mismatch, other streaming applications (Hulu, HBO Max, Amazon Prime) are also likely affected.
In case this particular scenario is applicable, follow the steps below to modify the Date & Time settings of your Apple TV and enable automatic timezone.
Here’s what you need to do:
- The first thing that you need to do is to make sure that your Apple TV is connected to your home Wi-Fi.
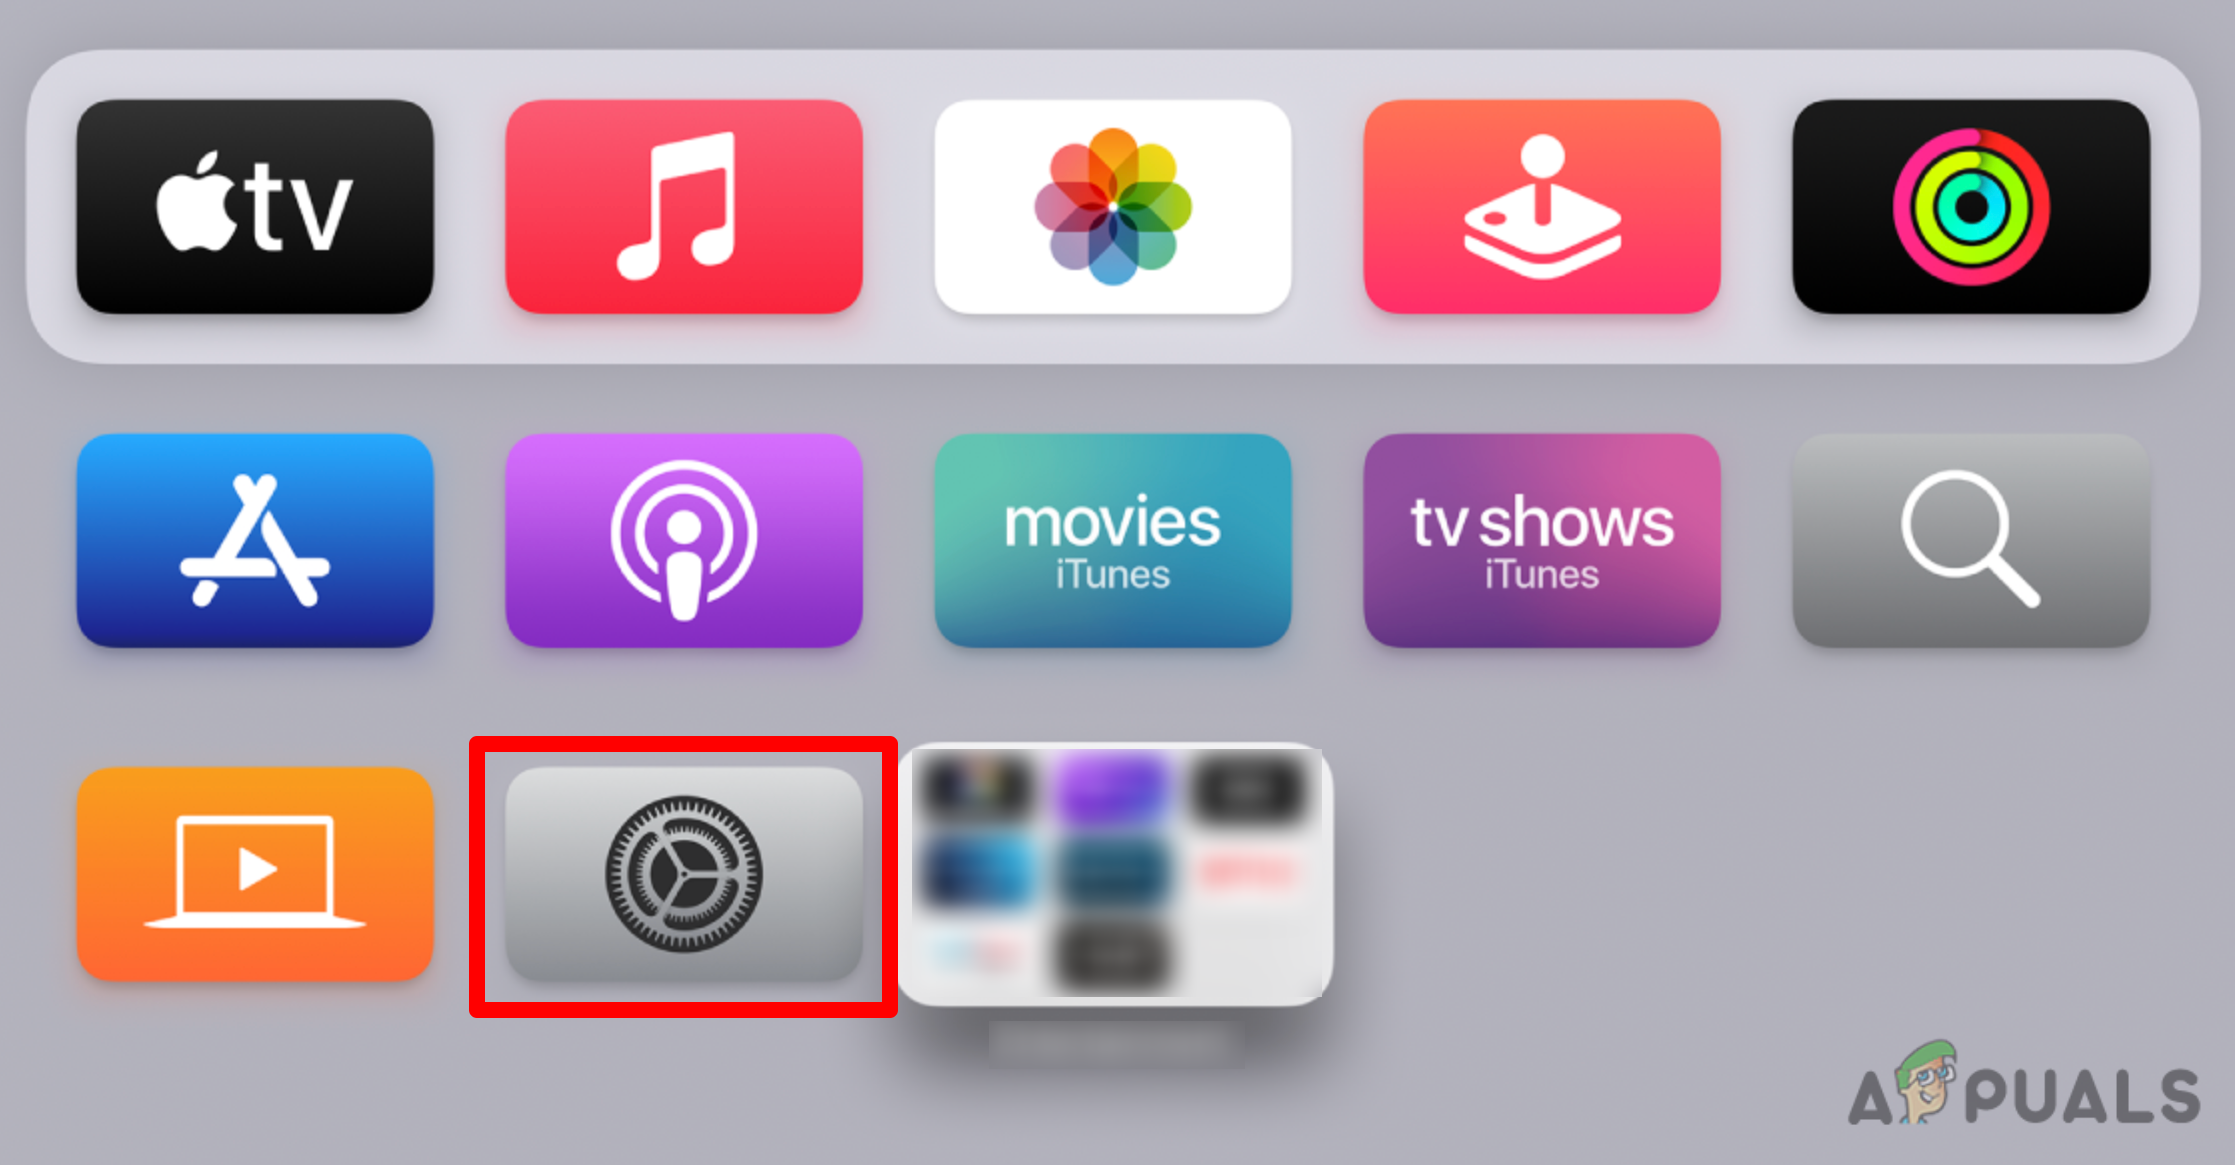
- From the home screen of your TvOS, go to Settings, then navigate to the General tab.
Access the Settings menu - Scroll down and under the Data & Time section, make sure that Set Automatically is turned on.
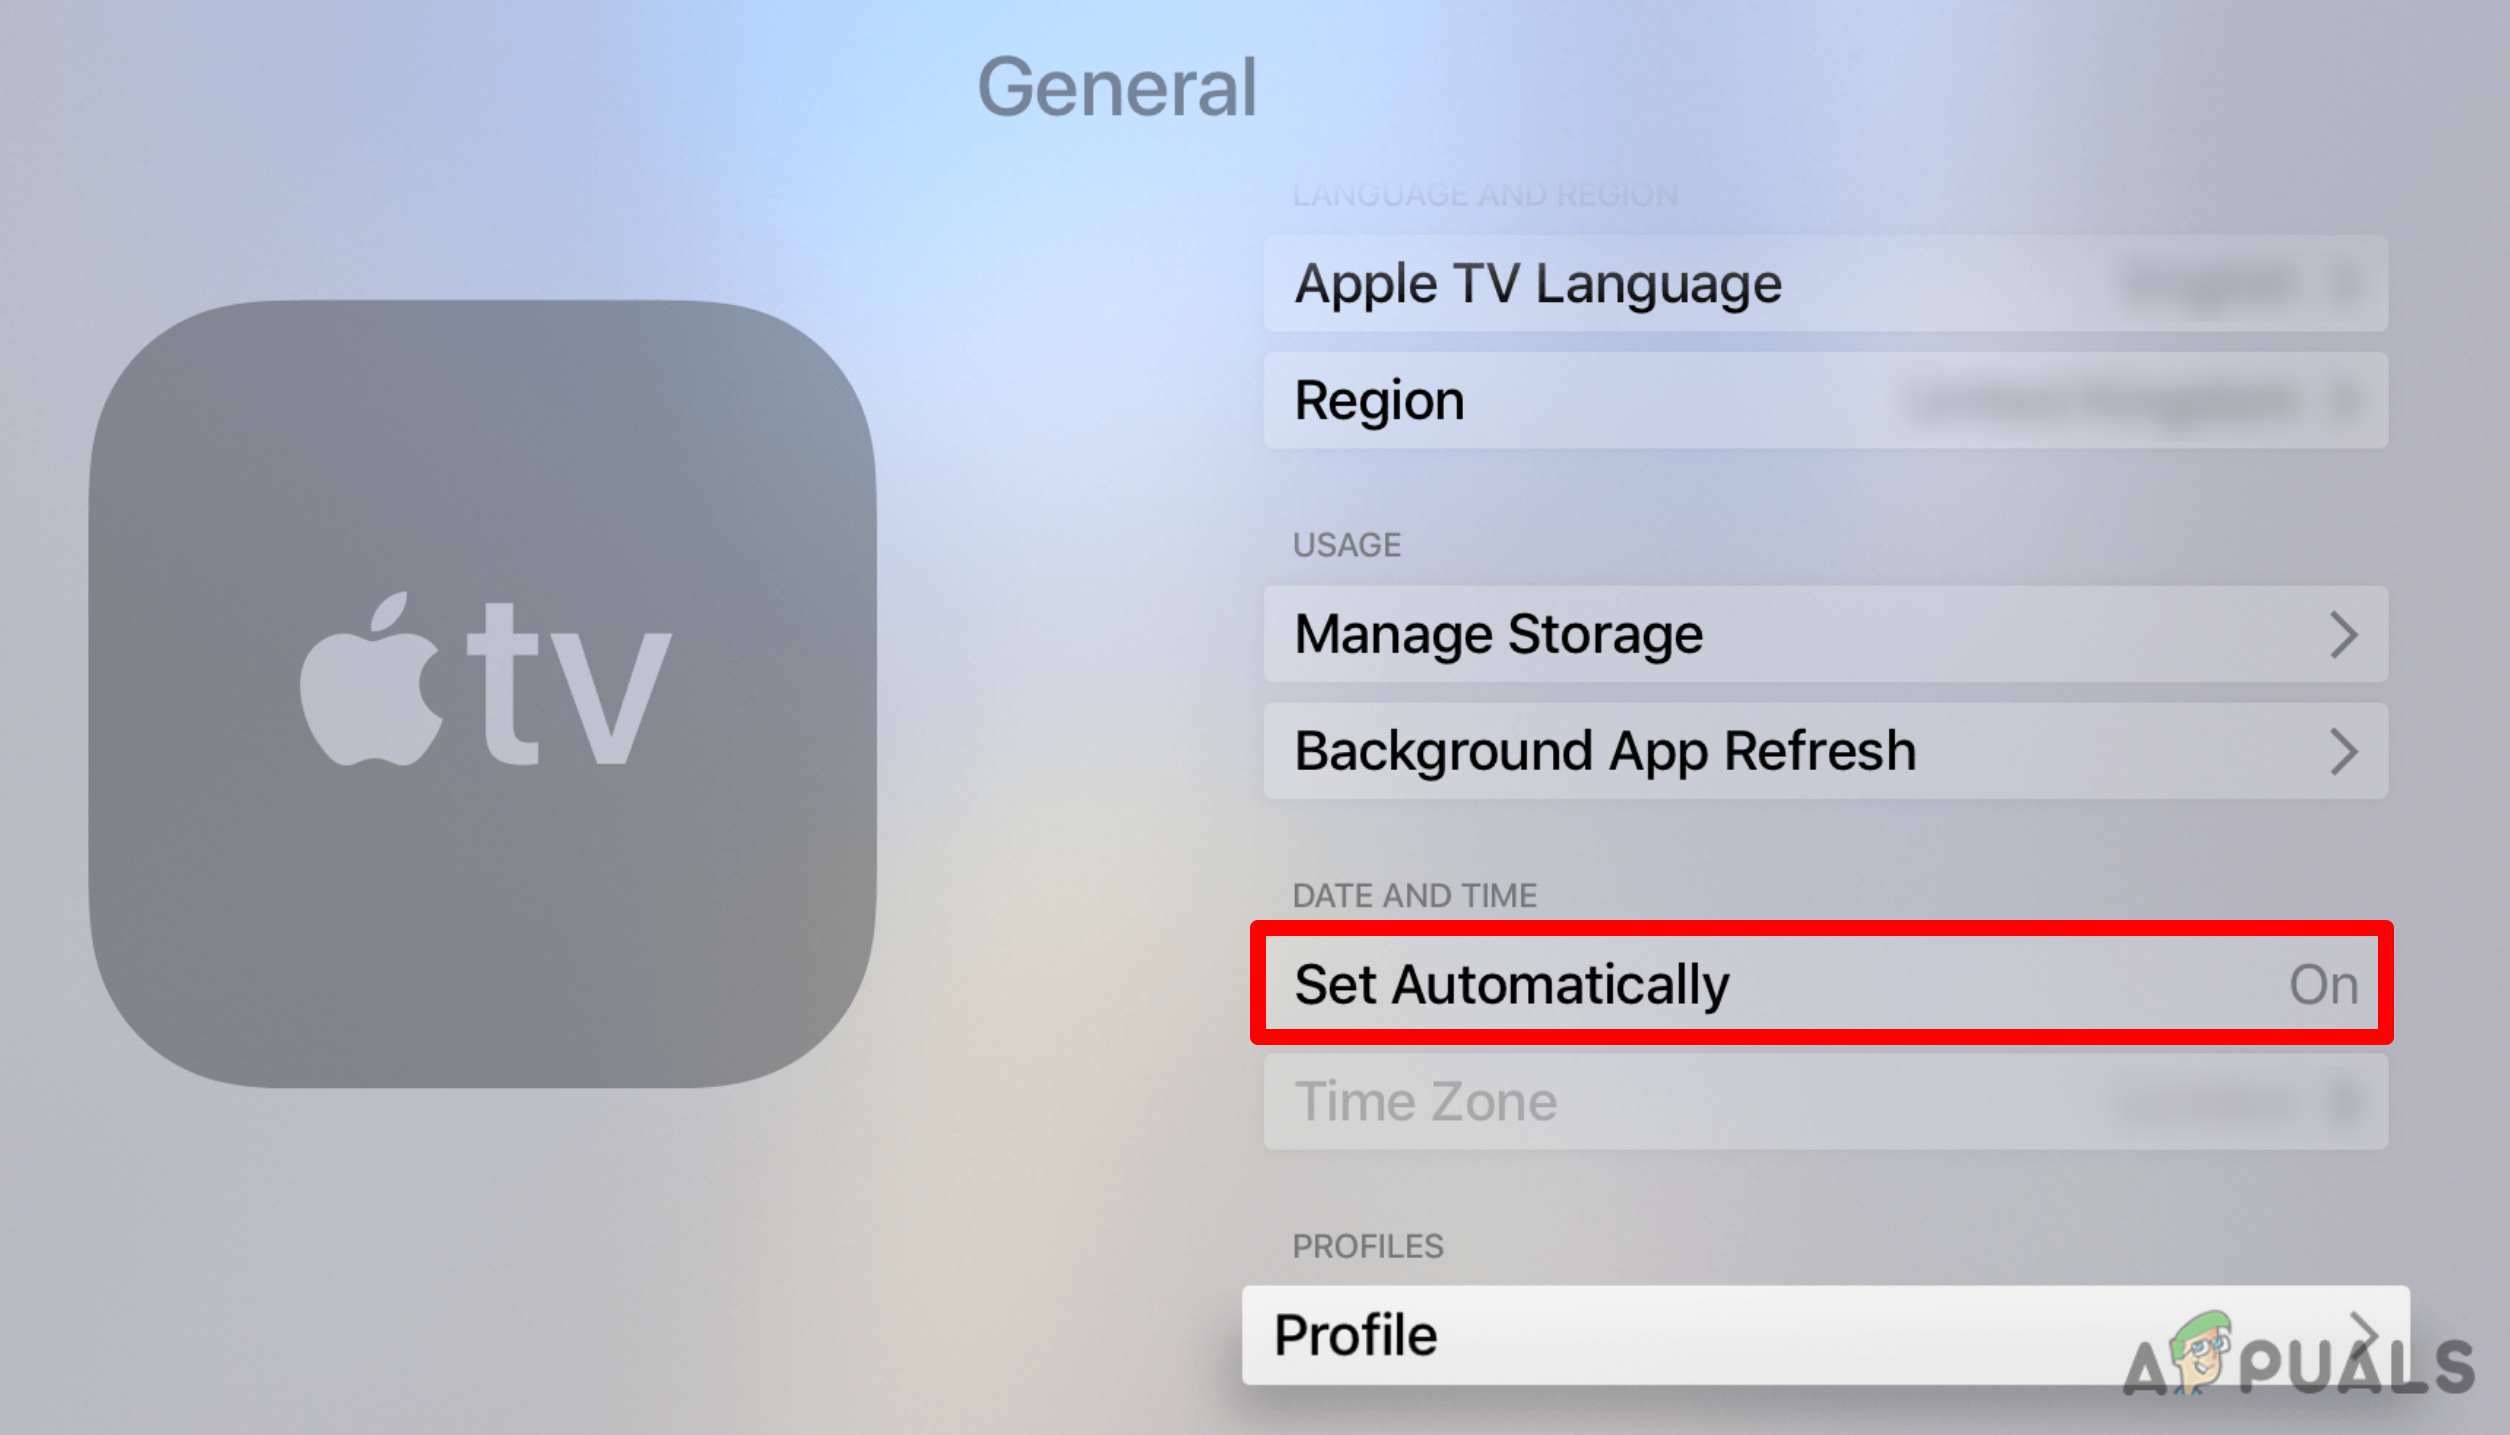
Enable the ‘Set Automatically’ toggle for timezone - Restart your Apple TV and attempt to stream content from Netflix once again to see if the issue has been resolved.
4. Change DNS to Google equivalents
You can also expect o see the MC-AuthFailure error on every device that attempts to stream content from your Netflix account due to a DNS inconsistency.
If your ISP (Internet Service Provider) is using a custom DNS range, there’s a chance Netflix has a rule against it so the connection will be interrupted. Fortunately, you can fix the issue easily by switching to a public DNS range (Google’s DNS has the best uptime record).
Note: Before changing your DNS Settings make sure to save the present server addresses or settings on paper before switching to Google Public DNS. It is crucial that you maintain these numbers as a backup, just in case you ever need to revert to them.
Now, depending if you need to change the DNS on your iOS or macOS, the procedure will be different. We’ve created two sub-guides to cover both scenarios.
4.1. Change to Google DNS on iPad and iPhone
Here’s how to change the DNS settings to the Google public range on an iPhone or an iPad:
- On your iOS device, go to the home screen and tap on Settings.
- From the Settings menu, go to the main Settings menu and tap on Wi-Fi.
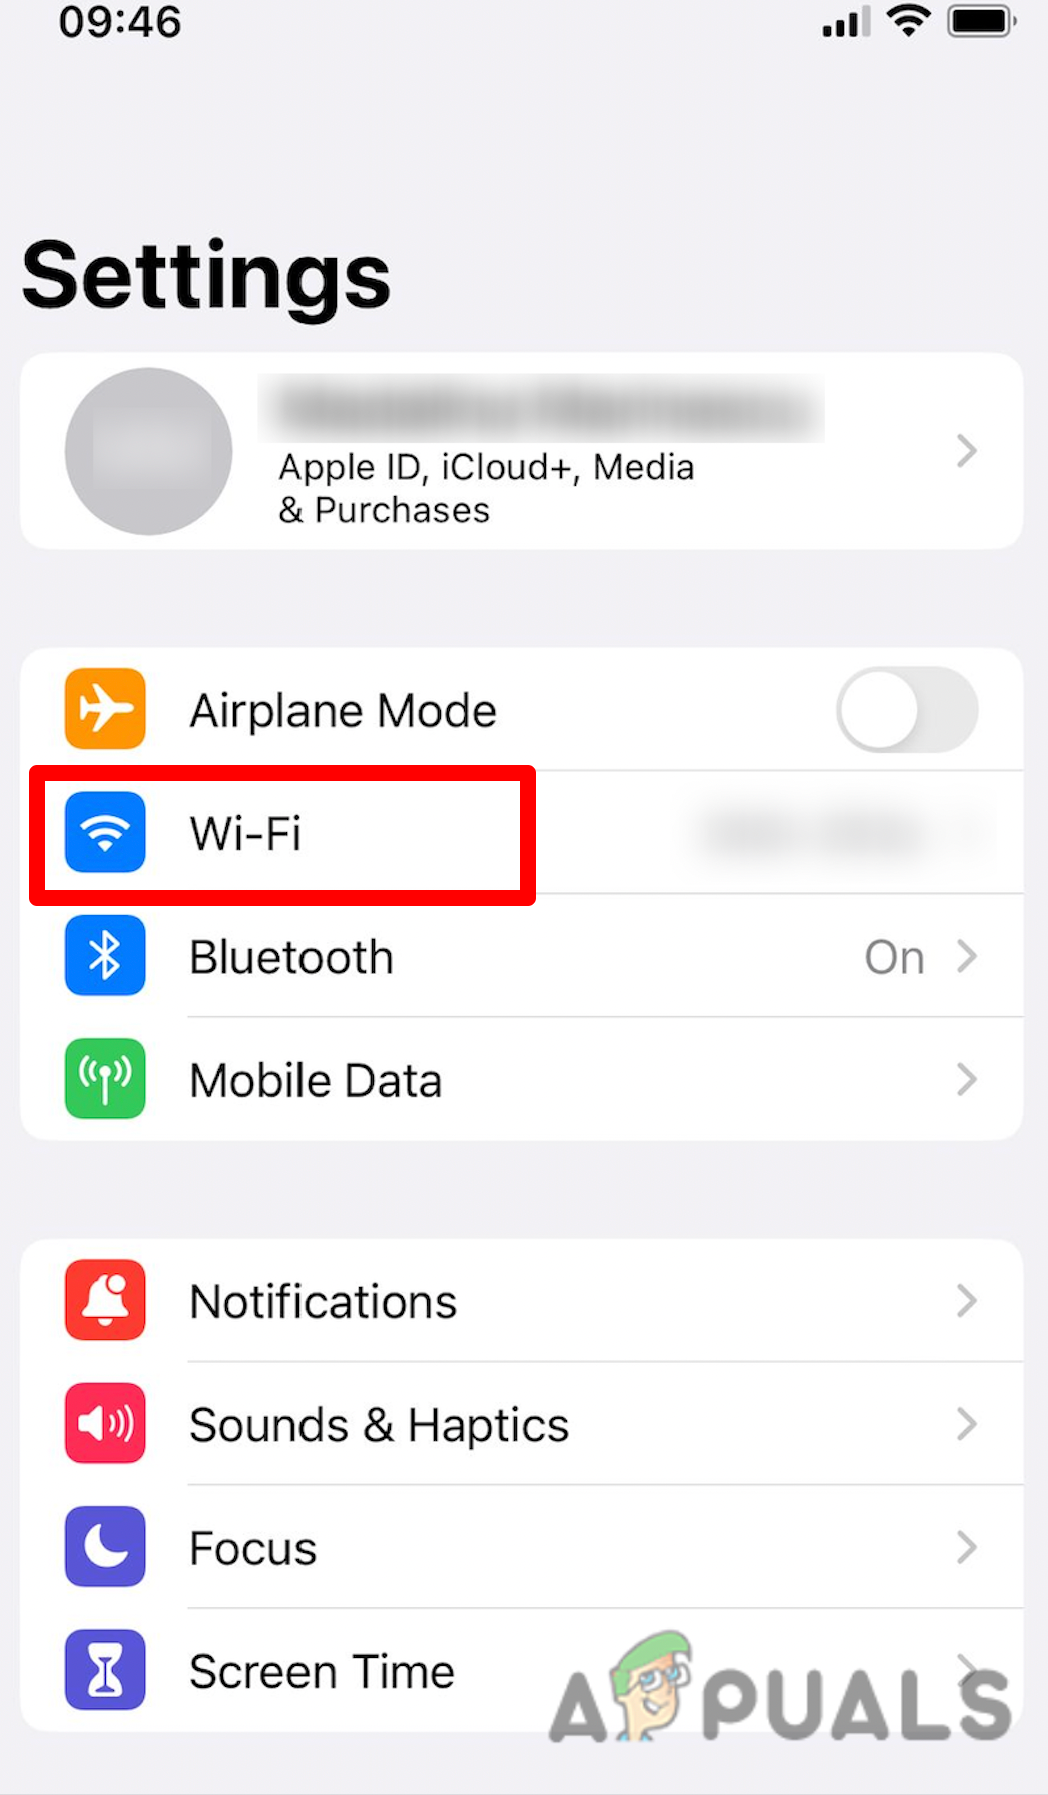
Accessing the Wi-Fi tab on iOS - Next, select the Wi-Fi network whose DNS servers you wish to modify (your home network) by tapping on the corresponding icon.
- Scroll down through the dedicated settings and tap on Configure DNS.
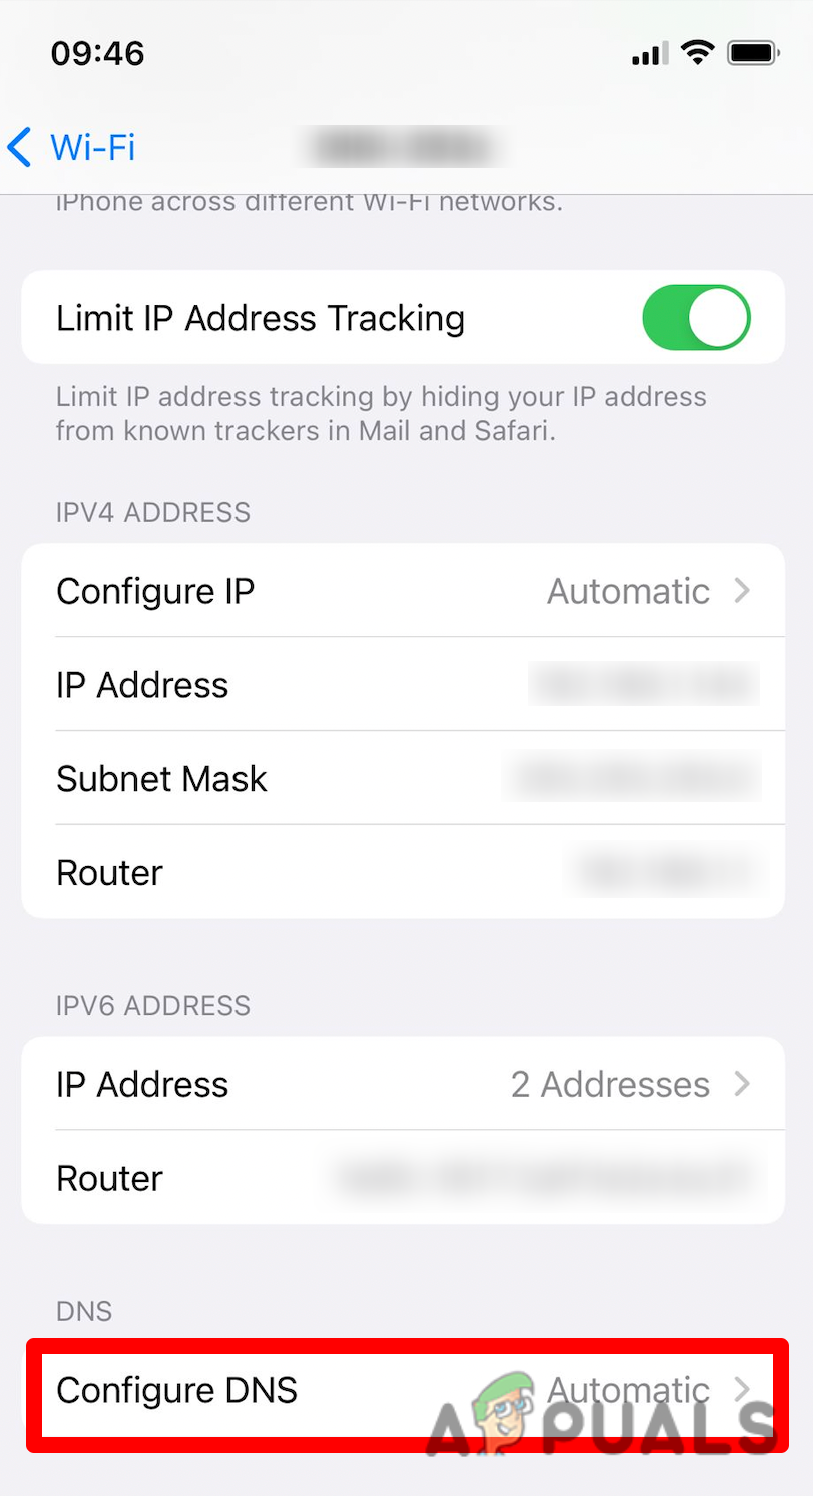
Configure the DNS - Next, set the DNS to Manual and remove all default DNS servers from the list.
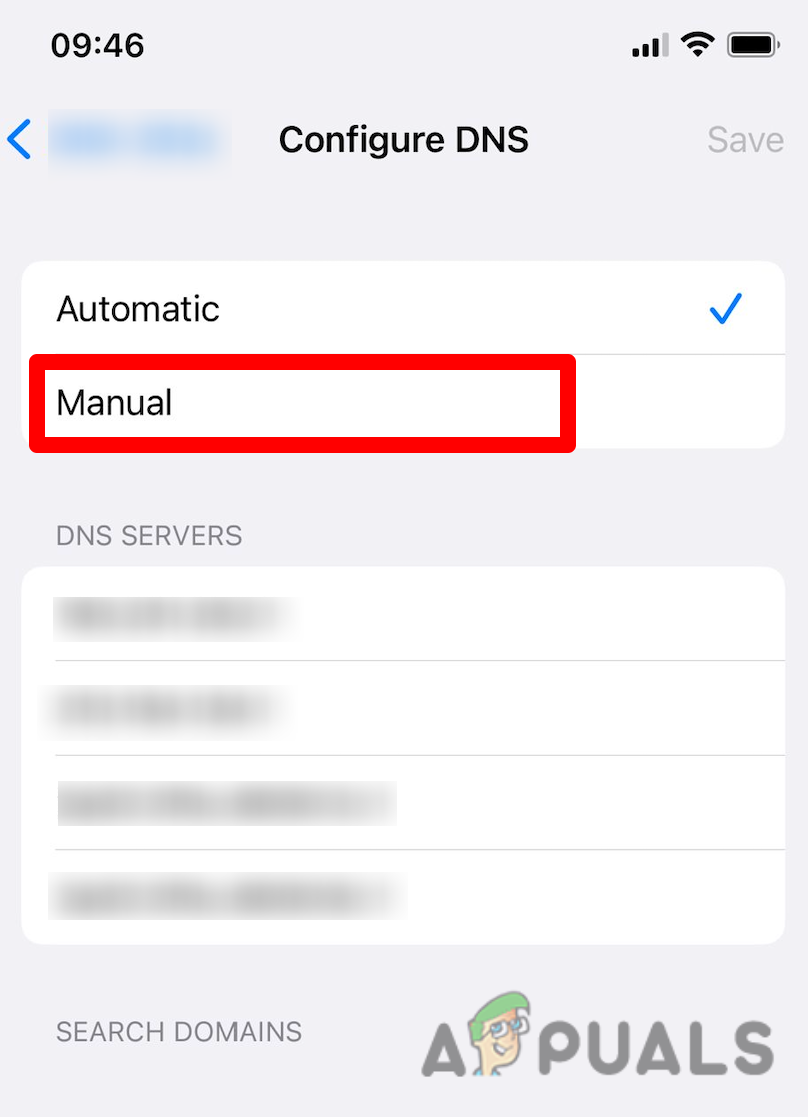
Set the DNS to manual - Add the following DNS addresses depending if you’re using IPv4 or IPv6:
IPv4:

8.8.8.8
8.8.4.4

IPv6:

2001:4860:4860::8888
2001:4860:4860::8844
- Save the new DNS range, then restart both your iOS device and your network.
- Stream content from Netflix again and see if the issue is now fixed.
4.2. Change to Google DNS on macOS
If you need to change the DNS range on a macOS, follow the instructions below:
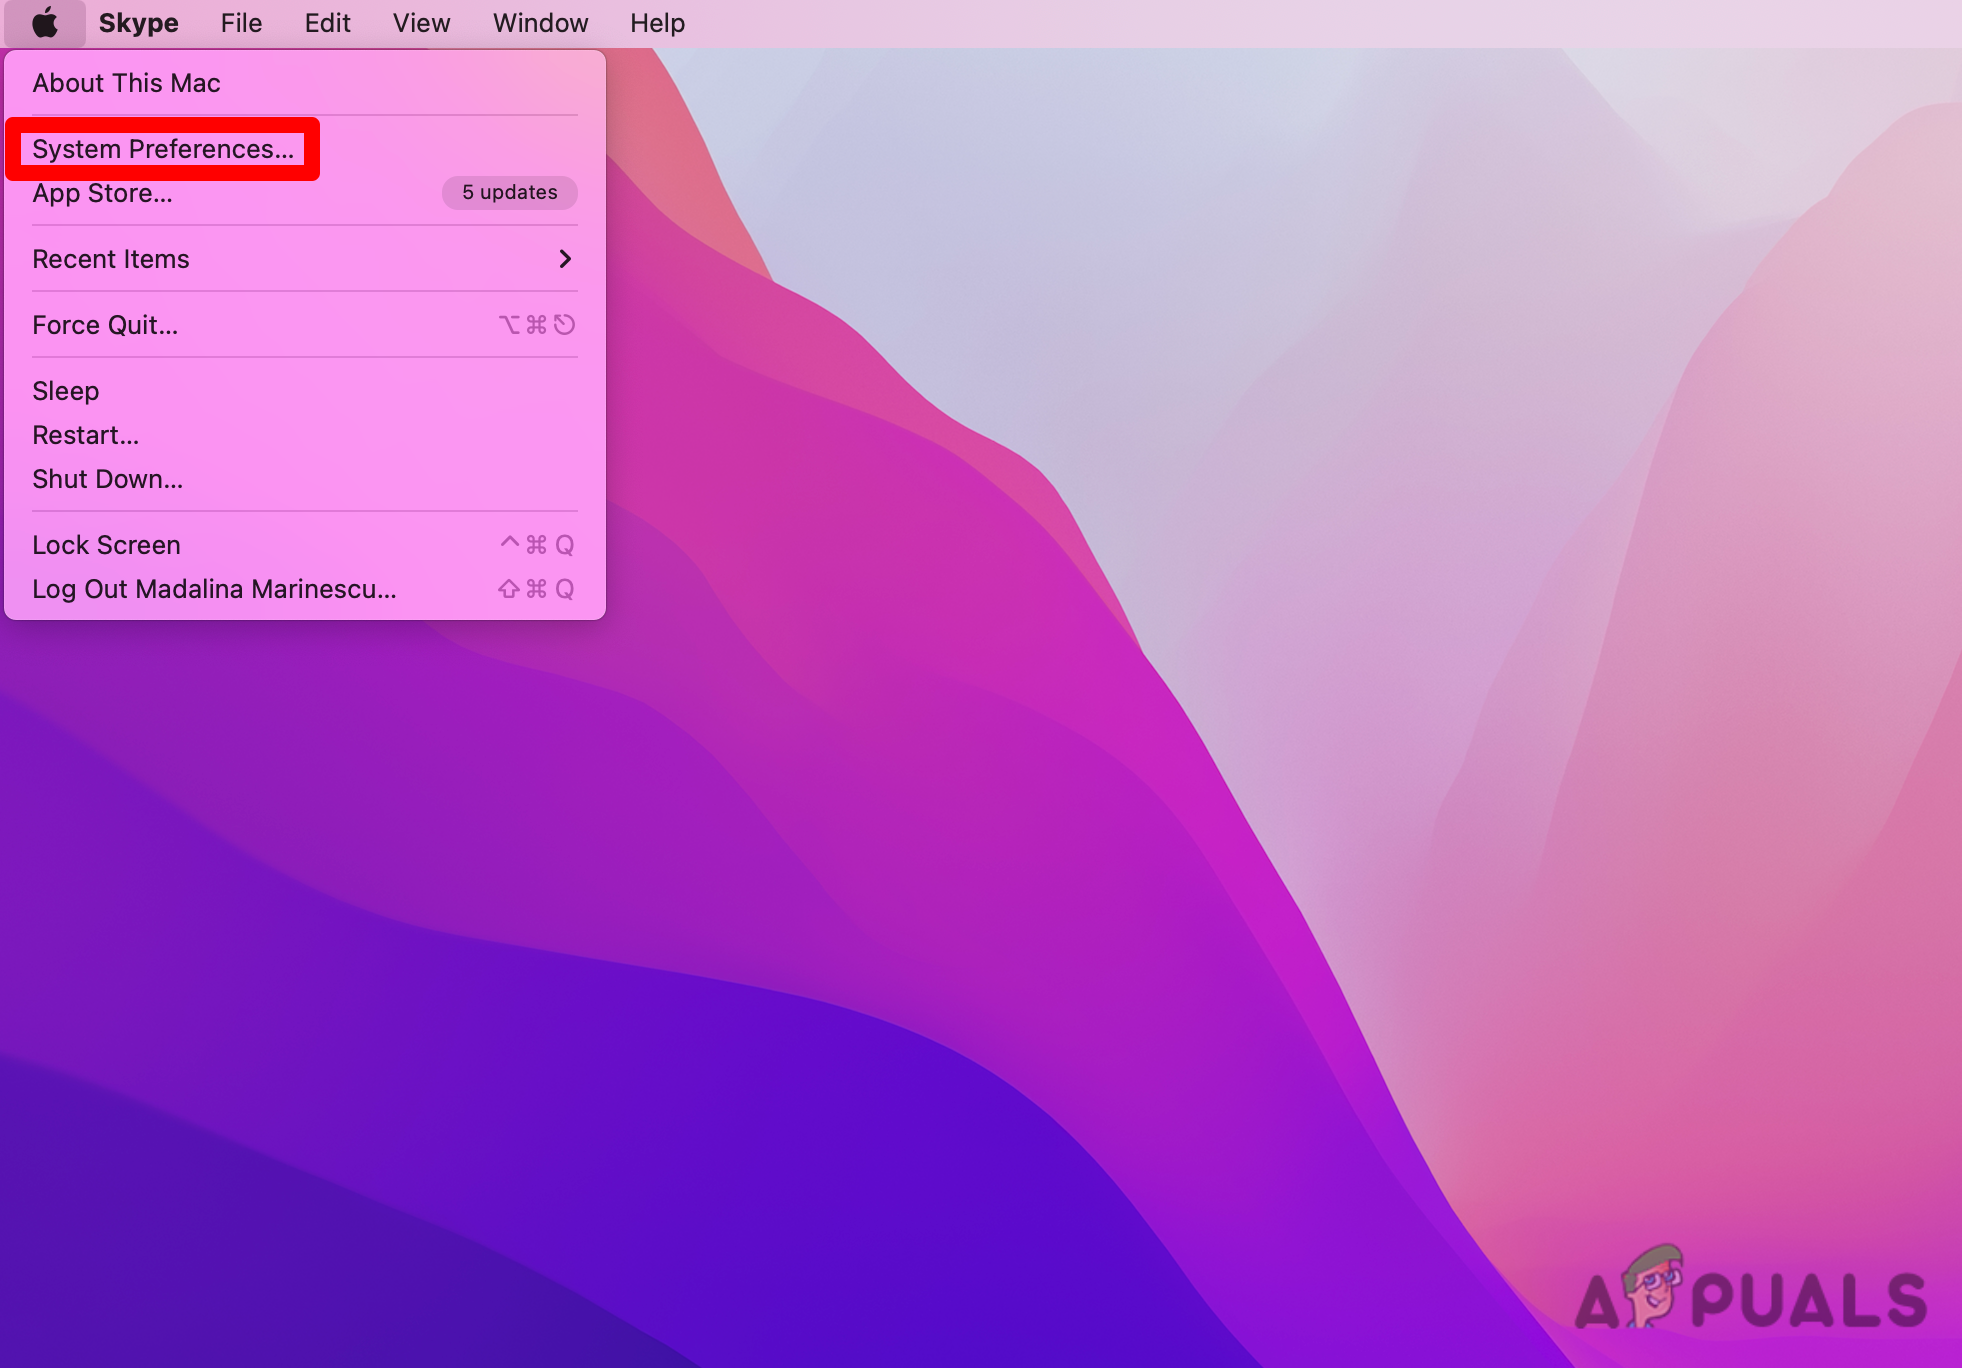
- Click on the Apple Menu from the top-left corner of the screen.
- From the drop-down menu, select System Preferences and then click on Network.
Accessing the System Preferences menu - If the lock icon from the left bottom corner of your screen is locked, you need to click on it first before you can make any changes.
- After you click the lock icon, enter your password when prompted.
- Choose the network that you wish to set up a custom Google Public DNS range.
Note: For a Wi-fi connection click on Wi-fi and then on Advanced. - For an Ethernet connection, click on Built-In-Ethernet > Advanced.
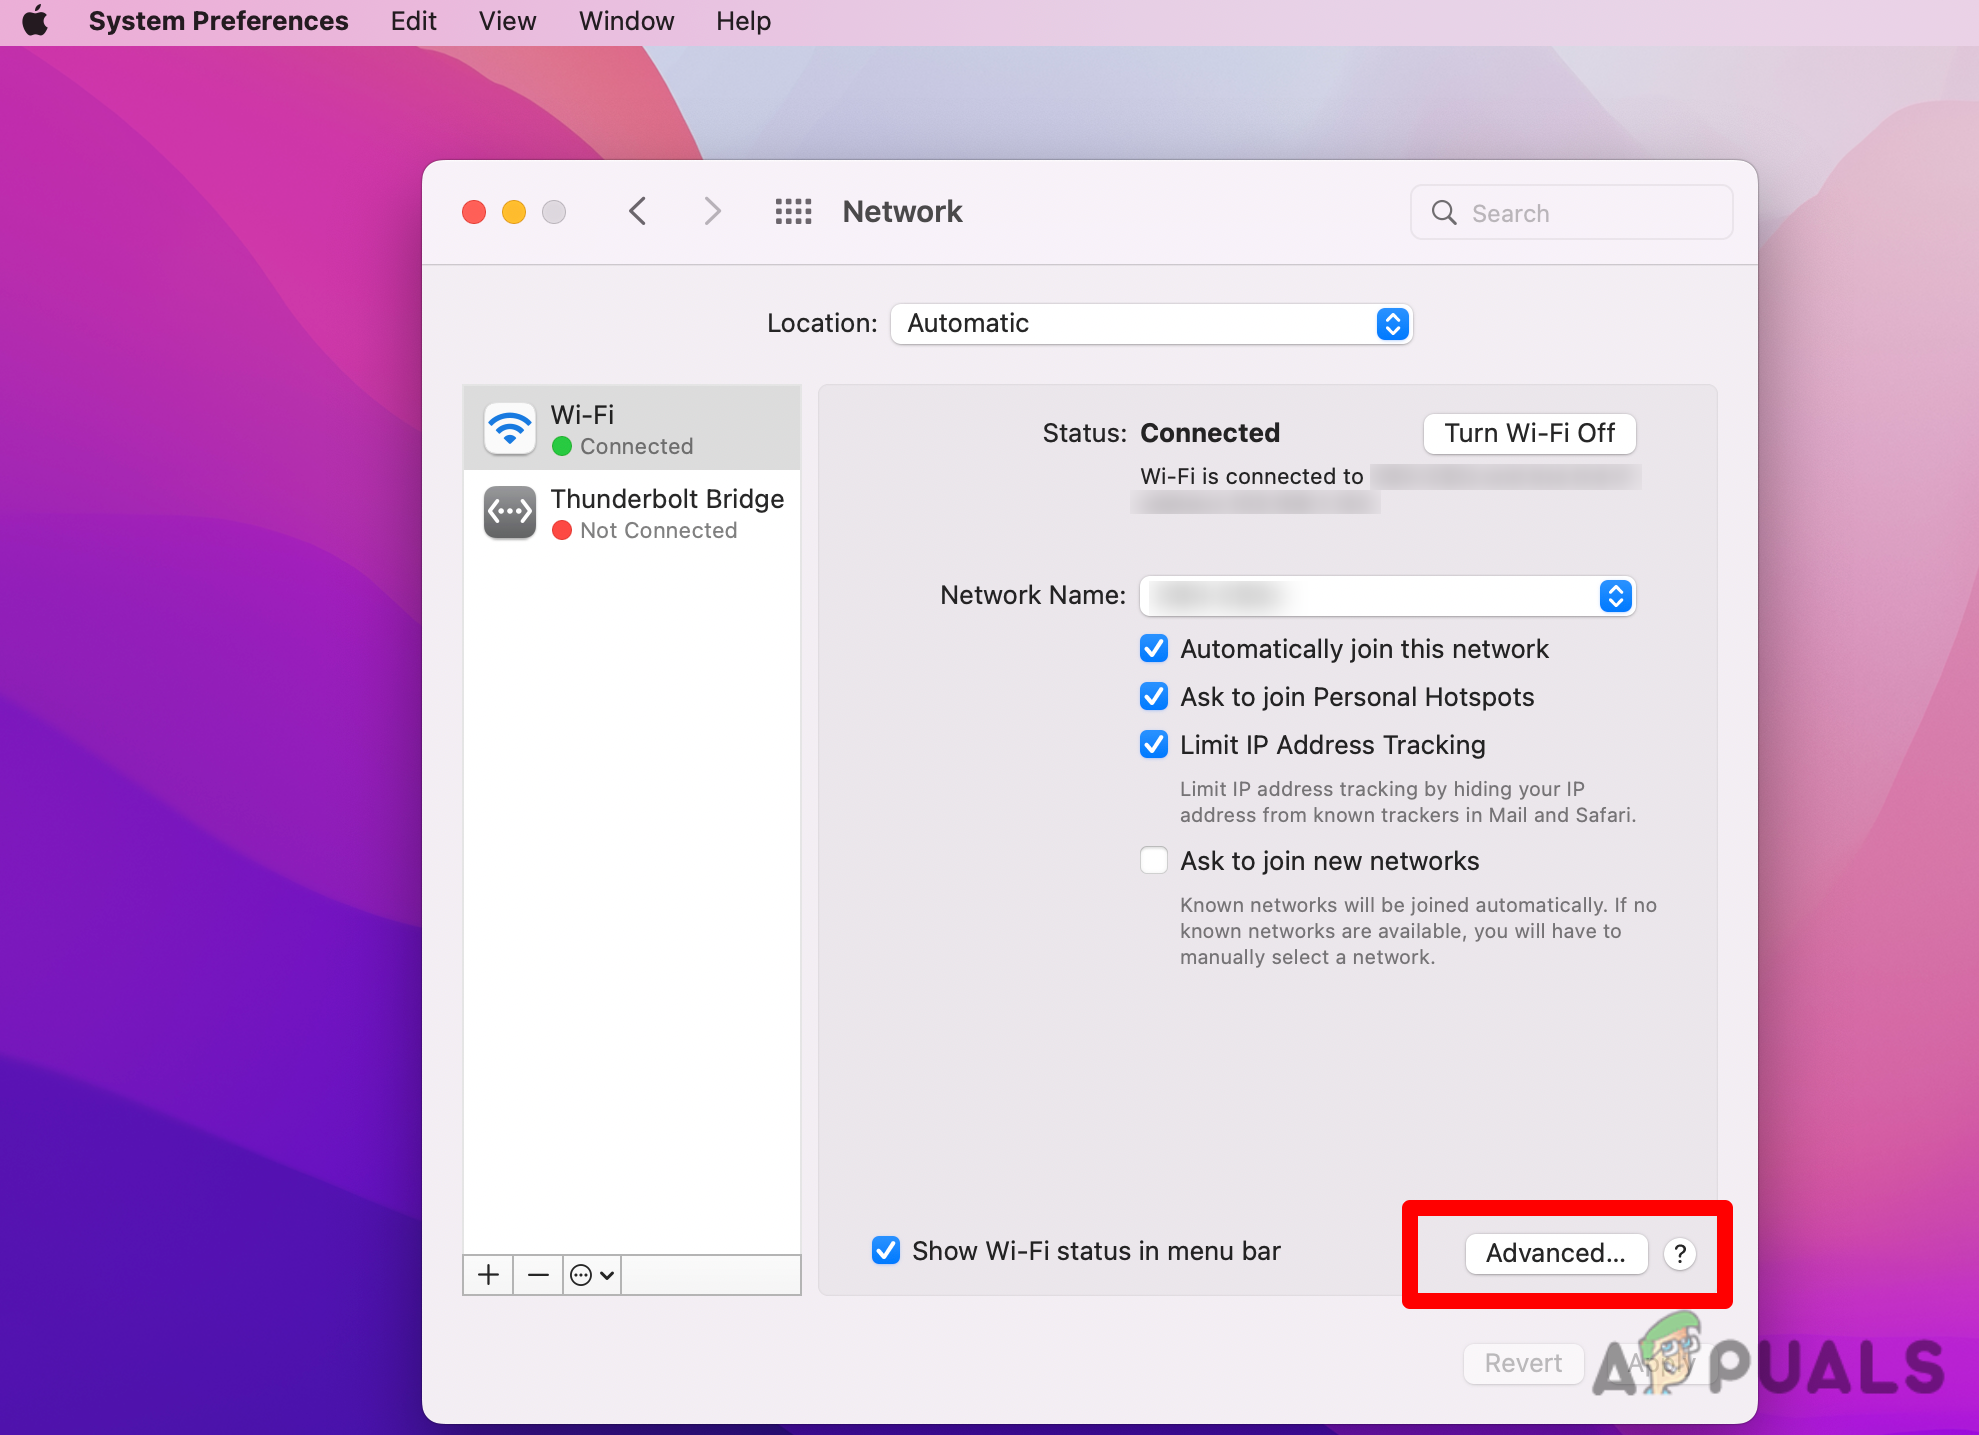
Access the Advanced menu - From the next menu, click on the DNS tab.
- Inside the DNS servers, click on the + icon and add the following Google IP address:
IPv4:

8.8.8.8
8.8.4.4

IPv6:

2001:4860:4860::8888
2001:4860:4860::8844
- Click Ok to apply the changes, then restart both your macOS and your home network.
- Stream content from Netflix again and see if the issue is fixed.
5. Ask Netflix support to create a new account
Unfortunately, there’s one particular scenario where fixing the issue is beyond your control. It turns out that you might see the Netflix Error 139 (Nferr_Mc_Authfailure) error due to a bug in the account management system of Netflix.
Users that have faced the same problem have managed to get it fixed by calling or opening a Live chat with a Netflix support agent and asking them to delete their account and migrate the billing to a new one.
Note: Going this route is not exactly ideal since you will lose any preferences, saved TV shows & movies – you will basically be starting from scratch. However, some users that had to go through this reported that Netflix gifted them 1 free month to compensate for this inconvenience.
Here’s a quick guide that will show you how to get in contact with the Netflix support team via Live Chat:
Note: You can also call the toll-free number of your country, but opening a live chat is way faster.
- Open a browser page on any device and go to the official Netflix login page.
- Sign In with the same account that is triggering the Netflix Error 139 (Nferr_Mc_Authfailure).
SIgning in with your Netflix account - After you are signed in, click on the Icon situated in the top right corner of the screen.
- From the drop-down menu that just appeared, select Help Center.
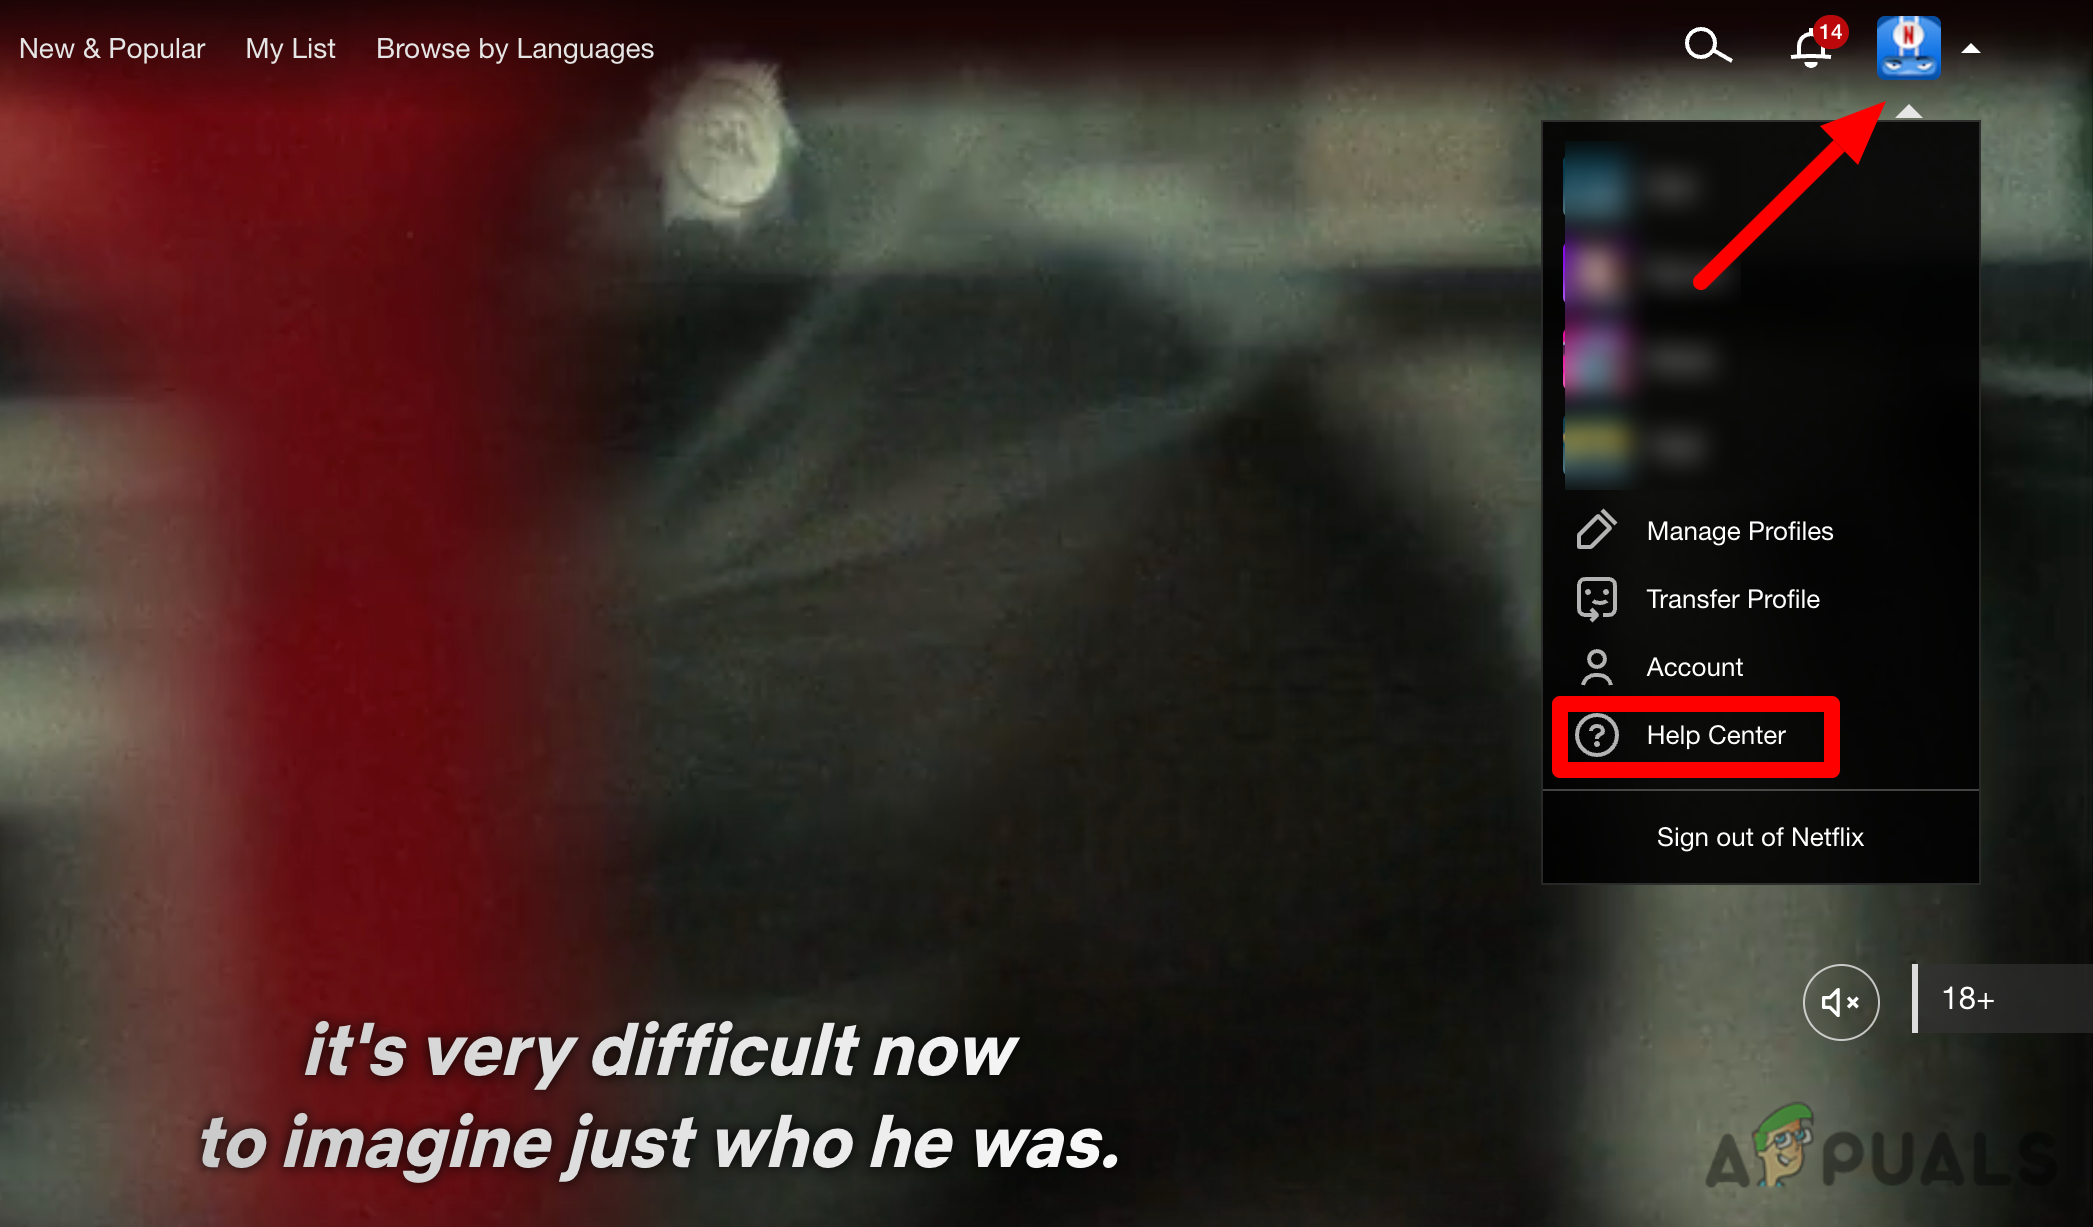
Open the drop-down menu and access the Help Center - Inside the Help Center, click on Start live chat and then click on Tell us what your issue is.
- Explain the issue as thoroughly as possible and mention that you want your current account to be deleted.
Note: Netflix support agents are aware of this issue and will likely migrate your billing to a new account.