Fix: Microsoft Edge Opens Then Closes
There’s no doubt that the Windows Edge browser is quite an improvement over Microsoft’s previous browser Internet Explorer. But Windows Edge is far from perfect with a few bugs in it. One of the problems that you might face while using Microsoft Edge is the crashing. When you open Microsoft Edge, it will close immediately. For some users, it stays open for a second or two while it quickly closes for other users. This error, obviously, prevents users from using Microsoft Edge which can be troublesome especially if you use Microsoft Edge as your main browser. However, keep in mind that this error only effects Microsoft Edge and other browsers work just fine. So, you can use Mozilla Firefox or Google Chrome while you are having problems with Microsoft Edge.
The problem is because of a Windows bug that Windows officials are working on. That is why you are most likely to see this problem if you recently did a Windows Update. However, the good news is that this will be solved in the next updates. But until then, you can solve the issue by following the methods given below.

Try the general troubleshooting. If that doesn’t solve your problem then move on to the methods given in detail.
General Troubleshooting
These are some general troubleshooting steps that you should perform before diving into the details of solution methods. These general solutions will only work if Edge opens, if it won’t open at all then ignore these and proceed with Method 1.
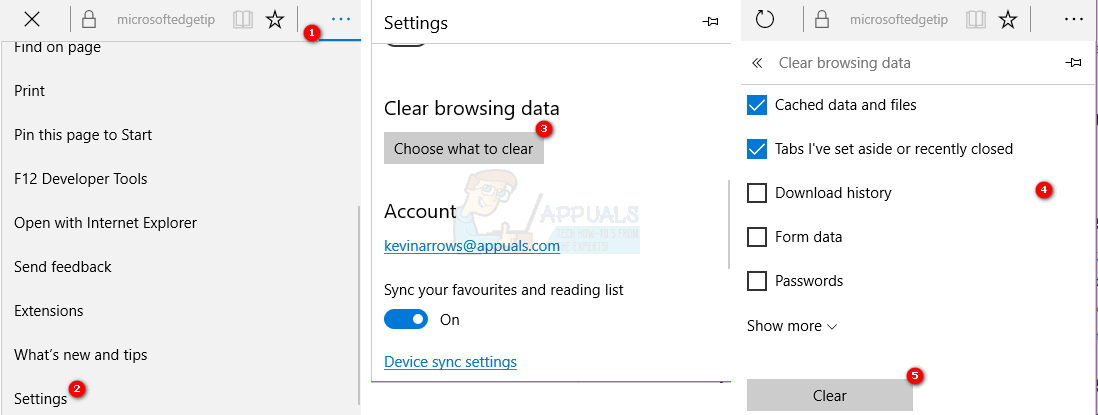
Clear Cache
- Open Microsoft Edge.
- Click the More (3 dots) button then select Settings.
- Click Choose what to clear under Clear browsing data.
- Select Cache data only and click Clear.
Reset Browser
- Hold Windows key and press R
- Type control and press Enter
- Click Network and internet
- Click Internet Options
- Click Advanced tab
- Click Reset
- Restart your computer
Run Troubleshooter
Go here and click on run troubleshooter. Follow the on-screen instructions to run the troubleshooter.
Method 1: Uninstall and Reinstall the Microsoft Edge
Note: This method will remove your Favourites or any other setting related to Microsoft Edge browser. So follow this method on your own risk. It is also advised to make restore point just in case you want to revert the changes.
Uninstalling and then reinstalling Microsoft Edge solves the problem for almost everyone. In order to uninstall the Microsoft Edge, you will need to either rename or delete a certain Microsoft Edge’s folder. But that folder is hidden by default so you need to make sure that you can see hidden files and folders. To do this follow the steps given below
- Hold Windows key and press E
- Click View
- Check the option that says hidden items
Uninstalling of Microsoft Edge
Now follow the following steps to uninstall Microsoft Edge
- Restart your computer to make sure none of the Microsoft Edge’s files are open because they will interfere with the uninstallation process
- Press Windows key once
- Type cmd in the Start Search box
- Right click on the cmd that appears in the search results and select Run as administrator
- Type the command given below and press Enter
![]()

- Type the command given below and press Enter
REN C:\Users\username\AppData\Local\Packages\Microsoft.MicrosoftEdge_8wekyb3d8bbwe edge.old

Note: replace “[username]” with your computers username
- Repeat step 6 again to make sure the folder is renamed. If the folder is renamed then you should see and error like Windows cannot find the file specified.
If you run into errors, make sure the folder name and paths are correct. (you can get these manually, by going to Packages\
If you see an Access Denied error or any other error then you have 2 options. Either rename the folders from Windows Explorer or switch to another account (administrator) and change the name of the folder from there. Steps for both are given below
Windows Explorer:
- Restart your computer
- Hold Windows key and press R
- Type the following and press:
C:\Users\%username%\AppData\Local\Packages\Microsoft.MicrosoftEdge_8wekyb3d8bbwe
- Right click on the RoamingState folder and click Delete
- Confirm if computer asks for permission
- Hold Windows key and press R
- Type C:\Users\%username%\AppData\Local\Packages\ and press Enter
- Locate and right click the folder named MicrosoftEdge_8wekyb3d8bbwe and select Rename. Rename this folder too Microsoft.MicrosoftEdge_8wekyb3d8bbwe.OLD and press Enter
Switching Accounts:
Sometimes you might need to switch to a local account (from your Microsoft Account) to rename the Microsoft Edge folder. This always lets you rename the folder but it takes more time
- Press Windows Key once
- Select Settings
- Click Accounts
- Click Sign in with a local account instead
- Enter the password of your current Microsoft account
- Type in your username and password.
- Click Next
Now you will sign out from your Microsoft Account and sign in to your local account. Once you are signed in, repeat the above-given steps to rename the Microsoft Edge folder. You can use wither the Command Prompt way or the windows Explorer way.
Reinstalling of Microsoft Edge
The above steps should uninstall Microsoft Edge from your computer. Now you can reinstall the browser by following steps
- Press Windows key once
- Type Powershell in the Start Search box
- Right-click on the PowerShell that appears in the search results and select Run as administrator
- Type cd c:\users\[username] and press Enter. Replace “[username]” with your computer’s username. Also, keep in mind if your username has more than one word then write it in quotations. For example users\”John boy”.
- Type the following and press Enter:
Get-AppXPackage -AllUsers -Name Microsoft.MicrosoftEdge | Foreach {Add-AppxPackage -DisableDevelopmentMode -Register "$($_.InstallLocation)\AppXManifest.xml" -Verbose}

- Wait until the processing is finished.
- Type exit and press Enter once the process is finished
Now your Microsoft Edge is installed back and it should work fine.
In case of errors:
If you see any errors then do the following:
- Hold Windows key and press R
- Type %SYSTEMROOT%\SystemApps and press Enter
- Locate and right-click the folder named MicrosoftEdge_8wekyb3d8bbwe and select Rename. Rename this folder to Microsoft.MicrosoftEdge_8wekyb3d8bbwe.OLD and press enter
- Now press Windows key once
- Type cmd in the Start Search box
- Right-click on the cmd that appears in the search results and select Run as administrator
- Type sfc /scannow and press Enter
- Once it is finished close the Command Prompt
- Press Windows key once
- Type Powershell in the Start Search box
- Right-click on the PowerShell that appears in the search results and select Run as administrator
- Type the following and press Enter:
Get-AppXPackage -AllUsers -Name Microsoft.MicrosoftEdge | Foreach {Add-AppxPackage -DisableDevelopmentMode -Register “$($_.InstallLocation)\AppXManifest.xml” -Verbose}

Once it is finished, you should be good to go.
Method 2: Switching Accounts
This isn’t a solution but more of a hack for this problem because it doesn’t actually solve the problem. You can get around the problem by switching to another account. The problem is mainly caused in you are signed in with your Microsoft Account.
So as long as you aren’t signed in with your Microsoft Account, Microsoft Edge should work fine. To switch to a local account, follow the steps given below
- Press Windows Key once
- Select Settings
- Click Accounts
- Click Sign in with a local account instead
- Enter the password of your current Microsoft account
- Type in your username and password.
- Click Next
Now you will sign out from your Microsoft Account and sign in to your local account.
Thanks.. Switching accounts fixed my issue..