How To Fix KB5011563 Will Not Install on Windows 11?
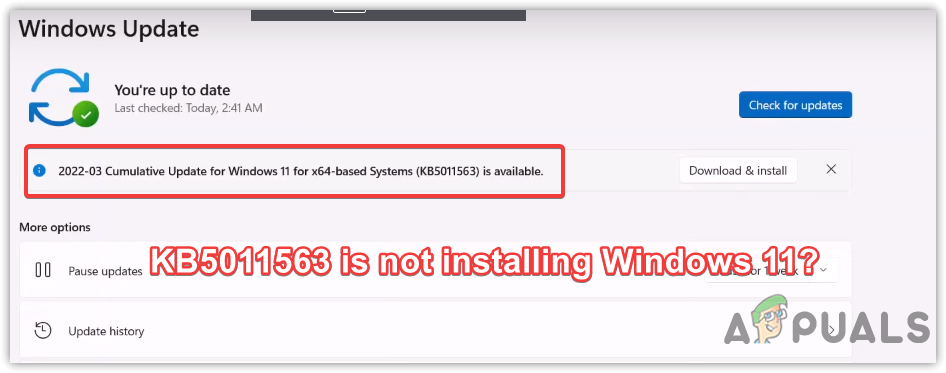
KB5011563 is not installing? Many users recently reported that they could not install the KB5011563 update on their Windows 11. If we talk about the reasons, Lack of space and corrupted update files in the software distribution are the most common contributors behind the update failure. Although the issue does not appear with the error message, you would likely be unable to install the update.
Before moving out to the troubleshooting methods, we want to draw your attention to the reasons, which of the following might be the culprit and responsible for causing this issue.
- Unstable Internet Connection- A bad internet connection can be one of the main reasons for this issue because the installation of the KB5011563 update stops at 0 percent and does not proceed, which is why the problem might occur.
- Corrupted data in Software Distribution- Sometimes, the content of the software distribution folder gets corrupted, which is required to install a Windows update.
- Stopped Windows Update Services– Windows update service and Background intelligent transfer service both are required as these services enable the administrator to manage the distribution of updates. Sometimes, Windows services could get stopped, which can cause problems when trying to install updates.
- Interference of Antivirus- The interference of any antivirus could prevent you from installing the KB5011563 update. You may need to disable the third-party antivirus or Windows defender as it aids in fixing the issue.
1. Run Windows Update Troubleshoot Utility
You can try running Windows Update troubleshooting, a utility that helps repair the corruption in the Windows destination folder. Most likely, the issue would resolve when you run the Windows Update utility. Below are the steps to run Windows Update Troubleshoot: –
- To run the Windows Update utility, launch Settings by pressing the Windows + I keys on the keyboard
- Once the Settings is opened, scroll down to Troubleshoot > Other Troubleshoot
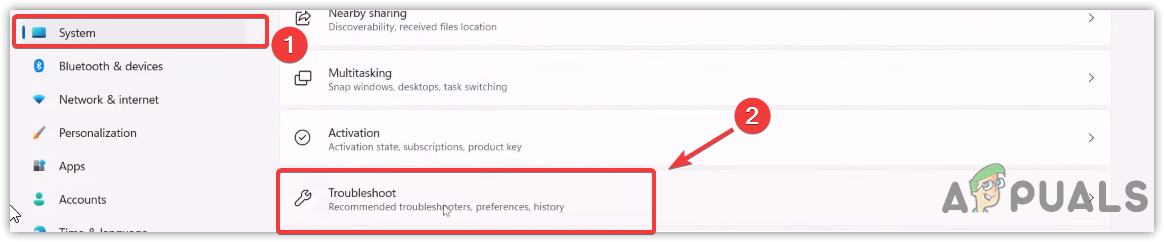
Navigating to Troubleshoot - You will see Windows Update under Most Frequent
- Click Run on the right side of the Windows Update utility
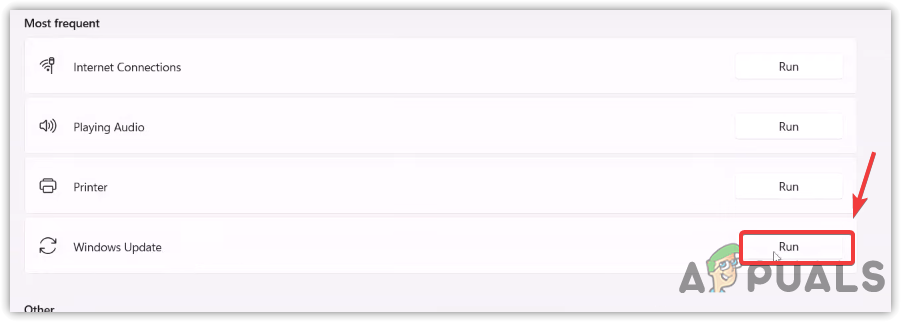
Run Windows Update Troubleshooter - It should detect and fix the problems regarding the updates.
2. Restart Windows Update Services
BITS or Background Intelligent Transfer Service is a technology used to download Windows updates from idle bandwidth. Moreover, it is used to ensure that there are no pending updates and that the system is ready to download the Windows update. While the Windows Update Service allows the admin to manage the distribution of updates. Both services are really important. If any of these are stopped, your Windows will not update.
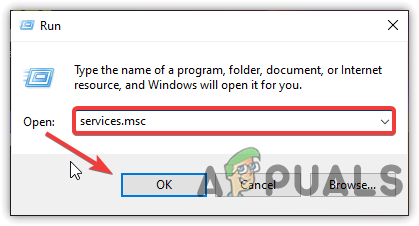
- To restart the relevant Windows Services, press the Windows + R on the keyboard to open the Run Program
- Type services.msc and press Enter
Launching Services Window - Find the Windows Update service and right-click on it
- Select Properties from the listed options then change the Startup type from Manual to Automatic
- Click Apply and then click OK

Restarting Windows Service - Once done, click Restart from the top left and wait for service to start
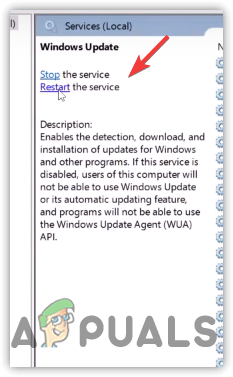
Click Restart - Once done, repeat the same process with the Background Intelligent Transfer Service
- After that, restart your computer and check if the issue is fixed.
3. Reset Windows Update Components
Windows Update Components is a necessary part that provides the ability to download and install Windows updates. Resetting the Windows Update will clear the software distribution folder, which stores the temporary data that may require to install Windows Update.
Follow the steps to reset Windows Update Components: –
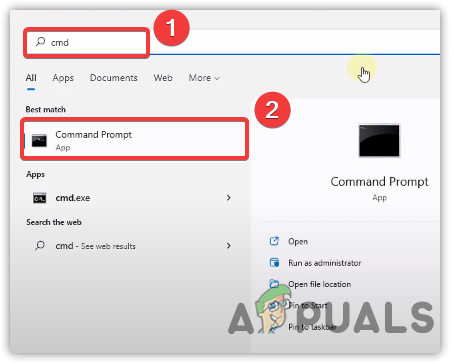
- Click Start Menu and type Command Prompt
- Right-click the command prompt and choose Run As Administrator
Running Command Prompt As Administrator - Click Yes when prompted to UAC
- Once the terminal launched, put the following commands to stop Windows services
net stop wuauserv
net stop bits
net stop cryptSvc
net stop msiserver
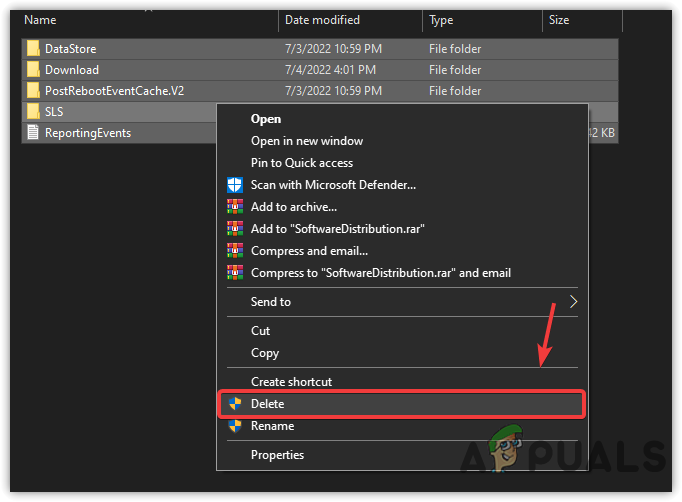
- Open Explorer and navigate to the mentioned path
C:\Windows\SoftwareDistribution
- Press Ctrl + A on the keyboard to select all files then press the delete key to remove all the data under the software distribution folder.
Deleting Files Under Software Distribution Folder - Open the command as administrator and put the following command to rename the software distribution folder
ren C:\Windows\SoftwareDistribution SoftwareDistribution.old
ren C:\Windows\System32\catroot2 catroot2.old
Once done, start the Windows services by inserting the below commands
net start wuauserv
net start bits
net start cryptSvc
net start msiserver
- Once done, try to update Windows and see if this fixes.
4. Run DISM & SFC Commands
If there is any corruption in the system files, you might not be able to install new updates until you repair them. SFC or System File Checker is a utility that helps repair Windows files by replacing them with cached files. On the other hand, DISM (Deployment Image Servicing and Management) includes three commands for scanning, repairing, and restoring, which might aid in fixing this issue. if you want to understand more, read our article on How to Use DISM to Repair Windows.
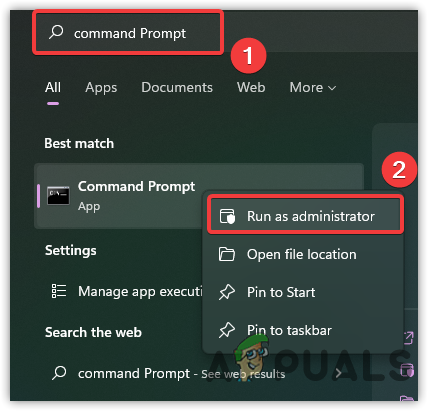
- To use the DISM or SFC commands, click Start Menu and type the command prompt
- Press Ctrl + Shift + Enter keys on the keyboard to run as administrator as these commands are required to have administrator privileges.
Launching Command Prompt as Administrator - Now insert the following commands to repair Windows images along with system files such as DLL
DISM /Online /Cleanup-Image /RestoreHealth
sfc /scannow
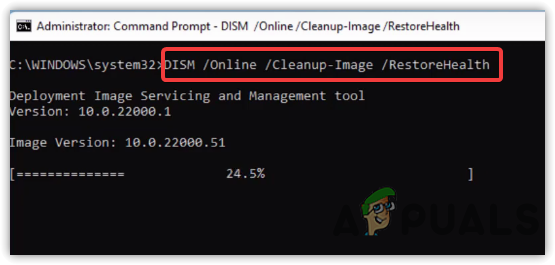
Running DISM Commands - Once done, try to update the Windows and check if this fixes.
5. Download Update From Microsoft Catalog
Microsoft Catalog provides Windows Updates for their operating system. It is a service that offers to download Windows Updates manually when there is a problem with the Windows update server either from the user. In case you are getting an 8DDD0020 error while accessing Microsft Catalog, you should visit our article on [Error Number: 8DDD0020] Microsoft Update Catalog Issue Resolved
- To download the update from Microsoft Catalog: –
- First, go to the Microsoft Catalog and type KB5011563 in the search bar then hit Enter
- Click the Download button to start the downloading process
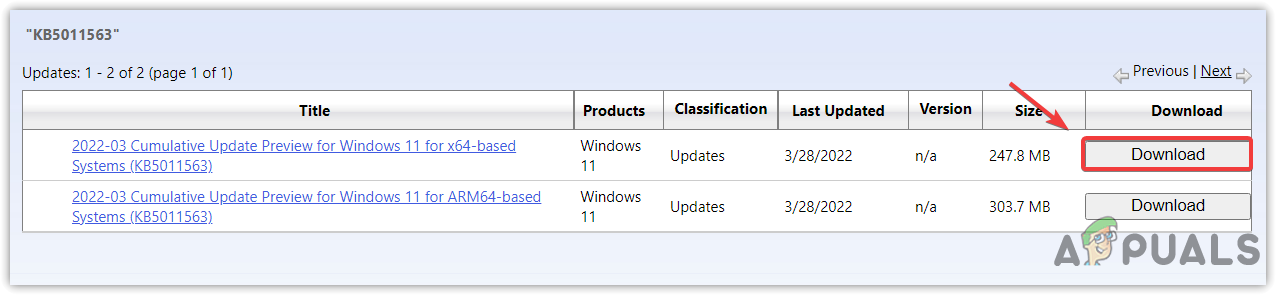
Downloading Windows update From Microsoft Catalog - Once done double-click on the installer and download the Windows update.
6. Update Windows Via Windows 11 Assistant
Fortunately, there is another option to install the problematic Windows update. If the above solutions fail to install, you may need to download the update via Windows 11 Assistant. It is similar to the media creation tool. Some users may face 0x8007007f error while installing Windows from Windows 11 Assistant. To fix this visit How to Fix “Error Code: 0x8007007f” on Windows 11 Installation Assistant?
Follow the steps to update Windows via Windows 11 Assistant: –
- Go to the website and download the Windows 11 Assistant
- Once the downloading is completed, run the Windows 11 Assistant
- In case the Windows 11 Assistant is not launching on your computer, then right on the tool and select Properties
- Go to the Compatibility tab, and tick the option Run This Program in Compatibility Mode For and choose Window 7
- Click Apply then click OK to save the changes
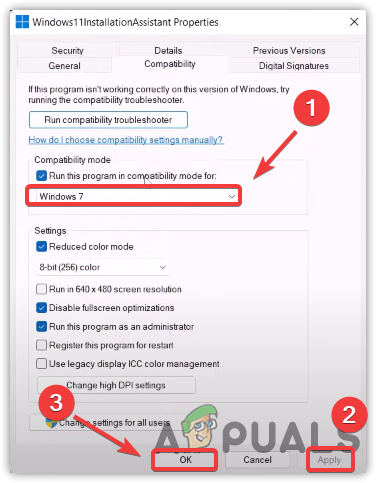
Run Windows 11 Assistant in Compatibility Mode - Now open the Windows 11 Assistant, accept the terms and conditions and it will automatically start updating to the latest version.
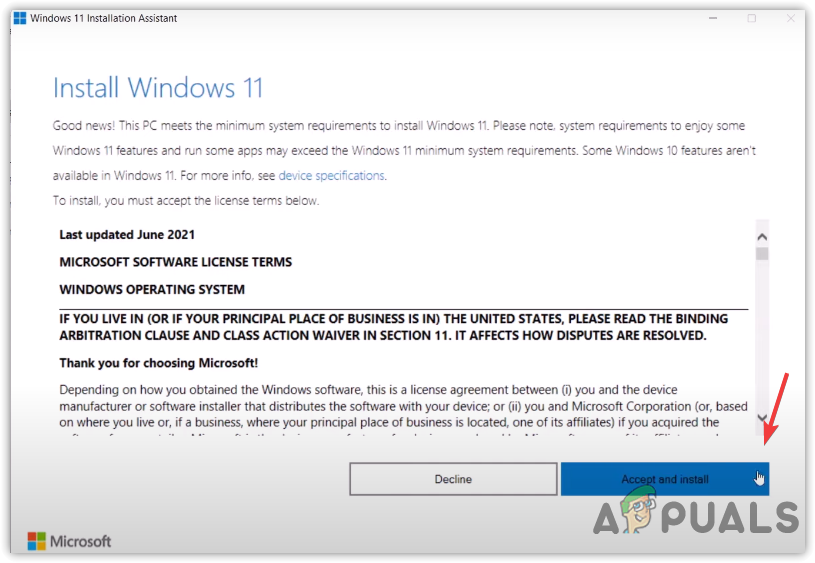
Accept the Terms and Conditions
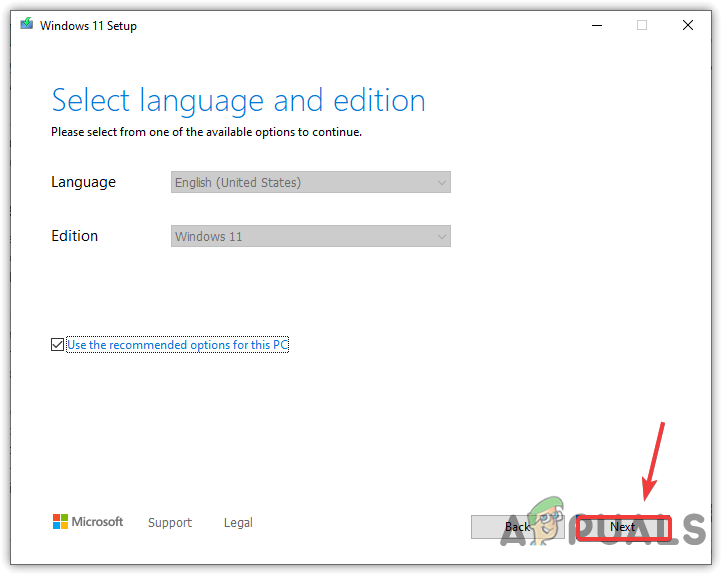
7. Use Media Creation Tool
If none of the methods worked, we recommend using the Media Creation Tool, a utility to download and update Windows. As your computer cannot install the update, you can use this tool to make an ISO file that automatically installs the latest version of Windows and you will have to worry about the problematic version. If the method does not fix it, you may need to reinstall Windows 11.
- To use Media Creation Tool, go to the website and download it
- Once done, open the Media Creation Tool and wait for the loading process to finish
- Accept the terms and conditions and click Next
Accept the Terms and Conditions - Choose ISO File from the listed options
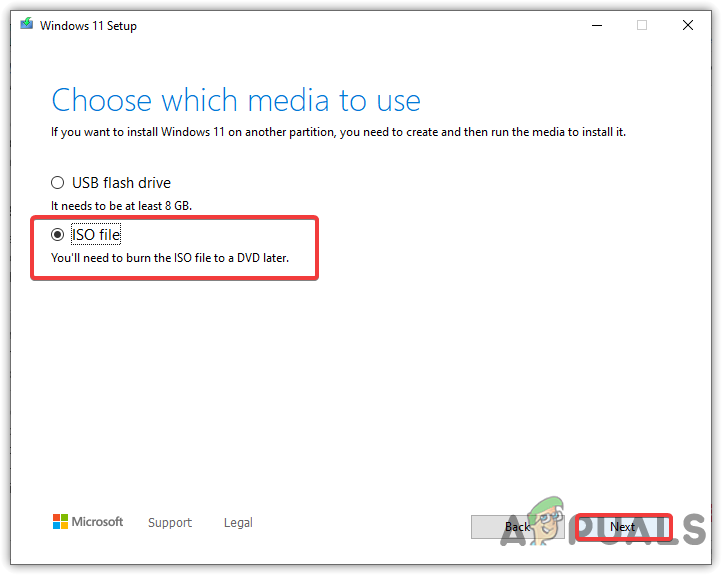
Select ISO File - Select the destination where you want to download
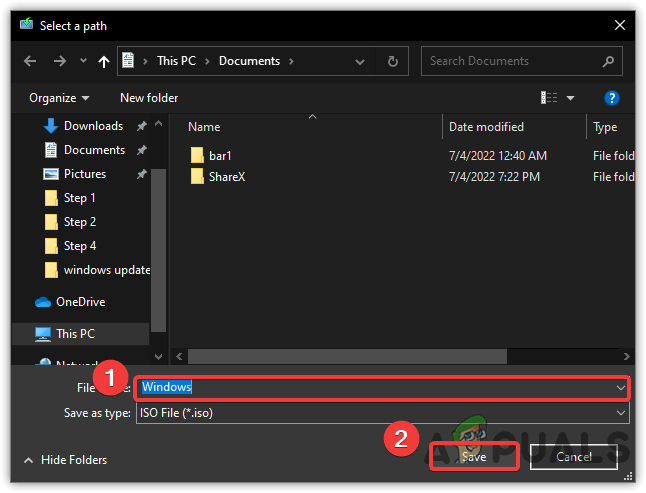
Downloading ISO Disc Image - Once you selected it, it will start creating ISO File
- Once done, navigate to the location where the ISO file is located
- Right-click on it and select Mount
- Run the Setup file by double-clicking on it
- Then, follow the on-screen instructions and at the end make sure to check the option Keep My Files
- Once done, your Windows should be updated successfully.


