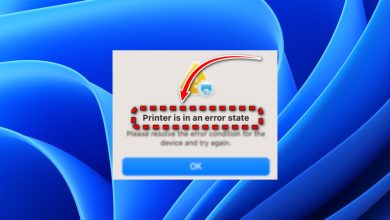
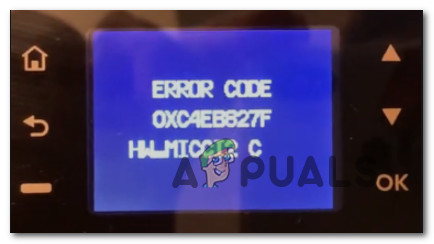
Fix HP Printer Error OXC4EB827F (Troubleshoot)
Some Windows users attempting to print content on their HP printer are reporting that the machine suddenly becomes unresponsive to commands before finally stopping the printing job and displaying the OXC4EB827F error code.
After investigating this particular issue thoroughly, it turns out that there are several different underlying reasons that might cause your HP printer to display the OXC4EB827F error code:
- Generic printer communication issue – If your HP printer is connected to a Windows 10 computer, you might expect to see this error due to a queue glitch. This is very common with HP and Canon printers. In this case, you should be able to fix this problem by running the Printer troubleshooter utility and applying the recommended fix.
- Firmware glitch – This problem can also occur due to a case where the native new HP firmware is available on your printer glitches out and refuses to take on new printer jobs. In this case, a power cycle operation should fix the issue automatically in the vast majority of cases.
- Outdated printer firmware – If your printer is waiting to install a critical firmware update, you will have to download and install the mandatory update before it can resume the active printing jobs. You can do this manually, from your printer menu using the HP Smart App or you can do it automatically if your HP printer supports it.
- Underlying hardware issue – Under certain circumstances, this problem can be caused by some type of hardware problem that cannot be resolved by a non-technical. In this case, you should get in contact with an HP Live agent for the guidance of getting your printer fixed (or sending it for repairs if you’re dealing with a hardware issue)
Now that you are familiar with every potential reason that might spawn the OXC4EB827F error code, here’s a list of methods that other affected users have successfully used to resolve the problem and use their printer normally:
Using the Printer Troubleshooter
If you’re using Windows 10, you can use a built-in utility at your disposal that should be capable of resolving the issue automatically if the error is covered by one of the many automated repair strategies covered by the Printer Troubleshooter.
But this will only be effective if you’re not dealing with a hardware issue.
When you start the Printer Troubleshooter, the utility will start analyzing your current situation and determine if any of the repair strategies included are applicable in this situation. If one of them is a match, you will be prompted to apply the fix. If everything goes well, this will end up resolving the issue with minimal hassle.
Follow the instructions below to run the Printer Troubleshooter:
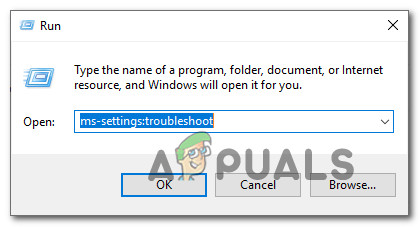
- Press Windows key + R to open up a Run dialog box. Then, type” ms-settings:troubleshoot” and press Enter to open up the Troubleshoot tab of the Settings app.
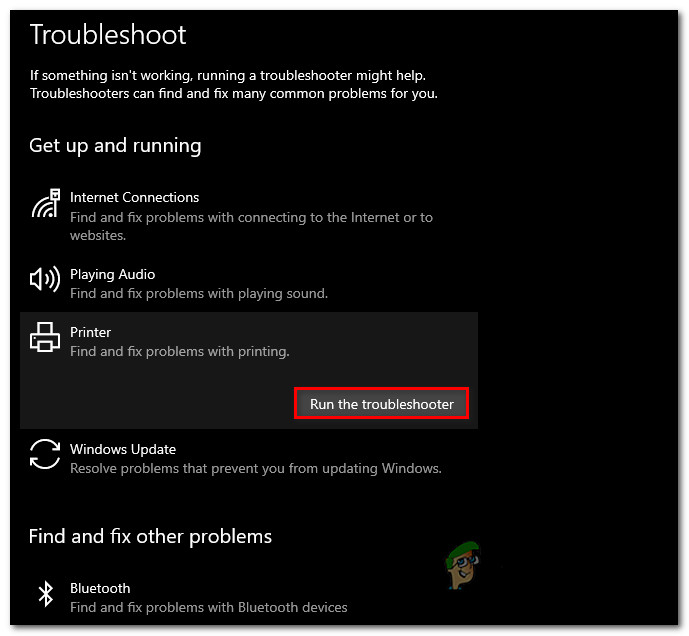
Opening the Troubleshooter tab - Once you’re inside the Troubleshooting tab, move to the Get up and running tab and click on Printer. Then, from the list of available options, and click on the Run the troubleshooter button.
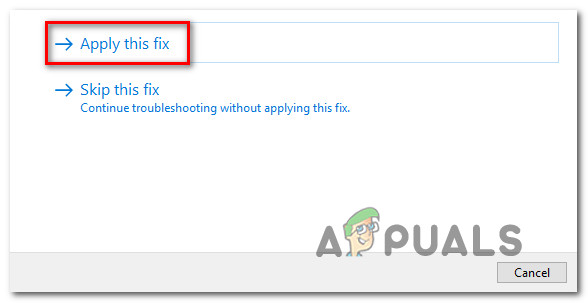
Running the Printer Troubleshooter - After the scanning period is complete, then click on Apply this fix if a repair strategy is recommended.
Applying the recommended fix - After the initial investigation is complete, close the troubleshooting window and see if you’re still encountering the same error message when trying to print something from your HP printer.
If the same issue is still persisting, move down to the next method below.
Power-Cycle Printer HP Printer
If the Windows troubleshooter was not able to treat the issue with your HP printer, chances are this problem is occurring due to a glitch with your printer.
In this case, before you move on to other troubleshooting guides, the first thing you should do is reset the entire printing mechanism – The procedure of doing so is pretty much universal and will be applicable to any HP printer model you might be using (LaserJet and OfficeJet).
NOTE: This operation is by no means technical and will not expose you to the risk of damaging your printing device. This is the equivalent of doing a factory reset on other devices. If the problem is related to a firmware glitch, the procedure below should resolve it swiftly.
Here’s a quick guide on power cycling your HP printer device:
- The first thing you should do is ensure that your printer is fully turned on and in idle mode (no job currently active). If you can still hear noises coming from your printer, don’t move forward! Instead, wait patiently until the machine becomes silent before moving down to the next step below.
- After you ensure that your printer is running in idle mode, go ahead and disconnect the power code from the rear of your printer. After you do this, ensure that you’ve also removed the power cord from the wall outlet.
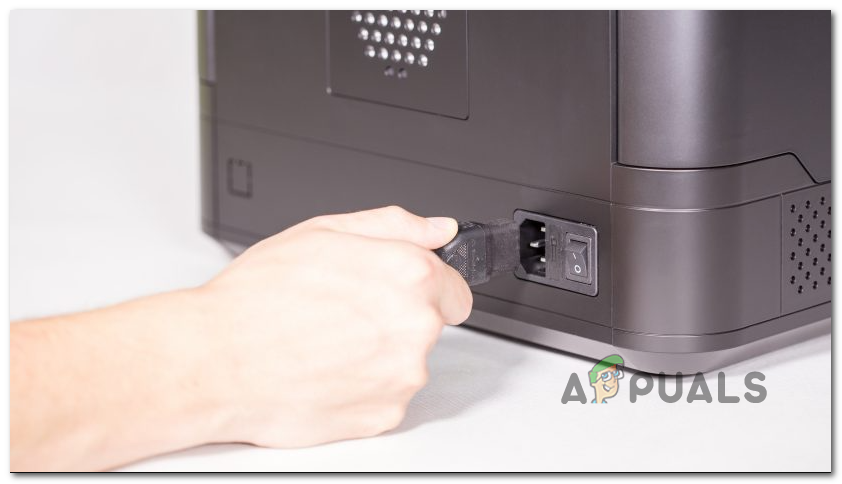
Unplugging your printer - After you unplug the cord, wait for at least 60 seconds before plugging the cord back in in order to ensure that the power capacitors are completely drained.
- Next, reconnect the power cord and start your printer conventionally.
- Once the warm-up period is finished, initiate another printing job, and see if the problem is now fixed.
In case you are still seeing the same OXC4EB827F error, move down to the next potential fix below.
Update HP Printer Firmware
As it turns out, you can also expect to see the OXC4EB827F error if you’re using a deprecated printer version that is not able to properly communicate with a Windows 10 computer.
HP regularly releases new printer versions aimed at improving quality of life and fixing bugs and glitches. But every once in a while, they end up releasing a mandatory update that is required in order to make the printer compatible with the OS build that it’s currently connected to.
If the reason why you are seeing the OXC4EB827F error code is that you’re missing a critical update, your next step should be to update your printer firmware to the latest available.
When it comes to updating your Hewett Packard printer driver to the latest, you have 3 ways forward. Feel free to follow any of the following guides (if supported by your printer) below to bring your printer build to the latest.
A. Update directly from the printer
The instructions below will only work as long as you’re using a printer released after 2010. In order to be able to update directly from the printer, your device needs to support Web Services and have access to the Internet.
Note: The exact instructions on installing a pending firmware update on your printer will vary a little from model to model.
However, we’ve created a general guide that should make it easier for you to install the pending update:
- On printers with an ePrint button or icon touch or press the HP ePrint icon, then access the Setup (Settings menu). Next, look for a setup entry named Product Update or Check Product Updates.
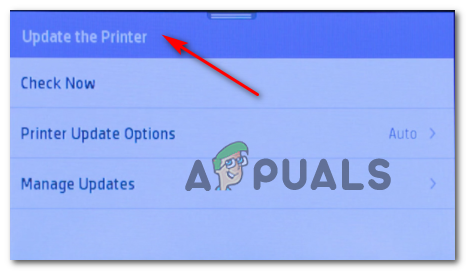
Updating the printer Note: On printers with text-based menus, access the Setup / Settings / Service. Next, access the Preferences / Printer Maintenance / Tools menu, then choose Web Services / Printer Update / LaserJet Update.
- If you see the Terms of Service or sign in with your account, follow the instructions and enable Web Services if required.
- Wait until the update procedure is complete, then restart your printer manually if it doesn’t do so by itself and see if the problem is fixed at the next system startup.
B. Download newer firmware manually
If you’re using an older HP printer that doesn’t support web services, you’ll need to download & install the latest firmware update manually from the HP Customer Support download page.
Important: this is applicable on both Windows and macOS computers.
Follow the instructions below to download & install newer printer firmware manually:
- Make sure that your printer is connected to your local network (via ethernet or USB cable).
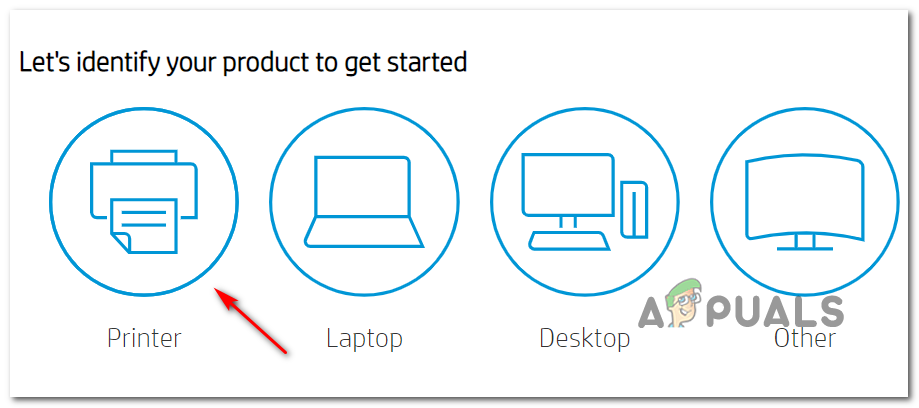
- Next, open up the HP Customer Support Download Page and click on Let’s identify your product to get started.
- AFter you do this, click on Printer and follow the on-screen instructions to identify the latest firmware update for your printer
Accessing the printer category - You will be prompted to type in your printer model. Do so, then click on Submit and select the operating system (Windows or macOS).
- The next step is to click on Firmware, then click on Download and wait for the download to finish.
- Once the file is finally saved on your computer, open it to start the firmware updating process.
- Once you’re finally inside the installation window, follow the on-screen instructions to complete the installation of your printer’s firmware.
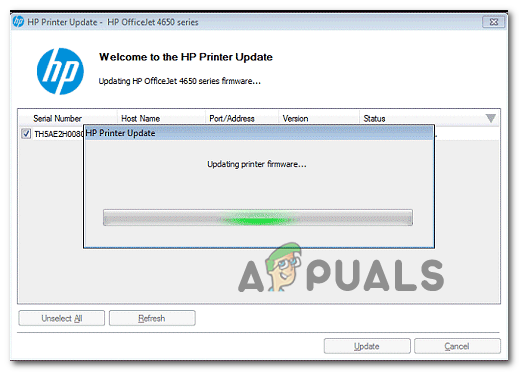
Updating the printer firmware - Once the installation is complete restart both your computer and your printer, then see if the problem is resolved.
If you already tried this method and you’re still seeing the same error when tying to print or you were already on the latest firmware version available, move down to the final potential fix below.
Contact HP Support
If none of the potential fixes above have worked for you, the only viable thing you can do by now is to get in contact with HP support.
We found several users that went this route and reported that a tech agent successfully troubleshoots the issue for them remotely. But this will work only if the problem is not hardware-based.
By all accounts of users who interacted with a live agent, HP support is fairly responsive as you can expect to reach a live agent without much trouble. The way it usually goes is they’ll offer support over the phone through a series of troubleshooting steps and if the problem still persists, you’ll be asked to send the device in for repairs.
Here’s a quick guide on getting in touch with an HP live agent:
- Open up your default browser and visit the official support page of HP.
- From the list of options, click on Printer at the top of the page.

Accessing the Printer category - At the next screen, enter your printer serial number inside the Serial Number box and click on Submit.
- After you successfully managed to identify your HP printer model, you can advance to the menu by navigating through HP Contact Forms > Get phone number.
- Use the recommended phone number to get in contact with a qualified technician, then follow through with the recommended troubleshooting steps given by the live agent.