How to Stop or Remove the Antimalware Service Executable on Windows 11
You don’t have to look very far to realize that the Antimalware Service Executable is destroying the Windows 11 experience for some users. On low-end PCs, there are a lot of user reports where this service takes up all the available RAM & CPU processing power. This article will help you remove this executable or stop it from damaging your daily usage of Windows 11.

We’ve investigated this particular issue thoroughly and it turns out that you will not be able to completely remove the anti-malware service executable as it’s an intrinsic part of the Windows Kernel.
The best you can hope to do is disable it. And when it comes to doing this, you have a few different options available to you.
- Disable via the GUI of Windows 11 – If you haven’t already attempted the most straightforward solution, you should consider disabling Windows Security before attempting to stop the Antimalware Service Executable. This will also disable all underlying services, including the Antimalware Service Executable.
- Disable the Health Service via Registry Editor – One of the most efficient ways to effectively cut off the antimalware service executable from being able to use your system resources is to use the Registry Editor to disable the HealthService value. Doing this will ensure that all Windows Defender components (including the Windows Defender Security Center) will be completely disabled.
- Disable the entire Windows Defender via Regedit – It is advisable to use Registry Editor to change the default behavior of the Windows Defender component if you wish to disable the antimalware service executable at its source.
- Disable via an elevated Command Prompt – If you don’t want to use Registry Editor, you may disable Microsoft Defender simply using the Command Prompt. Additionally, you may use the Command Prompt to alter the registry settings with only one line of code.
- Disable via Group Policy Editor – You may also disable the anti-malware executable without using a terminal by utilizing the Local Group Policy Editor if you are unable to open an elevated CMD prompt or if you’re just seeking for a way to do it.
- Install a third party antivirus – Microsoft Defender will instantly stop itself if you install an antivirus product from a different vendor, thus the problem you were experiencing should be resolved.
- Delete the Microsoft Defender folder – Users have claimed that all it took to fix their machines’ Antimalware Service Executable problems was to delete the Windows Defender folder.
- Disable the Windows Defender Service – You might be possible to resolve problems with Antimalware Service Executable by just disabling the Microsoft Defender service if you wished to prevent any permanent alterations.
- Disable Windows Defender Scheduled Tasks – Windows Defender need several tasks to be scheduled to work effectively. Sadly, this might cause problems with the Antimalware Service Executable. However, the issue may be quickly fixed by stopping the tasks that were planned in advance.
Now that we covered all the potential causes you might use as fuel to scrape off the Antimalware Service Executable off your Windows 11 installation, here’s a list of methods that will allow you to stop or remove the antimalware service executable.
1. Disable via Windows GUI
If you haven’t tried the most obvious fix yet, you should start your journey of trying to disable the Antimalware Service Executable by attempting to disable Windows Security.
In doing this, every underlying service (including the Antimalware Service Executable) will also be disabled.
Warning: Going this route also means that you will leave your system vulnerable to malware and security exploits. Only follow the instructions below if you know what you are doing.
If you want to disable the Antimalware Service Executable from the native menu of Windows 11, follow the instructions below:
- To launch the Settings app, press the Windows key + I simultaneously.
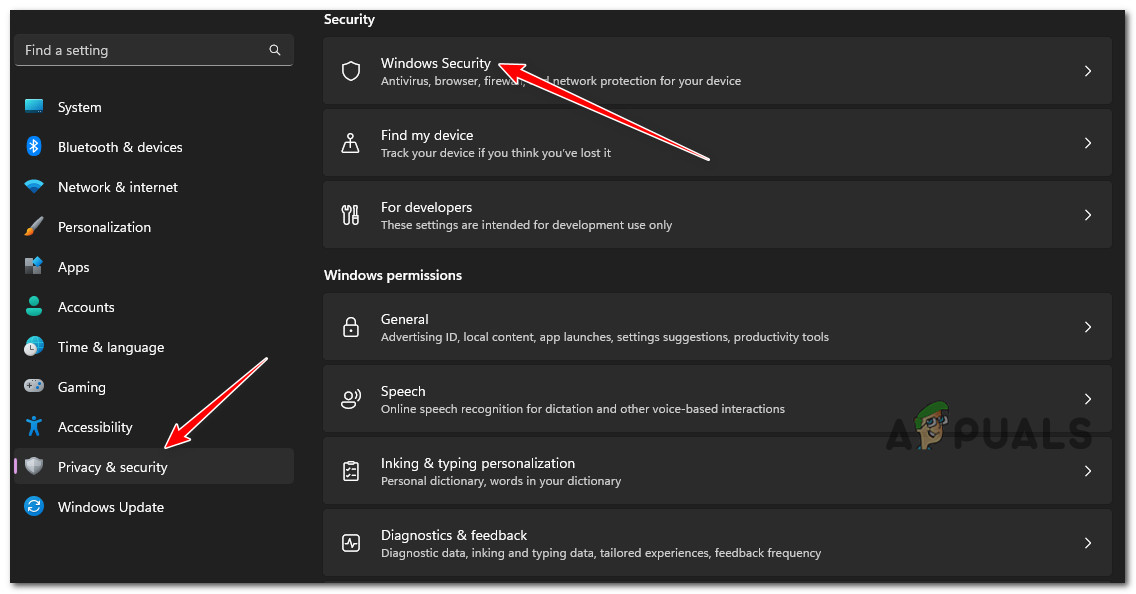
- Select Privacy & Security from the menu on the left side of the screen.
- Navigate to the window’s right pane, and click on Windows Security.
Access the Windows Security tab - At this point, a new window will emerge. From the top of the newly appeared menu, click on Open Windows Security.
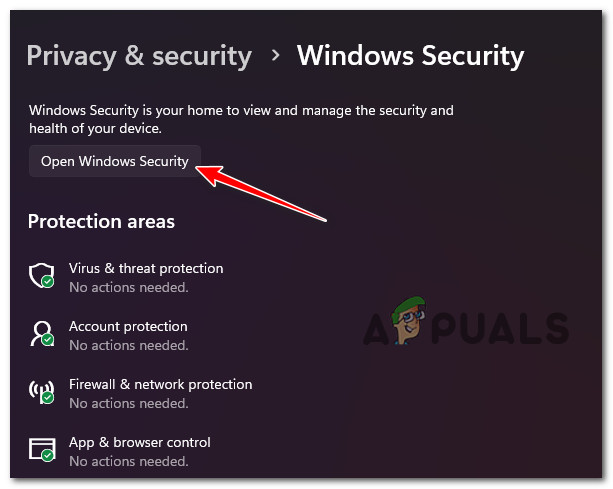
Open Windows Security - From the newly opened Windows Security menu, click on Virus & Threat Protection.
- Once you arrive at the next screen, turn off the protection for real-time. You also have the option to deactivate all of the additional features that are available on this page and our recommendation is to do so.
- Reboot your PC and see if the Antimalware Service Executable remains disabled after the next startup.
If this method didn’t ensure that the service remains disabled or if you’re looking for a different approach, move down to the next method below.
2. Disable the via Registry Editor
Deactivating the HealthService value in the registry using the Registry Editor is one of the most effective ways to prevent the antimalware service executable from accessing your system’s resources correctly.
This is one of the most efficient approaches. By carrying out these steps, you will ensure that each and every component of Windows Defender, including the Windows Defender Security Center, will be completely inactive.
Several affected users that we’re looking for ways to deal with the high-resource consumption of the AntiMalware Service executable have reported that this method was the only thing that got the job done.
Important: Using this method also means leaving your system severely exposed to malware infections if you don’t have a 3rd party antivirus to replace the built-in security component that you’re about to disable.
If you are ready to use this method and you understand the consequences, follow the instructions below:
- Press the Windows key + R to open up a Run dialog box.
- Next, type ‘regedit’ inside the text box and hit Ctrl + Shift + Enter to open up the Registry Editor with admin access.

Access the Registry Editor - If you are prompted by the User Account Control (UAC), click Yes to grant admin access.
- Once you are finally inside Registry Editor, use the side menu on the left to navigate to the following location:
Computer\HKEY_LOCAL_MACHINE\SYSTEM\CurrentControlSet\Services\Security\HealthService
Note: You can either get to this location manually, or you can paste the location directly into the nav bar at the top and press Enter to get there instantly.
- After you get to the correct location, move to the right-hand side menu and double-click on the Start Type value.
- Next, change the Base to Hexadecimal and set the Value data to 3.
- After successfully enforcing this change, you can safely close the Registry Editor.
- Next, press Ctrl + Shift + Esc to open up Task Manager. If the simple interface opens by default, click on More Details.
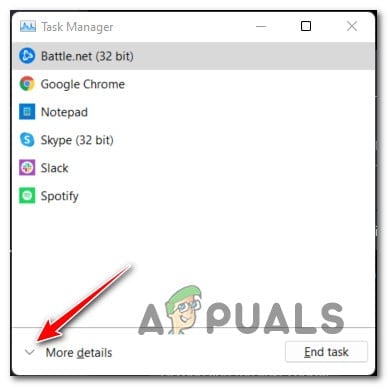
Click on More Details - Once you’re inside the expert interface of Task Manager, click on Services from the left-hand side menu.
- Next, look for the WinDefend service, right-click on it and choose Stop from the context menu.
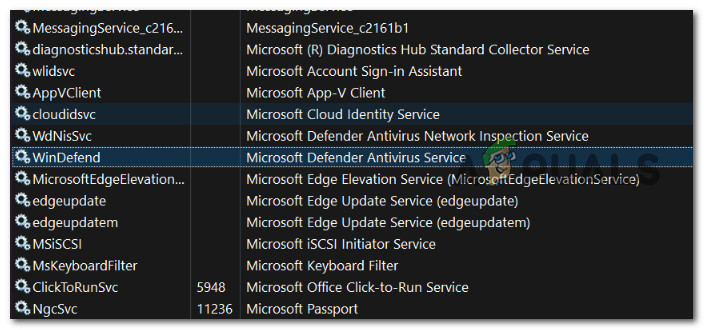
Stopping the Windows Defend menu - Reboot your PC and see if the Antimalware service executable remains disabled.
If you’re looking for a different approach, move down to the next method below.
3. Disable the entire Windows Defender component via Registry Editor
If you want to disable the antimalware service executable at its source, the best course of action would be to use Registry Editor to modify the default behavior of the Windows Defender component.
This method involves creating a new registry value inside the Windows Defender key to disable the entire built-in security component. But remember that this action also leaves your system vulnerable to security breaches if you don’t have an antivirus to replace the built-in component.
Important: Our recommendation is to back up the registry before you start following the instructions below.
If you understand the consequences and you want to move forward with this method, follow the instructions below:
- Press the Windows key + R to open up a Run dialog box.
- Next, type ‘regedit’ inside the text box and hit Ctrl + Shift + Enter to open up the Registry Editor with admin access.
Access the Registry Editor - If you are prompted by the User Account Control (UAC), click Yes to grant admin access.
- Once you are finally inside Registry Editor, use the side menu on the left to navigate to the following location:
HKEY_LOCAL_MACHINE/SOFTWARE/Policies/Microsoft/Windows Defender
- Next, use the menu on the left to right-click on Windows Defender, choose New, then choose Dword from the list of available options.
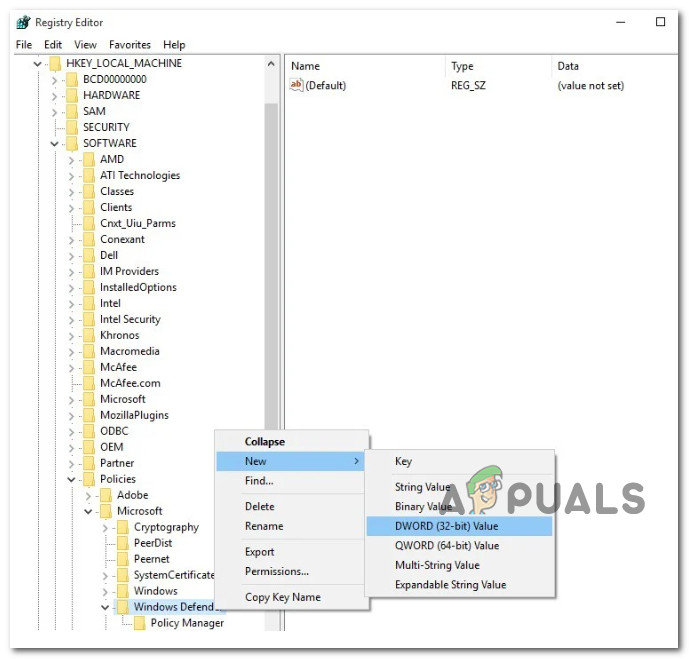
Access the Dword menu - Once the new Dword is created, name it DisableAntiSpyware.
- Next, double-click on it, Set the base to Hexadecimal, and set the value to 1.
If you can’t use this fix for some reason (Registry Editor is inaccessible) or you’re simply looking for a different approach, move down to the next method below.
4. Disable via Command Prompt
You may disable Microsoft Defender by utilizing the Command Prompt if you choose not to use Registry Editor. In addition, you may modify the settings of your registry with only a single line of code by utilizing the Command Prompt.
This will accomplish the same thing as the method directly above but it’s slightly faster and easier to perform since you can’t mess anything up by pasting a command.
If you followed the method above, there’s no point in following the instructions on this method since the end result is still the same – you’ll create a DisableAntiSpyware key and set its value to 1.
Note: It’s important to ensure you’re opening Command Prompt with admin access. Otherwise, the command won’t work.
Here’s how to disable the antimalware service executable from an elevated Command Prompt:
- Press the Windows key + R to open up a Run dialog box. Next, type ‘cmd’ inside the text box, then press Ctrl + Shift + Enter to open an elevated Command Prompt.
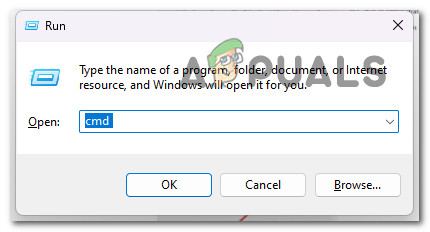
Open an elevated CMD window - Click Yes to grant admin access at the User Account Control (UAC).
- Once you’re finally inside an elevated Command Prompt, type or paste the following command to disable the entire Anti Spyware component effectively:
REG ADD "hklm\software\policies\microsoft\windows defender" /v DisableAntiSpyware /t REG_DWORD /d 1 /f
- Once this command has been successfully processed, your registry will be modified, and the entire Microsoft Defender component will be disabled.
If you’re looking for a different approach or cannot access the Command Prompt utility with admin access, move down to the next method below.
5. Disable via Group Policy Editor
If you cannot launch an elevated CMD prompt or you’re simply looking for a method that will allow you to disable the anti-malware executable without a terminal, another way to do it is by using the Local Group Policy Editor.
Important: the Local Group Policy Editor is only available for Pro and Enterprise versions of Windows. If you are on Home, Education, N or KN versions, you can sideload the Local Group Policy editor by following these steps.
If you have the Group Policy Editor available to you and you wish to disable the antimalware service executable by disabling the associated Real-time Protection policy, follow the instructions below:
- Start by pressing the Windows key + R to open a Run dialog box.
- Next, type ‘gpedit.msc’ inside the text box, then press Ctrl + Shift + Enter to ensure that the Group Policy Editor opens with admin access.

Open the Local Group Policy Editor - Click Yes to grant admin access at the User Account Control (UAC).
- Once you’re inside the Group Policy Editor, use the side menu on the left to navigate to the following location:
Computer Configuration/Administrative Templates/Windows Components/Microsoft Defender Antivirus/Real-time Protection
- Once you arrive inside the correct location, move over to the right-hand pane and double-click on the Turn off real-time protection policy.
- Next, modify the status of the Turn off real-time protection policy to Enabled, then hit Save to make the changes permanent.
- Reboot your PC to enforce the changes you just did.
If you’re looking for a different approach, move down to the next method below.
6. Install a third-party antivirus
A process that is closely associated with Microsoft Defender is known as Antimalware Service Executable.
However, Microsoft Defender cannot coexist with a third-party antivirus program; hence, if you are experiencing issues with Antimalware Service Executable, you should consider installing a third-party antivirus program on your computer.
There is a wide selection of excellent antivirus software on the market today; nevertheless, the ideal answer is to select an excellent antivirus program with a resource effect that is as little as possible.
If you use this antivirus software, the stress on your system’s CPU will be reduced, allowing it to operate at its maximum potential.
It protects your personal computer by utilizing cloud computing, eliminating the need for time-consuming software updates and scans.
If you install an antivirus program from a company other than Microsoft, Microsoft Defender will disable itself immediately, and the issue you were having should be rectified.
With this in mind, here’s a list of 5 suitable 3rd party antivirus suites that you should consider.
If you’re looking for a different approach, move to the next method below.
7. Delete the Microsoft Defender Folder
Users have reported that removing the Windows Defender folder was all required to resolve the issue with Antimalware Service Executable on their computers.
It is necessary for us to point out that Microsoft Defender is an essential part of Windows; removing it may result in the emergence of further problems; as a result, removing this directory is something you do at your own peril.
IMPORTANT: It is highly recommended that you establish a backup of your data and a System Recover point before deleting the directory. This will allow you to swiftly restore your computer in the event that something goes wrong.
When you delete this folder, Microsoft Defender will be removed from your computer, and the problem you were having should be fixed.
It is important to remember that Windows Update will install Microsoft Defender after each update, so you will need to perform this procedure again.
Note: Deleting core Windows components is a dangerous solution meant for advanced users, and we are not responsible for any new problems that may emerge after deleting the Windows Defender folder. This is because deleting core Windows components is a solution that is designed for advanced users.
As was just indicated, to delete the folder, you must first become the owner of the Windows Defender folder. This is a prerequisite for the deletion process.
It is of the utmost necessity to have precise information if you do not know how to make a restore point or how doing so would be of assistance to you.
If you understand the consequences and you are ready to enforce this method, follow the instructions below:
- Start by pressing the Windows key + R to open up File Explorer.
- Next, navigate to Program Files and locate the Windows Defender folder.
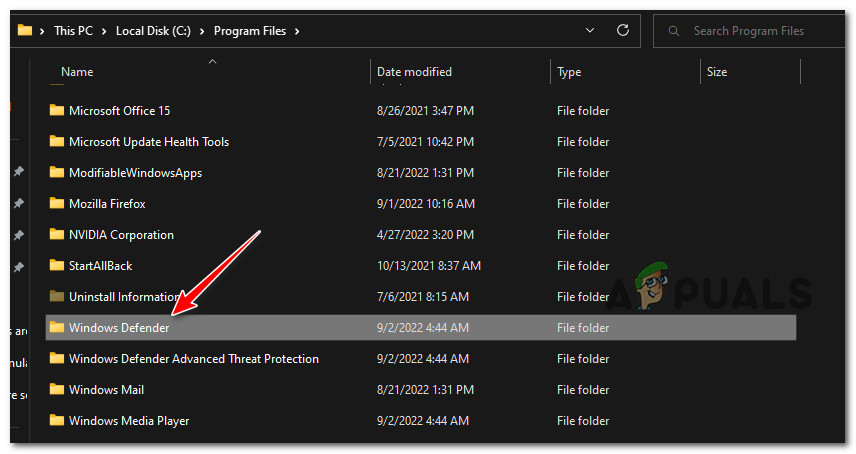
Locate the Windows Defender folder - Follow these steps to take ownership of this folder.
- Once you obtain full ownership, delete the Windows Defender folder.
If you don’t want to risk it and delete this essential folder, move down to the next method below.
8. Disable the Windows Defender Service
If you’re having issues with Antimalware Service Executable and want to avoid any irreversible changes, you might be able to fix the problem by simply turning off the Microsoft Defender service. This is one of the possible solutions.
After you have disabled this service, the issue should be completely remedied, and things should go back to how they were before.
Note: Keep in mind that this method has a lesser likelihood of working when compared to the other methods featured so far in this article.
If you want to limit the scope of the antimalware service executable by disabling the main Windows Defender service, follow the instructions below:
- Press the Windows key + R to open up a Run dialog box.
- Next, type ‘service.msc’ and press Ctrl + Shift + Enter to open a Run dialog box.
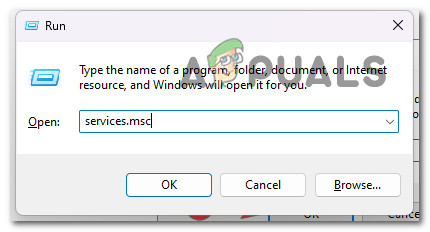
Access the Services screen - Click Yes to grant admin access at the User Account Control (UAC).
- Once inside the Services screen, scroll down through the list of available services and locate the Windows Defender Antivirus Service.
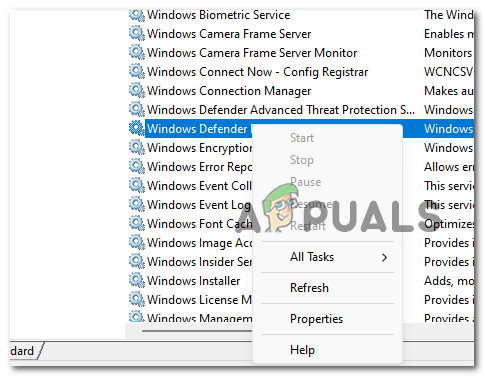
Access the Windows Defender - Once you see the context menu of Windows Defender, click on Properties from the context menu.
- Next, access the General tab and make sure the Startup type is set to Manual, then click on Stop to effectively disable the service.
If you think your issues with the antimalware service executable is related to a scheduled tab, move down to the next method below.
9. Disable Scheduled Tasks
Certain operations needed to be scheduled for Windows Defender to function properly. Unfortunately, doing so might lead to issues with the Antimalware Service Executable. However, you may easily solve the problem by turning off the tasks prepared in advance.
After you have disabled these tasks, the Antimalware Service Executable should no longer be using up your system resources after you have completed this step.
For specific instructions on how to disable scheduled tasks related to Windows Defender, follow the steps below:
- Press the Windows key + R to open up a Run dialog box.
- Next, type ‘taskschd.msc’ and press Ctrl + Shift + Enter to open Task Scheduler with admin access.

Open Task Scheduler - At the User Account Control (UAC), click Yes to grant admin access.
- Navigate to Task Scheduler Library in the left pane, pick Microsoft, then Windows, and choose Windows Defender from the drop-down menu.
- You should notice four different jobs on the right side of the screen. Choose all four of the jobs, then turn them off. Getting rid of them has been suggested by other users, so you may give it a shot.
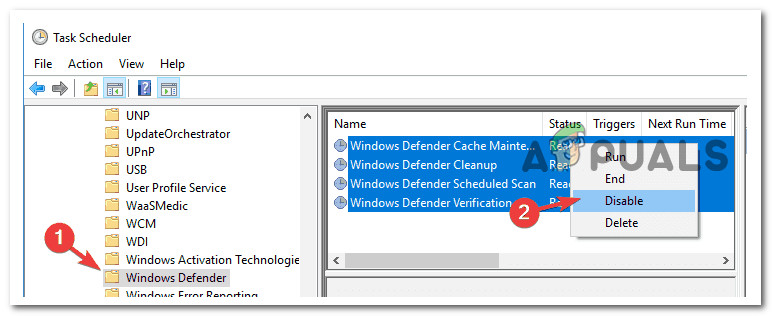
Access the Windows Defender


