How To Play Minecraft VR – Explained in Easy Steps
 Reviewed by Huzaifa Haroon
If the previous QuestCraft method seems too complex or risky, you may prefer this official method, which does not involve third-party apps. You can quickly experience Minecraft VR by connecting your Oculus headset to your PC or laptop via cable or Wi-Fi using Air Link.
- Install the Oculus desktop app on your computer.
- Within the Oculus app, navigate to Devices and tap “Add Headset“.
- From the list of supported devices, choose Quest 2.
[/caption> - You will be prompted to select either a Wired or Wireless (Air Link) pairing method:
- For wired connections, connect your Oculus headset to a USB 3.0 (or faster) port on your computer. Click Continue and follow the prompts. This ensures a stable and high-speed connection for optimal VR performance.
- For wireless connections, navigate to the Experimental Features section in Settings on your headset and enable Air Link. Enter the pairing code displayed on your headset into the Oculus app on your PC and click Confirm. This allows you to experience VR without the need for cables by using your Wi-Fi network.
Please note that while this is the official and most straightforward way to enjoy Minecraft VR, mod support is not available and roomscale tracking is not supported using this approach.
Minecraft VR via Vivecraft
The final method involves using a popular third-party solution called Vivecraft. This option is suitable only for Minecraft Java Edition and requires you to connect your headset to your PC, either by cable or wirelessly. The advantage of Vivecraft is that it allows you to use Forge mods, significantly enhancing gameplay with a range of additional features.
- Download and install Vivecraft. Multiple versions are available; choose the latest or the specific version that supports Forge mods. Note that Vivecraft does not support Fabric mods. Avoid any installer with “NONVR” in the file name, as these are not intended for VR play.
- During installation, tick the box labeled ‘Install Vivecraft with Forge‘ to enable Forge mod compatibility.
- Ensure your Minecraft launcher is completely closed during Vivecraft installation. Afterward, start Minecraft using the Vivecraft profile.
- Next, connect your Oculus headset to your PC and establish the link through the Oculus desktop app.
- Install SteamVR from Steam. If you do not already have Steam installed, make sure to install it first.
[caption id="attachment_312939" align="aligncenter" width="1599"] SteamVR Installation Page
 - Launch the Minecraft launcher on your computer and select the Vivecraft version in the version dropdown. Click Play—and your immersive VR adventure begins.
Minecraft is one of the most influential and expansive sandbox games ever created, attracting players of all ages around the globe. Thanks to its vast range of unique mods and engaging multiplayer modes, Minecraft consistently offers fresh and exciting ways to play. However, after extended play, you may find the formula becoming a bit repetitive. If you are eager for a new perspective, why not transform the entire point of view with VR technology?
This exciting innovation is now possible using the Oculus Quest 2 (Meta Quest 2). Not only can you experience Minecraft in VR, but you can also install additional mods to further customize your gameplay, making the experience even more immersive and enjoyable. This comprehensive guide will walk you through three proven methods to play Minecraft in VR so you can choose the approach that best suits your needs.
Minecraft VR via QuestCraft
The first method utilizes QuestCraft. QuestCraft is an unofficial port that allows you to play Minecraft Java . Because it is not officially supported, there is a risk of service disruption if the platform is blocked or taken down. This method involves several third-party applications and takes a bit longer to set up, but it offers extensive modding capabilities.
- Begin by registering as a developer on the Meta website. Visit the Oculus developer page and create an organization. Accept the developer agreement and verify your account with either a phone number or credit card.
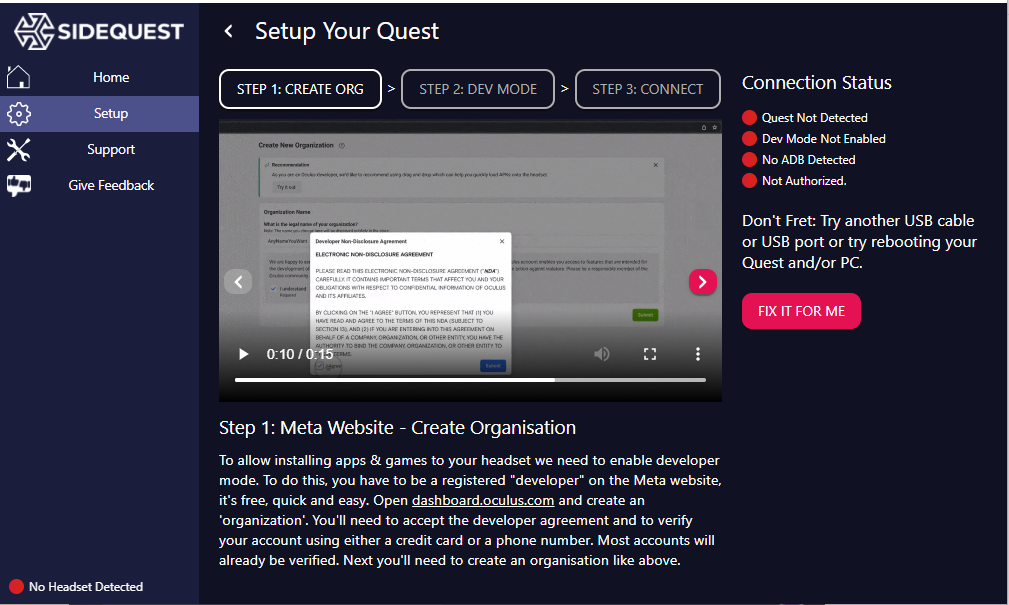
Organization Creation Instructions on SideQuest[/caption> - Download the Oculus Mobile App and enable Developer Mode from the Device Menu in the app. This is necessary to allow the installation of third-party software on your headset.
- Download and install SideQuest on your PC or laptop.
Organization Creation Instructions on SideQuest[/caption> - Connect your Oculus headset to your PC via a USB cable, then launch SideQuest. The application should automatically detect your headset. The first time you connect, you will need to approve a permissions prompt to continue.
- Install QuestCraft using the SideQuest app. After installation is complete, safely disconnect your headset from your computer and put it on.
[caption id="attachment_312923" align="aligncenter" width="1999"] [/caption>
 - On your Quest 2, access the apps menu and select ‘Unknown Sources‘ from the dropdown menu (this will be the last option on the list). This is required to launch applications that are not from the official Oculus Store.
- Locate and open QuestCraft from the Unknown Sources list, then grant it the permissions it requests to run.
- At this point, you will reach the Minecraft login screen. Enter your Microsoft account credentials to continue to the next stage.
- Go to Settings and choose Renderer. Select the third option, gl4es 1.1.5 (Open GL ES 3). While some users may skip this, it is a necessary step as recommended by the QuestCraft development team.
[caption id="attachment_312926" align="aligncenter" width="2340"]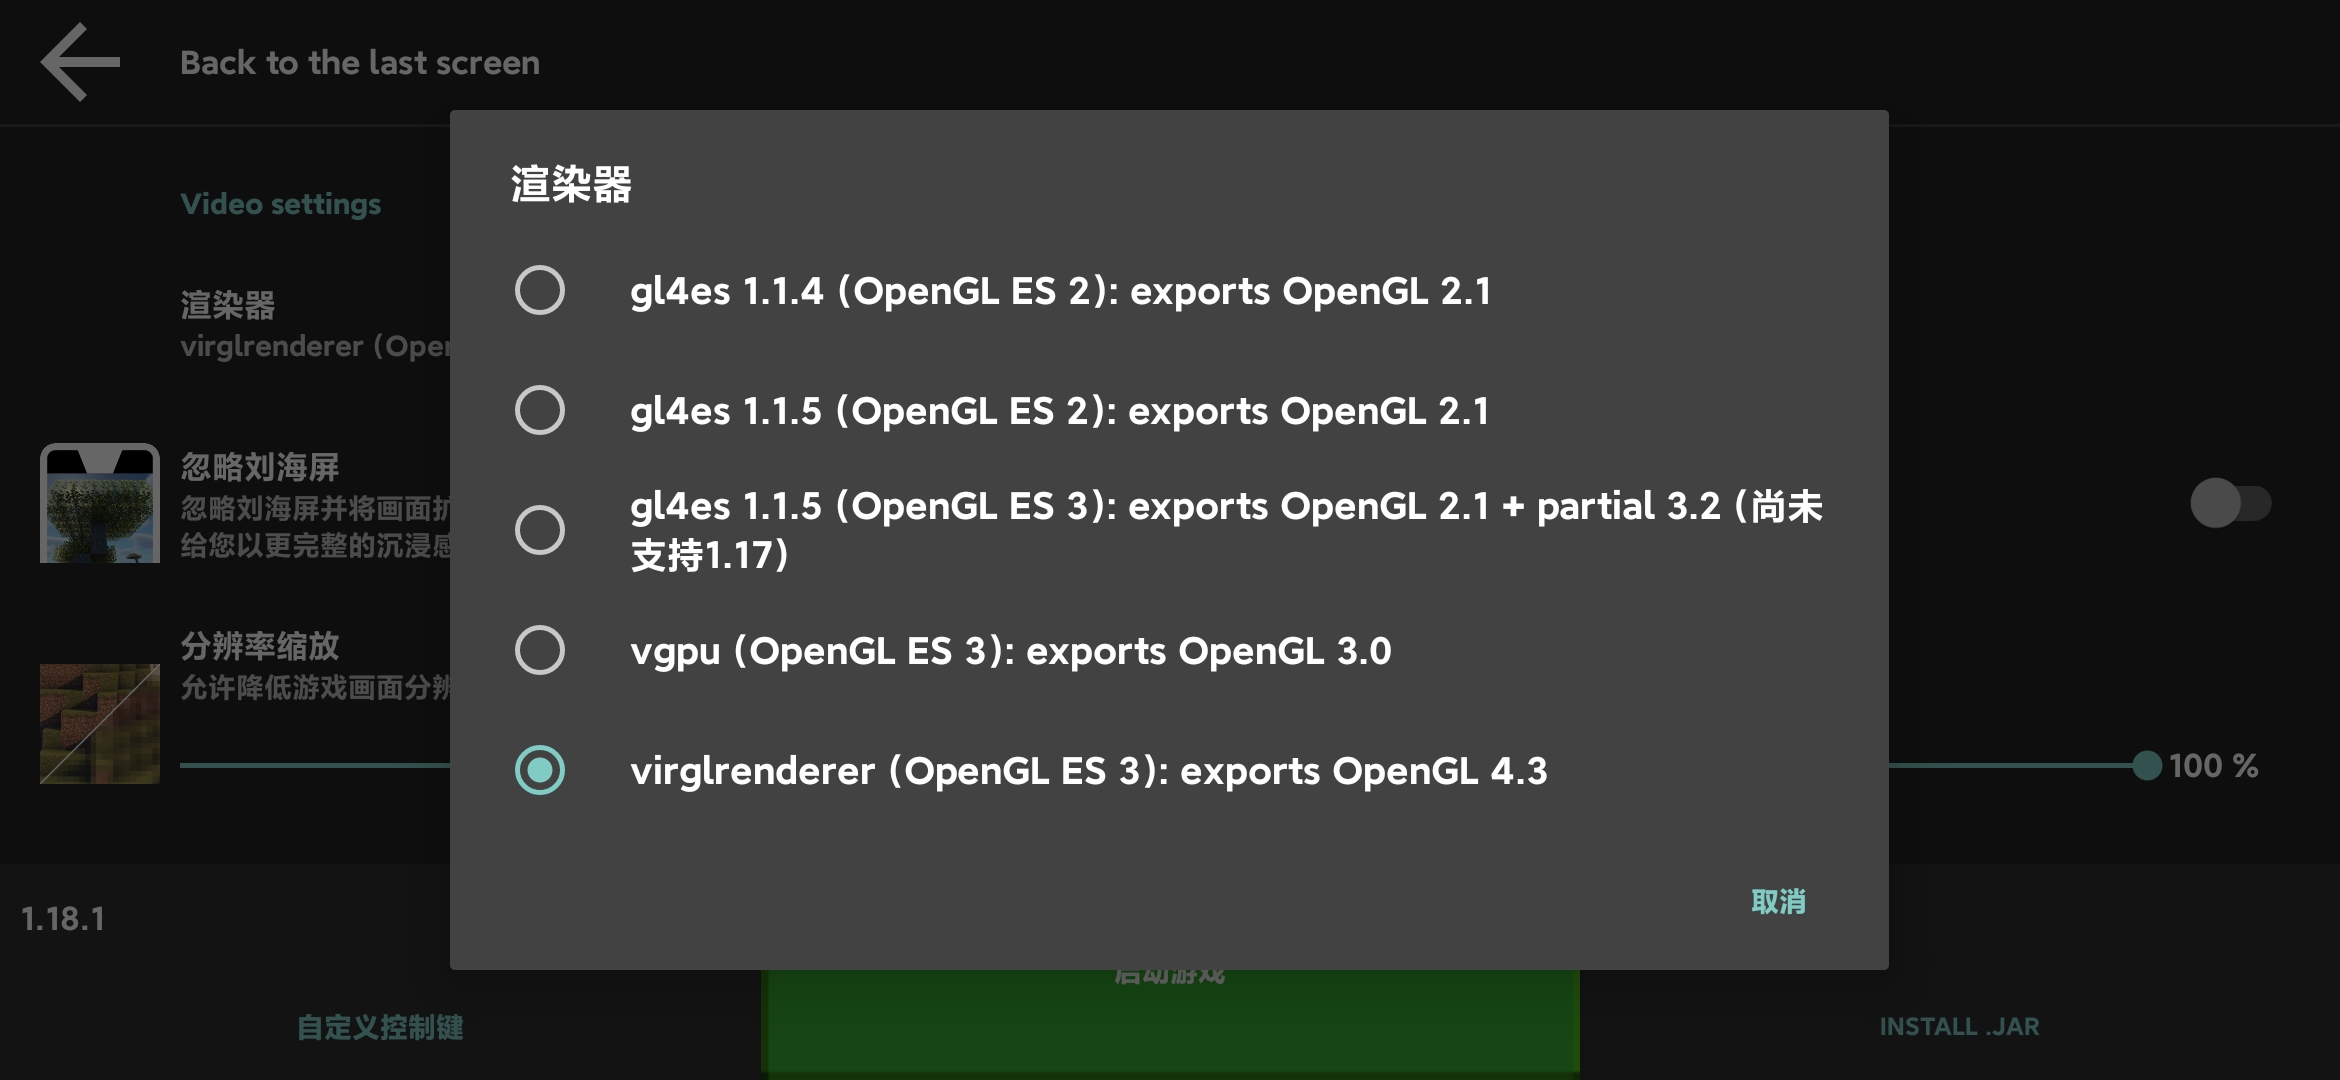 Renderer Screen for QuestCraft | GitHub[/caption>
 - From the version menu, select fabric-loader (this is the final option in the menu). Fabric-loader enables advanced modding functionality.
- Lastly, a Warning Prompt will appear prior to launching the game. Select Play Anyway to proceed. Note that game initialization may take a few minutes. Avoid disconnecting your headset during the loading process to prevent issues.
Minecraft VR via Wired/Wireless (Air Link)
If the previous QuestCraft method seems too complex or risky, you may prefer this official method, which does not involve third-party apps. You can quickly experience Minecraft VR by connecting your Oculus headset to your PC or laptop via cable or Wi-Fi using Air Link.
- Install the Oculus desktop app on your computer.
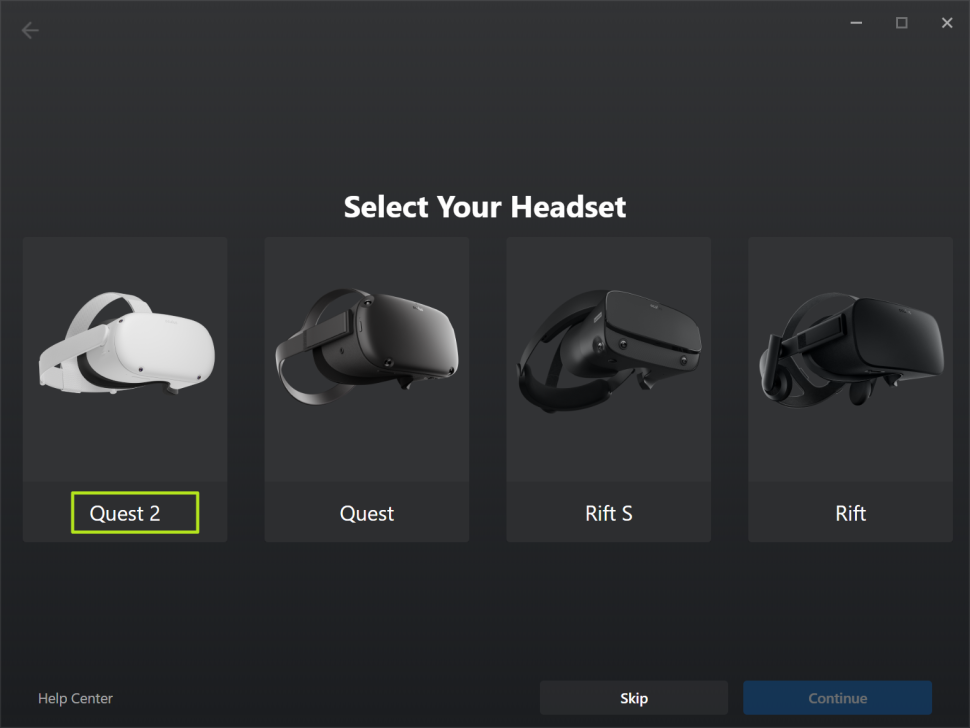
- Within the Oculus app, navigate to Devices and tap “Add Headset“.
- From the list of supported devices, choose Quest 2.
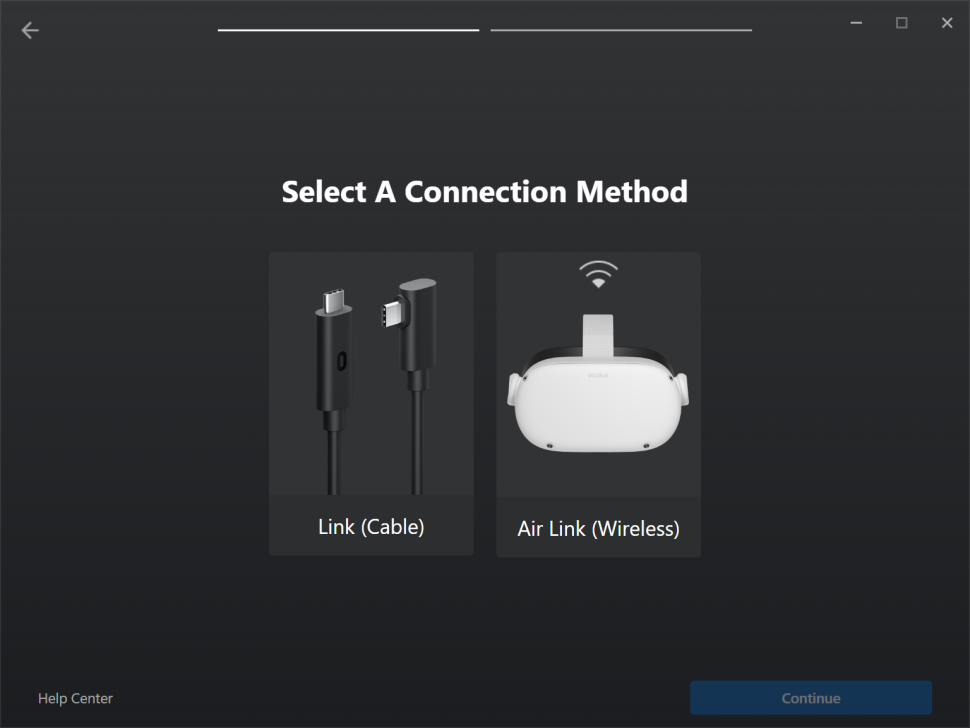
[caption id="attachment_312929" align="aligncenter" width="970"] [/caption> - You will be prompted to select either a Wired or Wireless (Air Link) pairing method:
- For wired connections, connect your Oculus headset to a USB 3.0 (or faster) port on your computer. Click Continue and follow the prompts. This ensures a stable and high-speed connection for optimal VR performance.
- For wireless connections, navigate to the Experimental Features section in Settings on your headset and enable Air Link. Enter the pairing code displayed on your headset into the Oculus app on your PC and click Confirm. This allows you to experience VR without the need for cables by using your Wi-Fi network.
Please note that while this is the official and most straightforward way to enjoy Minecraft VR, mod support is not available and roomscale tracking is not supported using this approach.
Minecraft VR via Vivecraft
The final method involves using a popular third-party solution called Vivecraft. This option is suitable only for Minecraft Java Edition and requires you to connect your headset to your PC, either by cable or wirelessly. The advantage of Vivecraft is that it allows you to use Forge mods, significantly enhancing gameplay with a range of additional features.
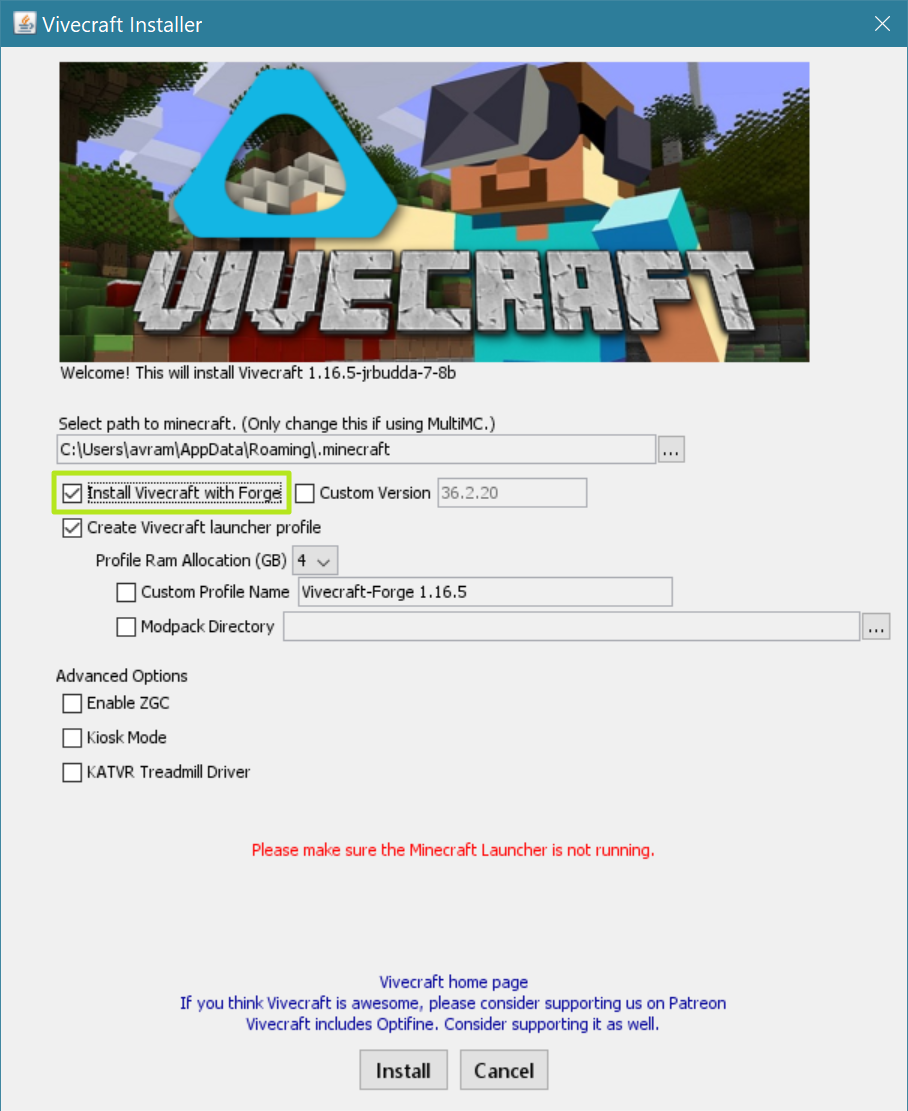
- Download and install Vivecraft. Multiple versions are available; choose the latest or the specific version that supports Forge mods. Note that Vivecraft does not support Fabric mods. Avoid any installer with “NONVR” in the file name, as these are not intended for VR play.
- During installation, tick the box labeled ‘Install Vivecraft with Forge‘ to enable Forge mod compatibility.
- Ensure your Minecraft launcher is completely closed during Vivecraft installation. Afterward, start Minecraft using the Vivecraft profile.
- Next, connect your Oculus headset to your PC and establish the link through the Oculus desktop app.
- Install SteamVR from Steam. If you do not already have Steam installed, make sure to install it first.
[caption id="attachment_312939" align="aligncenter" width="1599"] SteamVR Installation Page - Launch the Minecraft launcher on your computer and select the Vivecraft version in the version dropdown. Click Play—and your immersive VR adventure begins.
Reviewed by Huzaifa Haroon