How to Optimize Ubuntu Internet Speed with MTU Settings
While computer texts differ in their application of the term, Ubuntu uses the TCP Maximum Transmission Unit (MTU) to refer to the largest size a TCP packet a machine can pass over a TCP/IP networking connection. While calculating this value is relatively simple and defaults work on a majority of machines, it might be possible to further optimize your system if packets are fragmenting because of unusual settings. Sending large single outgoing packets is more efficient than sending multiple smaller outgoing ones.
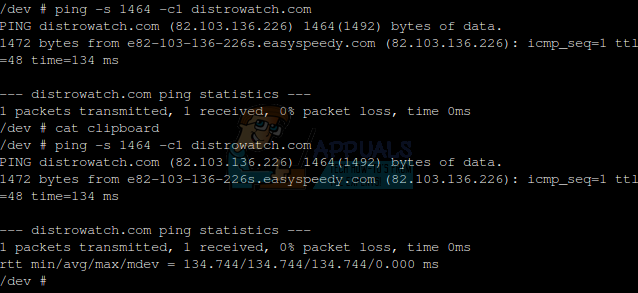
The easiest way to locate the correct MTU value for your machine is to open a terminal window. You can do this by holding down CTRL, ATL, and T, or by initiating it from the Unity dash. If you’re working with Ubuntu Server, you’ll be defaulted to a CLI interface without any graphical environment. Upon reaching the terminal window, type in ‘ping -s 1464 -c1 distrowatch.com’ and await the output. If you receive no response, it indicates that your network connection hasn’t been configured correctly. However, if proper output is received, look for a section that reads ‘1464(1492) bytes of data.’ This indicates that you are sending the packet with 28 bytes of header information.
Method 1: Examining ping Output for Packet Fragmentation
The ping command will let you know if the packet was sent in more than one fragment with multiple header data attached. Examine the output for any line that contains a warning similar to “Frag needed and DF set (mtu = 1492).” The wording of the warning may vary depending on the version of ping included with your Ubuntu. If this text is not present, it is more than likely that you are currently using an MTU measurement that is not sending out fragmented packets.
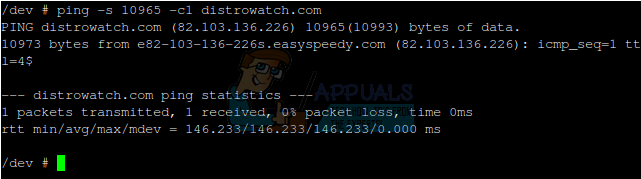
To find the most optimized MTU for your system, you need to run this ping command with a small packet size. Gradually, increase it until it begins to fragment, at which point you should consider it as your cut-off. Bear in mind that the MTU equals payload plus 28, as there needs to be some room for the header data. If you can increase the size to something very large without any fragmentation, your network interface might be capable of handling massive packets without generating fragments. The appearance of a ‘Frag needed’ warning indicates that any packet sent with a payload size equal to or greater than the one you ran will be sent as multiple packets. For instance, if you try ‘ping -s 2464 -c1 distrowatch.com’ without any warning, but ‘ping -s 2465 -c1 distrowatch.com’ results in a warning, this indicates that 2,464 plus 28 is the largest MTU setting that your TCP/IP configuration can handle before sending multiple fragmented packets. Pinpointing an exact value might take a few moments.
Once you have a value in mind from running the ping command multiple times, you’ll need to run sudo ifconfig to find a list of known network interfaces. Ubuntu and its derivatives hash out the root account, but we operated from a shell created by sudo bash for our examples. It’s recommended you rather just preface each command with sudo individually.
As soon as you know the correct device, try:
sudo ifconfig interfaceName mtu ####
Replace ‘interfaceName’ with the name of the network adapter with which you’re working, and then replace ‘####’ with the size you found plus 28 for header information. You can run ‘ifconfig’ to see what the default MTU was for your NIC and run it again multiple times to see if the previous command changes it. Some network interface adapters simply won’t allow you to change it. If that’s the case, then further optimization will, unfortunately, be fruitless. However, if this worked, you can actually make it permanent. Try running ‘ifconfig | grep MTU‘ to find all the values if you have multiple connectors. You can then match the values to the connectors with which you’re working.

Method 2: Making MTU Optimizations Stick
So far you’ve made no permanent change to your system. If you reboot, then you’ll wipe any changes out, which is good if you’ve made some sort of mistake and find that you can’t connect to the Internet any longer. On the other hand, if you’ve found an accurate value for your MTU, then you’ll need to edit the ![]() document. This is probably a good time to make a copy of it in case something happens. Try
document. This is probably a good time to make a copy of it in case something happens. Try ![]() or something similiar so you have a copy just in case. If you’d like to edit it graphically, then type
or something similiar so you have a copy just in case. If you’d like to edit it graphically, then type ![]() and enter your password. If you’re using Kubuntu, Xubuntu or Lubuntu, then you’ll need to replace gedit with the graphical text editor your Ubuntu respin uses. Xubuntu, for instance, uses mousepad instead of gedit. If you’re using Ubuntu Server or simply prefer working with the command line, then instead type
and enter your password. If you’re using Kubuntu, Xubuntu or Lubuntu, then you’ll need to replace gedit with the graphical text editor your Ubuntu respin uses. Xubuntu, for instance, uses mousepad instead of gedit. If you’re using Ubuntu Server or simply prefer working with the command line, then instead type ![]() , assuming you’re not using a root shell.
, assuming you’re not using a root shell.
Irrespective of the method you used to edit it, locate the name of the interface which ifconfig previously returned. Let’s assume you were looking at the first Wifi connector on your machine, which would probably be named wlan0 or something similar. In this case, try to find a snippet of code that begins with ‘iface wlan0 inet static’ or a similar phrase. Your results may vary, but the subsequent line will read ‘address’ followed by an IP address in the format ###.###.#.##. It may be formatted differently if you’re using a native IPv6 connection. You will also see a netmask and gateway line, followed by something that lists a hostname or a similar title. At the bottom, there will be another line that reads ‘mtu’, followed by a number. Replace this number with the optimized MTU value, save the document, and then exit the text editor. You will need to reboot the system to ensure the changes are correctly applied.
Should everything be fine after several reboots, then delete the interfaces.bak file in your ~/Documents directory. You could instead use sudo mv ![]() and then
and then
![]() if anything went awry in the process.
if anything went awry in the process.
Method 3: Editing TCP Receive Window (RWIN) Settings
Ubuntu refers to the largest amount of data that a host accepts before it acknowledges the sender as the RWIN value. If you download a 30 MB file, then the remote server doesn’t actually immediately send you a 30 MB block of data. Your Ubuntu host sends a specific RWIN number when it requests the file, and then the server begins streaming data until it’s reached the number of bytes before it waits for an acknowledgement that your system got the data. Once the server receives this, it begins to send additional blocks before waiting for another acknowledgement.
Latency is the time it takes to transmit and receive packets from a remote server. Connection rates contribute to this value, but so do numerous other delays. The ping command will explain latency in terms of round-trip time (RTT) numbers. Look at the output from our previous ping of DistroWatch. You’ll find a line that reads time=134 ms, which is how long it took for packets to go round trip from our Ubuntu machine to distrowatch.com and back again. We were sending a 1,492-byte packet, so at 134 ms we could calculate a formula to find the total transfer speed:
1,492/.134 seconds = 11,134.328 bytes/second, which comes out to approximately 10.88 binary kilobytes per second. That’s rather slow overall, which is why RWIN is in place to keep you from having to acknowledge each packet sent individually.
RWIN settings in Ubuntu are separate from MTU settings. Calculate the Bandwidth Delay Product (BDP) for your Internet connection with this formula:
(Total maximum bandwidth your Internet connection should supply in Bytes per Second)(RTT in Seconds) = BDP
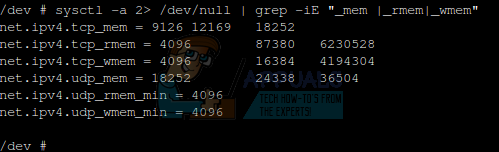
TCP packet size doesn’t influence RWIN, but the packet size itself is influenced by the value selected in Method 1. Use this command to find the kernel variables related to RWIN:
![]()
Please keep in mind that there is a space after _mem, but nowhere else in the quoted text. This could result in several values. The necessary ones include net.ipv4.tcp_rmem, net.ipv4.tcp_wmem, and net.ipv4.tcp_mem. The numbers succeeding these values portray the minimum, default, and maximum levels for each. These figures stand for the receive window memory vector, send vector, and TCP stack vector respectively. Suppose you’re operating Ubuntu Kylin, you might observe a lengthy list of extra ones. Please note that you can safely disregard any of these additional values. Some Kylin users may also see some of the values delineated in other scripts; however, just look for these lines.
Ubuntu doesn’t have an RWIN variable, but net.ipv4.tcp_rmem is close. These variables control memory usage and not just the TCP size. They include memory eaten up by data socket structures and short packets in massive buffers. If you want to optimize these values, then send the maximum size packets you set in Method 1 to another remote server. Let’s use the 1,492-byte default again, subtracting 28 bytes for header information, but remember that you may have a different value. Use the command ping -s 1464 -c5 distrowatch.com to get additional RTT data.
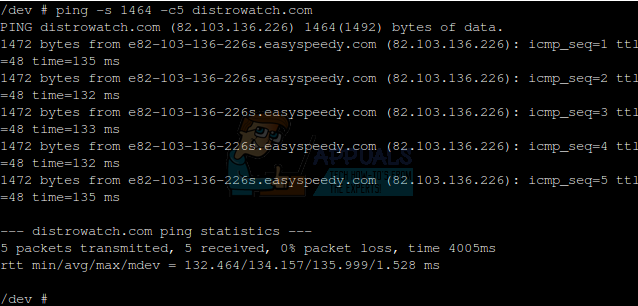
You’ll want to run this test more than once at different times of the day and night. Try pinging some other remote servers as well to see how much RTT varies. Since we had an average of slightly over 130 ms each time we tried it, we can use the formula to figure out our BDP. Let’s assume you’re on a very generic 6 Mbits/second connection. The BDP would be:
(6,000,000 bits/sec)(.133 sec)*(1 byte/8 bits) = 99,750 bytes
This means the default net.ipv4.tcp_rmem value should be somewhere around 100,000. You could set it even higher if you fear that you’d get an RTT as bad as half a second. All values found in net.ipv4.tcp_rmem and net.ipv4.tcp_wmem need to be set identically, since transmission and reception of packets happen over the same Internet connection. You’ll generally want to set net.ipv4.tcp_mem to the same value used by net.ipv4.tcp_wmem and net.ipv4.tcp_rmem since this first variable is the total largest buffer memory size set for TCP transactions.
Issue the command ![]() and see if both of these settings are set to 0 or 1, which indicate a state of off or on.
and see if both of these settings are set to 0 or 1, which indicate a state of off or on.

Setting net.ipv4.tcp_no_metrics_save to 1 will force the Linux kernel to optimize the receive window between the net.ipv4.tcp_rmem and net.ipv4.tcp_wmem values in a dynamic fashion. When net.ipv4.tcp_moderate_rcvbuf is enabled, it prevents congestion from influencing subsequent connectivity. Before making any permanent changes, conduct a speed check through http://www.speedtest.net or http://www.bing.com/search?q=speed+test to make sure you have a handle on your measurements.
Temporarily change the variables with your calculated values. Make sure to replace the #s with your calculated sums.
sudo sysctl -w net.ipv4.tcp_rmem=”#### ##### ######” net.ipv4.tcp_wmem=”#### ##### ######” net.ipv4.tcp_mem=”#### ##### ######” net.ipv4.tcp_no_metrics_save=1 net.ipv4.tcp_moderate_rcvbuf=1
Retest your connect to see if the speed has improved, and if not tweak your command again and rerun it. Remember that you can push the up key in your terminal to repeat the last used command. Once you’ve found the appropriate values, open ![]() with the gksu or sudo text editor command from Method 1, and edit the lines to read as following, once more replacing the #s with your calculated values. You’ll of course want to also backup the
with the gksu or sudo text editor command from Method 1, and edit the lines to read as following, once more replacing the #s with your calculated values. You’ll of course want to also backup the ![]() file the same way you did in part one just in case you make a mistake. If you’ve made one, then you can also restore in the same fashion as well.
file the same way you did in part one just in case you make a mistake. If you’ve made one, then you can also restore in the same fashion as well.
net.ipv4.tcp_rmem=#### ##### ######
net.ipv4.tcp_wmem=#### ##### ######
net.ipv4.tcp_mem=#### ##### ######
net.ipv4.tcp_no_metrics_save=1
net.ipv4.tcp_moderate_rcvbuf=1
Save it once you’re sure everything is okay. Issue the following command:
sudo sysctl -p
This will force the Linux kernel to reload the settings in ![]() , and if all went well then it should give you at least a somewhat speedier network connection. Depending on your original defaults, the difference might actually be dramatic or potentially not noticeable at all.
, and if all went well then it should give you at least a somewhat speedier network connection. Depending on your original defaults, the difference might actually be dramatic or potentially not noticeable at all.