Fix: “General Failure” Error When Running Ping Commands
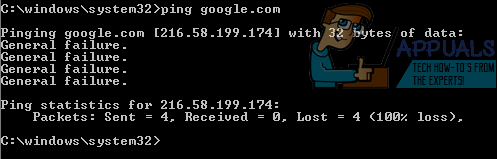
In an elevated or non-elevated Command Prompt on a computer running on the Windows Operating System, the ping command can be used to get in contact with another website or IP address on the same network and see what reply is received, along with the specific statistics of the reply that is received. The ping command is one of the simplest commands at the disposal of Windows users, but that isn’t to say that nothing ever goes wrong while running ping commands. One of the most common problems Windows users have run in to while trying to run ping commands in a Command Prompt is an issue where the ping command fails and all the Command Prompt says in return is General failure.
The Command Prompt doesn’t provide any additional information as to exactly what failed or why the computer failed to run the ping command. That being the case, there are a ton of different possible causes for this problem. On the bright side, however, there’s basically just as many possible solutions to this problem as there are possible causes for it. The following are some of the most effective solutions that users affected by this problem can use to try and resolve it:
Solution 1: Uninstall any applications that block HTTP traffic in any way
First and foremost, if you have any applications on your computer that are, in one way or another, capable of blocking HTTP traffic to or from your computer, you need to get rid of them right away. Such applications include (but are certainly not limited to) Peerblock, Charles, Wireshark and the AnyConnect mobility client. A program capable of blocking HTTP traffic to or from your computer might be blocking your computer’s attempts to ping the website or IP address you are trying to get in touch with, which is why uninstalling any and all such applications is an excellent place to start in this case.
Solution 2: Configure Windows to prefer IPv4 over IPv6 in prefix policies
Not many Windows users know that simply un-checking the IPv6 internet protocol in the Network adapter settings of their computer does not completely disable the IPv6 protocol. There are prefix policies built into the Windows Operating System that are programmed to prefer using IPv6 over IPv4, and that can lead to your attempts at running ping commands resulting in General failure error messages. To configure Windows to prefer IPv4 over IPv6 in prefix policies, you need to:
- Go here and click on Download under Prefer IPv4 over IPv6 in prefix policies to download Microsoft Easy Fix 21066.
- Once Microsoft Easy Fix 21066 has been downloaded, navigate to where you downloaded it to and double-click on it to run it.
- Follow the onscreen instructions so that the utility may fix this problem for you.
- Once the utility is done working its magic, close it and check to see if you can now successfully run ping commands.
Solution 3: Disable any and all IPv6-IPv4 transition technologies
If you have any kind of IPv6 transition or tunneling technology enabled and on your computer, that might be the cause of all your problems. Thankfully, though, simply disabling any and all IPv6-IPv4 transition technology should fix the issue.
- Open the Start Menu.
- Search for “cmd“.
- Right-click on the search result titled cmd and click on Run as administrator.
- One by one, type each of the following commands into the elevated Command Prompt, pressing Enter after typing in each one:
netsh int ipv6 isatap set state disabled
netsh int ipv6 6to4 set state disabled
netsh interface teredo set state disable
- Close the elevated Command Prompt.
- Restart your computer.
- Check to see whether or not the problem still persists when the computer boots up.
Solution 4: Reset your computer’s TCP/IP and Winsock catalog
- Open the Start Menu.
- Search for “cmd“.
- Right-click on the search result titled cmd and click on Run as administrator.
- One by one, type each of the following commands into the elevated Command Prompt, pressing Enter after typing in each one:
netsh i i r r
netsh winsock reset
- Close the elevated Command Prompt.
- Restart your computer and check to see if this solution got the job done when it boots up.
Solution 5: Flush your computer’s DNS
A solution that tons of users affected by this problem have found immensely effective in getting rid of it and restoring their computers’ ability to successfully run ping commands is flushing their computers’ DNS. Flushing your computer’s DNS is not only a pretty safe bet when it comes to fixing this problem but is also, in general, good for the health of your computer. To flush your computer’s DNS, you need to:
- Open the Start Menu.
- Search for “powershell“.
- Right-click on the search result titled Windows PowerShell and click on Run as administrator.
- One by one, type each of the following commands into the elevated instance of Windows PowerShell, pressing Enter after typing in each one:
ipconfig/release
ipconfig/renew
ipconfig /flushdns
netsh int ip reset c:\tcp.txt
netsh winsock reset
- Close Windows PowerShell and restart your computer.
When the computer boots up, check to see whether or not the problem has been resolved.
Solution 6: Reset your computer’s Hosts file
- Open a fresh instance of Notepad.
- Paste the following into the fresh instance of Notepad:
# Copyright (c) 1993-2006 Microsoft Corp.
#
# This is a sample HOSTS file used by Microsoft TCP/IP for Windows.
#
# This file contains the mappings of IP addresses to host names. Each
# entry should be kept on an individual line. The IP address should
# be placed in the first column followed by the corresponding host name.
# The IP address and the host name should be separated by at least one
# space.
#
# Additionally, comments (such as these) may be inserted on individual
# lines or following the machine name denoted by a ‘#’ symbol.
#
# For example:
#
# 102.54.94.97 rhino.acme.com # source server
# 38.25.63.10 x.acme.com # x client host
# localhost name resolution is handle within DNS itself.
# 127.0.0.1 localhost
# ::1 localhost
- Press Ctrl + S to save the Notepad document.
- Name the Notepad document “hosts” (including the quotation marks), navigate to the directory you want the file to be saved in and click on OK.
- Press the Windows Logo key + R to open a Run dialog.

- Type the following into the Run dialog and press Enter:
%WinDir%\System32\Drivers\Etc
- Locate the hosts file, right-click on it, click on Rename, rename the file to old and press Enter.
- Move over the new “Hosts” file from wherever you saved it to, to %WinDir%\System32\Drivers\Etc.
- If you are asked to confirm the action while moving the file, do so.
Once the file has been moved, restart your computer and check to see if the problem has been resolved once it boots up.
Solution 7: Enable all of the ICMPv4-In rules in your computer’s Firewall settings
- Open the Start Menu.
- Search for “firewall“.
- Click on the search result titled Windows Firewall with Advanced Security.
- In the left pane of the window, click on Inbound Rules.
- In the right pane, locate every single Inbound Rule titled File and Printer Sharing (Echo Request – ICMPv4-In), right-click on it and click on Enable Rule.
- Once done, restart your computer.
- When the computer boots up, check to see if the issue has been fixed.
Hi everybody
I have resolved the issus of general failure by disabling the windows firewall.Firewall block the icmp messages between my pc and the router