How to Neutralize the Sound Signature of Any Headphone Brand
If you bought a pair of headphones or IEMs and find that you don’t like how they sound, it may not be due to the quality of the headset – it could in fact be due to the sound signature that the headphones are calibrated to.
What are “sound signatures” on headphones?
Headphones come in a variety of sound signatures – also known as coloured sound. This is why you’ll see some headsets referred to as “bass heavy”, “V-shaped”, “Neutral”, “Warm & Bright”, etc. This typically refers to how the headset was calibrated by the manufacturer – think of it like equalizer settings built into the headphones.
For example, a “V-shaped” sound signature headset would quite literally mean a “V” shape if you were to look at their frequency response through an equalizer – heightened bass, recessed mids, and heightened treble. Studio grade or “reference” headphones typically have a neutral sound – the built-in equalizer is almost perfectly flat.
Why do companies create headphones with sound signature profiles?
Sound signatures aren’t necessarily a bad thing, as they are created for the average consumer who enjoys a certain type of sound. When people buy “Beats”, they know they’re getting a Bass Heavy sound signature, for example.
However, if you are a true audiophile who wants a pure listening experience, you might not like the sound signature of the particular headset you bought. After adjusting them to a “Neutral” frequency response, you might suddenly find them amazing. This is because sound signature headphones don’t really play well with external equalizers – its like adding two layers of EQ on top of each other.
For example, say you have a pair of V-shaped sound headphones. Then you use the “Rock” preset on your phone’s equalizer – well now you just doubled what the headsets sound signature is already doing, because the “Rock” preset is V-shaped itself.
What is a Neutral sound signature and why do I want it?
A “neutral” sound signature is exactly what it sounds like – all frequencies are nearly exact “flat”, like an equalizer on the Flat preset. Nothing is favored over the other – bass, mids, and treble frequencies will all be equally proportional. This is a common sound signature in “reference grade” headphones that a lot of studio producers use, because it allows them to hear the pure audio sound without any type of influence on the frequencies.
By using a “Neutral” sound signature, you will be hearing the music exactly as the artist / producer intended it to sound – this is either good or bad, depending entirely upon your personal taste. But if you have a neutral sound signature on your headphones, it is much easier to apply an equalizer to tweak it to your particular preference, as you won’t be adding an equalizer on top of what your headphone manufacturer already tuned the frequencies to.
Okay, I’m Convinced – How do I Neutralize My Headphone Frequencies?
So what we’re going to do today is show you a few ways you can “re-calibrate” your headset to get a more neutral sound, for both PC and Android. We’ll be achieving this through witchcraft and sorcery, because its some really in-depth stuff and we had to read a lot of guides, forums, and test various headsets to put this guide together for you.
The best DIY method (on PC) is to use a third-party systemwide equalizer that has various modes, such as Linear and Phase Correction – if you use Foobar, you could try a VST-based equalizer like FabFilter Pro Q (see Appuals guide “How to Use VST Plug-ins in Foobar”).
If you want to experiment with a third-party software that reportedly does all the work for you, you can research SonarWorks Reference 4, which is a VST plug-in software that includes a lot of presets to “neutralize” some of the most popular headphone brands. They can also personally calibrate your headset for somewhat of a hefty fee, if you agree to mail your headset to the company.
How to Find a Frequency Graph for your Headphones
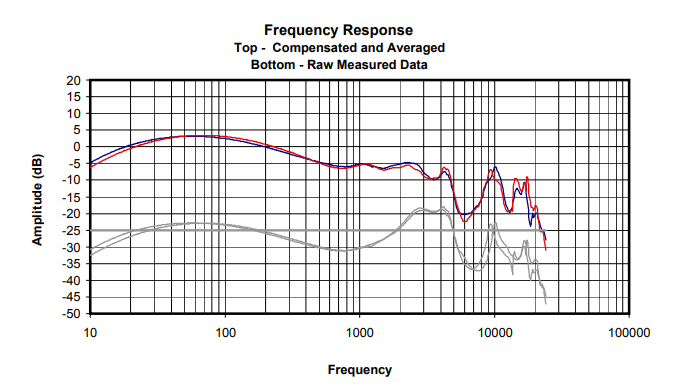
To begin, you should find a frequency response graph of the headset you want to neutralize. You can normally get this from the manufacturer’s website, or a database like Headphone.com – you’re looking for something like this:
So armed with your frequency response graph, we basically want to invert the tuning of the headset, to cancel out the manufacturer’s sound signature. Think of it this way – if the manufacturer tuned the headphones to have a +3dB in the 100hZ frequency, then by adding -3dB to your equalizer in the same frequency, you are thereby cancelling out the manufacturer’s frequency tuning.
You can achieve this a variety of ways – you can use a standard equalizer that comes with your audio player, but this isn’t ideal, because then you can’t apply an equalizer afterwards, unless you use a 3rd-party systemwide equalizer.
If you’re using an Android device and you have Viper4Android, you can create a DDC profile which is specifically what we want to achieve – or you can create an IRS (impulse response) that will also do what we want. Or you can follow the guide for using a standard equalizer on PC, and adapt the steps to the equalizer on your Android device.
Neutralizing Headphones on PC Using a Standard Equalizer
When you read the frequency graph for your headphones, the horizontal grid lines are fairly self-explanatory – they tell you the decibel level (dB), but the vertical lines are a little more complex.
The vertical grid lines represent the various frequency responses of the tone in Hertz, which means that the farther to the left of the graph, the lower the frequency (AKA the “bass” frequency range, which is normally around 100hZ and below). To the right are the higher (treble) frequencies, and in the middle you have, of course, the “mids”.
So to read the vertical lines:
- 10 Hz – 100 Hz, each red/blue line denotes a change of 10 Hz
- 100 Hz – 1000 Hz: each red/blue line denotes a change of 100 Hz per vertical line
- 1000 Hz – 10000 Hz: each red/blue line denotes a change of 1000 Hzper vertical line
- 10000 Hz and above: each red/blue line denotes a change of 10000 Hz per vertical line
So for example, the space in between the 10 and the first vertical line represents all the frequencies between 10 and 20, and the space between the second and third line represent the frequencies between 20 and 30 – however, you need to pay careful attention to the changes each vertical line denotes depending where you are on the graph, because the spacing is not the same for frequencies between 10 – 100, 100 – 1000, etc.
Another thing to be aware of is that the L/R channels of your headset might be slightly different from each other in terms of frequency response. Your headset might have, for example, a +2dB calibration in the 100hZ range on your Right channel, but a +2.5dB calibration on the Left channel.
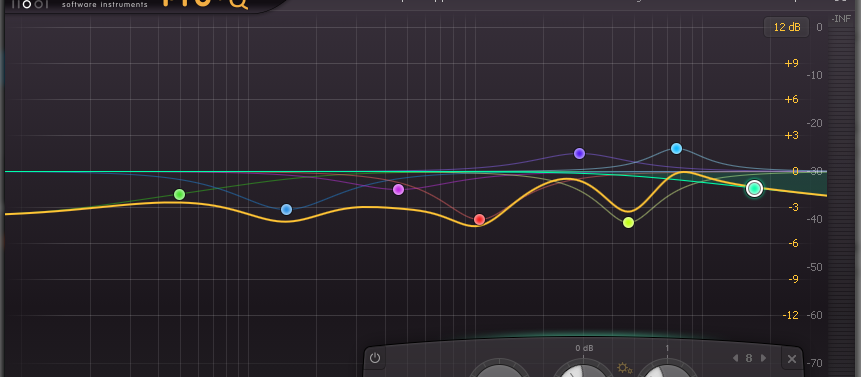
So going back to your equalizer, you need to look at the different frequencies that your equalizer can adjust – this is why it’s ideal to have a parametric equalizer, or an equalizer that supports as many bands as possible. A 5 or 10 band equalizer simply will not cut it for this kind of task.
So find each frequency on your reference graph, and mark the decibel value of each of the frequencies, such as 60 Hz being at a value of approximately +7dB, whereas on an “Ideal frequency” graph it would show +4.5dB (or similar) – thus, lets say there is a difference of -3.5dB between the manufacturer’s calibration, and the “Ideal” calibration for a more neutral tone.
On the equalizer, go to the 60 Hz bar and change the value from 0 dB to -3.5dB (or whatever the particular “Ideal” decibel is for your particular brand of headphones). Do this for the entire range of frequencies, and yes, this is difficult and time-consuming work, and you will probably need to make two separate frequency graphs for your Left and Right channels.
How to Neutralize Headphones for Android (Viper4Android DDC Profile)
Okay, so this is admittedly a bit of work. For starters, you need a rooted Android device, with Viper4Android installed – if you have neither, you will want to find an Android root guide for your device, and then there are different methods of installing Viper4Android, either as a Magisk Module or a flashable .ZIP through custom recovery. If you have no idea what we’re talking about, you should do some research as this is a fairly involved process.
In any case, after you have Viper4Android set up on your Android device, we can create a DDC profile. The DDC toggle in V4A is specifically for neutralizing sound-signatured headphones, and it comes with a lot of preset profiles for some of the most popular brands of headphones. However, if yours is not in the list, we need to use the official ViPERsToolBox to create and export a profile.
After you have installed ViPERsToolBox on your PC, grab a frequency graph of your particular headset model off the internet, and then launch ViPERsToolBox.
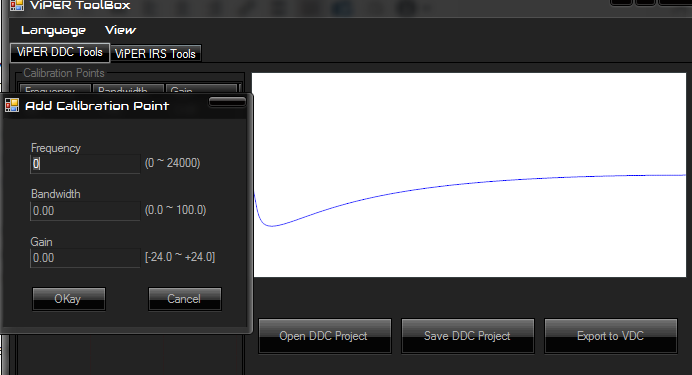
Using your frequency graph as a reference, you will right-click inside ViPERsToolBox’s graph chart, and choose “Add Point”. This is very similar to the guide for using a basic equalizer above, in that you want to create a frequency chart that is nearly the exact opposite of how your headset is signature tuned.
After you are done adding all of the correction points, you need to click the “Export to VDC” button, and then copy it to your phone’s storage in the <storage>/Viper4Android/DDC folder.
Then you will launch Viper4Android on your Android device, scroll down the list of presets until you find the one you exported to your device, then choose it and hit the “Enable” button for the DDC effect.


Explain the bandwidth setting? And should my graph be an exact duplicate? Some say it’s a bad idea to do it 100% or else you’ll get very silent audio (for points that go beyond 10db, or 20db, or further)