How to Make A Group of Contacts on Gmail
People often use Gmail to keep in touch with their clients and their workforce. Sometimes when you have to send emails to the same people again and again, you get tired of typing their email ID’s again and again. Here is a solution for that. You don’t have to write their email ID’s every time you have to email the same group of people. You can now use your Gmail to make groups of these same people, and not one group, you can make more than one groups to keep the contacts arranged easier to access all at one time.
This will help you save so much of your precious time. Now all you have to do is to write the name of the group to send them an email instead of writing the email addresses for everyone on the list. Follow the steps below to create a group of contacts on your Gmail.
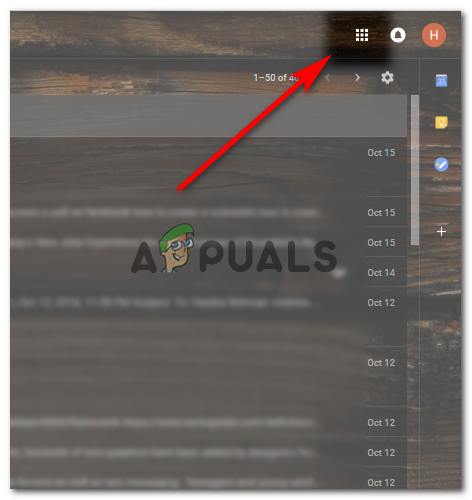
You need to open your Google Contacts first. How to open contacts on google? Well, when you signing to Gmail, on the right corner of your Gmail home page, you will find a grid like icon. Click on that and you will see another icon of ‘contacts’. That is what we are looking for to make a group of your Google contacts. Click on ‘Contacts’ now.


This is how your window will look like when you click on ‘Contacts’.

On the left side, you can see a list ot ‘My Contacts’, ‘Starred’, ‘Most Contacted’, ‘Other Contacts’ and other options like ‘New Group’. ‘Import Contacts’ and ‘Try Contacts Preview’.

There are two ways in which you can create a group of your contact on Gmail.
Clicking on New Group on the Left
The first way of making a group of your contacts on Gmail is to click on the option on your left where it says ‘New Group…’

Clicking on this will lead you to a window which will ask you to name your group that you want to create. As an example, I am going to make a new group for all my work related contacts. And for that, I am going to name the group as ‘Work’.


Click OK after typing the name of the group. You will notice on your left that another name has been added to the list under ‘My Contacts’.

Now since you only created a group, the group would be empty. If you want to add contacts to this group, this is what you need to do. Now the contacts showing in front of you, check all the ones which you want to be copied to the group ‘Work’.

After you have selected the contacts, click this group icon.

And click the group you want these contacts to be a part of.

Clicking on Apply, now, would copy the selected contacts to your new group, which in this case is ‘Work’. To be sure about whether your contacts have been moved or not, you can recheck by seeing whether a number in brackets has appeared in front of your new group i.e. ‘Work’ , in this case, or not.

My group for work has 5 contacts now. You can add as many as you can and that are relevant to the group.
Second Way of Creating a Contact Group
Just how we selected our contacts after creating a group, so that they could be copied to a ‘Work’ group, you now need to select your contacts first in this method before you create a group.
Once you have selected all your contacts, click the ‘Groups’ icon at top and then click ‘Create new’.

This dialogue box will appear again where you have to write the new groups name.

Pressing OK after typing a name for your new group, will create the group which will be visible on the left of the screen. Work Again is the group I created.

You can use any of the two methods to create a group of contacts on Gmail.


