How to Install Windows on Chromebook
Chromebooks don’t officially support Windows and generally, we can’t install Windows on a Chromebook. However, on many Chromebooks, there are several unofficial ways to install Windows. This is not generally recommended by Google but it gets the job done perfectly.

Step 1: Requirements for Installation of Windows
There is a special type of BIOS on Chromebooks for Chrome OS. To install Windows, you have to consider the following things.
- You have to Install a replacement BIOS (a UEFI firmware) for your Chromebook so that you could boot and install Windows. But keep in mind that replacement BIOS can only be installed on supported Chromebook models, so it can’t be done on every model of Chromebook.
- You’ll need some additional hardware like a USB keyboard and mouse to install Windows because your built-in keyboard and mouse of your Chromebook won’t work in the installer.
- Also, a PC running Windows to create the USB installation media is a must-have.
- Bear in mind that even after installing Windows, you are not in safe waters. Windows don’t have hardware drivers for Chromebook like the touchpads etc. You may find third-party drivers of your Chromebooks if you’re lucky. These drivers are packed together for Windows to support for these components.
- Also, data from your Chromebook will be wiped, so make sure you don’t have anything important stored on it.
During this installation process if your Chromebook ever appears to freeze or become stuck you can force the Chromebook to shut down by holding down the Power button for ten seconds or so.
Step 2: Can it be done for Your Chromebook?
Windows cannot be installed on every Chromebook but only in specific models. Installation instruction for Windows on different models will be different and you have to follow instructions for your Chromebook model. Follow these helpful resources:
- Check if your Chromebook is supported. List of Chromebook Supported models can be found here, with all the information about built-in hardware components whether they will or will not work afterward.
- This website will provide you with detailed installation instructions of the Chromebook model by selecting the model of your Chromebook and get installation instructions, with links to hardware drivers that will enable hardware of your Chromebook to work.
- This community is devoted to installing Windows on Chromebooks. To find whether a Chromebook or specific hardware component can or can be made to support Windows, you can search for details on this site.
The Windows installation process will be similar for many models of Chromebook, but some things e.g. the location of the write-protect screw on the motherboard can be a bit different.
Step 3: Remove the Write Protect Screw
BIOS of Chromebook is locked by a special hardware feature that prevents you from modifying it, called write protect. To disable this feature, you will have to open up the Chromebook, locate the write-protect screw, and remove it. On some Chromebooks, there will be a write protection switch instead of a write-protect screw.
- Turn off Chromebook, if not already off, don’t put Chromebook to sleep but shut it down completely.
- Flip over the Chromebook.
- Unscrew all the screws at the bottom to remove the plastic panel and gain access to the motherboard. Do not lose the screws.

Bottom View of Chromebook - Locate the write-protect screw or write-protect switch. You can find more documentation about the screw of your Chromebook by searching the internet with the model name and number of your Chromebook plus “write protect screw”. For our Chromebook, the location of the screw was as the image below

Locate the write-protect screw - The write-protect screw looks visibly different from all other screws on the motherboard. The write-protect screw on our Chromebook was in dark gray while the other screws on the motherboard were bright silver. There was a bright silver under the screw whereas the other screws on the motherboard had a bronze color under them.

Looks of Write-Protect Screw - Remove the write-protect screw and re-attach the bottom cover of the Chromebook. Now you can write to and modify the BIOS of your Chromebook. Keep the write-protect screw at some safe place so if you ever wanted to write-protect your BIOS again later.
Step 4: Enable Developer Mode
Now “Developer Mode” is to be enabled on your Chromebook. Chromebooks are locked down for security purposes and will only boot if the operating system is properly signed after checking the OS for tampering and preventing users and applications from modifying the Chrome OS. In Developer Mode you can disable all these security features, so you have a laptop to tweak and play with to your heart’s content.
When Developer Mode is enabled, you’ll be able to access a Linux terminal within Chrome OS and do whatever you like.
There are two quick warnings you should understand:
- Enabling and Disabling Developer Mode erases and Wipe data on Your Chromebook: So, for the process of enabling Developer Mode, your Chromebook will be “power washed.” All the user accounts, their files, and data will be removed from your Chromebook. Of course, most of your data should be stored online, and afterward, you can access that data by logging into the Chromebook with the same Google account.
- Google Doesn’t Offer Support for Developer Mode: Developer mode is not officially supported by Google. It’s for the use of developers and power users. Google won’t provide support for this stuff. And the basic “This may void your warranty” warnings apply, so in other words in case of hardware failure in developer mode, just disable developer mode before getting warranty support.

To enable developer mode on modern Chromebooks, hold down the Esc and Refresh keys and tap the Power button to enter recovery mode. In Older Chromebooks, there were physical developer switches that you’ll need to toggle instead.
So, when at the recovery screen press Ctrl+D to agree to the prompt, and you’ll boot into developer mode.

Now, whenever you will boot your Chromebook, a warning screen will show. To continue boot either you have to press Ctrl+D or wait for 30 seconds so that warning could disappear.
This warning screen is to alert the user that the Chromebook is in developer mode and normal security measures are not intact.

Step 5: Flash the BIOS of Chromebook
Now you can flash your Chromebook’s BIOS From within Chrome OS. To open the terminal window, press Ctrl+Alt+T.
- In the terminal type “shell” and Hit “Enter” to access the Linux shell environment.

Linux shell - In the terminal Window Run the below command to download and run the script that will replace your Chromebook’s BIOS:
cd ~; curl -L -O https://raw.githubusercontent.com/MrChromebox/scripts/master/firmware-util.sh; sudo bash firmware-util.sh
This command will change your home directory, download the script file and will run with root privileges. Consult the developer’s website if you want more details about the working of this script.

- This script will present a helpful interface for the completion of the installation process. In the list, you have to choose the “Custom coreboot Firmware (Full ROM)” option by typing “3” and “Enter”.
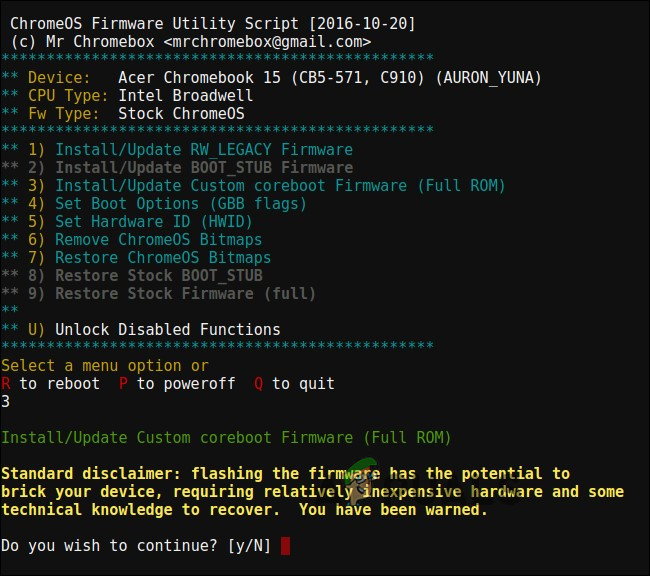
Custom coreboot Firmware (Full ROM) - Enter “Y” to agree to flash your firmware and then Enter “U” to install a UEFI firmware. If you select the “Legacy” option you will not be able to run Windows.
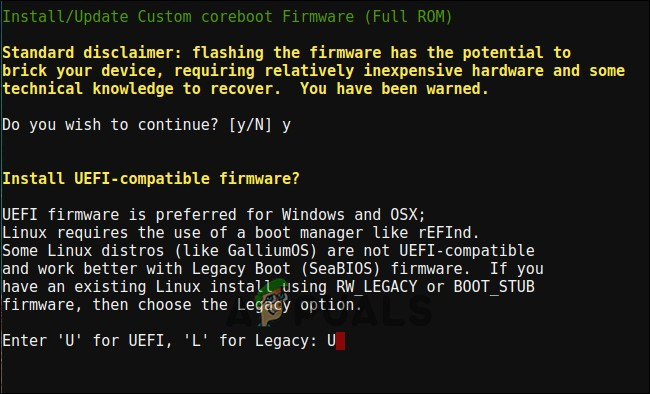
Agree to Flash Firmware and UEFI - The script will offer to create a backup of the Chromebook’s stock BIOS and copy it on a USB drive for you. You must create this backup copy and store it somewhere safe in case if you ever want to restore the Chromebook’s original BIOS in the future.
- Don’t leave the BIOS backup copy on the USB. Now You will have a .rom file that you can copy from the USB drive and store at some safe place after completion of the process.
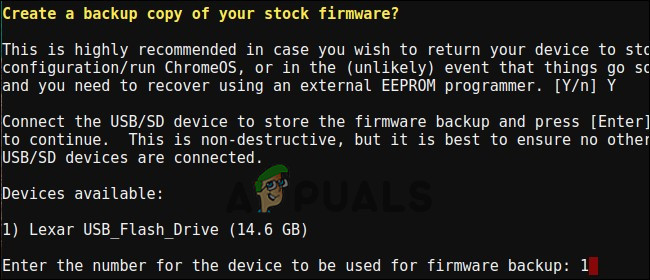
BIOS backup - After completion of the backup process, the script will download and replace the Coreboot firmware onto your Chromebook. Power the Chromebook off when it’s finished.
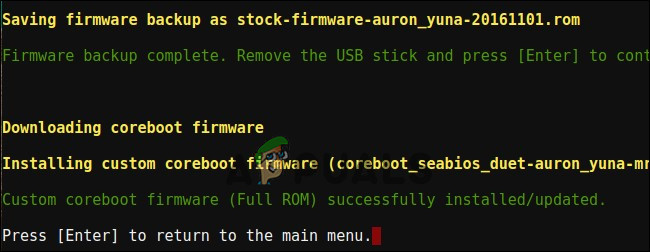
Script Completion Notice - At this point, you can re-install the write-protect screw, if you want.
Step 6: Create a Windows Installation Drive
To install Windows onto Chromebook you will have to make the Windows installation media first. But it cannot be done by using Microsoft’s official method, instead, you will download an ISO and burn it to a USB drive using a tool “Rufus” for which you will use a Windows PC.
- Visit this website Click the “Download tool now”, select “Create installation media for another PC”, and download an ISO file.

Check ISO File Option - Download and run the Rufus utility, which you’ll use to create your Windows installer USB drive.
- Plug a USB drive into the PC. This USB drive will be used for the Windows installer and any files on it will be erased So, nothing important to be stored on this USB.
- Open Rufus, select your USB, & select “GPT partition scheme for UEFI” and “NTFS”. Click on the button located at the right of “Create a bootable disk using” and select the downloaded Windows 10 ISO image.
- Double-check that Rufus says “GPT partition scheme for UEFI” before you continue. Sometimes it automatically changes to its default setting after selecting the ISO file. Once again recheck that all the settings are correct, then click on the “Start” button to create a Windows USB drive installation media.

Rufus Options
Step 7: Install Windows
Now it is time to install Windows on your Chromebook.
- Insert the USB drive into the Chromebook and switch on the Chromebook.
- It should now boot from the USB otherwise press any key when “Select Boot Option” appears on your screen after that select “Boot Manager” then select your USB device from the list and after that, you will be shown Windows installer.

Boot Manager - Connect either a USB mouse or a USB keyboard or both to your Chromebook. You can get by with just a USB keyboard or USB mouse to interact with the Windows installer.

Windows Installer Options - Install the Windows normally like you will install on a PC, installing Windows on your Chromebook in place of Chrome OS. Partition the internal drive as per your liking. We deleted all the internal partitions and told Windows to install itself using the allocated space. You don’t need a product key to install and use Windows 10 but you can add a product key within Windows 10 later. And for Chrome OS, if you wanted to revert to it, you will create a Chrome OS recovery disk on any system running Chrome and then use it to restore to the original Chrome OS.

Partition the Internal Drive - The Windows installer will restart partway through. You should remove your USB drive when it does so, or the system will restart back to the start of the installer. If this happens, remove the USB drive, restart the Chromebook. It will boot Windows from your Chromebook’s internal drive and will complete the setup process
Step 8: Install Third-Party Drivers for Your Hardware
Now Windows should have been installed and the Chromebook will boot into Windows. You’re nearly there! You just have to install third-party drivers to make most out of the hardware of the Chromebook. USB keyboard and mouse will be needed for this.

These third-party drivers aren’t properly signed and Windows normally do not allow installation of these drivers, for which, we will enable a feature called “test signing”. This feature is designed for driver testing.
- Open a Command Prompt as Administrator and Run the undermentioned command:
bcdedit -set testsigning on
- Restart the Chromebook after running the above command.

Driver Test Signing On - Now you can install the third-party drivers of your Chromebook recommended by the installation guide for the model of Chromebook. We installed drivers for the Chromebook’s chipset, rapid storage technology, Intel HD graphics, keyboard, Realtek HD audio, and trackpad.
- Windows will display a security warning when you install these drivers because these drivers are unofficial which are not created by the manufacturer and aren’t signed by Microsoft Cooperation. Agree to install these drivers.
- After completion of installation on our system, everything seemed to work fine on this model of Chromebook and we detached the USB keyboard and mouse and were able to use the Chromebook normally. The “Search” button of the Chromebook’s keyboard became a Windows key.
Hurrah! There it is you, now you turn your Chromebook in a very inexpensive, (hopefully) Windows PC. If something is not working as expectations, be sure to check with the helpful sources provided above to see if you need to install the new drivers or fix something that updating of Windows has broken.


