How to Fix the Steam Stuck on Allocating Disk Space on Windows?
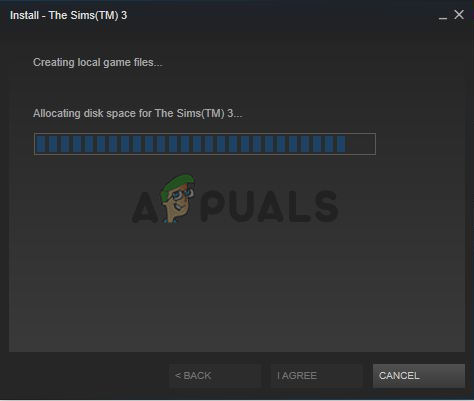
The “Allocating disk space” message in Steam appears when downloading a game through the Steam client. It’s a normal message during the installation but the problem is that this message hangs on for too long. In most cases, the client simply gets stuck while displaying this message during the installation.
Luckily, there are many different methods people used to resolve this problem successfully and we have decided to present them all in an article. Make sure you check it out below and follow the instructions carefully!
What Causes the Steam Stuck on Allocating Disk Space Error on Windows?
This problem has affected many Steam users around the globe and we think that pinpointing the right cause is crucial if you want the resolve the problem as soon as possible. When you settle down on the right cause, you can immediately figure out the troubleshooting method you need to use and the problem is gone in no time. Check out the list of causes we have prepared below!
- Download cache – The Steam has its download cache which can get stuck and block the installation of the game. Clearing this cache has proven to be a great way to resolve the “Allocating disk space” issue.
- Download server is full or not working – You can choose from which server to download Steam games. Some servers may be full or they might be under maintenance. This causes the problem at hand and we recommend changing the server in Steam settings.
- Blocked by a firewall – Many users have reported they needed to add Steam as an exception inside Windows Defender Firewall to get rid of the “Allocating disk space” message. If Steam is blocked by a firewall, it’s difficult to expect the connection to go through!
- Overclocking – If you are overclocking anything on your computer, make sure you stop during the installation process.
Solution 1: Clear Download Cache
The most obvious cause of this problem is that Steam got stuck trying to manage its download cache files. This cache can be cleared easily from within the client so make sure you try out this simple method before moving on to the more complicated ones. Follow the steps below to clear the download cache in Steam.
- Open up your Steam client by double-clicking its shortcut on the Desktop. An alternative is to simply search for it in the Start menu or by clicking the Search/Cortana button next to it.

- This method can be performed even when the installation is already running and the “Allocating disk space” message is being displayed. Click the Steam button at the menu bar at the top right part of the window and choose the Settings option from the context menu which will appear.
- Navigate to the Downloads tab and check the bottom of the screen for the Clear Download Cache Click it before clicking OK. In the Steam window, click the Steam button again and click Exit to quit Steam completely.
- Reopen the client and the download/install should now finish without any problems!
Solution 2: End the Steam Process in Task Manager and Run it as an Administrator
Violently ending the Steam process during the installation seems to be a great way to resolve the problem, according to other users who have experienced the same problem. Ending the task and reopening Steam and the installation managed to resolve the problem for many users so make sure you try it out as well.
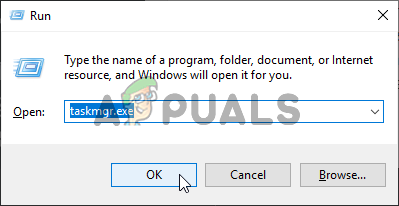
- Use the Ctrl + Shift + Esc key combination to open the Task Manager directly. You can also use the Windows Key + R combination to open the Run box. Type “taskmgr.exe” in the textbox without the quotation marks and click OK to open the Task Manager.
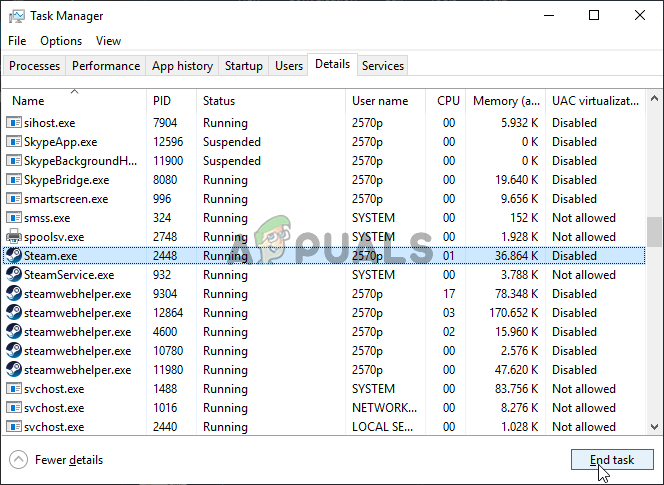
- Click More details inside to expand it. Navigate to the Details tab and click the Name column to sort the list of tasks in alphabetical order.
- Scroll down until you reach the Steam.exe entry in the list. Left-click it and click the End task button in the bottom right part of the window. Repeat the process for all entries if available.
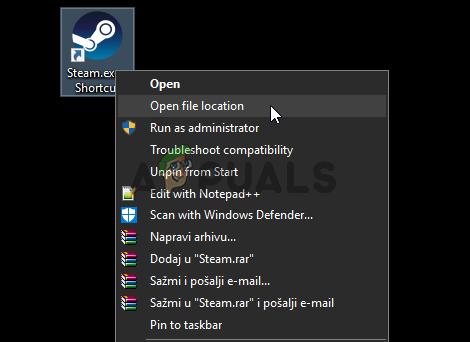
- Open up Steam’s installation folder. If you have a shortcut on the Desktop, right-click it, and choose the Open file location from the context menu which will appear.
- If you don’t have a shortcut on the Desktop, locate the installation folder manually. By default, it should be:
C:\Program Files (x86)\Steam
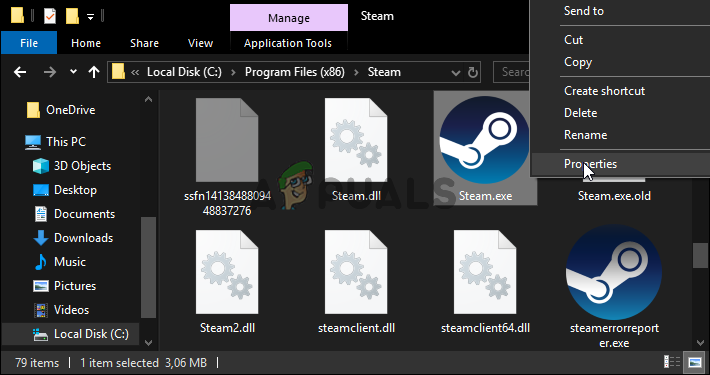
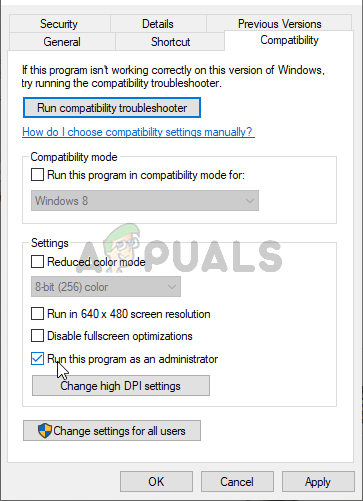
- Locate the Steam.exe file inside, right-click its entry and choose Properties from the menu which will appear after right-clicking. Navigate to the Compatibility tab inside Properties.
- Under the Settings section at the bottom, make sure you place a checkmark next to the Run this program as an administrator Confirm the changes you have made by clicking the OK button inside.
- Reopen the Steam client by double-clicking its icon on the Desktop or by searching for it. Check to see if the installation finishes without getting stuck on the “Allocating disk space” message!
Solution 3: Change the Download Server
This message sometimes hangs on if the Steam server you are downloading the game from is having issues with too much traffic Many players have reported that changing the download server from the one currently set can resolve the problem quite easily so make sure you follow the steps below to do so!
- Open your Steam client by double-clicking its shortcut on the Desktop. An alternative is to simply look for it in the Start menu or by clicking the Search/Cortana button next to it.
- These steps can be run even when the installation is already running and the “Allocating disk space” message is right there is a second Steam window. Click the Steam button at the menu bar at the top right part of the Steam client and choose the Settings option from the context menu which will appear.
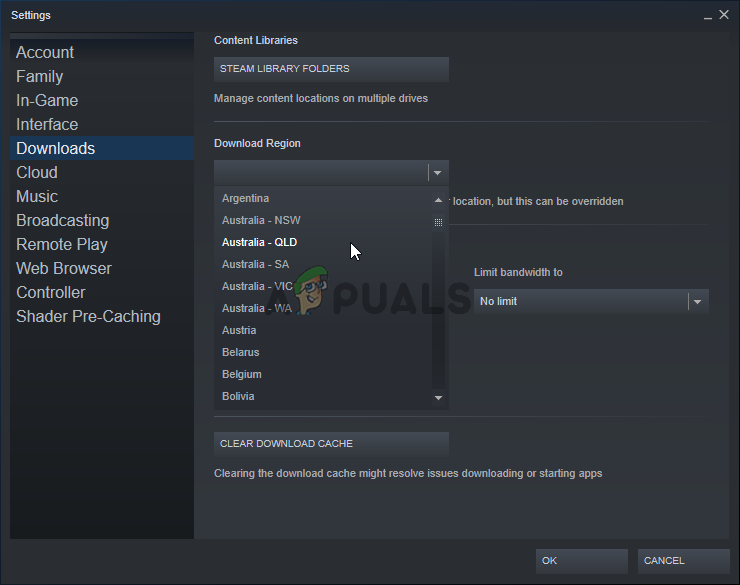
- Navigate to the Downloads tab and check the screen for the Download Region Click the arrow button underneath and choose a different server to download from. Make sure the location is somewhere near. In the Steam window, click the Steam button again and click Exit to quit Steam completely.
- Reopen the client and the download/install should now finish without any problems!
Solution 4: Refresh the Steam Installation
Refreshing the Steam installation is quite a simple fix that can be used to easily replace broken files and resolve problems such as the “Allocating disk space” message. Uninstalling Steam is almost always not an option because all games you have installed are also uninstalled along with the client! Follow the steps below to refresh the Steam installation!
- Follow the steps 1-3 from the Solution 2 to exit Steam completely. Open up Steam’s installation folder. If you have a shortcut on the Desktop, right-click it, and choose the Open file location from the context menu which will appear.
- If you don’t have a shortcut on the Desktop, locate the installation folder manually. By default, it should be:
C:\Program Files (x86)\Steam
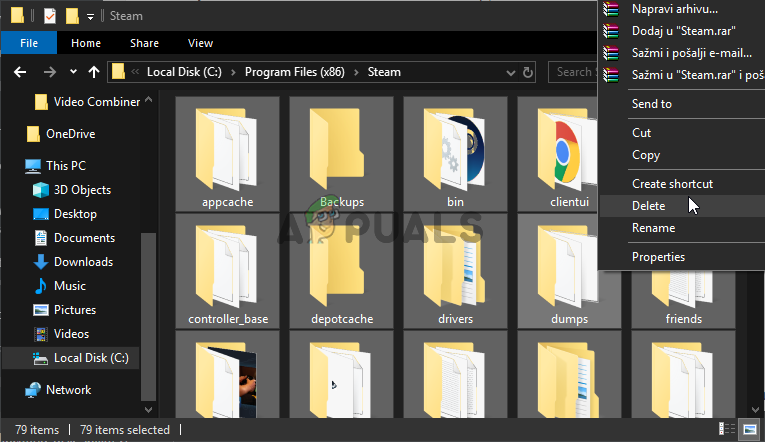
- Inside the Steam folder, select everything except the steamapps folder and the Steam.exe executable. Right-click the selection and choose Delete from the context menu which will appear.
- After the files have been deleted, open Steam by double-clicking the Steam.exe executable. It should download Steam again. Restart the installation and check to see if the “Allocating disk space” message still hangs during the installation!
Solution 5: Trick Steam into Thinking the Game is Installed
The steps presented below will make sure the Steam client is fooled into thinking the game is already installed. This will effectively skip the allocating disk space part and the problem should be resolved in no time. The method is a bit lengthy but it gets the job done!
- Make sure you follow the steps 1-3 from Solution 2 to close your Steam client and the installation window on your computer.
- Navigate to the library folder where Steam is installed. If you haven’t made any changes to the installation folder, it should be:
C:\Program Files (x86)\Steam
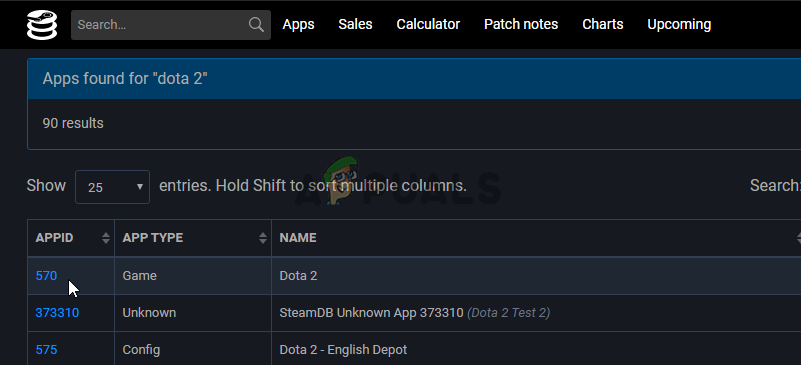
- Navigate to steamapps >> downloading. Now, open up a web browser and open this link. Type in the name of the game you are troubleshooting in the search bar at the top of the window. Locate your game in the list of results and check the AppID Take note of the number.
- Inside the downloading folder, locate the folder named the same as the AppID you just noted down, right-click on it, and choose the Rename option from the context menu which will appear. Change its name by adding something next to the number. Open the folder, use the Ctrl + A combination followed by the Ctrl + C combination to copy everything from the folder.
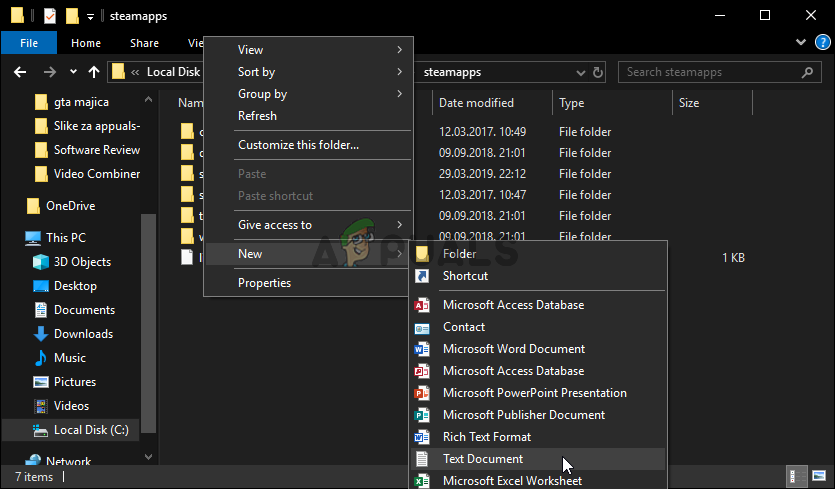
- Now, it’s time to navigate to your Steam library folder. It can be a folder you have set up but, by default, it’s the common folder inside the steamapps. Open it, right-click anywhere inside, and choose New >> Folder.

- Name it like the game you are trying to install. Open the folder and use the Ctrl + V key combination to paste everything you copied from the downloading folder. You can also right-click anywhere and choose Paste from the menu.
- Navigate to the steamapps folder, right-click anywhere inside, and choose New >> Text Document. Name it “appmanifest_AppID” where the AppID placeholder needs to be replaced by the actual AppID.
- Open the file and type the following inside. Make sure you keep the formatting the same.
"AppState"
{
      "AppID"  "AppID"
      "Universe" "1"
      "installdir" "AppDir"
      "StateFlags" "1026"
} - Replace the AppID placeholder with the actual AppID and replace the AppDir placeholder with the exact name of the game’s folder inside steamapps >> common. Click the File option from the menu bar at the top and choose the Save as option from the menu.

- Set the Save as type option to All Files. Set the File name to “acf” with the actual AppID before clicking the Save button. If prompted to replace the file with the one already inside the folder, make sure you confirm.
- Open up your Steam client by double-clicking its shortcut on the Desktop. An alternative is to simply search for it in the Start menu or by clicking the Search/Cortana button next to it.
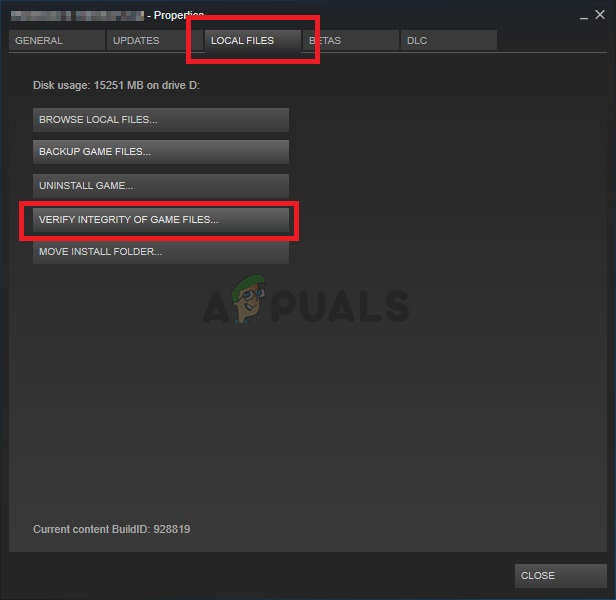
- Navigate to the Library tab and the game you are troubleshooting should appear as installed. Right-click its entry and choose the Properties option from the context menu which will appear.
- Navigate to the Local Files tab inside the Properties window and click the Verify Integrity of Game Files
- Wait for it to finish checking the folder. It should start an update to download all remaining files, starting where the installation left off. Wait for it to finish!
Solution 6: Disable Windows Defender Firewall
It’s highly likely that the game download and install have been blocked at some point by the Windows Defender Firewall. This firewall should cooperate well with legit software such as Steam but problems like this often occur. Disabling the antivirus during the installation should be enough to resolve the problem so make sure you follow the steps below and don’t forget to enable the firewall afterward!
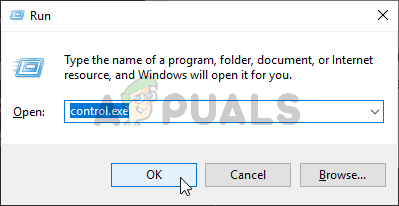
- Open up Control Panel by using the Windows Key + R key combination which is used to open the Run dialog box. Type “control.exe” inside the box and click the OK button to open the Control Panel. Searching for it in the Start menu is also an option.
- Click the View by option from the top-right part of the Control Panel window and make sure you choose Large or Small icons. Scroll down until you reach the Windows Defender Firewall entry and left-click to open it.
- From the left-side navigation menu, click the Turn Windows Defender Firewall on or off Make sure you provide administrator permissions if prompted to do so!
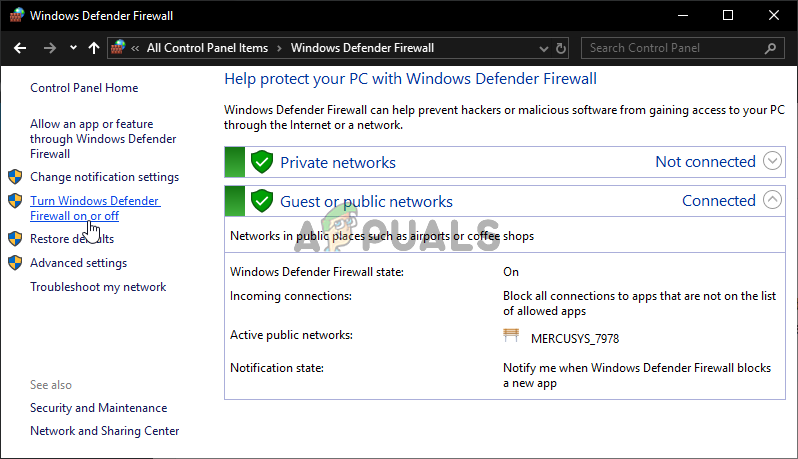
- Check the radio button next to the Turn off Windows Defender Firewall (not recommended) option for both Private and Public network settings. Click the OK button to apply the changed. Restart the installation and check to see if it finishes properly.
- If it does, go back to Windows Defender Firewall Settings and return the radio buttons next to Turn on Windows Defender Firewall options for both Private and Public network settings.
Solution 7: Stop Overclocking
Overclocking is used to increase the clock speed of your CPU or GPU processors or even the frequency at which your RAM works. It can provide your computer with a significant performance boost and improve the performance you get from various installed programs on your computer.
However, everything comes with a price and you should know that overclocking can be dangerous and cause various issues. Besides instability and power supply issues, you can also expect various hard-drive issues, such as this problem related to disk space during Steam game installation. Several users have reported that stopping overclocking on their computer was the right method to resolve the problem so make sure you do so.
The steps you will need to take solely depend on the software you used to start overclocking. Open it, and look for such option inside. Restart your computer, rerun the installation and check to see if the same error still appears when trying to install a Steam game!
If none of these methods shown above have helped you at all, it’s possible that your drive may contain bad sections, you can do a disk check by following this article (here). After checking your disk through Disk Check the problem still isn’t resolved please contact Steam Support so that they can check if there is anything wrong from the server-side.


When I do the trick solution and the update starts to download it says preallocating and is stuck again.