3 Solutions to Fix ‘Server denied POP3 access’ Gmail Error
Gmail is one of the most used domains for emails. It provides countless features along with a fast and easy to use interface which is the reason for its massive popularity. POP and IMAP forwarding is a feature which can be used to follow the current messages in the user’s inbox to another email. This prevents the loss of important messages and is time-saving as it can be used to forward all the messages in the inbox altogether.
However, quite recently, a lot of reports have been coming in where users are unable to access this feature and the “Server denied POP3 access for the given username and password” message is seen while trying to do so. In this article, we will discuss some of the reasons due to which this error is triggered and also provide viable solutions to rectify it completely.
What Causes the “Server denied POP3 access for the given username and password” Error?
After receiving numerous reports from multiple users, we decided to investigate the issue and devised a set of solutions that eradicated it completely. Also, we looked into the reasons due to which it is triggered and listed them as follows.
[/tie_list type="plus"]- POP Disabled: In some cases, it was seen that POP forwarding was disabled in the old account due to which the error was being triggered. It is important that POP forwarding is enabled in both the accounts in order for the feature to work properly.
- TFA Enabled: It is possible that two-factor authentication for the old account has been enabled due to which the issue is being triggered. Especially the users whose old account is hosted on the Zoho mail domain were facing problems due to TFA being enabled.
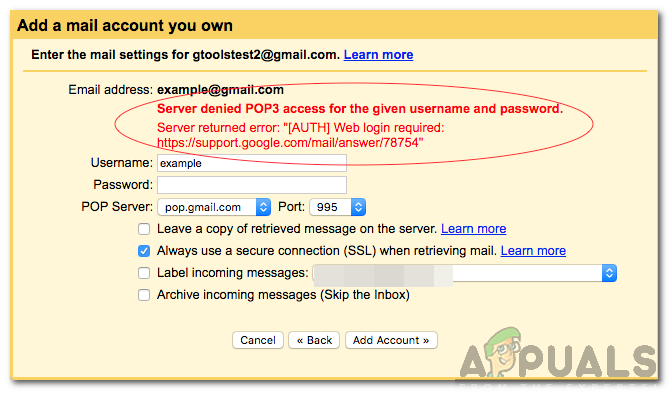
- Wrong Credentials: It is important that the full email address and the password are written correctly when the domain asks for the credentials to the old account. Some users were writing the username instead of the email due to which the issue was being triggered. Therefore, it is recommended that you enter the “Email Address” instead of the username to verify your credentials.
- POP Data Limit: In some cases, the email provider has a certain limit on the amount of data that can be forwarded to another email in one day. If the user exceeds that data limit, POP forwarding is temporarily disabled for that account.
Now that you have a basic understanding of the nature of the problem, we will move on towards the solutions. Make sure to implement these in the specific order in which they are provided to avoid any conflicts.
Solution 1: Enabling POP Forwarding
It is important that POP forwarding for both the email accounts has been enabled before trying to transfer messages. Therefore, in this step, we will be enabling POP forwarding. For that:
- Launch your browser and open a new tab.
- Sign in to Gmail after entering your account’s credentials.
- Click on the settings cog on the top right.
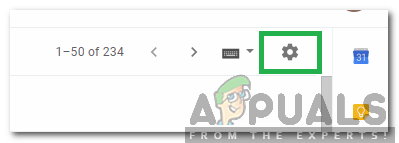
Click on the “Settings” cog - Select “Settings” and click on the “Forwarding and POP/IMAP” button.

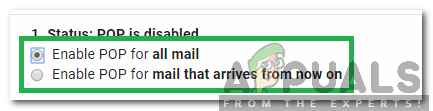
Clicking on the “Forwarding and POP/IMAP” button - Check the “Enable POP for All Mail” or the “Enable POP for mail that arrives from now on” option depending upon your needs.
Checking the “Enable POP for All Mail” option - Click on the “Save Changes” button to configure your settings.
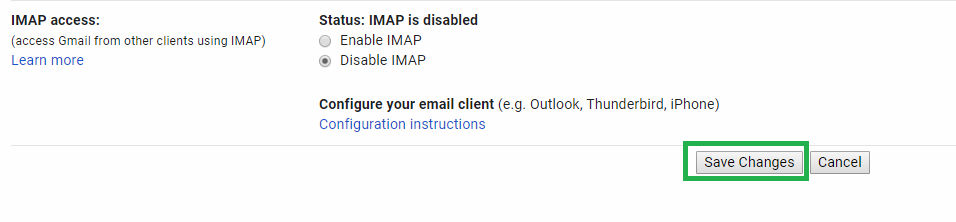
Clicking on the “Save Changes” option9 - Do this for both the accounts and check to see if the issue persists.
Solution 2: Using Device Specific Password
If you have set up two-factor authentication on the email, the normal password might not work for verification in the new email. Therefore, in this step, we will be generating a Device Specific Password to bypass the security. For that:
- Login to your “Zoho Mail” account.
- Click on the “My Account” button on the top to view the current Zoho Accounts.
- Select the “Two Factor Authentication” button and select the “Manage Application Specific Password” option.
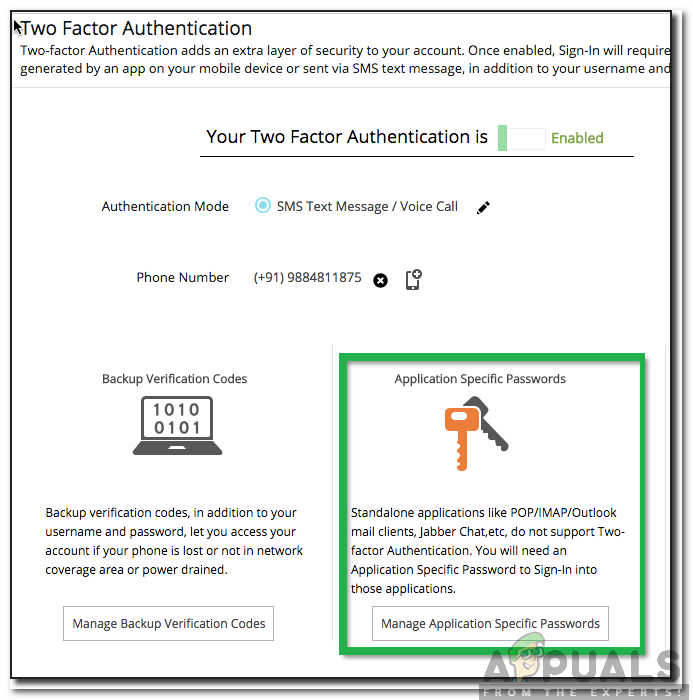
Clicking on the “Manage Application Specific Passwords” option - Enter the Device’s name and the current password.
- Click on “Generate” and a password will be displayed.
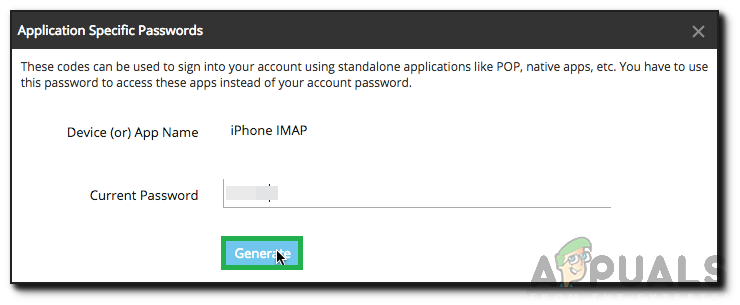
Entering the device name and current password and clicking on “Generate” - Use this new password in the new email to access POP forwarding for the old account.
Note: Use the password without any spaces if it doesn’t work otherwise. - Check to see if the issue persists.
Solution 3: Reducing Security
If the Error is still being triggered it means that the source account might be suspicious of the new account that you are using. Therefore, in this step, we will be reducing the security of the source account temporarily to initiate the forwarding process. For that:
- Login the old account from which the messages are to be forwarded.
- Visit this page after the login process is completed.
- Click on the “Continue” button to allow the device access.
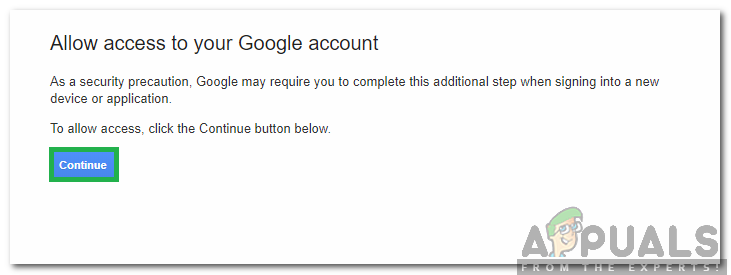
Clicking on “Continue” - Sign back into the new account and try to add the account again.
- Check to see if the issue persists.