How to Fix Error Code ‘BIOHD-4’ on HP Computer
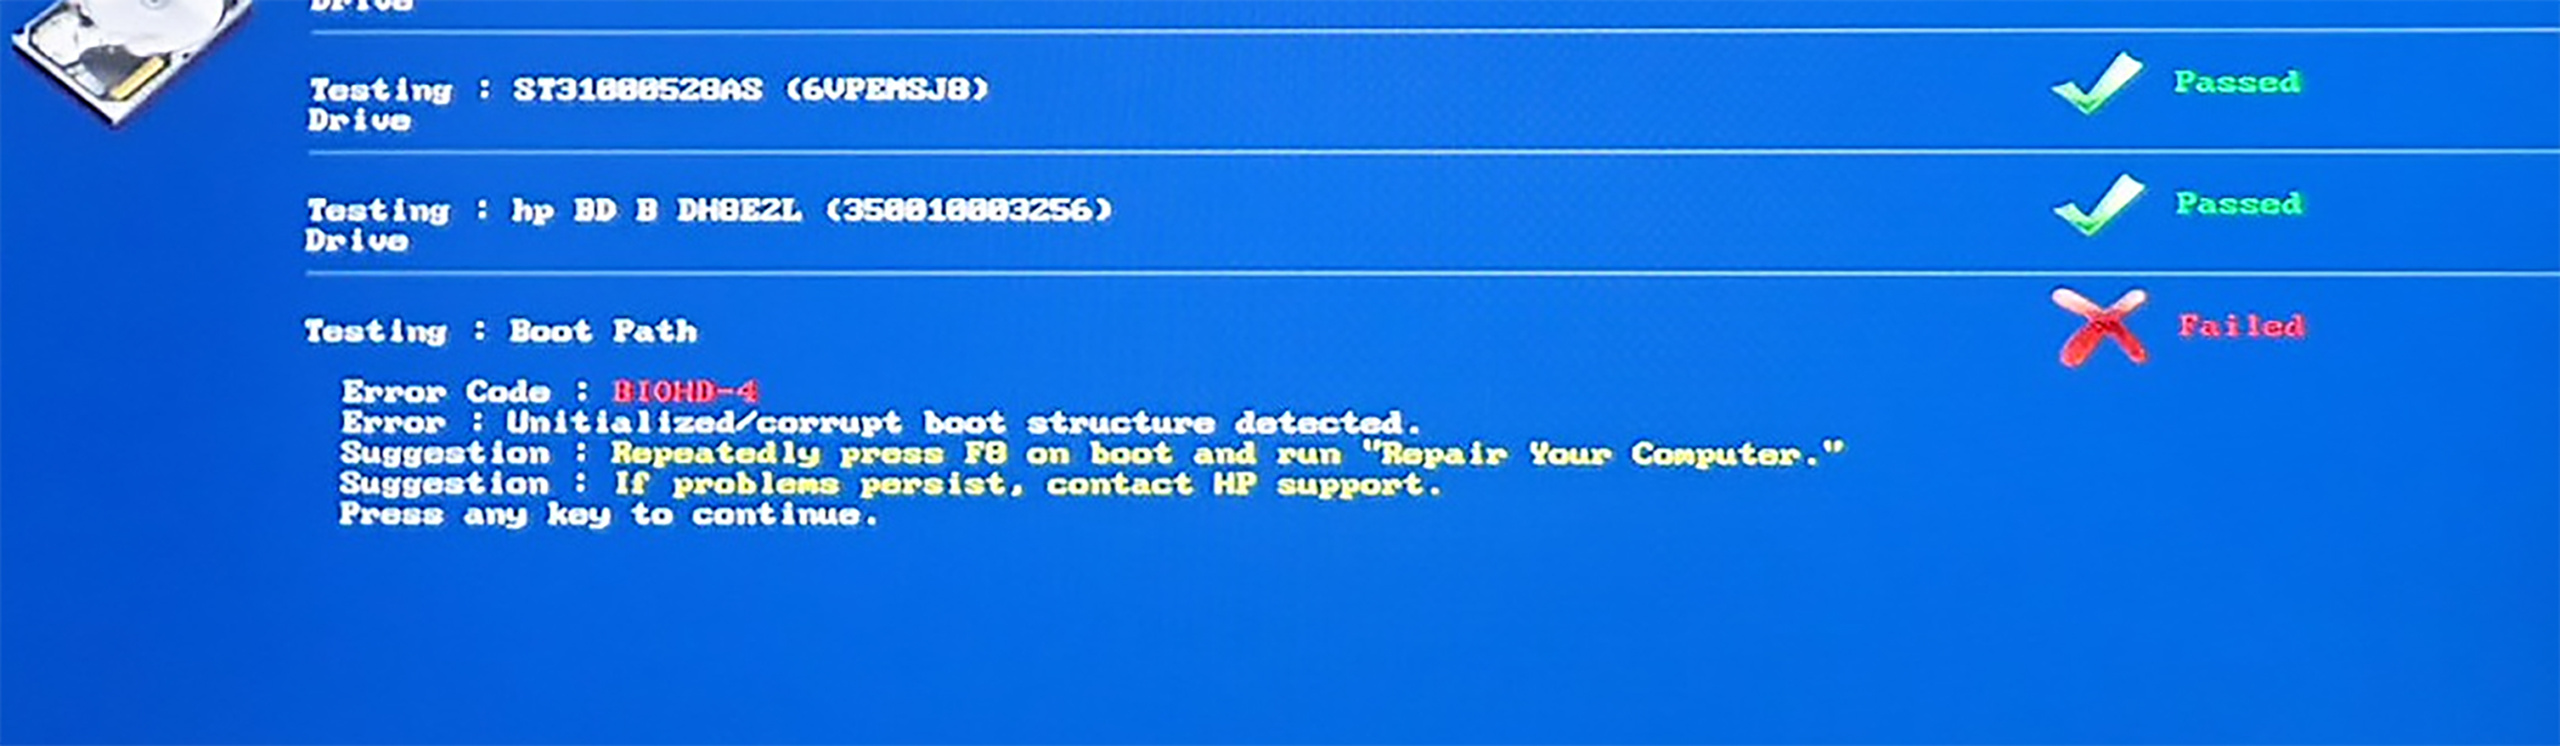
Some Windows users are unable to get past the initial boot screen on their HP computer. Upon the initial check, the boot path returns the error code ‘BIOHD4’. Some affected users are saying that the issue only happens occasionally while others are reporting that this issue pops up at every boot attempt.
After investigating this particular issue thoroughly, it turns out that there are several different underlying instances that might be causing the BIOHD-4 error code. Here’s a shortlist of potential issues that might be triggering this error code:
- Corrupted BCD or MBR data – By far, the most common cause of this particular issue is a corruption issue related to the BCD or MBR data responsible for loading up the necessary files needed to boot up your OS. Several users facing the same problem have reported that the issue was finally resolved after they repaired the BCD and MBR data from an elevated Command Prompt.
- Storage-Related problem – A failing drive or corrupted HDD / SSD sector can also be responsible for the apparition of this error code. If the issue is superficial, you can resolve it via a CHKDSK scan. But in more serious circumstances, the only way to resolve it is by replacing the problematic drive.
- System file corruption – As it turns out, system file corruption can also be responsible for your system’s inability to complete the boot-up process. Some users that were also dealing with this issue have confirmed that the problem was finally resolved after they’ve reset every Windows component with a procedure like clean installing or repair install.
Now that you are aware of every potential culprit that might be responsible for the apparition of this boot error, here’s a list of verified fixes that other affected users have successfully used to get to the bottom of this issue:
Method 1: Repairing the Boot Configuration Data
When troubleshooting this particular issue, the first thing you should investigate is a potential corruption that might be affecting the MBR files or boot configuration data.
Note: This is very likely if the message under the BIOHD4 error is ‘Uninitialized/Corrupt boot sector detected‘.
If this scenario is applicable, you can use the Boot Configuration Data (BCD) utility to locate the Windows boot files on all disks and add them back to the boot list so that the booting sequence can locate them during startup. This method was successfully used by a lot of users that were previously dealing with the BIOHD4 error.
Rebuilding the BCD file clusters should also be effective in situations where you are dual-booting.
IMPORTANT: This method will require a compatible installation of Windows installation media. In case you don’t have one at the ready, you can create the Windows installation media from scratch and load it on a USB drive.
After you ensured that you meet all the requirements, follow the instructions below:
- Start by plugging in the USB stick containing the installation media.
- Next, start your computer normally via the power button.
- At the first screen, access the Setup key by pressing the correspondent button depending on your motherboard manufacturer.
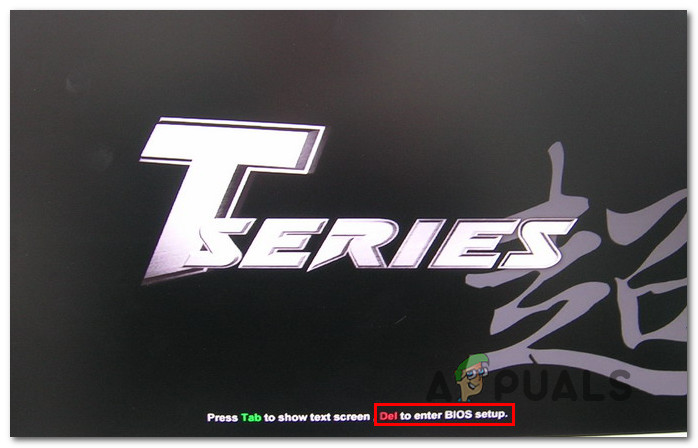
Accessing the Boot menu Note: Keep in mind that the setup key will be different from manufacturer to manufacturer. But in most cases, the Setup key is either one of the F keys (F2, F4, F6, F8), or the Esc key. If you’re having trouble accessing the Setup menu, search online for specific instructions on accessing it.
- Inside the Setup menu, access the Boot tab and make sure to set the USB stick containing the installation media as the first boot option.
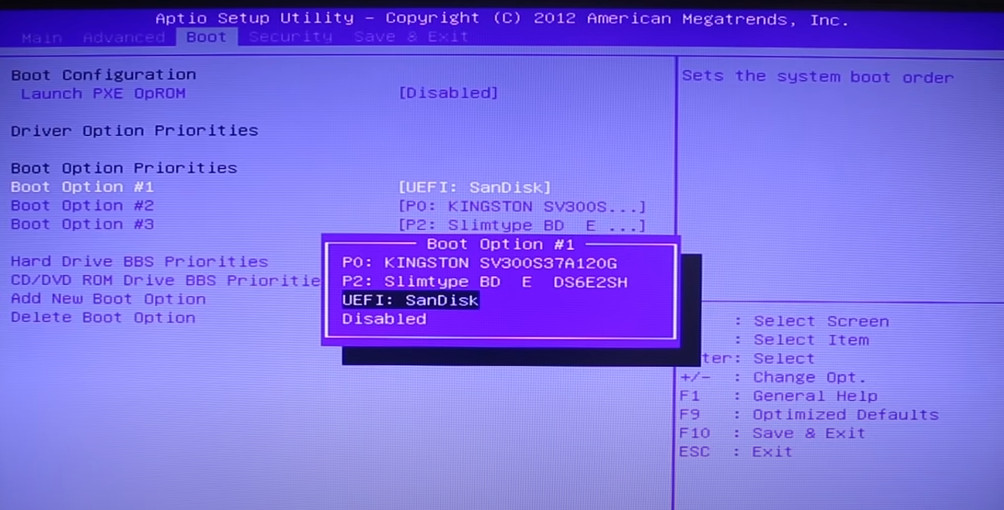
Establishing the correct boot order - Next, save the changes and restart your computer to allow it to boot from the installation media.
- Once you successfully boot from the installation media, click on Repair your computer from the bottom-right corner of the screen.
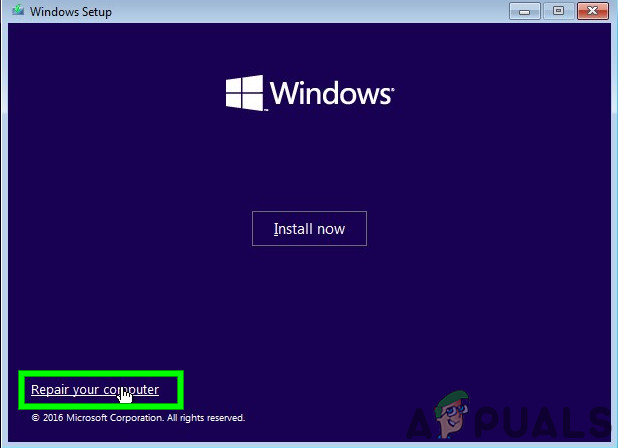
Repair Computer via installation media - Once the Recovery menu loads, access the Troubleshoot menu and click on Command Prompt from the list of available options.

Opening the Command Prompt menu Note: On certain Windows 10 versions, you can also boot from the Recovery menu (without booting from the installation media) by forcing 3 consecutive system interruptions during the startup procedure.
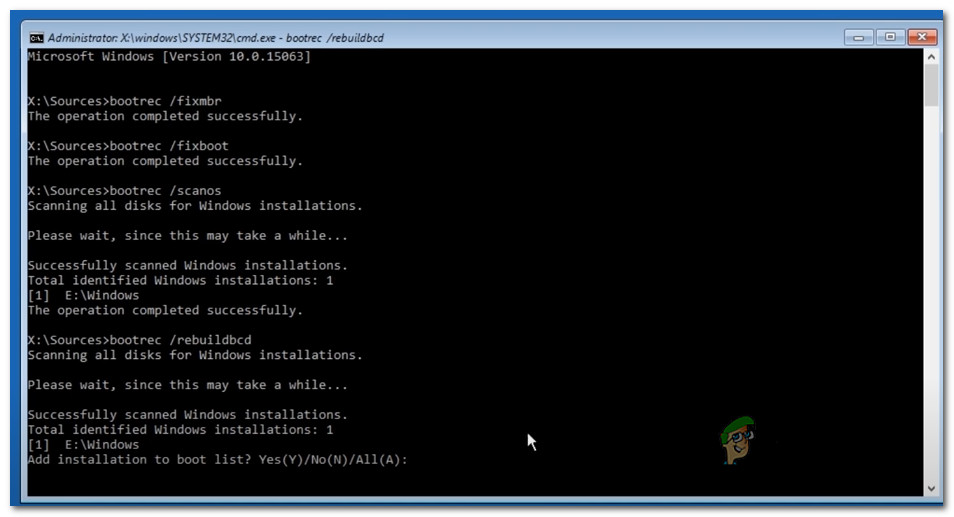
- Inside the elevated Command Prompt, type the following command and press Enter to fix the MBR dependencies associated with your Windows installation:
bootrec /fixmbr
- Once the first bootret command is processed successfully, type the following command and press Enter to fix the Boot Configuration Data associated with your Windows installation:
bootrec /fixboot
Note: If you get the ‘Access is denied’ error while inputting one of the 2 commands above, follow these instructions to fix the bootrec access problem.
- Next, type the following command and press Enter to scan all your disks for the Windows installation media:
bootrec /scanos
Note: This operation can take over 10 minutes depending on the size of your partitions. Don’t close this window until the operation is complete.
- After the operation is finally completed successfully, type the following command to effectively rebuild the BCD configuration data:
bootrec /rebuildbcd
- When asked to confirm, type Y and press Enter to confirm and start the operation.
Fixing the Bootrec data - Finally, type ‘exit’ and press enter to effectively leave the elevated CMD prompt and allow your Windows to boot normally.
In case the end result is the same and you’re still encountering the biohd-4 error during the initial system integrity scan, move down to the next method below.
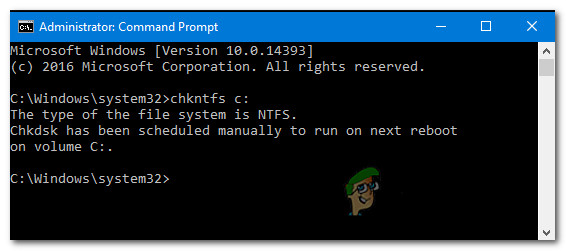
Method 2: Running CHKDSK scan
If the first method was not effective in your case and you’ve confirmed that the error was not occurring due to some kind of corruption affecting the MBR or BCD files, the next thing you should do is to investigate an HDD/SSD storage-related problem.
If the BIOHD4 is occurring due to some kind of corrupted storage sectors, a CHKDSK (Check Disk Scan) scan should allow you to identify any malfunctioning logical sectors and replace them with unused equivalents.
CHKDSK comes pre-installed on every recent Windows version including Windows 7 and Windows 8.1- You will be able to initiate a Check Disk scan regardless of your windows version. This scan will fix the majority of corruption instances and logical errors that might trigger this error code on an HP computer.
NOTE: To maximize your chances of running an effective CHKDSK scan, our recommendation is to initiate it from an elevated Command prompt. Follow these instructions on running a CHKDSK scan from an elevated CMD.
Note: If this utility has revealed some type of corrupted drive elements that cannot be replaced with a free sector, chances are your drive is failing to the point where it cannot be saved. In this case, you need to back up your data and look for a replacement ASAP.
If you already tried this fix out and you’re still seeing the same error code (and you’re not dealing with a failing drive), move down to the next potential fix below.
Method 3: Resetting every Windows Component
If you tried every potential fix above and you’re still encountering the BIOHD4 error during the booting sequence, chances are you’re dealing with some kind of system file corruption that is the MBR and BCD data.
In this case, the next logical step is to reset every Windows component with a procedure like a clean install or install repair (in-place repair).
The easy route is to go for a clean install – Keep in mind that unless you’ll back up your data in advance, you can expect to lose all your personal data present on your OS driver. However, a major advantage of this method is that you will not be required to use compatible installation media.
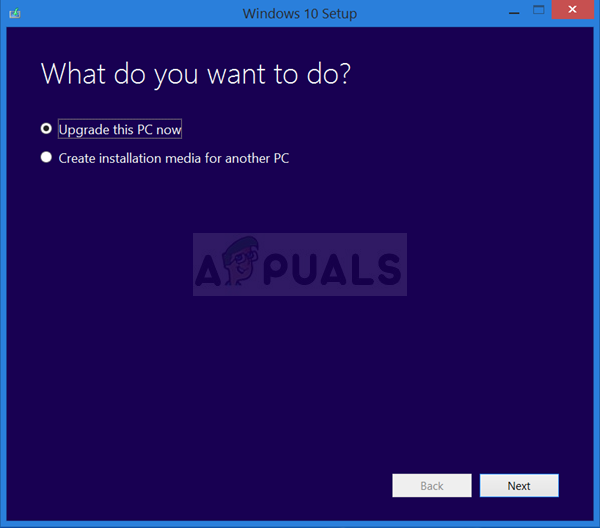
If you’re looking for the focused approach that will exclude your personal files stored on your OS drive from the operation, you’ll need compatible installation media to initiate a repair install (in-place repair procedure).
Note: This operation is considerably more tedious than clean installing. But the main advantage is that you’ll be able to refresh every corrupted OS component without losing data from your apps, games, documents, and personal media that’ currently stored on your OS drive.
Method 4: Contacting HP Support
If none of the potential fixes above have worked for you, the only viable thing you can do by now is to get in contact with HP support. Several affected users that went this route have reported that a technical successfully troubleshot the issue for them remotely.
In other cases, the support agent from HP asked them to send the desktop PC or laptop in for repairs.
By all accounts of users that went this route, HP support is fairly responsive as you can expect to reach a live agent without much trouble. They’ll offer support over the phone through a series of troubleshooting steps and if the problem still persists, you’ll be asked to send the device in for repairs.
Here’s a quick guide on getting in touch with an HP live agent:
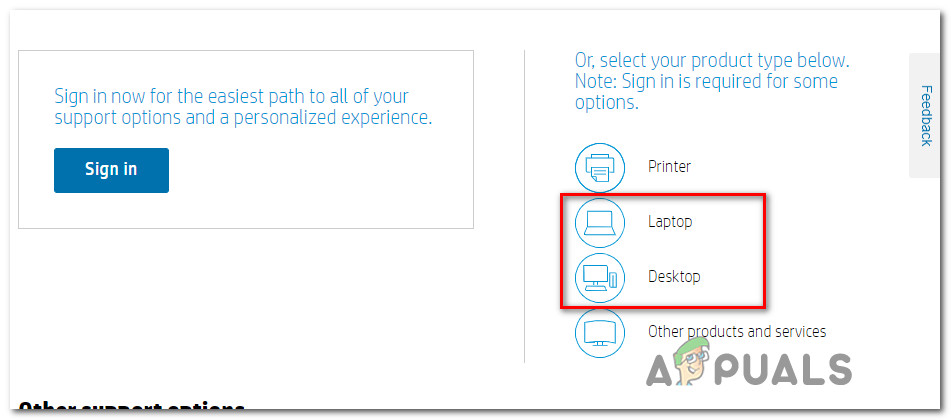
- Open up your default browser and visit the official support page of HP.
- From the list of available options, scroll down and click on Laptop or Desktop (depending on your applicable category).
Selecting the correct category - Once you get to the next screen, enter your printer serial number inside the Serial Number box and click on Submit.
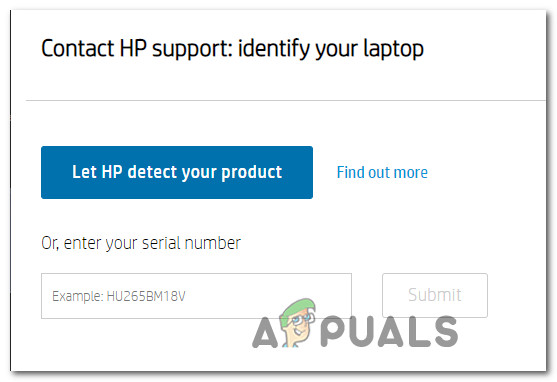
Identifying your HP Desktop or Laptop - Once you have successfully managed to identify your HP device, you can advance to the menu by navigating through HP Contact Forms > Get phone number.
- Use the recommended phone number to get in contact with a qualified technician, then follow through with the recommended troubleshooting steps.


