How to Create a Flashable Zip for Android System Mods
If you’re an Android developer who wants to create apps intended for /system partition (such as root apps), there are certain instances where you’ll want to create a flashable .zip for your app. This is so that the app files can properly be installed to the /system partition.
A few other uses of flashable .zips include:
- Modifying the DPI
- Applying a custom font
- Applying a custom boot animation
- Removing or adding system apps
Instructing your users to mess around in the file system and manually move files is a time waster for everyone involved – creating a flashable .zip is a much more convenient route. This Appual’s guide will show you how to create a flashable zip for Android.
We will also show you an addon.d script, so that custom system changes will survive a dirty ROM flash – thus, users will not need to re-flash your zip for each update.
Requirements:
- A root file explorer (MiXplorer, Solid Explorer)
- ZipSigner (for signing zips) or the MiX Signer plug-in if you use MixPlorer
- A Nandroid backup is highly recommended
You should also prepare all the files that are going into the zip – APKs, configs, boot animations, etc. Have everything organized before we begin, because this is a delicate process.
Template of a Custom Zip
If you want to download a template zip that you can customize to your own needs, or use it as a base for creating a flashable zip, you can grab them here:
- TEMPLATE SCRIPT: DOWNLOAD LINK (basic commands / you have to add your custom values: apps, paths of ringtones, bootanimation…)
- TEMPLATE ZIP: DOWNLOAD LINK (examples are always welcome to better understand an explanation. It can help to understand how to structure your files).
The template should be enough to start using a custom script.
You’ll need to remember these main paths, because these are the things in the /system partition that your flashable zips will typically target:
addon.d => backup script to survive a dirty flash (used by GApps package for instance)
app and priv-app => system apps to add or remove
etc => host file
fonts => your font
media => your bootanimation.zip
media > audio > alarms => sounds for alarms
media > audio > notifications => sounds for notifications
media > audio > ringtones => sounds for ringtones
media > audio > ui => sounds for various things such as low battery, unlock, camera,..
root of /system for build.prop file
Always remember that files removed from these paths will be re-installed after a dirty flash, and files that have been manually added will be removed. This is why its necessary to create a script that makes a backup of your /system mods.
Example of an Update-Script
ui_print("+-------------------------------------+");
ui_print("| CLEAN FLASH SCRIPT |");
ui_print("| |");
ui_print("| by Primokorn |");
ui_print("+-------------------------------------+");
run_program("/sbin/busybox", "umount", "/system");
run_program("/sbin/busybox", "mount", "/system");
ui_print(" ");
ui_print("***Deleting bloatwares***");
delete_recursive(
"/system/app/adaway.apk",
"/system/app/AdAway",
"/system/app/BasicDreams",
"/system/app/BookmarkProvider",
"/system/app/Calendar",
"/system/app/CalendarWidget",
"/system/app/CMFileManager",
"/system/app/CMWallpapers",
"/system/app/DeskClock",
"/system/app/Eleven",
"/system/app/Email",
"/system/app/ExactCalculator",
"/system/app/Exchange2",
"/system/app/Gello",
"/system/app/HexoLibre",
"/system/app/Jelly",
"/system/app/LiveWallpapersPicker",
"/system/app/LockClock",
"/system/app/messaging",
"/system/app/MiXplorer",
"/system/app/NexusLauncher",
"/system/app/Phonograph",
"/system/app/PhotoTable",
"/system/app/PicoTts",
"/system/app/PicoTTS",
"/system/app/ResurrectionStats",
"/system/app/SoundRecorder",
"/system/app/Terminal",
"/system/app/TugaBrowser",
"/system/app/Wallpaper",
"/system/app/WallpaperPickerGoogle",
"/system/priv-app/AudioFX",
"/system/priv-app/Chrome",
"/system/priv-app/Gallery2",
"/system/priv-app/MusicFX",
"/system/priv-app/OnePlusCamera",
"/system/priv-app/OnePlusGallery",
"/system/priv-app/OnePlusMusic",
"/system/priv-app/Recorder",
"/system/priv-app/Screencast",
"/system/priv-app/Snap",
"/system/priv-app/SnapdragonCamera",
"/system/priv-app/SnapdragonGallery",
"/system/priv-app/WeatherManagerService",
"/system/priv-app/WeatherProvider",
"/system/priv-app/Tag"
);
ui_print("Installing apps and mods, etc");
show_progress(8.800000, 5);
package_extract_dir("system", "/system/");
ui_print("***Fixing permissions***");
set_perm(0, 0, 0755, "/system/addon.d/99-dirty.sh");
set_perm(0, 0, 0644, "/system/etc/gps.conf");
set_perm(0, 0, 0644, "/system/fonts/Roboto-Regular.ttf");
set_perm(0, 0, 0644, "/system/media/audio/ringtones/PlasticRing.ogg");
set_perm(0, 0, 0644, "/system/priv-app/Phonesky.apk");
set_perm(0, 0, 0644, "/system/priv-app/microG.apk");
set_perm(0, 0, 0644, "/system/priv-app/Gsam.apk");
set_perm(0, 0, 0644, "/system/priv-app/BBS.apk");
set_perm(0, 0, 0644, "/system/priv-app/V4A-Magisk.apk");
run_program("/sbin/busybox", "mount", "/data");
package_extract_dir("data", "/data/");
set_perm(0, 0, 0755, "/data/local/afscript.sh");
show_progress(8.800000, 5);
run_program("/sbin/busybox", "umount", "/data");
run_program("/sbin/busybox", "umount", "/system");
ui_print(" ");
ui_print("Done.");
ui_print("Ready to reboot.");
Note: ui_print(” “); is for text message. These lines don’t do anything.
You should always unmount and re-mount the partition before working on it.
run_program("/sbin/busybox", "umount", "/system");
run_program("/sbin/busybox", "mount", "/system");
To remove system components / apps, put a comma at the end of each line, except the last one.
delete_recursive(
"/system/app/adaway.apk",
"/system/app/AdAway",
........................
"/system/priv-app/WeatherProvider",
"/system/priv-app/Tag"
);
Extract the system files you want to install.
package_extract_dir("system", "/system/");

Set the file permissions.

set_perm(0, 0, 0755, "/system/addon.d/99-dirty.sh");
..............
set_perm(0, 0, 0644, "/system/priv-app/V4A-Magisk.apk");
Do the same thing but for the /data folder. So you will mount the partition, extract the data you want to add, and set the permissions.
run_program("/sbin/busybox", "mount", "/data");
package_extract_dir("data", "/data/");
set_perm(0, 0, 0755, "/data/local/afscript.sh");
Next you will unmount the modified partitions.
run_program("/sbin/busybox", "umount", "/data");
run_program("/sbin/busybox", "umount", "/system");
Example of Addon.D script
#!/sbin/sh
#
# /system/addon.d/99-dirty.sh
# /system is formatted and reinstalled, then thes files are restored.
#

. /tmp/backuptool.functions

list_files() {
cat <<EOF
addon.d/99-dirty.sh
fonts/Roboto-Regular.ttf
media/audio/ringtones/PlasticRing.ogg
priv-app/BBS.apk
priv-app/Gsam.apk
priv-app/microG.apk
priv-app/PhoneSky.apk
priv-app/V4A-Magisk.apk
etc/gps.conf
etc/hosts
EOF
}

case "$1" in
backup)
list_files | while read FILE DUMMY; do
backup_file $S/"$FILE"
done
;;
restore)
list_files | while read FILE REPLACEMENT; do
R=""
[ -n "$REPLACEMENT" ] && R="$S/$REPLACEMENT"
[ -f "$C/$S/$FILE" ] && restore_file $S/"$FILE" "$R"
done
rm -rf /system/app/adaway.apk
rm -rf /system/app/AdAway
rm -rf /system/app/BasicDreams
rm -rf /system/app/BookmarkProvider
rm -rf /system/app/Calendar
rm -rf /system/app/CalendarWidget
rm -rf /system/app/CMFileManager
rm -rf /system/app/CMWallpapers
rm -rf /system/app/DeskClock
rm -rf /system/app/Eleven
rm -rf /system/app/Email
rm -rf /system/app/ExactCalculator
rm -rf /system/app/Exchange2
rm -rf /system/app/Gello
rm -rf /system/app/HexoLibre
rm -rf /system/app/Jelly
rm -rf /system/app/LatinIME
rm -rf /system/app/LiveWallpapersPicker
rm -rf /system/app/LockClock
rm -rf /system/app/messaging
rm -rf /system/app/MiXplorer
rm -rf /system/app/NexusLauncher
rm -rf /system/app/Nova.apk
rm -rf /system/app/Phonograph
rm -rf /system/app/PhotoTable
rm -rf /system/app/PicoTts
rm -rf /system/app/PicoTTS
rm -rf /system/app/ResurrectionStats
rm -rf /system/app/SoundRecorder
rm -rf /system/app/Terminal
rm -rf /system/app/TugaBrowser
rm -rf /system/app/Wallpaper
rm -rf /system/app/WallpaperPickerGoogle
rm -rf /system/priv-app/AudioFX
rm -rf /system/priv-app/Chrome
rm -rf /system/priv-app/Gallery2
rm -rf /system/priv-app/LatinIME
rm -rf /system/priv-app/MusicFX
rm -rf /system/priv-app/OnePlusCamera
rm -rf /system/priv-app/OnePlusGallery
rm -rf /system/priv-app/OnePlusMusic
rm -rf /system/priv-app/Recorder
rm -rf /system/priv-app/Screencast
rm -rf /system/priv-app/SnapdragonCamera
rm -rf /system/priv-app/SnapdragonGallery
rm -rf /system/priv-app/Snap
rm -rf /system/priv-app/Trebuchet
rm -rf /system/priv-app/WeatherManagerService
rm -rf /system/priv-app/WeatherProvider
rm -rf /system/priv-app/Tag
;;
pre-backup)
# Stub
;;
post-backup)
# Stub
;;
pre-restore)
# Stub
;;
post-restore)
# Stub
;;
esac
Create a list of files you want to keep after a dirty flash.
list_files() {
cat <<EOF
addon.d/99-dirty.sh
fonts/Roboto-Regular.ttf
media/audio/ringtones/PlasticRing.ogg
priv-app/BBS.apk
priv-app/Gsam.apk
priv-app/microG.apk
priv-app/PhoneSky.apk
priv-app/V4A-Magisk.apk
etc/gps.conf
etc/hosts
EOF
}
RM -RF the files you don’t want to be installed after a dirty flash (system files you removed in your modification that will be re-installed from a dirty flash)
rm -rf /system/app/adaway.apk
rm -rf /system/app/AdAway
rm -rf /system/app/BasicDreams
rm -rf /system/app/BookmarkProvider
................................................
rm -rf /system/priv-app/WeatherProvider
rm -rf /system/priv-app/Tag
;;
How to Create a Flashable Android Zip
We’ll be using MiXplorer for this, as it’s the best root explorer and file manager for Android, hands down.
- First select all your folders that will be included in the zip, and choose Archive.
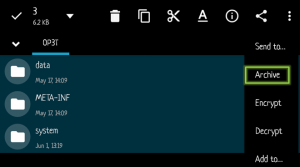
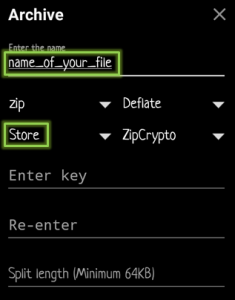
- Confirm the creation of your archive file, give it a name and choose Store.
- Your flashable zip will be created, so select the zip file and then Sign it (using MiX signer plugin)
- Now select TestKey to just check it for signature errors.
- You can now flash the zip – recommend moving it to /SDcard for easily finding it from custom recovery.
Final Notes
Your flashable zip needs to be installed after a clean flash, or after wiping the /system partition and doing a dirty flash of your ROM. The updater-script will remove and add the system files you specified in your script – but leave the addon.d script alone, because it will do its job without any interference from you.
After your first installation, thoroughly check the /system partition to make sure everything is correct – files are removed, etc. Maybe you had a typo in a file name and it wasn’t removed, it happens.


where is the template zip example? Can you re-share it?