How to Convert FLAC to AAC in Foobar
and why AAC is better than MP3
While many people still use the .MP3 format these days as their preferred “lossy” format, it’s likely because they don’t know any better – AAC (Advanced Audio Coding) was actually created as a superior lossy format, and is supported on most audio players (except strictly MP3-only players, but who uses MP3 players in 2018?).
AAC achieves better sound quality than MP3 at lower bitrates – a 256kbps AAC sounds better than a 320kbps MP3, and this has been tested by numerous engineers. Furthermore, AAC is the only network broadcast audio format that can achieve an “Excellent” rating for all EBU listening test projects.
If AAC is better than MP3, why is MP3 more popular than AAC?
Well, that’s hard to answer – AAC came out in 1997, 3 years after MP3, and for a long time AAC was mainly associated with Apple – in fact, some people might think it stands for “Apple Audio Codec”, because AAC is the primary format used on iTunes, iPod, etc. Apple likes to be on the “cutting edge” of technology, so its no surprise they latched onto AAC when it was declared the successor to MP3 – but Apple does not own or control the AAC format.
So for a long time, people believed AAC was an Apple owned and controlled format, and that the codec was only compatible with Apple products – which is entirely untrue. AAC is an international standard that was approved in 1997! Though for some reason, a lot of devices could only play MP3 files back in the late 90s and early 2000s – most likely the manufacturers of these devices were also under the impression that AAC was an Apple-controlled format.
Today, your Android device can play AAC without any problems, as can most PC media players. Its just that people who are somewhat familiar with music coding see “AAC” and immediately think of iTunes / Apple, so for some reason, MP3 remained popular and the format of choice for a lot of people, despite AAC being superior in every way conceivable. Oh, and one last thing – that ALAC (Apple Lossless Audio Codec) format, the lossless version of AAC? Yeah, Apple created it, but its open-source.
Okay, I get it – AAC is free and for everyone. What now?
In this Appual’s guide, we’re going to show you how to convert your lossless FLAC files to high-quality AAC. Your AAC files will have better sound and smaller file size than MP3, but it’s a little more difficult configuring the codecs for AAC export – which is probably part of the reason converting your CD collection to AAC never really caught on, unless you used iTunes or something similar.
For this guide, we will show you two separate methods – though others exist, these are the easiest (aside from downloading iTunes and using its auto-converter). We will show you how to convert FLAC to AAC using the Foobar Encoder Pack, which includes qaac for AAC encoding in a variety of AAC formats.
How to Convert FLAC to AAC in Foobar
Requirements:
- Foobar Encoder Pack
- (Optional) iTunes installed on your PC, to use Apple AAC encoding, or Winamp to use FhG encoding
- Lossless FLAC file of your choice
First, you need to download and install the Foobar Encoder Pack. Save the .exe file on your computer, then allow it to install to your native Foobar directory, as seen below.

If you don’t have iTunes, you should consider installing it – yeah, I know, we went through all that spiel about how Apple doesn’t own AAC, and now we need iTunes to convert FLAC to AAC. You don’t need iTunes, you can use an alternative AAC encoder such as AAC FDK, AAC Nero, AAC FhG, but Apple AAC has the best encoding (someone can debate me, as Fraunhofer FDK AAC is a very close second-best).
In either case, go ahead and install either iTunes or Winamp, it’s up to you. If you’re on Windows, make sure you download the version right for you – x32 or x64, though Windows 10 users can just grab iTunes from the Microsoft Store.
Now in Foobar, go through your media library and find whatever you want to convert. Right-click and go to Convert > … (click the …, we don’t have any conversion presets setup yet)

Now on the right side of the new window that opens, you have 4 options – Output format, Destination, Processing, and Other.
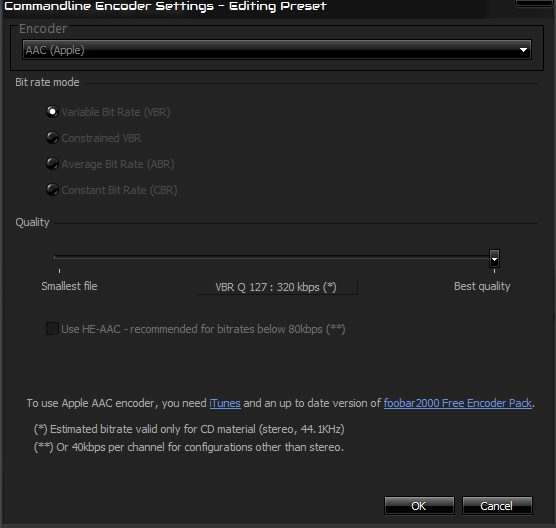
First click the “Output format” menu, and choose either AAC (Apple) or AAC (Winamp FhG), depending on whether you installed iTunes or Apple. I’m going with AAC (Apple) in the screenshots.
Now under bitrate mode, you can change it to either VBR (Variable Bitrate) or CBR (Constant Bitrate) – its really difficult to explain the difference in a few short words, but VBR is probably better for AAC encoding, so go with VBR. Then for the Quality slider, of course, crank it up to “Best quality” for 320kbps. If file size / storage space is a concern, you can lower it to 256kbps, because a 256kbps AAC will sound better than a 320kbps anyways.
Hit “Okay”, then change the other options such as Destination and Processing if you want – Destination is self-explanatory, but “Processing” actually allows you to add DSP (post-processing) effects to the file being encoded, such as Equalizer, Reverb, etc. It will build those effects into the file being encoded – this might actually be useful if you use a lot of CPU-intensive DSP effects, and want them built into the audio file itself.
After you hit “Convert”, it will ask you to point to the Winamp codec if you have Winamp installed, or it should automatically begin converting if you have iTunes installed and chose the Apple AAC codec.


