‘Configure Windows advanced settings for lossless audio playback’
There’s nothing more annoying than audio glitches and stutter when recording or playing high-quality audio formats. Many people are beginning to appreciate “hi-res” and lossless audio formats now that digital streaming and music downloading services are offering them, but few people have actually optimized their computer for recording or playing these high-res audio formats.
If you’re a musician trying to record tracks in your favorite DAW and you’re hearing tons of glitches, stutters, and audio dropout, or you’re an “audiophile” getting too much crackle and distortion while playing your favorite 24/192kHz lossless-quality music files, Appuals has just the guide for you!
Understanding Buffer and Latency in Audio
Let’s define some terms:
- Buffering – the process of grouping samples into batches for processing.
- Buffer Size – the number of samples in one batch.
- Audio Cycle – the processing of one audio buffer.
- Latency – the time duration of the buffer.
Our ears generally decide how much latency is tolerable to us. Its pretty much established that most humans cannot discern audio intervals less than about 10 milliseconds – basically, two sounds played 10ms apart sound like they are instantly together. So, latency can be calculated by dividing the buffer size by the sample rate and using some simple algebra we can work out the required buffer size:
- Latency = BufferSize / SampleRate
- BufferSize = Latency * SampleRate
- BufferSize = 0.01 * 44100 = 441
At a sample rate of 44.1KHz, 10ms is 441 samples. Since some sound cards only support buffer sizes that are powers of 2 (like RAM), this is often rounded up to 512 samples (about 12ms) or down to 256 samples (6ms) – depending on what your computer is capable of.
For your computer to produce a glitch free audio stream, the computer needs to provide a fresh buffer of samples to the sound card roughly every 10 milliseconds. If it is unable to keep up with that buffer rate, then there is nothing that will fill in the blank spaces between audio, and you will have glitches.
The type of glitch you hear will depend on a couple of things.
- Short delays typically sound like a “tick”.
- Longer delays either produce no sound – “drop outs”, or sometimes the buffered samples from the previous cycle are replayed causing “stuttering”.
The key to performance tuning a PC for real-time audio processing is eliminating anything that might cause it to be held up on other tasks for longer than the duration of the buffer.
So, to reduce or completely eliminate audio glitches during live monitoring of input signal, or playback of output signal, there are a number of things you can do that revolve around your Windows settings.
Power Management:
Just like optimizing your computer for intensive gaming, the first thing we want to do is make sure your computer is set to a high-performance power plan, with some things disabled.
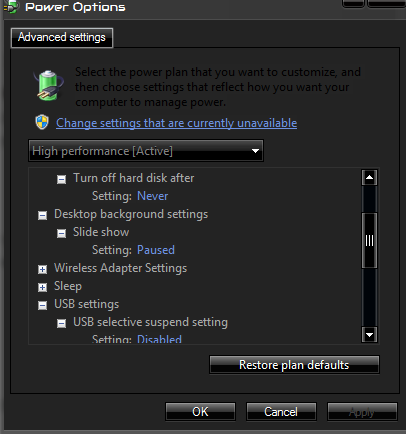
- Power Plan: High Performance
- Turn off Hard Disk: Never
- Minimum and Maximum processor state: 100%
- USB Suspend: Never
- PCI Express link state management: Off
Device Manager:
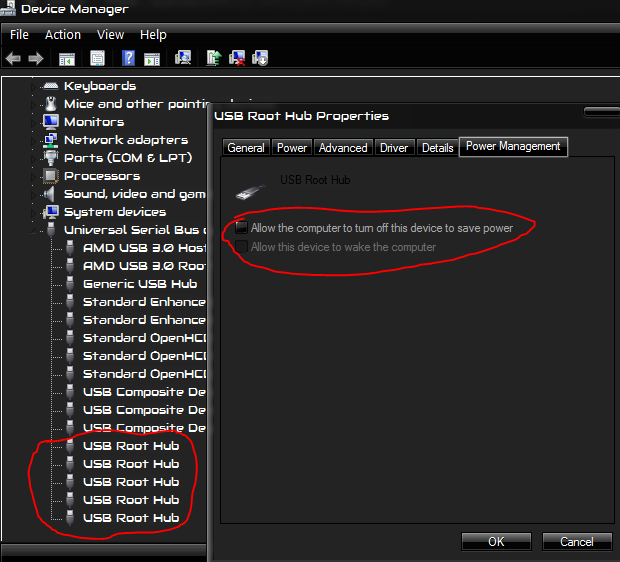
- Open the Device Manager, by clicking the Windows Start button, typing “device manager” and pressing Enter.
- Scroll to the bottom of the list and expand the entry “Universal Serial Bus controllers”.
- Go through the list and right click on all devices including the words “USB Hub” or “USB Root Hub”.
- Choose “Properties” from the popup menu.
- Switch to the “Power Management” tab
- Uncheck the option “Allow the computer to turn off this device to save power”
- Repeat from step 3 for all hub devices.
Hard Drive Compression and Indexing
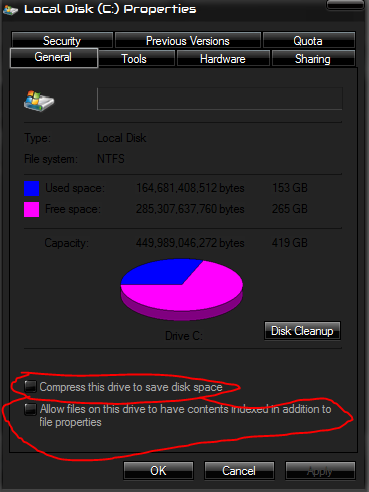
- Start Windows Explorer (Windows Key + E) 2. Select “Computer” (or “This PC” on Windows 10) in the left-hand panel:
- Right click on each hard drive and select “Properties”
- Turn off the two options at the bottom of the window:
Processor Scheduling
Windows multi-tasking revolves around a process called time slicing. This allows each program a tiny amount of time to run. By continuously cycling through all the running programs it appears as if they’re all running at once. This Processor Scheduling setting controls the duration of each of these time slices. Longer time slices are better for background processing, whereas shorter timer slices can make the user-interface seem more responsive.
You might be wondering which is best for audio processing; There’s no correct answer! It entirely depends on what you’re doing, so one might perform better than the other.
Longer time slices might give your audio software more time to process audio but they can also keep the processor tied up on other tasks and prevent audio processing.
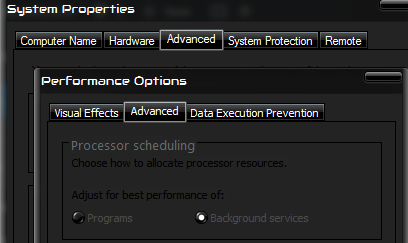
It’s probably best to start with “Background services” mode:
- Click the Window Start button and type “advanced system settings” and press Enter.
- In the “Processor scheduling” section select either “Programs” for shorter time slices or “Background services” for longer.
Core Parking Core
Core parking is a CPU-specific feature available in some modern processors (e.g.: Intel i7 processors) in which entire CPU cores will be disabled to minimize power consumption. This is good for power management but can affect real-time audio performance because there is a small delay when unparking which can lead to drop outs if that processing power is needed.
By default, Windows hides the setting for core parking but it can be shown with a few tweaks to the system registry.
- Click the Windows Start button and type “regedit” and press Enter to launch Window’s Registry Editor program
- Press the Home key to move the selection in the left-hand pane to the very top
- Press Ctrl+F to bring up the Find dialog and search for “dec35c318583” (without the quotes)
- Once found, make sure the found key is related to power settings by checking the status bar – it should include “Control\Power\PowerSettings”. If not, ignore it and repeat from step 3.
- Double click the “Attribute” setting in the right-hand panel and change the value to 0 (zero) as shown below:
- Repeat steps 3-5 until all such entries have been changed (there may be several). To be clear: it’s only the “Attribute” values under the “0cc5b647-c1df-4637-891a-dec35c318583” keys that should be changed.
- Once you’ve made these changes, a new settings option will appear in Power Options that will control core parking:
- Go to Control Panel -> Power Options -> Change Plan Settings -> Change Advanced Power Settings
In the Advanced Settings window navigate to Processor Power Management -> Processor performance core parking min cores. The value you enter for this setting is the minimum percentage of processor cores that must kept running (not parked). Set this to 100% to prevent any cores from being parked.
Page File Settings
The Paging File is a special file that Window’s uses for additional storage when physical memory starts to run low. The paging file is also referred to as the “swap file” because pages of memory are swapped between it and physical memory. By default, Windows is typically configured automatically manage the size of the paging file however you should consider setting it to a fixed size so it doesn’t need to be resized while performing.
To configured the paging file:
- Click the Window Start button
- Type “advanced system settings” and press Enter
- In the Performance group, click the “Settings” button
- Switch to the “Advanced” tab
- In the Virtual Memory group, click the “Change” button
- Turn off “Automatically manage paging file size for all drives”
- Click on the first drive in the list
- Select the “Custom Size” radio button
- Enter the desired initial and maximum size values (see below)
- Repeat Steps 7-9 for each of the other drives.
You now need to consider how big the paging file on each drive should be:
- Always put the page file on the fastest hard drive. If you have an SSD drive you definitely want to put the swap file on that drive.
- You generally only need a paging file on one drive however you can get a very small performance increase by using multiple drives.
- A guideline for the total size of all paging files should be roughly 1.5 times the amount of physical RAM in your computer. E.g.: 4GB Physical RAM = 6GB Paging File.
- If you have lots of physical RAM (e.g.: > 8GB) you can usually get away with a smaller paging file. E.g.: if you have 32GB RAM it doesn’t much sense to allocate 48GB to the paging file (this might be a considerable fraction of an SSD drive).
Multiple Audio Devices
If you have a dedicated sound card for audio performance its worth disabling the built-in sound device, or other sound cards if you’re not using them. Sound card drivers are notorious for causing DPC latency issues.
Also disabling them can also simplify the setup of your audio software since the ability to select these devices will be removed.
- Click on the Windows Start button, type “device manager” and press Enter
- Expand the group named “Sound, video and game controllers”
- Right click on any sound cards that you don’t need and select “Disable” from the popup menu
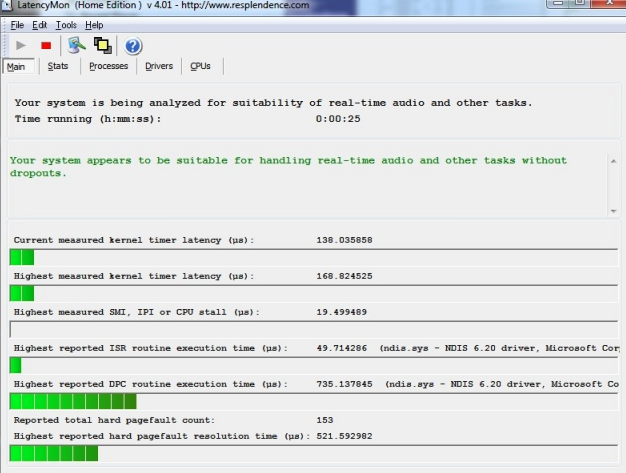
LatencyMon
There’s a great, freely available tool for checking ISR and DPC latency issues called LatencyMon. This tool will tell you whether your computer is optimized for optimal input/output audio, and what drivers on your computer are affecting your overall latency.
After you have downloaded LatencyMon:
- If you’re running on a battery powered device, make sure you have mains power attached
- Make sure your power settings are configured as they would be during performance
- Close all other running software
- Start LatencyMon
- Press the green “play” button to start the test
- Let it run for a few minutes
- Press the red “stop” button to stop the test
If all the times reported by LatencyMon are less than the amount of headroom then DPCs and ISRs probably aren’t going to be causing you issues. If on the other hand the reported times are longer than the available headroom (or if they’re more than about 500µs (0.5ms), then you should probably take closer look. LatencyMon will show which drivers had the slowest ISR and DPC times.
- Check for an updated driver. If one is available update it and re-run the test.
- If you have the latest driver and it’s for a device you know you don’t need during live performance you might be able to simply disable it in Windows Device Manager and re-run the test. (Never uninstall a device and be careful not to disable devices that the system needs for correct operation – see below)
- Try searching for the name of the driver and the terms “DPC” or “ISR”. You’ll often find forum discussions on particular drivers that are problematic and sometimes a specific version (perhaps even an older version) are known to perform more reliably.