Fix: High CPU Usage by Sppsvc.exe ‘software protection platform service’
Having high CPU usage on a Windows operating system is nothing new. There are numerous cases where different processes slow down your PC by consuming a lot of your resources. Sometimes, these processes can even make the PC unusable.
High usage by “sppsvc.exe” is a little different from other processes. It occurs in two cases; in a genuine windows copy and in a copy activated with third-party applications (such as KMS etc.). What need to be noted by users is that if you don’t have official windows, KMS will most likely be running in the background and conflicting with sppsvc which is the authentication mechanism present in Windows. In cases of a genuine windows copy, it is most likely a bug with third-party application and be solved by checking the system in a safe/clean boot.
Note: It is possible that you have a genuine windows copy but a pirated copy of other Microsoft utilities (such as Microsoft office) which are activated using third-party applications.
In either case, if we disable the service as a last resort to end the CPU usage, it will bring forth the watermark “Windows is not activated” on the bottom right side of the screen.
Solution 1: Running System Maintenance Troubleshooter
We can try running the system maintenance troubleshooter and check for any errors and discrepancies in your operating system.
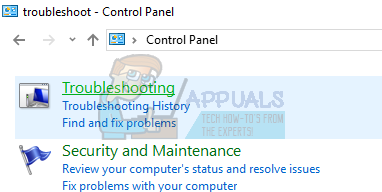
- Press Windows + R, type “control panel” in the dialogue box and press Enter.
- Type “troubleshoot” in the search bar of the control panel at the top right side of the window.

- Select “Troubleshooting” heading off the list of results returned.
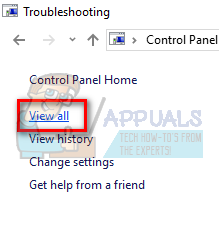
- Once in the troubleshooting menu, click “View all” present in the navigation pane at the left side of the window. Now Windows will populate all the troubleshooters available on your computer.
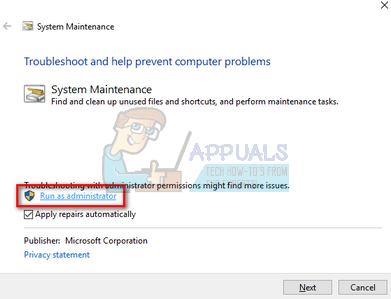
- Locate “System Maintenance” from the list of options available and click it.

- Now System Maintenance troubleshooter will launch. Click on Advanced located inside the troubleshooter and click the option “Run as administrator”. Also, check the option “Apply repairs automatically”.
- Now Windows will check for errors and discrepancies in your system and notify you if it found any. It will also attempt to repair these errors by itself.

- If any errors were identified and fixed, restart your computer.
Solution 2: Checking in Safe Mode and Clean Boot
We can check if the process still consumes all these resources in a safe or clean boot. Both methods start your computer with a minimum set of services and drivers so you can identify and isolate the program/application giving you trouble.
Boot your computer into safe mode and If you cannot identify the problem using the safe mode, you can move on to clean booting your system and check if you can successfully isolate the problem.
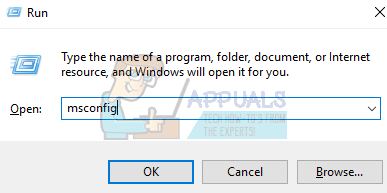
- Press Windows + R to launch the Run application. Type “msconfig” in the dialogue box and press Enter.
- Navigate to the Services tab present at the top of the screen. Check the line which says “Hide all Microsoft services”. Once you click this, all Microsoft related services will be disabled leaving behind all the third-party services.
- Now click the “Disable all” button present at the near bottom at the left side of the window. All the third-party services will now be disabled.
- Click Apply to save changes and exit.

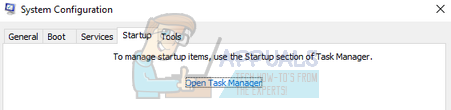
- Now navigate to the Startup tab and click the option of “Open Task Manager”. You will be redirected to the task manager where all the applications/services which run when your computer starts will be listed.
- Select each service one by one and click “Disable” at the bottom right side of the window.
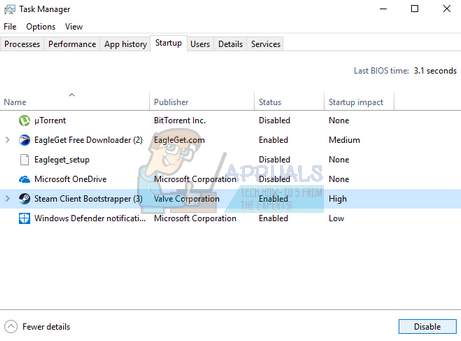
- Now restart your computer and check if the CPU usage is still as before. If it isn’t, it means there was an external program that was causing the problem. Search through your installed programs and determine which application is causing you problems.
Solution 3: Running System File Checker
System File Checker (SFC) is a utility present in Microsoft Windows which allows the users to scan their computers for corrupt files in their operating system. This tool has been there in Microsoft Windows since Windows 98. It is a very useful tool for diagnosing the problem and checking if any problem is due to corrupt files in windows.
We can try running SFC and see if our problem gets solved. You will get one of the three responses when running SFC.
- Windows didn’t find any integrity violations
- Windows Resource Protection found corrupt files and repaired them
- Windows Resource Protection found corrupt files but was unable to fix some (or all) of them
- Press Windows + R to launch the Run application. Type “taskmgr” in the dialogue box and hit Enter to launch your computer’s task manager.
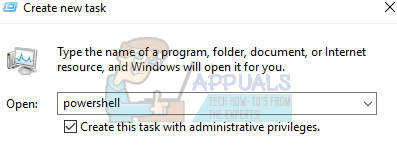
- Now click on File option present at the top left side of the window and select “Run new task” from the list of options available.

- Now type “PowerShell” in the dialogue box and check the option underneath which states “Create this task with administrative privileges”.
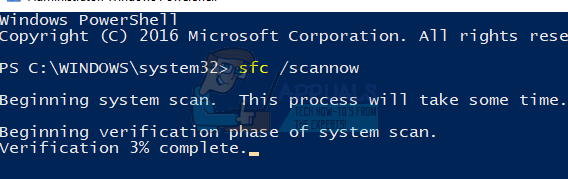
- Once in the Windows Powershell, type “sfc /scannow” and hit Enter. This process may take some time as your entire Windows files are being scanned by the computer and being checked for corrupt phases.
- If you encounter an error where Windows states that it found some error but was unable to fix them, you should type “DISM /Online /Cleanup-Image /RestoreHealth” in the PowerShell. This will download the corrupt files from the Windows update servers and replace the corrupt ones. Do note that this process can also consume some time according to your internet connection. Don’t cancel at any stage and let it run.
If an error was detected and was fixed using the above methods, restart your computer and check if the process started working normally.
Solution 4: Scanning for Malware
Sometimes, this unusual behavior is caused by malware or virus present on your machine. Many users reported that many viruses disguised themselves as the Microsoft process and continued to consume the system resources.
Scan your computer using your antivirus utility and ensure that your PC is clean. If you don’t have any specific antivirus utility installed, you can use the Windows Defender utility.
- Press Windows + S to launch the start menu’s search bar. Type “Windows Defender” and open the first result which comes forward.

- On the right side of the screen, you will see a scan option. Select the full scan and click on Scan This process might take some time as Windows scans all of your computer’s files one by one. Be patient and let the process complete accordingly.

- If there was malware present on your computer, let the utility remove and restart your computer before launching the task manager.
Note: You can also run the Microsoft safety scanner since it has the latest virus definitions and check if it finds any discrepancies.
Solution 5: Updating your KMS or Disabling it
For the users using KMS software for activating windows products, check if you have the latest KMS software installed on your PC. Once you have updated your KMS activation, restart your PC completely and check if the problem still persists. If it still does, you can either try disabling KMS or stop the sppsvc.exe. By disabling the “sppsvc.exe” you will be shown “Windows is not genuine” watermark on your lock screen (covered in solution 6). However, if you have a genuine copy of windows and have used KMS for activation of other software, you can try disabling KMS.
- Press Windows + S to launch the search bar. Type “Task Scheduler” in the dialogue box and press Enter.

- Once in the task scheduler, expand “Task Scheduler Library” and open the KMS process. On the right side, you will see different applications for which KMS is activated and working. Right-click on each of the entry and select “Disable”. This will disable the processes completely.
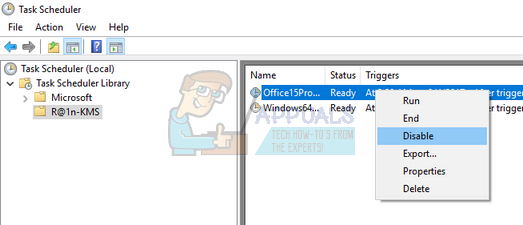
- Reboot your computer and check if the problem at hand got fixed.
Solution 6: Disabling the Service (sppsvc)
If all the above methods don’t work, you can try disabling the service completely using the Registry Editor. Do note that this solution might pop the watermark “Windows is not activated” on your home screen.
Note: Registry Editor is a powerful tool and should always be used with precaution. Don’t change entries you have no knowledge of. Doing so might render your computer unusable.
- Press Windows + R to launch the Run application. Type “regedit” in the dialogue box and press Enter.
- Once in the registry editor, navigate to the following file path:
Computer\HKEY_LOCAL_MACHINE\SYSTEM\CurrentControlSet\Services\sppsvc
- Once in the “sppsvc” directory, search for the key “Start” present at the right side of the window.
- Double-click it to open its value and set it to “4”. Press OK to save changes and exit.
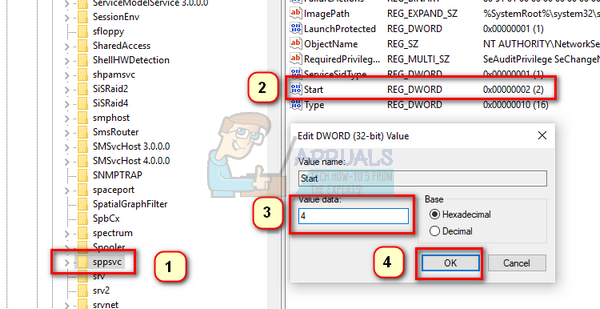
- Reboot your computer and check if the problem at hand got solved.
Another remedy is to stop the service from the services window. This might not work all the time but it is still worth a shot.
- Press Windows + R to launch the Run application. Type “services.msc” in the dialogue box and press Enter.
- Now search for the service “Software Protection”. Once you find it, right-click on it and select:
All Tasks > Stop
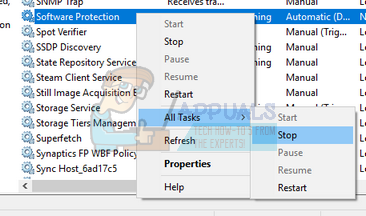
This will instantly stop the service and all the related tasks of Software Protection from your computer.
Solution 7: Disabling from Scheduler (sppsvc)
If the software protection (sppsvc) isn’t stopped by solution 6, we can try disabling it using the task scheduler.
- Press Windows + S to launch the search bar. Type “Task Scheduler” in the dialogue box and press Enter.
- Once in the task scheduler, expand “Task Scheduler Library” and open the following path:
Microsoft > Windows
- On the right side of the screen, you will see a few entries. Search through them until you find “SvcRestartTask”. Right-click it and select “Disable”.
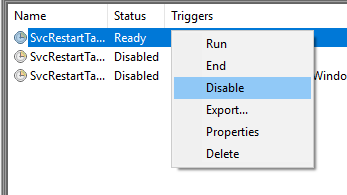
If there are also other entries present, disable each one of them to ensure that the service doesn’t start again. Reboot your computer and check if the problem got solved.
Solution 8: Updating the latest Windows Updates
Windows roll out important updates targeting the bug fixes in the operating system. If you are holding back and not installing the Windows update, we strongly recommend that you do. Windows 10 is the latest Windows operating system and new operating systems take a lot of time to get perfect in every regard.
There are a lot of issues still pending with the OS and Microsoft rolls out frequent updates to target these issues.
- Press the Windows + S button to launch your start menu’s search bar. In the dialogue box type “Windows update”. Click the first search result which comes forward.

- Once in the update settings, click on the button which says “Check for updates”. Now Windows will automatically check for updates available and install them. It may even prompt you for a restart.
- After updating, restart your computer and check if your issue got fixed.
Solution 9: Refreshing your Windows
If all the above solutions don’t fix the issue, you can try refreshing your Windows with a fresh copy. You can also try restoring your Windows from a previous restore point (if made) and check if the problem still persists. If it doesn’t, you can install a new copy of windows after backing up all of your data.
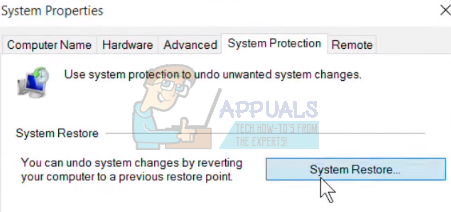
- Press Windows + S to launch the start menu’s search bar. Type “restore” in the dialogue box and select the first program which comes in the results.

- Once in the restore settings, press System Restore present at the beginning of the window under the tab of System Protection.
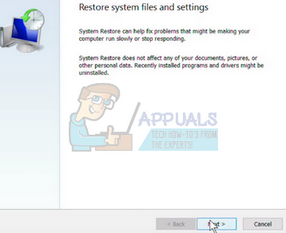
- Now a wizard will open navigating you through all the steps to restore your system. Press Next and proceed with all the further instructions.
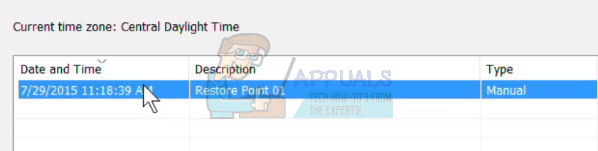
- Now select the restore point from the list of options available. If you have more than one system restore points, they will be listed here.
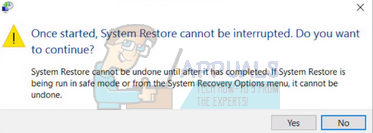
- Now windows will confirm your actions for the last time before it starts the system restore process. Save all your work and backup important files just in case and proceed with the process.
Post-1709 Update:
It seems that Microsoft eventually caught up with the KMS software. The high CPU/Disk usage by Software Protection will not go away if you are using KMS software until any further releases are developed by the KMS software developers targetting this. Until then there are no workarounds but to either purchase a genuine copy of Windows or roll back to any version before 1709.
what total garbage