Fix: Your PC ran into a Problem and Needs to Restart Loop
A BSOD (Blue Screen of Death) is generally a nightmare for PC users as the causes are different for each error. Furthermore, the BSOD often occurs out of nowhere and you often lose any progress you might have been working on for the last few hours!

An even bigger problem occurs when you are stuck with a never-ending loop of BSODs that appear along the “Your PC ran into a problem and needs to restart” error message. We have gathered some working solutions in this article and we are certain that one of the methods mentioned below will definitely work for you!
What Causes the “Your PC ran into a Problem and Needs to Restart” Loop?
The causes for BSODs are numerous and even the same error message can sometimes lead to two different solutions being used to troubleshoot it on two different computers. This being said, when BSODs appear in a loop, not allowing you to access your computer normally, you can’t really perform many solutions because of the fact that you don’t even reach the welcome screen.
Causes are often displayed as a corrupt registry, corrupt system files, or corrupt drivers. These errors are generally quite difficult to resolve and your only chance might be to refresh your Windows installation (while keeping your files) or to undo the changes you have made to the registry prior to error appearing.
However, before starting, make sure to check that all your hard drives/SSDs are properly connected to the computer and that there isn’t an issue with their working. After you have done that, you can proceed with the solutions listed below.
Solution 1: Perform a Repair Installation
This method might seem desperate as it includes creating a bootable Windows 10 media and actually performing a repair installation but it can help you since you won’t lose any of your personal files. This has helped plenty of users deal with the BSOD loop so make sure you try this out! You can also try to perform a repair startup before continuing with this method.
- Download the Media Creation Tool software from Microsoft’s website. Open the downloaded file you just downloaded and accept the terms and conditions.
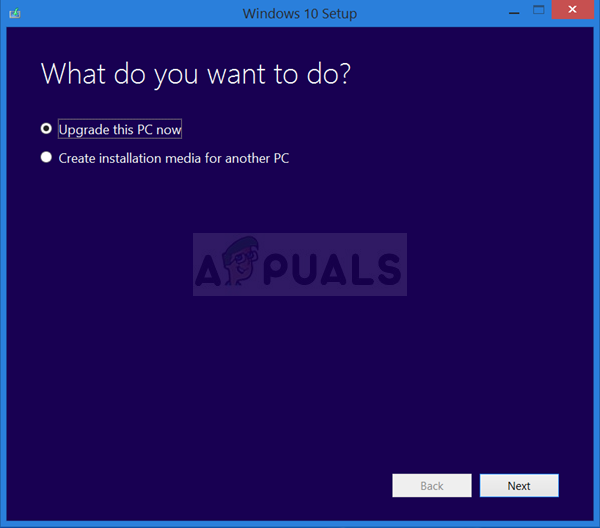
- Select the Create installation media (USB flash drive, DVD, or ISO file) for another PC option from the initial screen.
- The language, architecture, and other settings of the bootable drive will be chosen based on your computer’s settings, but you should uncheck the Use the recommended options for this PC in order to select the correct settings for the PC which has the password attached to it (if you are creating this on a different PC, and you probably are).
- Click Next and click on the USB drive or DVD option when prompted to choose between USB or DVD, depending on which device you want to use to store this image on.
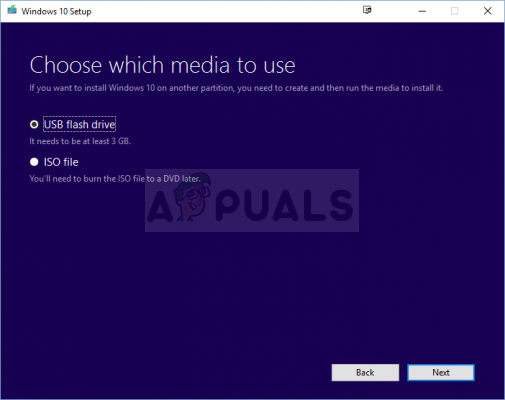
- Click Next and choose the USB or DVD drive from the list which will show the storage media connected to your computer.
- Click Next and the Media Creation Tool will proceed to download the files necessary to install create the installation device.
Now that you probably have your recovery media, we can start actually solving the booting issue by starting the recovery drive which you should boot from.
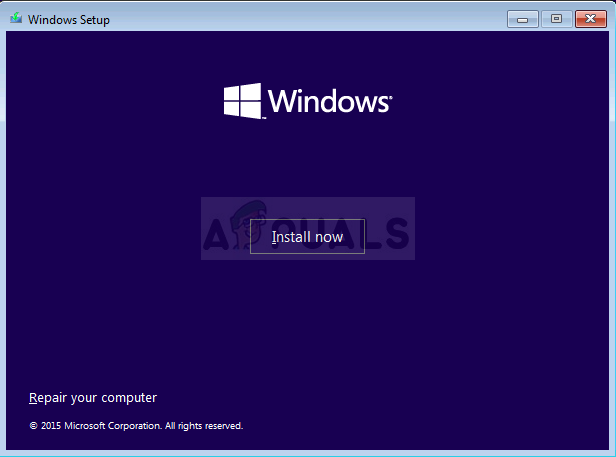
- Insert the installation drive you own or which you have just created and boot your computer. The initial screen will differ depending on the operating system you have installed.
- Windows Setup should open prompting you to enter the preferred language and time and date settings. Enter them correctly and choose the Repair your computer option at the bottom of the window.
- The Choose an option screen will appear so navigate to Troubleshoot >> Reset this PC. This will let you keep your personal files but it will delete the apps you have installed. Follow the further set of instructions on-screen and wait for the process to finish. Check to see if the BSODs still appear in a loop!
Solution 2: Undo Recent Changes to Your Computer’s Registry
Faulty registry settings are also a major reason for system failure and it’s almost impossible to fix this problem as you are unable to even reach your computer. That is why you will have to use the recovery media you created in Solution 1 to try and access Command Prompt which we will use to undo changes to your computer’s registry!
- Insert the installation drive you own or which you have just created and boot your computer. The initial screen will differ depending on the operating system you have installed.
- Windows Setup should open prompting you to enter the preferred language and time and date settings. Enter them correctly and choose the Repair your computer option at the bottom of the window.
- The Choose an option screen will appear so navigate to Troubleshoot >> Advanced options >> Command Prompt. Make sure you choose the Administrator account in order to continue!
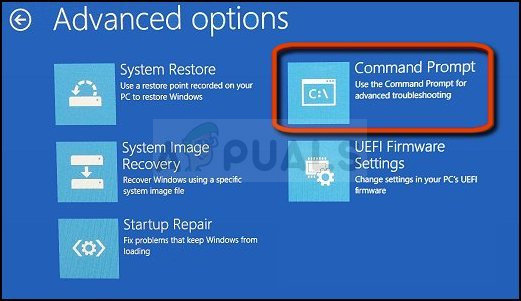
Command Prompt in Advanced Options - Type in the command below in order to navigate to the System32 folder on your hard drive:
CD Windows\System32
- Use the two commands below to switch over to the config folder and display the files and folders inside the folder inside Command Prompt.
CD config
DIR
- Check to see if you are able to find a folder called RegBack. It should be listed with a more recent date. If you locate it, type in the two commands below in order to navigate to this folder and list out its contents.
CD RegBack
DIR
- In the list of files that will appear, you should be able to see these basic five files. DEFAULT, SAM, SECURITY, SOFTWARE, and SYSTEM. Don’t worry if their size checks out as zero.
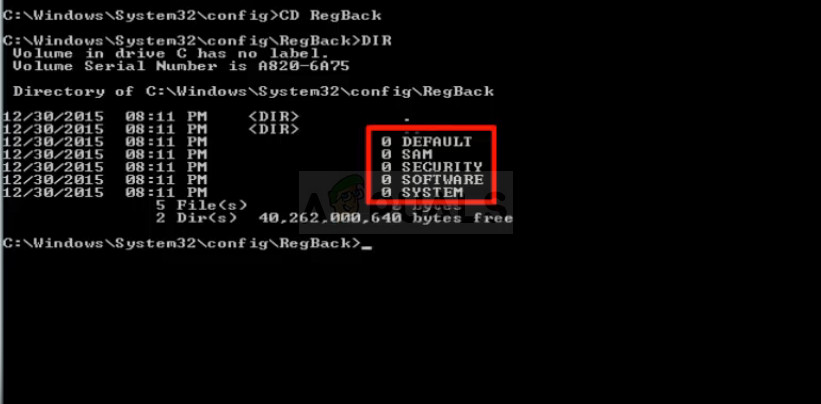
- These files are the key files that need to be replaced in order for you to undo the changes you have made to the registry. Looking above in the config folder, you should see the files with the same names.
- Files in the config folder are currently being used whereas the RegBack ones are the backup. This can only be done by performing the set of command below.
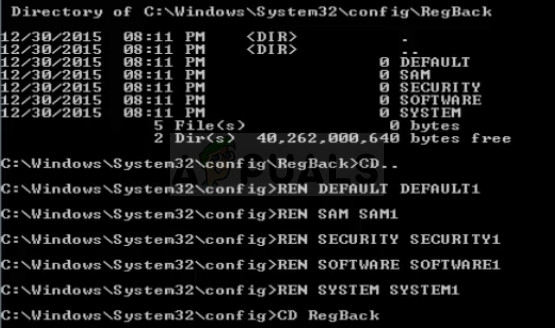
- The command will go back to the config folder and rename all current files to a new name so that they are no longer used. Make sure you don’t skip a command if you want this method to work!
CD..
REN DEFAULT DEFAULT1
REN SAM SAM1
REN SECURITY SECURITY1
REN SOFTWARE SOFTWARE1
REN SYSTEM SYSTEM1
- The last set of commands will copy the backup files from the RegBack folder to the config folder, replacing the old, corrupted version of the registry with older files that should be able to boot your computer.
CD RegBack
COPY * C:\WINDOWS\System32\config
- You should see a message stating that five files were copied successfully. Navigate back to the Troubleshoot menu and choose to turn off your PC. After it boots again, you should be able to access your computer normally once again.
Note: If the issue still persists, try booting up your computer in safe mode and check if it boots up normally. If it does, try to uninstall recently installed applications and underclock the computer if any overclocking was done recently. Check to see if the issue persists. After doing so, all you are left with is a Bios Update or a clean Windows Install.


