Fix: Windows Update Error Code 0x80073701
Windows Update issues are probably the worst problems users have to deal with on a regular basis because the issues are often quite difficult to solve and different update error codes are sometimes related to a totally different cause and solution.
However, there are some online sources from where you can extract solutions but the information is often scattered around without an organized format. Some solutions are general and they may help you deal with any update error code but some of them are quite specific for certain error codes. Take a look at the remainder of the article in order to get yourself familiar with this specific error code.
Fix Windows Update Error Code: 0x80073701
The official solution for the 0x80073701 Windows Update error code is yet to be announced but there are quite a few working solutions which you should try before undertaking any major operations such as installing a fresh installation of Windows 10 or similar.
Some of the steps below may look somewhat advanced to casual users but the instructions have been simplified enough so that they can be followed by anyone. This particular error code may have something to do with the previous files which have been downloaded for the previous update and they went corrupt. Let’s take a look at some of the working solutions.
Solution 1: Some of the System Files Are Either Missing or Corrupt
This problem may occur if some of the system files necessary for the update are either missing from your system or if they are corrupt and can’t be accessed. This is especially valid if the error code is displayed next to the ERROR_SXS_ASSEMBLY_MISSING message. Make sure your follow the instructions below in order to fix this.
- Run the DISM (Deployment Image Servicing and Management) tool. This tool is particularly useful if you want to check whether your system is ready for the following update. The tool can be used to scan and check your Windows image for errors and inconsistencies.
If you want to take a look at detailed instructions on how to operate this tool, check out our article on the topic: https://appuals.com/use-dism-repair-windows-10/ - Use the SFC.exe (System File Checker) tool which is accessed via the administrative Command Prompt (the same as DISM tool). The tool will scan your Windows system files for broken or missing files and it’s able to fix or replace the files instantly. This can be quite useful if you need those files for the updating process since the ERROR_SXS_ASSEMBLY_MISSING appears if there is a problem with one of your system files.
If you want to take a look at detailed instructions on how to operate this tool, check out our article on the topic: https://appuals.com/how-to-run-sfc-scan-in-windows-10/. - Previous versions of Windows such as Windows XP, Vista, and Windows 7 used the CheckSUR tool in order to check whether their system is ready for the update. However, this program has been discontinued and it can no longer be found on official Microsoft sites, except for Windows 7 Service Pack 1. If you are by any chance running this version of Windows OS, click here to download the file and install it on your system. Additionally, the tool is incompatible with Windows 8, 8.1, and Windows 10.
Solution 2: Run the Windows Update Troubleshooter
Windows has several built-in troubleshooters which can definitely fix some of the problems you may be facing but it’s generally up to you to solve the problem. However, certain troubleshooters may fix the issue you are dealing with immediately if the solution to the problem is trivial. Follow the instructions below in order to run it.
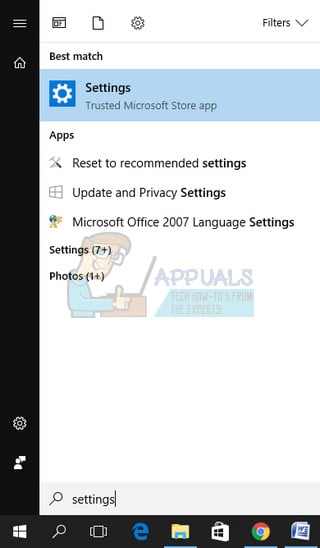
- Open the Settings application by clicking on the Start menu button at the bottom left part of your screen and then the gear icon just above. You can also search for it.
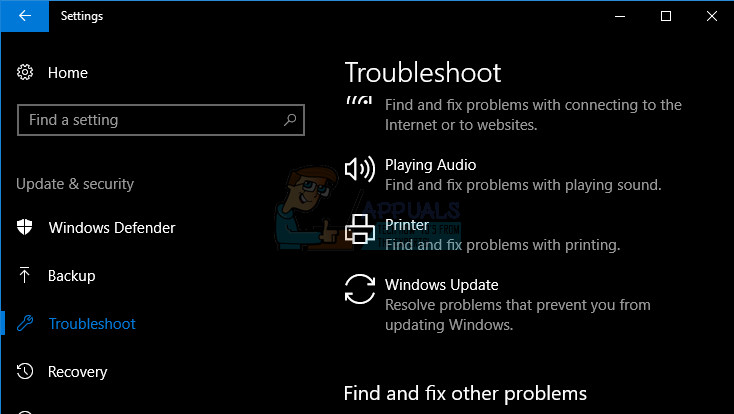
- Open the Update & Security section and navigate to the Troubleshoot menu.
- First of all, click on the Windows Update troubleshooter option and follow the instructions which will appear on screen to see whether there is indeed something wrong with Windows Update services and processes.
- After the troubleshooter finishes, navigate to the Troubleshoot tab in the Settings app again and open the Internet Connections troubleshooter.
- Restart your computer and try updating your PC again.
Note: In order to make sure the process runs smoothly, try disconnecting all of your peripheral devices except for your mouse and keyboard. Some device can indeed make your system slow down or freeze, especially during the updating process.
You should also check your time and date settings since these settings may cause a plenty of issues if they are left under the wrong value. Follow the instructions below in order to reset your date & time settings:
- Open Date and Time settings by opening the Start menu, opening the Settings app by clicking on the gear icon above the power icon, choosing the Time & language option, and navigating to the Date & time tab.

- In the Date and Time tab, make sure that your computer’s date and time are correct. If the time is not correct, you can try turning the Set time automatically option on or off, depending on the default state.
- To change the date, under Date, click the dropdown menu in order to find the current month in the calendar, and then click the current date.
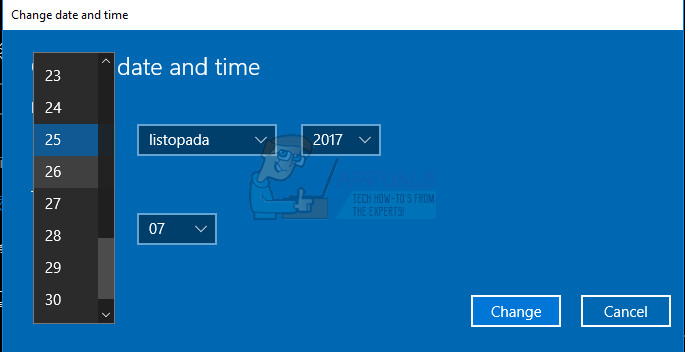
- To change the time, under Time, click the hour, minutes, or seconds that you want to change, and then slide the values until you settle for the one correct according to your location.
- When you have finished changing the time settings, click OK.
Solution 3: Reset the Windows Update Components to Their Default Values
This particular method has helped plenty of users deal with the Windows Update error code 0x80073701 so it’s recommended that you try it as soon as possible. This method may turn out to be sort of difficult to users who are not so into troubleshooting but following the instructions carefully should go without problems
Before proceeding with this solution, it’s recommended that you close all of your running programs and it’s advisable to create a backup of your registry just in case something goes terribly wrong while you edit it. Backup your registry by following the instructions in our article.
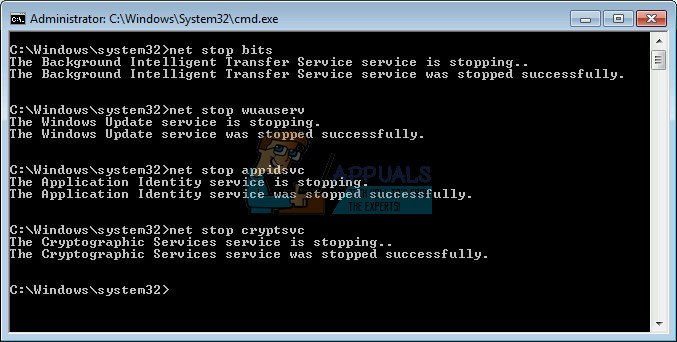
- Let’s proceed with the solution by killing the following services which are the core services related to Windows Update: Background Intelligent Transfer, Windows Update, and Cryptographic Services. Disabling them before we start is crucial if you want the remainder of the steps to perform smoothly.
- Search for “Command Prompt”, right-click on it, and select the “Run as administrator” option. Copy and paste the following commands and make sure you click Enter after each one.
net stop bits
net stop wuauserv
net stop appidsvc
net stop cryptsvc
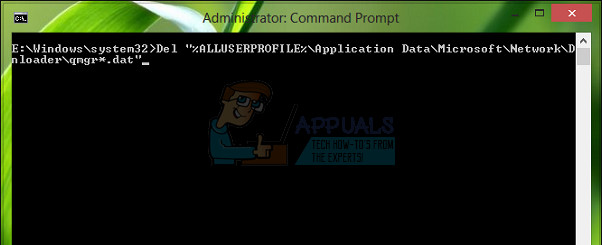
- After this, you will have to delete some files which should be deleted if you want to continue with resetting the update components. This is also done via Command Prompt with administrative privileges.
Del “%ALLUSERSPROFILE%\Application Data\Microsoft\Network\Downloader\qmgr*.dat”
- The following step can be skipped if this is not last resort. This step is considered to be the aggressive approach but it will definitely reset your updating process from its very core. So we can recommend that you try this out. It has been suggested by a lot of people on online forums.
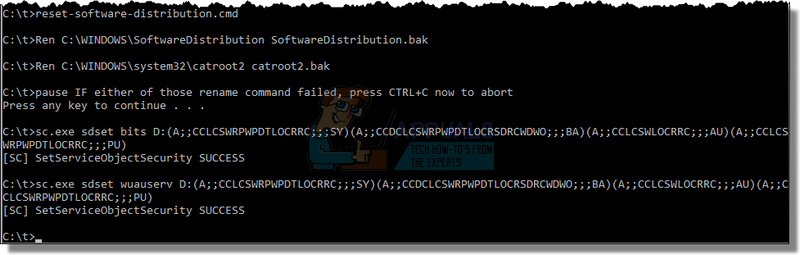
- Change the name of the SoftwareDistribution and catroot2 folders. In order to do this, at an administrative command prompt, copy and paste the following commands and click Enter after copying each one.
Ren %systemroot%\SoftwareDistribution SoftwareDistribution.bak
Ren %systemroot%\system32\catroot2 catroot2.bak
- The following commands will help us reset the BITS (Background Intelligence Transfer Service) and the wuauserv (Windows Update Service) to their default security descriptors. Make sure you don’t modify the commands below so it’s for the best if you simply copy them.
exe sdset bits D:(A;;CCLCSWRPWPDTLOCRRC;;;SY)(A;;CCDCLCSWRPWPDTLOCRSDRCWDWO;;;BA)(A;;CCLCSWLOCRRC;;;AU)(A;;CCLCSWRPWPDTLOCRRC;;;PU)
exe sdset wuauserv D:(A;;CCLCSWRPWPDTLOCRRC;;;SY)(A;;CCDCLCSWRPWPDTLOCRSDRCWDWO;;;BA)(A;;CCLCSWLOCRRC;;;AU)(A;;CCLCSWRPWPDTLOCRRC;;;PU)
- Let’s navigate back to the System32 folder in order to proceed with the solution at hand.
cd /d %windir%\system32
- Since we have completely reset the BITS service, we will need to reregister all of the files necessary for the service to run and operate smoothly. However, each of the files requires a new command in order to make it reregister itself so the process may end up being lengthier than what you are used to. Copy the commands one by one and make sure you don’t leave out any of them. Here is a list of files which need to be reregistered along with the corresponding commands next to them.
- Some files may have been left behind after these processes so we are going to look for them in this step. Open the Registry Editor by typing “regedit” in either the search bar or the Run dialog box. Navigate to the following key in Registry Editor:
HKEY_LOCAL_MACHINE\COMPONENTS

- Click on the Components key and check the right side of the window for the following keys. Delete them all if you locate any of them.
PendingXmlIdentifier
NextQueueEntryIndex
AdvancedInstallersNeedResolving
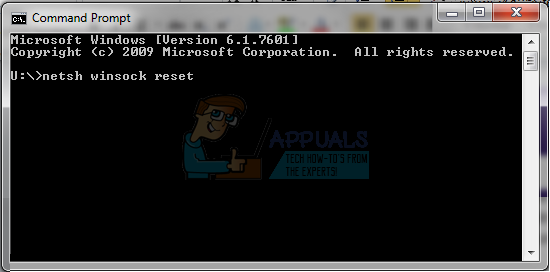
- The next thing we are going to do is reset Winsock by copying and pasting the following command back into the administrative Command Prompt:
netsh winsock reset
- If you are running Windows 7, 8, 8.1, or 10, at a command prompt, copy the following command, and tap the Enter key:
netsh winhttp reset proxy
- If all of the steps above have gone through painlessly, you can now restart the services you killed in the very first step by using the commands below.
net start bits
net start wuauserv
net start appidsvc
net start cryptsvc
- Restart your computer after following through with all of the steps which are listed.
Solution 4: Remove Packages Using Command Prompt
Since there are two types of Windows updates: Delta updates and Cumulative updates, certain issues may appear if both of them are downloaded and started at the same time. The difference between these updates is that Delta updates bring only the new fixes which arrived that month and Cumulative updates bring all of the fixes for that month along with previous updates which haven’t been installed.
Delta updates are only published to the Windows Update Catalog whereas Cumulative updates are published both to the Windows Update Catalog, WSUS, and the Windows Update server from which you download updates automatically. If you have made a mistake by installing both the Delta and the Cumulative update or if both of them are downloaded or installed at the same time, follow the instructions below in order to fix this issue.
- Open Command Prompt by searching for it in the Start menu, right-clicking on the first result and selecting the Run as administrator option.

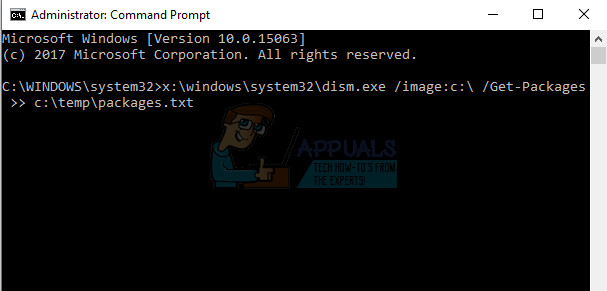
- Copy and paste the following command in order to list the packages which are waiting to be installed.
x:\windows\system32\dism.exe /image:<drive letter for windows directory> /Get-Packages >> <path to text file>
The x should replace the partition where your Windows installation is located (usually c) and the same can be applied to “<drive letter for windows directory>”. The “<path to text file>” can be replaced by any location you want to save the text file to. For example:
x:\windows\system32\dism.exe /image:c:\ /Get-Packages >> c:\temp\packages.txt
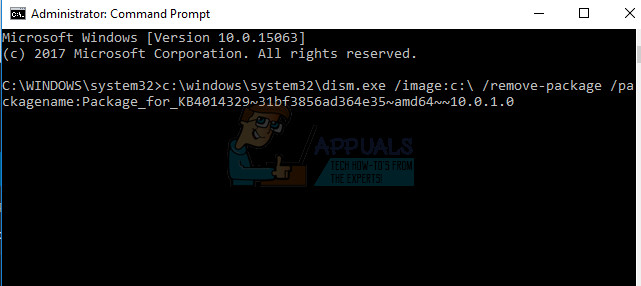
- Open the file by locating it in the location you saved it too and try to find any updates (packages) pending install. If you do locate such update packages, you can remove them by using the remove-package command in a similar manner by using the DISM.exe tool. Copy and paste the following command in the administrative Command Prompt:
dism.exe /image:<drive letter for windows directory> /remove-package /packagename:<package name>
An example for this command may be:
c:\windows\system32\dism.exe /image:c:\ /remove-package /packagename:Package_for_KB4014329~31bf3856ad364e35~amd64~~10.0.1.0