How to Solve Steam Running Slow?
One of the several issues faced by Steam client is that it operates so slow that it is near to impossible to play your games. It may also consume a lot of your CPU resources and memory causing the system to heat up. This is a very common problem with a lot of fixes available. There is no specific “one” fix for this solution as the software and hardware configuration of the user may vary. We have listed down a number of steps and techniques to ensure that your problem goes away.
Solution 1: Clearing your Steam browser cache and cookies
It may be the case where your Steam browser accumulates so much data in its cache and cookies that there isn’t much space left. This can cause it to have unexpected behavior i.e. running slow. As we all know, Steam has a separate browser integrated within the client itself. It is used to view web pages in the client when you click any link or it is used to display heavy advertisements. Follow the steps listed below to clear your Steam browser’s cache and cookies.
- Launch your Steam client by right-clicking on it and selecting the option Run as administrator.
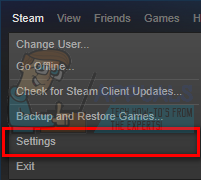
- Once in the client, click on the tab of Steam present at the top left corner of the screen. From the drop-down box, click on Settings.
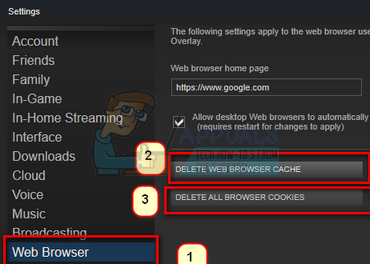
- Once in the Settings, navigate to the Web Browser tab present on the left side of the screen. It will be the second last option on the left.
- Once in the Web Browser options, you will see two buttons i.e. Delete Web Browser Cache and Delete Web Browser Cookies. One by one click both the options and let Steam do the work.
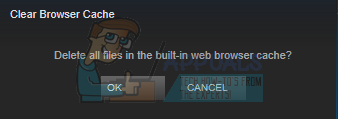
- A prompt will come forward asking you to confirm your decision. Press Ok to continue. After clearing both, Press Ok to save changes and exit.
- Restart Steam after ending all processes using the task manager.
Solution 2: Clearing Download cache
It may be the case where your Steam Downloads have excessive download data present in the cache that it is starting to make a problem for you. Whenever you download something on Steam, it accumulates in the Download cache. We can try clearing the download cache and check if it helps in speeding up your Steam client.
- Launch your Steam client by right-clicking on it and selecting the option Run as administrator.
- Once in the client, click on the tab of Steam present at the top left corner of the screen. From the drop-down box, click on Settings.
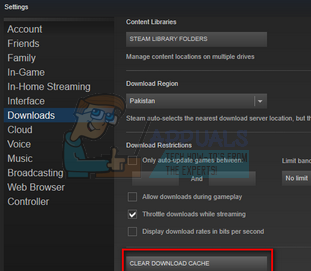
- Once in the Settings, navigate to the Downloads tab present at the left side of the window.
- Here you see an option of Clear Download Cache present at the near bottom of the screen. Click it. Now Steam will ask you to confirm your action. Press Ok and wait until the process is completed. Now save changes and exit the client.
- Restart Steam after ending all Steam related processes using the task manager. Check if your problem got solved.
Solution 3: Enabling Automatically Detect Settings and Disabling LAN settings
Having a proxy active on your computer can cause Steam to do extra hard work. A proxy induces a tunnel through which your internet data flow. While sometimes it may work, many times Steam produces an error or shows unexplained behavior. We can disable your proxy settings and check if Steam improves its performance or not.
First of all, make sure that suspicious search engines are uninstalled and there are no “extra” programs present on your PC.
Method 1: Chrome
- Open Chrome browser and click on the Chrome menu (top right) upon opening.
- After the drop-down comes, click on Settings.
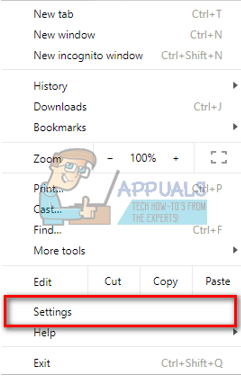
- Once the Settings page is opened, type “proxy” in the search dialogue bar present on the top.
- From search results, select the result which says “open proxy settings”.
- When the settings are opened, click on “LAN Settings” in the Connections tab, present in the bottom.
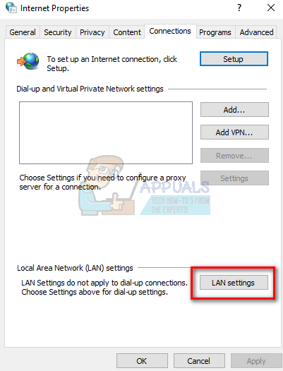
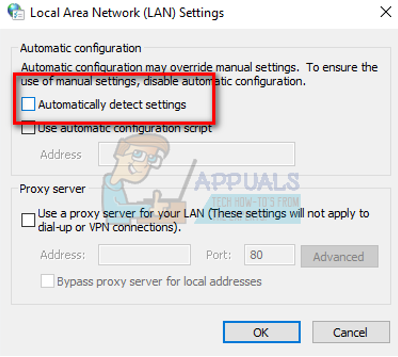
- Check the line which says “Automatically detect settings”. And uncheck the line which says “Use a proxy server for your LAN”. Save changes and exit. Restart Steam.
Method 2: Through Network Settings
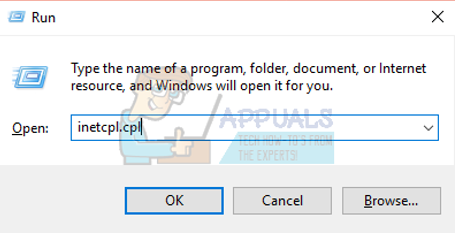
- Press Windows + R button to bring up the Run application.
- In the dialogue box, type “inetcpl.cpl”.
- Internet properties will open. Navigate to the Connections tab and click on LAN settings.
- Once in the LAN settings, check the line which says “Automatically detect settings”. And uncheck the line which says “Use a proxy server for your LAN”. Save changes and exit to re-launch Steam.
Solution 4: Granting Steam administrative privileges
There may be another problem where Steam might not be having administrative privileges. Steam requires these to ensure that it can function without any obstacles involved. Steam requires a lot of changes to its files and also requires a lot of resources to perform at its best. Some of these tasks require these privileges. To ensure that your client doesn’t get slow because of this, grant Steam and its entire directory administrative privileges.
Solution 5: Repairing Steam
Another thing you can try before refreshing Steam files is to repair Steam using the Run application. The repair Steam option checks for corrupt Steam files and replaces them accordingly. Do note that this process may require administrative privileges.
- Press Windows + to bring up the Run application.
- In the dialogue box, type the address of your Steam directory, followed by bin, then the exe and finally followed by a space and a “/repair”.
The final command will look something like this:
C:\Program Files (x86)\Steam\bin\SteamService.exe /repair
You can replace “C:\Program Files (x86)\Steam” by another address if you have Steam installed elsewhere, for example, if you have it installed in local disk E, the command will become E:\Steam\bin\steamservice.exe /repair
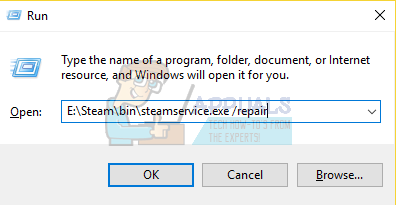
- After you run the program, it will launch a command prompt and start repairing. Don’t cancel the operating until it exits itself. You may see nothing in the command prompt, don’t worry that is normal.

- Now launch Steam and check if your client started to work properly or not.
Solution 6: Verifying integrity of game files
It may be the case that your game files may be corrupted or may have some missing game files. Because of this, your Steam client might not be working properly. Your library files can also be in the incorrect configuration which may lead to a bugged Steam overlay. Therefore, in this step, we will verify the integrity of the game files.
- Open your Steam client and click the Library present on the top. Here all your installed games will be listed. Select the game in which Steam overlay fails to open.
- Right-click on the game which is giving you the error and select Properties.
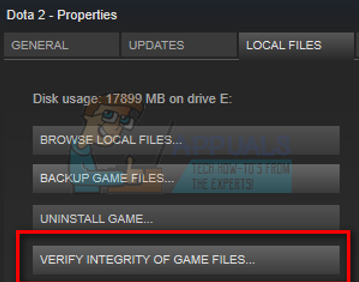
- Once in the properties, browse to the Local Files tab and click on the option which says Verify Integrity of Game Files. Steam will then start verifying all the files present according to the main manifest it has. If there is any file missing/corrupted, it will download that files again and replace it accordingly.
- Now navigate to your Settings by pressing the Settings option after clicking Steam present in the bottom left corner of the screen. Once in the Settings, open the Downloads tab present at the left side of the interface.
- Here you will see a box in which it is written “Steam Library Folders”. Click it
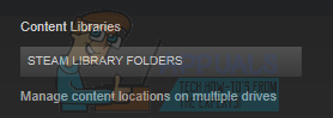
- All your steam content information will be listed. Right-click on it and select “Repair Library Files”.

- Restart Steam and check if the client starts working normally.
Solution 7: Disable Unwanted Programs
It might be the case that some third-party applications or even a windows service running in the background might be preventing Steam from being able to utilize the required resources for its proper functioning. If the application is hogging a lot of resources and you notice there is high CPU, GPU, or DISK usage by a particular application on your computer, Steam might be running slow.
Therefore, in this step, we will be completely diagnosing and isolating the application that is interfering with the proper functioning of Steam and then we will either disable it permanently or prevent it from being started automatically. For that:
- Press “Windows” + “R” to launch the Run prompt.
- Type in “taskmgr” and then press “Enter” to launch the task manager.
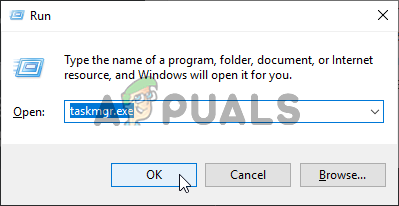
Running the Task Manager - In the Task Manager, click on the “Processes” tab at the top and a list of applications should be shown that are currently running on your computer.
- The Task Manager will also show the current CPU, DISK usage, and Memory usage on your computer.
- Click on the “CPU” option and make sure that the arrow is facing downwards to sort the usage from high to low.
- Check if any application is using an abnormal amount of resources on your computer and click on it.
- Click on “End Task” to prevent it from running on your computer.
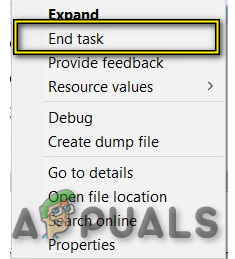
End Task in Task Manager - Similarly, click on the “Memory” and the “Disk” options one by one and eliminate all high usage applications.
- Check to see if doing so fixes the issue with Steam running slow.
Now that we have diagnosed with some third-party applications that might prevent proper functioning, we also have to make sure that there isn’t a lot of resource usage by system applications and services. In order to do that:
- Press “Windows’ + “R” to launch the Run prompt.
- Type in “MSConfig” and press “Enter” to launch the Boot settings window.
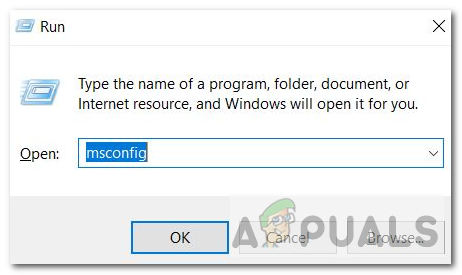
msconfig - In this window, click on the “Services” option and then uncheck the “Hide all Microsoft Services” option.
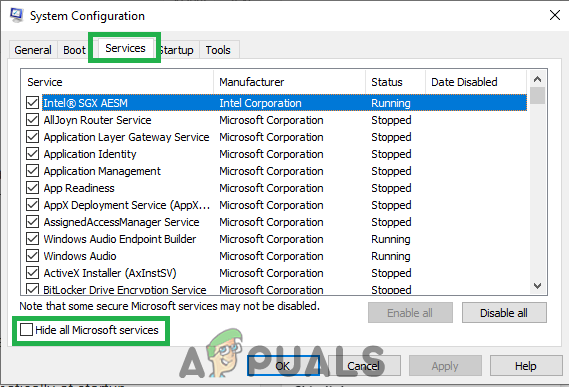
Clicking on the “Services” tab and Un-checking the “hide all Microsoft Services” option - Click on the “Disable all” button to prevent these services from launching at startup.
- Now, click on the “Startup” tab and select the “Open Task Manager” option.
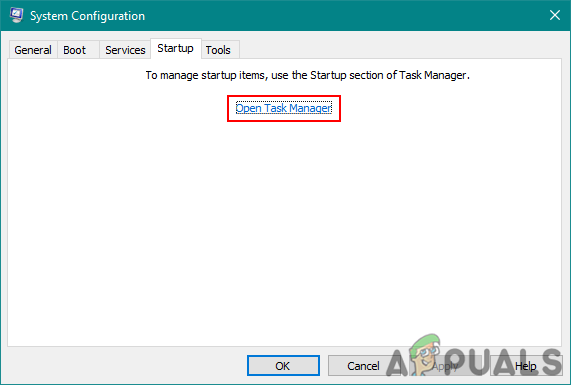
Opening the Task Manager - In the task manager’s Startup tab, make sure to disable all applications from launching at startup.
- After that, save your changes and close out of both windows.
- Restart your computer and check to see if Steam works normally.
- If it does, it means that a service or application was preventing the proper functioning of the application. Therefore, you can start enabling these services and applications one by one and check which one makes the issue come back.
- After diagnosing the faulty service or applications, you can either try to reinstall it or keep it disabled permanently.
Solution 8: Update Device Drivers
In some situations, it is possible that your computer might not have the latest drivers installed which are necessary for the proper functioning of all applications and games on your computer. Therefore, in this step, we will be using Driver Easy to diagnose any corrupted drivers, install missing ones, and update the outdated ones. In order to do that:
- Firstly download the DriverEasy software and run the executable to install it.
- Run the driver easy and select scan now to run the scan for any defective, outdated, or missing drivers on your computer.

Clicking on the “Scan Now” button - Next, click the update button to a flagged network adapter driver. This will automatically download the correct version of the network driver. After that, you can install it manually (using the Free version).
- If you select Update All it will automatically download and install the appropriate and matched versions of all the drivers that are either missing or outdated on your PC. But you require a Pro version for this one. You will be notified of the upgradation once you select the Update All option.
- If you choose to install the drivers manually, you will have to install them on your computer yourself one by one. The drivers will be downloaded by DriverEasy, you can run their executables or point to their directories in the device manager while prompting an upgrade to install them on your computer.
- After installing these drivers, check to see if the issue persists.
Solution 9: Change Power CFG
It is possible that in some cases the issue might be triggered due to the computer not allowing optimal power to the application for proper resource dispensation. Therefore, in this step, we will be changing the Power setting the computer is using to make sure that is not the case. For that:
- Press “Windows” + “R” to launch the Run prompt.
- Type in “Control” and then press “Enter” to launch the control panel interface.

Accessing the Classic Control Panel interface - In the Control Panel, click on the “View By:” option and then select the “Large Icons:” option.
- Select the “Power Options” button in the Control Panel and then click on the “High Performance” button to allow for the operating system to use the High-Performance profile.
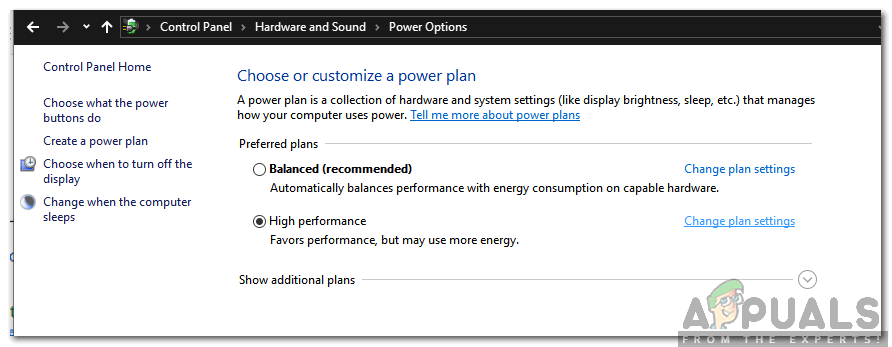
Checking “High Performance” and selecting “Change Plan Settings” - Closeout of this window for the changes to take effect.
- Check to see if this improves the Steam Client’s speed.
Solution 10: Testing Compatibility Settings
It is possible that the Steam client might be facing incompatibility issues with some aspects of the operating system that you are using. Therefore, in this step, we will be employing the Windows feature where we should be able to test different compatibility settings with the application. In order to do that:
- Right-click on the Steam executable on your desktop and select the “Open File Location” option.
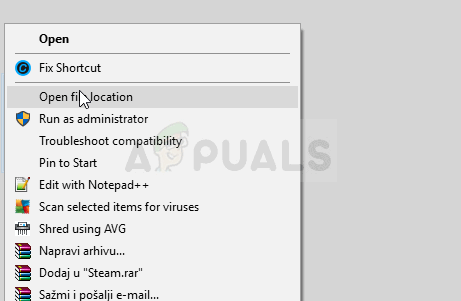
Open file location - It should take you into the Steam installation folder.
- In this folder, right-click on the main Steam executable and select “Properties” from the list.
- In Steam’s Properties, click on the “Compatibility” tab and check the “Run this Program in compatibility mode for” option.
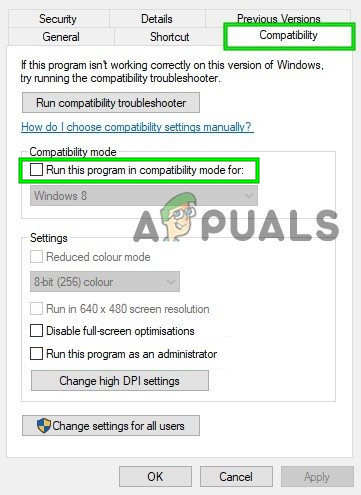
check Run this Program in Compatibility Mode - Click on the dropdown which displays different versions of the operating system.
- Make sure to try them all out one by one and check which one provides better performance.
- After you have selected an operating system from the dropdown, click on the “Apply” button to save your changes and then the “OK” button to exit out of the application.
- Check to see if doing so fixes the Steam performance issue.
Solution 11: Changing Priority
This step needs to be altered according to the user’s needs so that you can gain your expected results from this process. There are two types of scenarios that you could be facing if you are going through this post. Either the Steam Client itself is running really slow or the Steam games might be running slow.
If the Steam Client itself is running slow on your computer, then as we indicate in the steps below, you should change its priority to High or Realtime. However, if you are facing this issue with Steam games, we would recommend you to change Steam’s priority to Low nad the game’s priority to Realtime. In order to change priorities:
- Press “Windows” + “R” to launch the Run prompt.
- Type in “taskmgr” and press “Enter” to launch the task manager.

Running the Task Manager - In the task manager, click on the “Details” tab to view each process running on your computer.
- In the details tab, right-click on the “Steam.exe” process and adjust it according to the issue that you are facing. If you are facing a laggy Steam Client, after right-clicking, click on “Set Priority” and click on the “Realtime” or the “High” option.
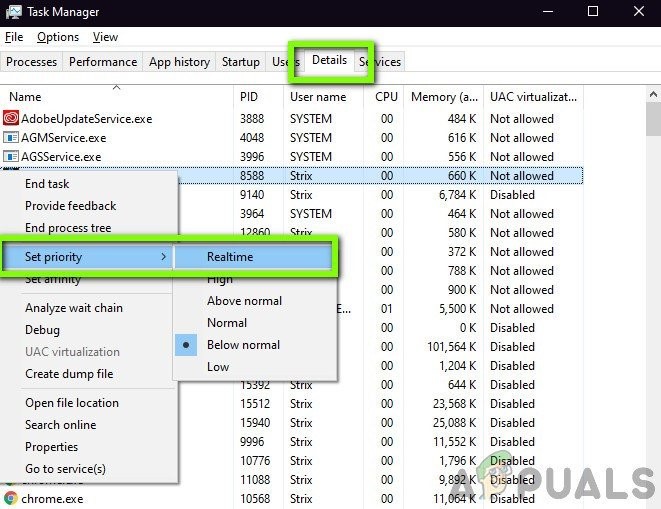
Set priority to Real-Time - However, if you are facing laggy games and normal Steam Client, right-click on the client, click on “Set Priority” and then select “Low”. After that, in a similar fashion, set the game’s priority to “High”.
- After configuring the priority from the Task Manager, close out of the window and check to see if the issue persists.
Solution 12: Selecting GPU
Some people might be facing issues with the Steam games due to the graphics card that they are using to process their graphics. If your computer is using an Nvidia GPU and it also contains an integrated GPU, this issue can be triggered. Therefore, in this step, we will be readjusting the Nvidia Client’s settings to prevent the dedicated GPU from being used for games. For that:
- Right-click on any empty space on your desktop and click on the “Nvidia Control Panel” option.
- In the Nvidia Control Panel, Click on the “Manage 3D Settings” and then click on the “Program Settings” tab.

Manage 3D Settings - In the program settings, click on the dropdown and select “Steam.exe” from the list.
- Click on the “Preferred Graphics Processor” and then select Nvidia High-Performance GPU or the GPU that you have installed from the list.

Changing Preference to Dedicated graphics - Click on “Apply” to save your settings and then make sure to select the Nvidia GPU for all the video games as well.
- After doing all this, check to see if the issue still persists.
Solution 13: Deleting HTML Cache
Some people complained that the issue goes away temporarily when the Web cache is cleared from Steam as we indicated in the first step in this article but it comes back after some time. Therefore, in this step, we will be exploring a permanent solution to this issue by permanently deleting the cached files on our computer and then deleting a folder from steam. For that:
- Press “Windows” + “R” to open the run prompt.
- Type in “%temp%” and press “Enter” to launch the temporary files folder.
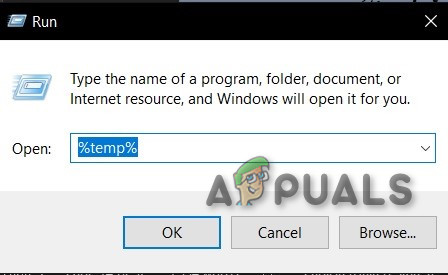
%temp% command in Run Command - Press “Ctrl” + “A” to select all files and then press “Shift” + “Delete” to clear them from your computer.
- Also, launch the run prompt again and type in “%appdata%” and press “Enter”.

%appdata% as a Run command - Press “Ctrl” + “A” to select all files inside the folder and press “Shift” + “Delete” to remove them from the computer.
- After clearing out these files, we will now be clearing the Steam cache.
- Right-click on the Steam executable on your desktop and select the “Open File Location” option to navigate to the Steam installation folder.
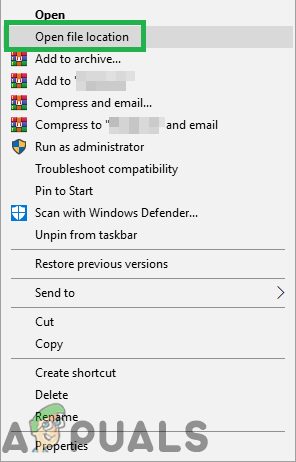
Right-Clicking and selecting “Open File Location”. - In the Steam installation folder, click on the “App cache” folder to open it and delete the HTTPcache from inside the folder.
- After this, navigate to the “AppData/local/steam” folder on your computer and delete the HTML cache from it.
- After deleting the folder, run the “Steam.exe” and let it download any files that it wants to.
- After Steam launches, check to see if the issue persists.
Final solution: Refreshing game files
Now there is nothing left except to reinstall Steam and see if that does the trick. When we refresh your Steam files, we will preserve your downloaded games so you won’t have to download them again. Furthermore, your user data will also be preserved. What refreshing Steam files actually do is delete all the configuration files of the Steam client and then force it to install them again. So if there were any bad files/corrupt files, they will get replaced accordingly. Do note that after this method, you would need to log in again using your credentials. Don’t follow this solution if you don’t have that information at hand.
You should also try to repair your steam installation.