Fix: Outlook Keeps Asking for Password on Windows 10
Outlook on Windows 10 keeps asking for a password, causing interruptions even after you enter the correct details. This often happens because of outdated or wrong entries in Windows Credential Manager, especially after Windows or Office updates. Security features like Multi-Factor Authentication (MFA) or outdated add-ins can also trigger this issue.

Other reasons could be expired passwords or problems with network or proxy settings.
Now that you know the causes, let’s discuss the solutions.
1. Clear Cached Passwords
Removing cached passwords in Windows Credential Manager deletes old or incorrect login details that Outlook might use. This forces Outlook to request and save updated login information, often fixing repeated password prompts.
- Go to the Start Menu and open the Control Panel.
- Set View By to Large Icons, located under the address bar on the top-right corner.
- Navigate to User Accounts.

Windows Control Panel - On the left-hand side, click ‘Manage your credentials‘.
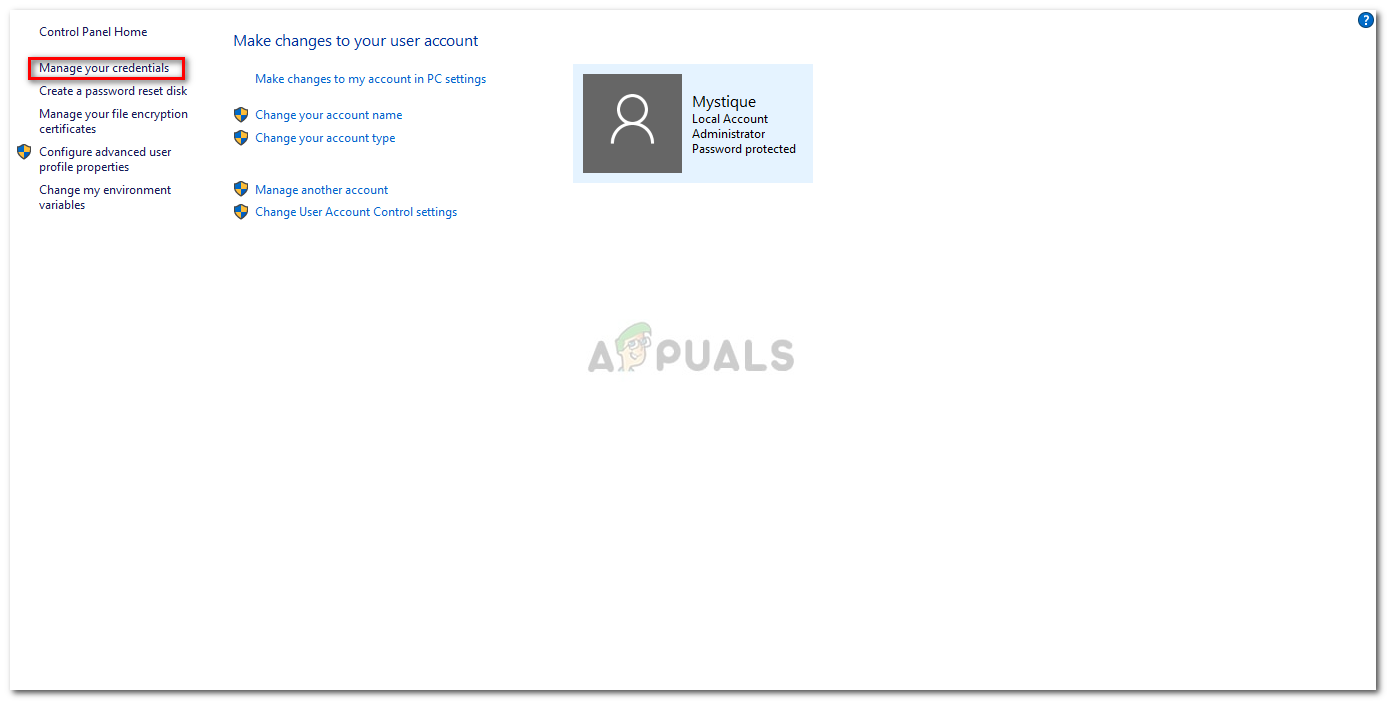
User Accounts – Control Panel - Select the credentials for Lync, Outlook, and Microsoft in both Windows Credentials and Generic Credentials.
- Click on Details and then select Remove from Vault.
- Exit the Control Panel and restart your system.
2: Enable the Remember Password Option
Turning on “Remember Password” stops Outlook from asking for login details repeatedly by storing them securely, letting Outlook access your saved credentials directly without interruptions.
- Run Outlook, go to the File tab, and click on Account Settings.
- Select your account under the Email tab.
- A window will appear; scroll down to the bottom and locate the ‘Remember Password‘ option. Make sure it is checked.
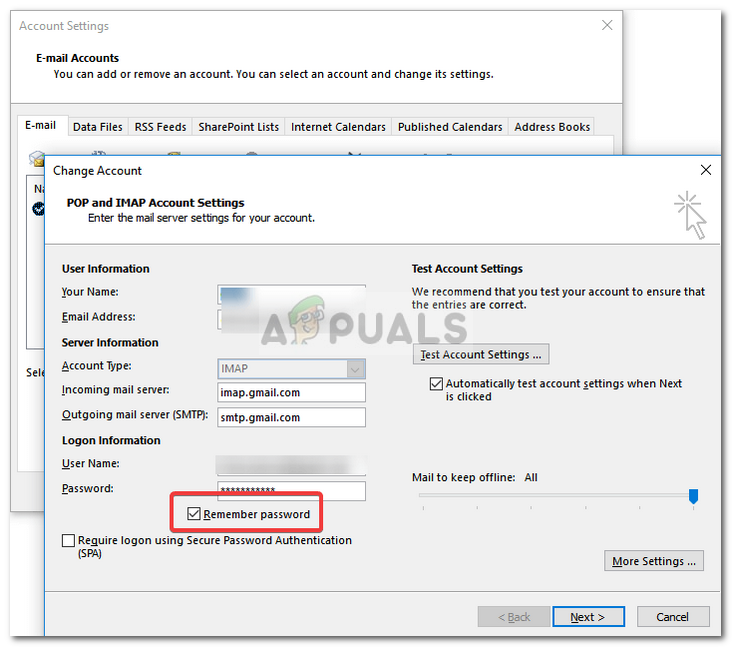
Checking the Remember Password Option
3. Uncheck the ‘Always Prompt for Logon Credentials’ Option
Sometimes, disabling the “Always Prompt for Logon Credentials” option stops repetitive login requests in Outlook. By unchecking this, Outlook uses stored credentials to sign in automatically, bypassing unnecessary prompts. This reduces interruptions and provides a more seamless experience.
- Launch Outlook.
- Go to the File tab and select Account Settings.
- In the Account Settings section, select Account Settings again.
- Highlight your account and click Change.
- Click on the More Settings button.
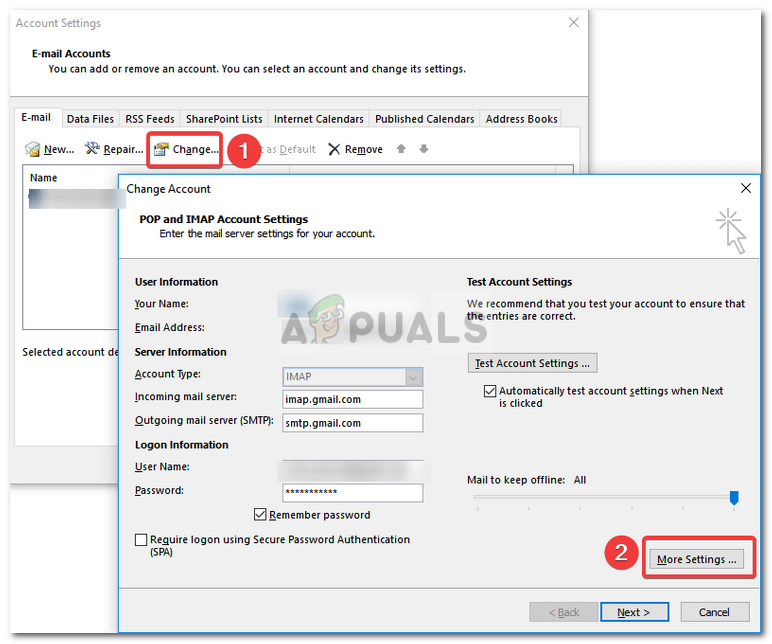
Outlook Account Settings - Switch to the Security tab.
- Unselect the ‘Always prompt for logon credentials‘ option under user identification.
- Click OK and close Outlook.
4. Create a New Profile
Starting fresh with a new profile can fix ongoing login issues in Outlook. Creating a new profile resets settings and clears old data, which might be causing repeated password prompts. This ensures Outlook connects to your account with updated settings, removing errors from the old profile.
- Ensure you have closed Outlook.
- Go to the Start Menu and open the Control Panel.
- Click on Mail.
- Click the Show Profiles button and select Add.
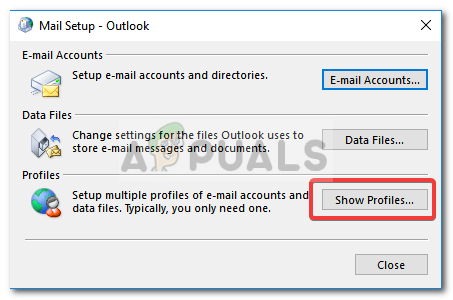
Mail Settings - Enter a name for the new profile and select OK.
- Enter your name and email.
- Hit Next and then click Finish.
- Select your profile as the ‘Always use this profile’ and click OK.
5. Update Outlook
Outdated versions of Outlook can cause compatibility problems with Windows, leading to repeated password prompts. Updating ensures Outlook matches the latest security settings, reducing conflicts and improving connection stability.
- Open Outlook, go to File, and select About Outlook.
- Select Office Account and click on Update options.
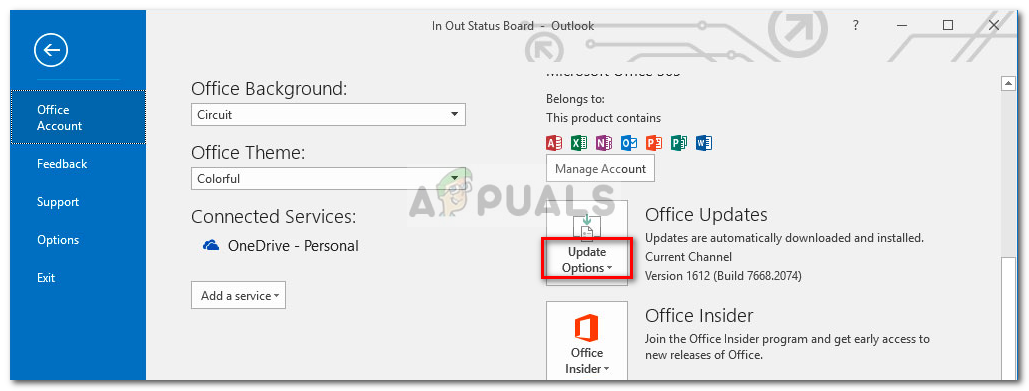
Checking for Office Updates - Select the Update now option to search for any new updates.
6. Use the Microsoft Support and Recovery Assistant (SaRA)
The Microsoft Support and Recovery Assistant (SaRA) easily fixes Outlook’s repeated password prompts. It automatically finds and fixes issues with Outlook’s settings, like credential conflicts or connection errors. This tool not only stops the login loop but also aligns Outlook’s settings with the system to prevent future problems.
- Launch a web browser and navigate to the SaRA download page.
- Click on Advanced Diagnostics-Outlook to download SaRA.
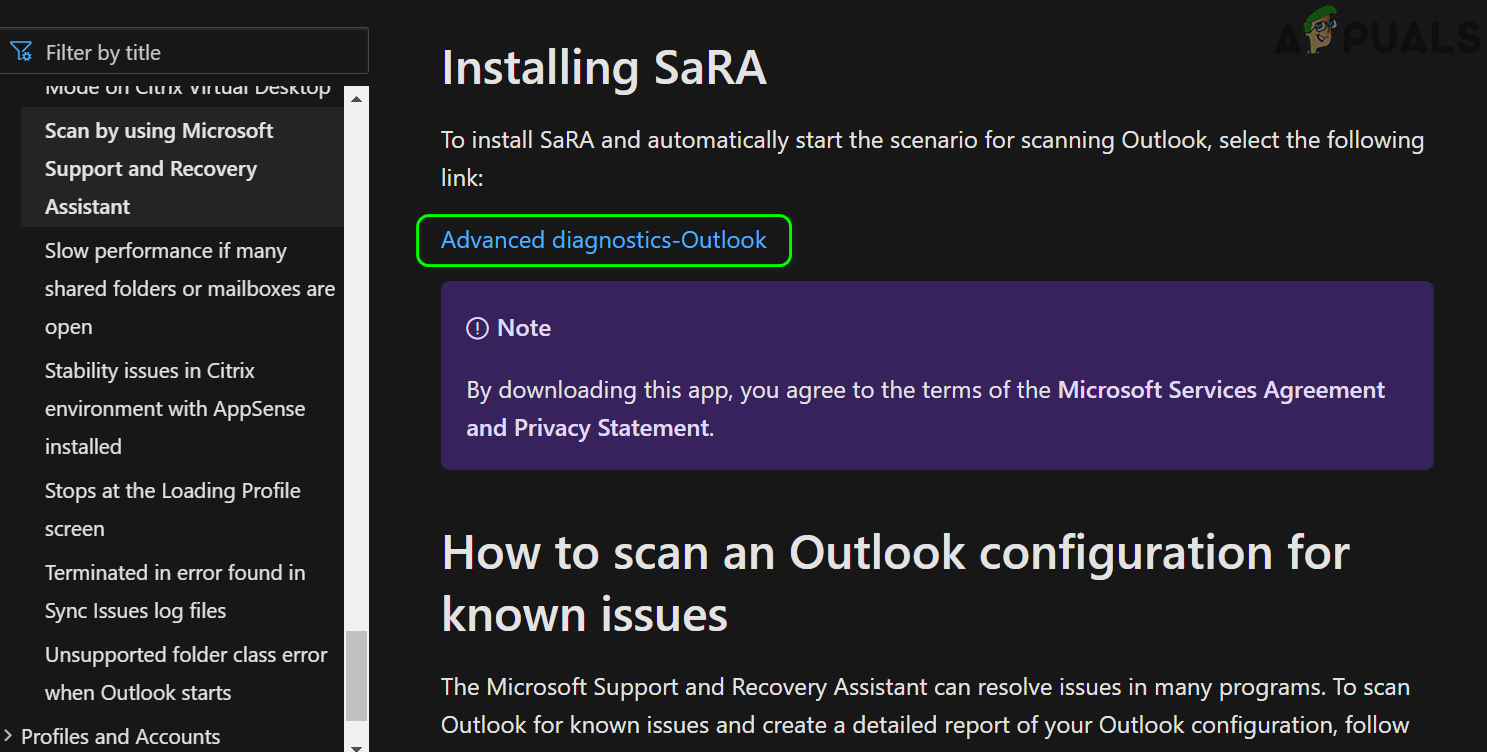
Download SaRA - Launch the downloaded file as an administrator and follow the prompts to complete the SaRA procedure.
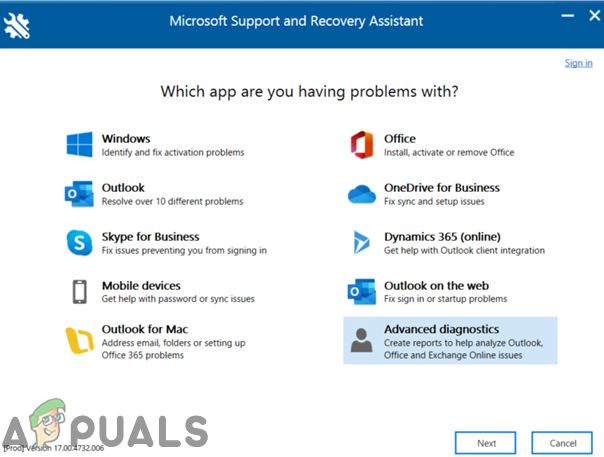
Select Outlook or Advanced Diagnostics in SaRA - Reboot your machine and check if your system is free of the password issue.
7. Disable UEFI Secure Boot
Turning off UEFI Secure Boot can resolve Outlook password prompts if it conflicts with system drivers or apps. It may help the Credential Manager and network authentication work better, reducing password prompts. Only do this if Secure Boot is causing the issue.
Warning: Proceed at your own risk, as disabling UEFI Secure Boot may expose your system and data to security threats.
- Ensure all applications are closed, and click the Windows button.
- Select the Power icon and click Restart while holding the Shift key.
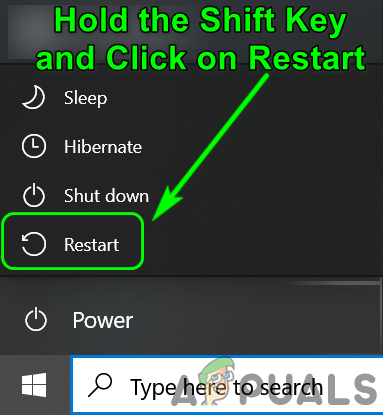
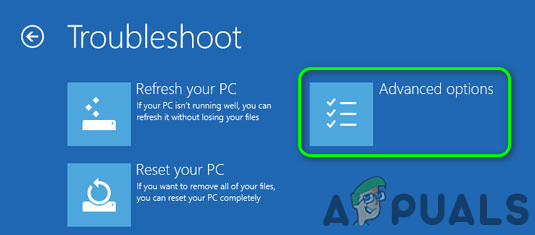
Hold the Shift Key and Restart Your System - Select Troubleshoot and then Advanced Options in the menu shown.
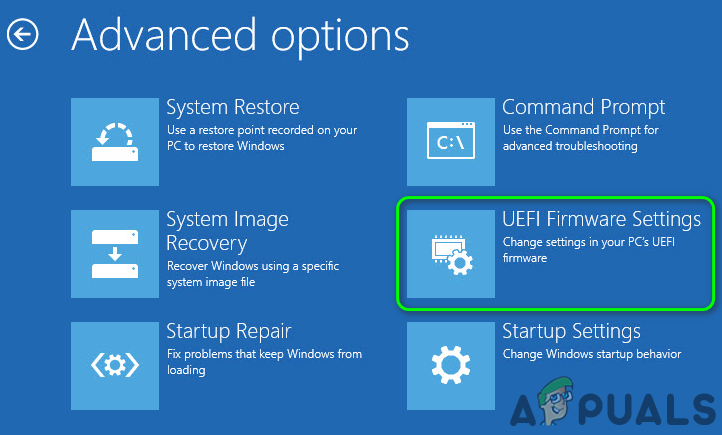
Open Advanced Options in the Troubleshoot Window - Select UEFI Firmware Settings and confirm to reboot the system. Wait for it to boot into BIOS settings.
Open UEFI Firmware Settings in Advanced Options - In the left pane, expand Secure Boot and select Secure Boot Enable. In the right pane, select Disabled.
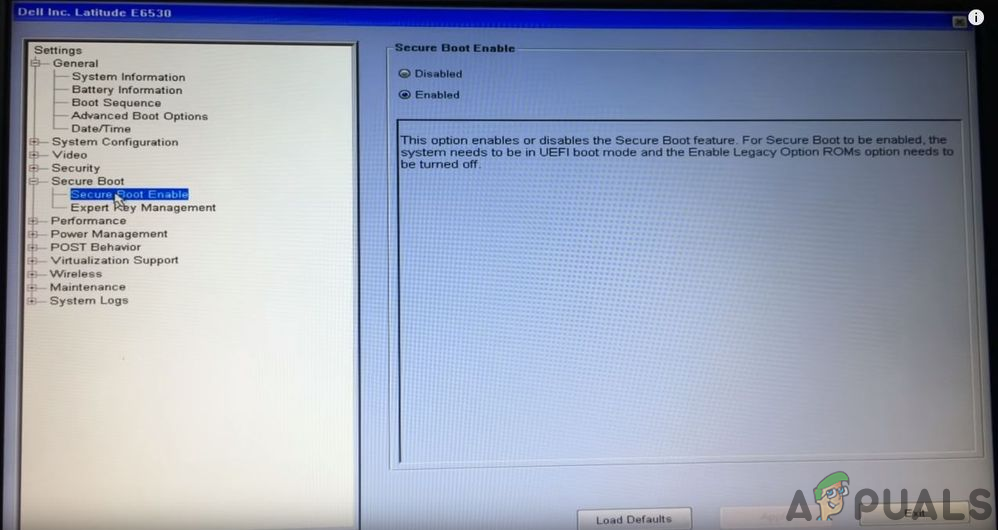
Disable UEFI Secure Boot - Save your changes and exit the BIOS.
- Power on your system and check if the Outlook password issue is resolved.
8. Use the Registry Editor
Tweaking registry settings can stop Outlook from repeatedly asking for your password by fixing authentication issues. This changes keys that handle credentials and addresses glitches. Always back up the registry before editing.
Warning: Proceed with caution. Incorrect registry edits can cause significant issues.
- Create a backup of your system’s registry.
- Press the Windows key, search for Registry Editor, and run as Administrator.
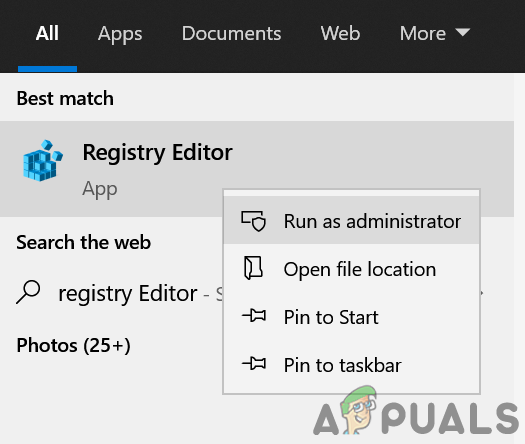
Open Registry Editor as Administrator - Navigate to:
Computer\HKEY_LOCAL_MACHINE\SYSTEM\CurrentControlSet\Control\Lsa
- In the right pane, double-click disabledomaincreds and set its value to 1.
- Double-click LmCompatibilityLevel and change its value to 3.
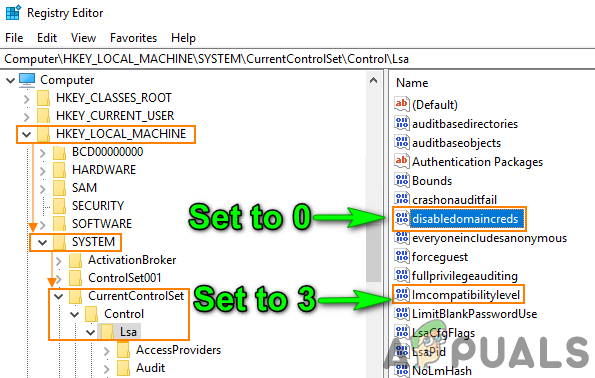
Change LSA Registry Keys - Exit the Registry Editor and reboot your system.
- See if the password issue is resolved.
- If not, change the LmCompatibilityLevel value to 2.
- If the issue persists, open the Registry Editor and navigate to:
Computer\HKEY_CURRENT_USER\SOFTWARE\Microsoft\Office
- Expand the number folder (office version number) and select Outlook, e.g.:
Computer\HKEY_CURRENT_USER\SOFTWARE\Microsoft\Office\16.0\Outlook\
- Select AutoDiscover. In the right pane, right-click and select New.
- Select DWORD (32-bit) Value and name it ExcludeExplicitO365Endpoint.

Set ExcludeExplicitO365Endpoint Value to 1 Double-click ExcludeExplicitO365Endpoint and set its value to 1. If AutoDiscover is not available, check other number folders and add ExcludeExplicitO365Endpoint there.
- Reboot your system and check for the password issue.
- If unresolved, open the Registry Editor and navigate to:
Computer\HKEY_CURRENT_USER\SOFTWARE\Microsoft\Office\16.0\Common\Identity
- Create a DWORD key and name it EnableADAL, setting its value to 0.
- Create another DWORD key, name it DisableADALatopWAMOverride, and set its value to 1.

Set DisableADALatopWAMOverride Value to 1 - Reboot and see if the password issue is resolved.
9. Create a Task in the Task Scheduler
Setting up a recurring task in Task Scheduler can stop Outlook’s persistent password prompts by regularly resetting cached credentials. This refreshes Outlook’s login process and reduces issues from outdated credential data.
- Open Services by pressing the Windows key, typing “Services,” and selecting “Run as Administrator.”
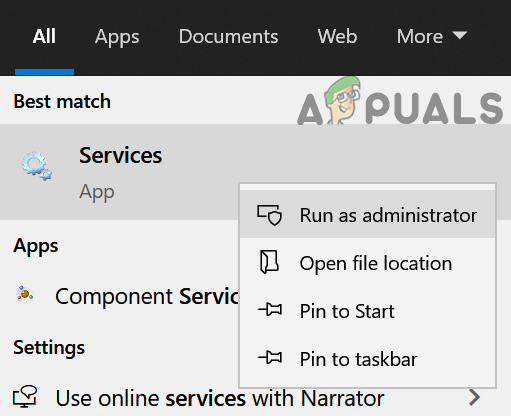
Open Services as Administrator - Find “Credential Manager,” double-click it, set Startup type to Automatic, and click Apply/OK.
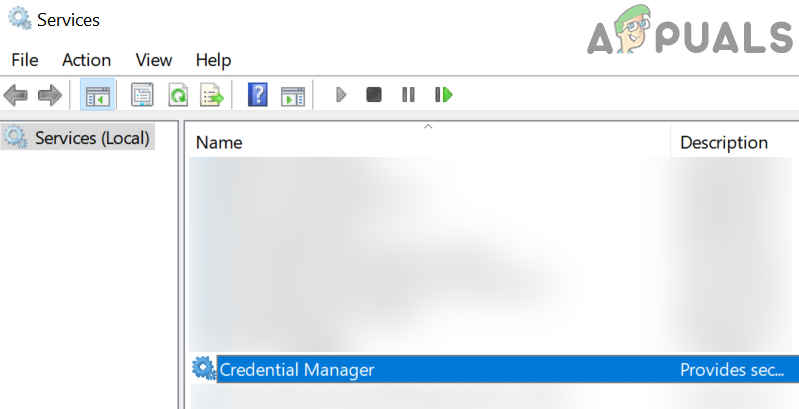
Double Click on Credential Manager Service 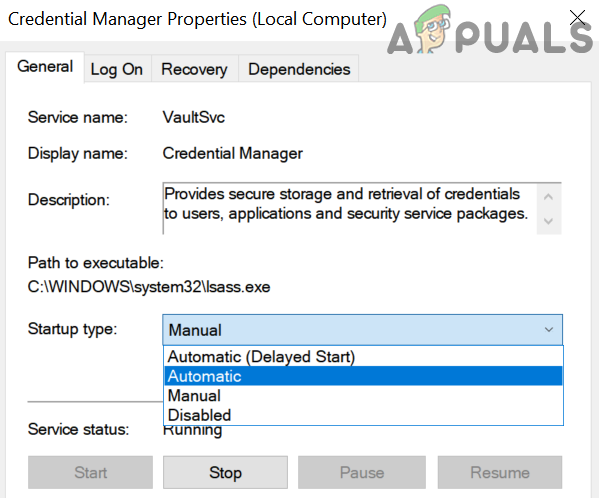
Set Startup Type of Credential Manager Service to Automatic - Restart your computer.
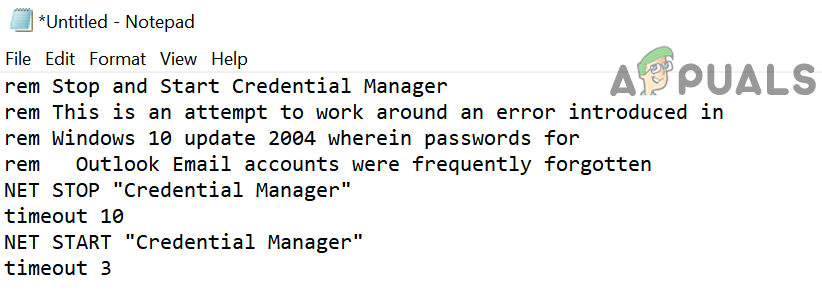
- If the issue persists, open Notepad, copy the following script, and save it as a .cmd file on your desktop.
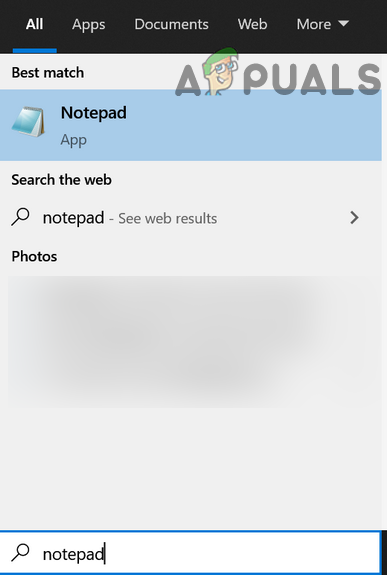
Open Notepad
- Open Services by pressing the Windows key, typing “Services,” and selecting “Run as Administrator.”
rem Stop and Start Credential Manager

rem This is an attempt to work around an error introduced in

rem Windows 10 update 2004 wherein passwords for

rem Outlook Email accounts were frequently forgotten

NET STOP "Credential Manager"

timeout 10

NET START "Credential Manager"

timeout 3
- Open Task Scheduler from the Windows search bar, click the Action menu, and select Create Task.
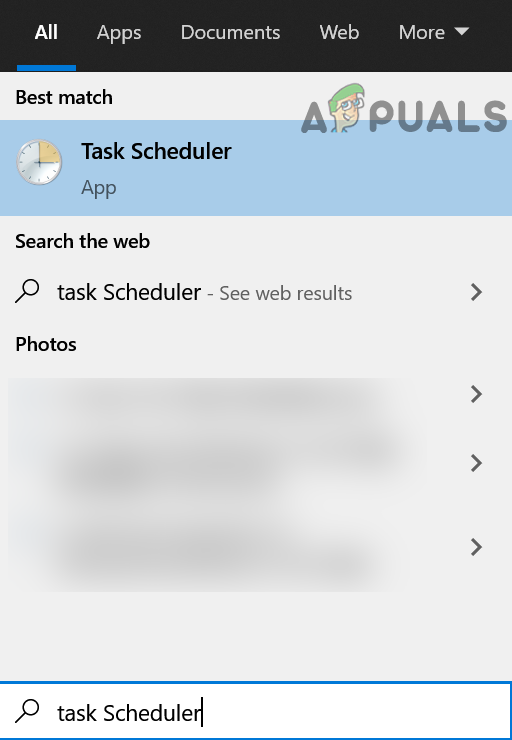
Open the Task Scheduler 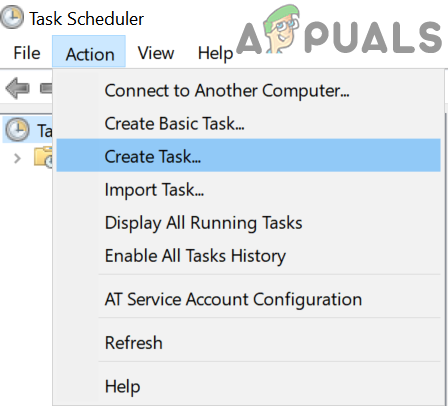
Create Task in the Task Scheduler - Name the task (e.g., OutlookPasswordFix) in the General tab and enable Run with Highest Privileges.
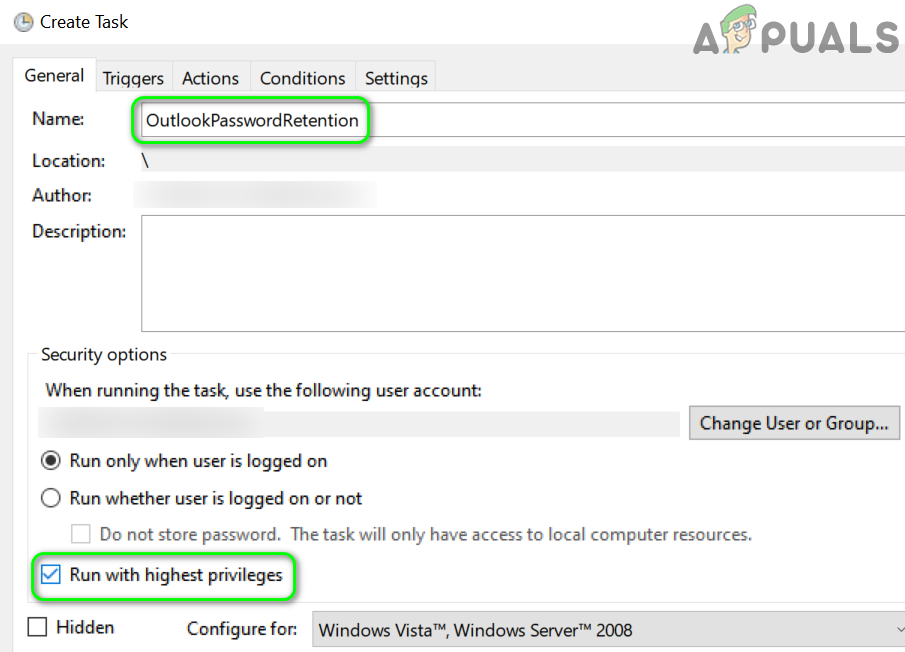
Enable the option of Run with Highest Privileges - Go to the Triggers tab, click New, set it to Daily, and adjust the start time to ten minutes later.
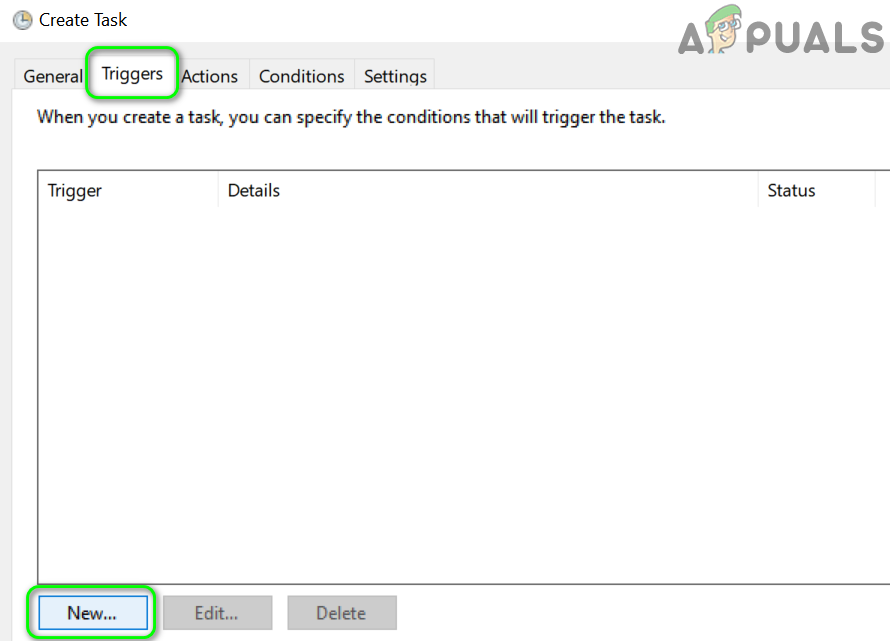
Create a New Trigger for the Task - Check “Repeat Task every 1 Hour” and set “For a Duration of” to Indefinitely, then click OK.
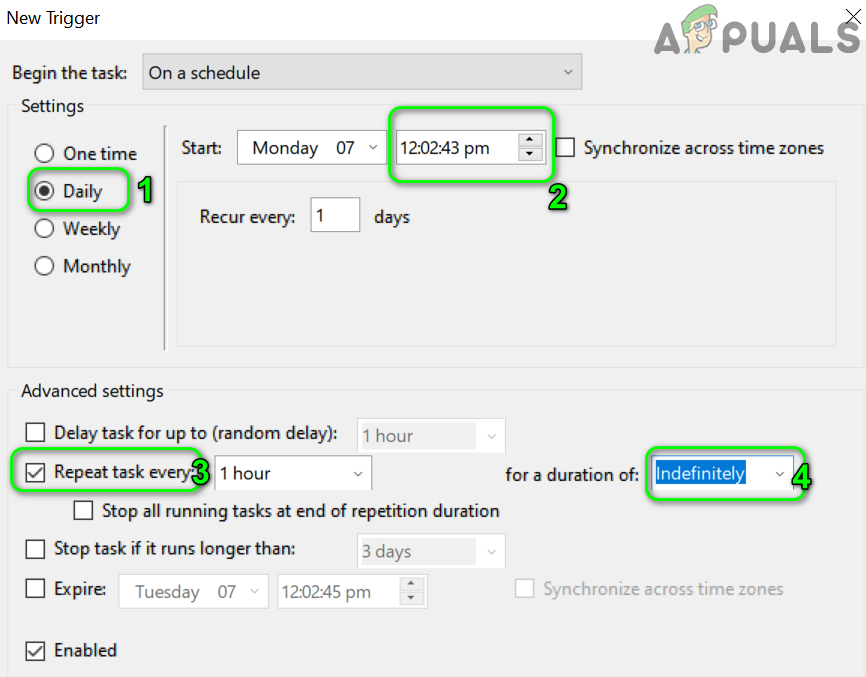
Set the Triggers Parameters - In the Actions tab, click New, browse to select the .cmd file, and click OK.
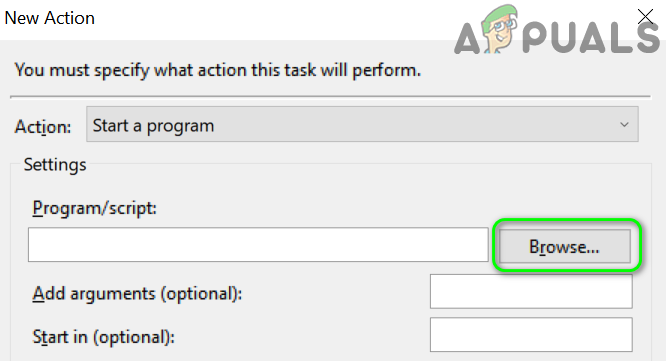
Browse for the Command File - Under the Conditions tab, uncheck “Start the Task Only if the Computer is on AC Power.”
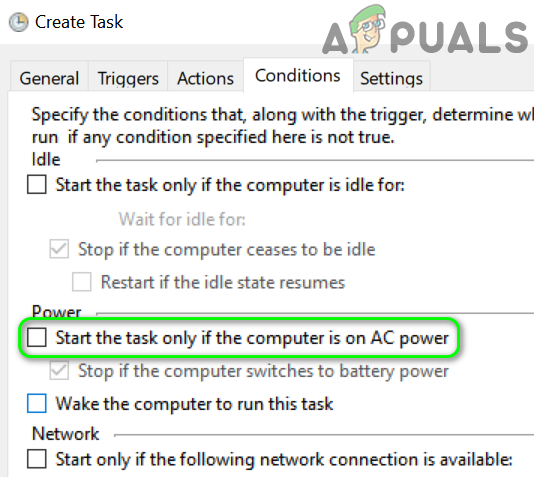
Uncheck the Option of Start the Task Only if the Computer is on AC Power - In the Settings tab, uncheck “Stop the Task if it Runs Longer than” and click OK.
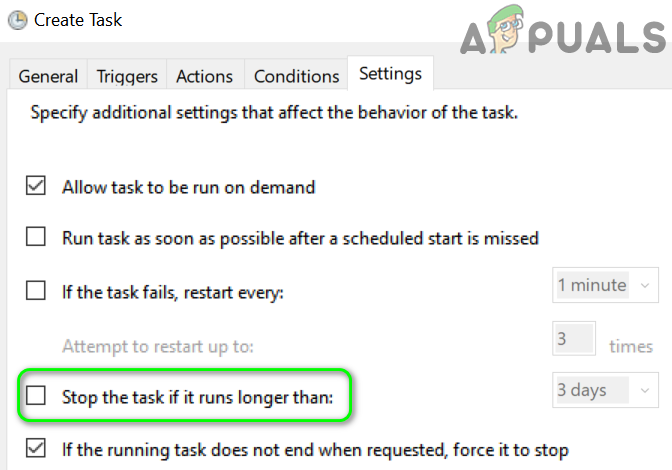
Uncheck the Option of Stop the Task if it Runs Longer than - Close the Task Scheduler, wait ten minutes, and reboot your PC.
If the issue persists, as a workaround, export the credentials from Credential Manager and import them after a system restart if Outlook asks for passwords. This saves you from typing each password individually. If the issue remains, using SFC and DISM commands may help. If not, you may need to perform a clean installation of Windows.


