Fix: No Internet Secured Wi-Fi Network Connection Error
There have been quite a number of reports of an issue affecting Windows 10 users that causes affected users to not be able to access the internet over Wi-Fi even through the Wi-Fi network they are connected to has a working internet connection. Windows 10 users affected by this problem have also reported seeing an error message stating “No internet, secured” on their screens.
Here’s what we know about this problem so far: it is, in most cases, caused by an invalid IP configuration. In addition, many Windows 10 users start experiencing this problem after downloading and installing Windows updates for their computers as quite a few updates for Windows 10 tend to change network configuration settings when they are installed.
1. Change WiFi Network Adapter Properties
Fortunately, this issue is entirely fixable, although you should run Network and Internet troubleshooter for Windows 10 before proceeding with any other solutions. To run the Network and Internet troubleshooter on a Windows 10 computer, open the Start Menu, search for “troubleshooting”, click on the search result titled Troubleshooting, click on Network and Internet and go through the troubleshooter. If the troubleshooter doesn’t deliver results, however, the following are the most effective solutions you can use to try and resolve this problem on your own:
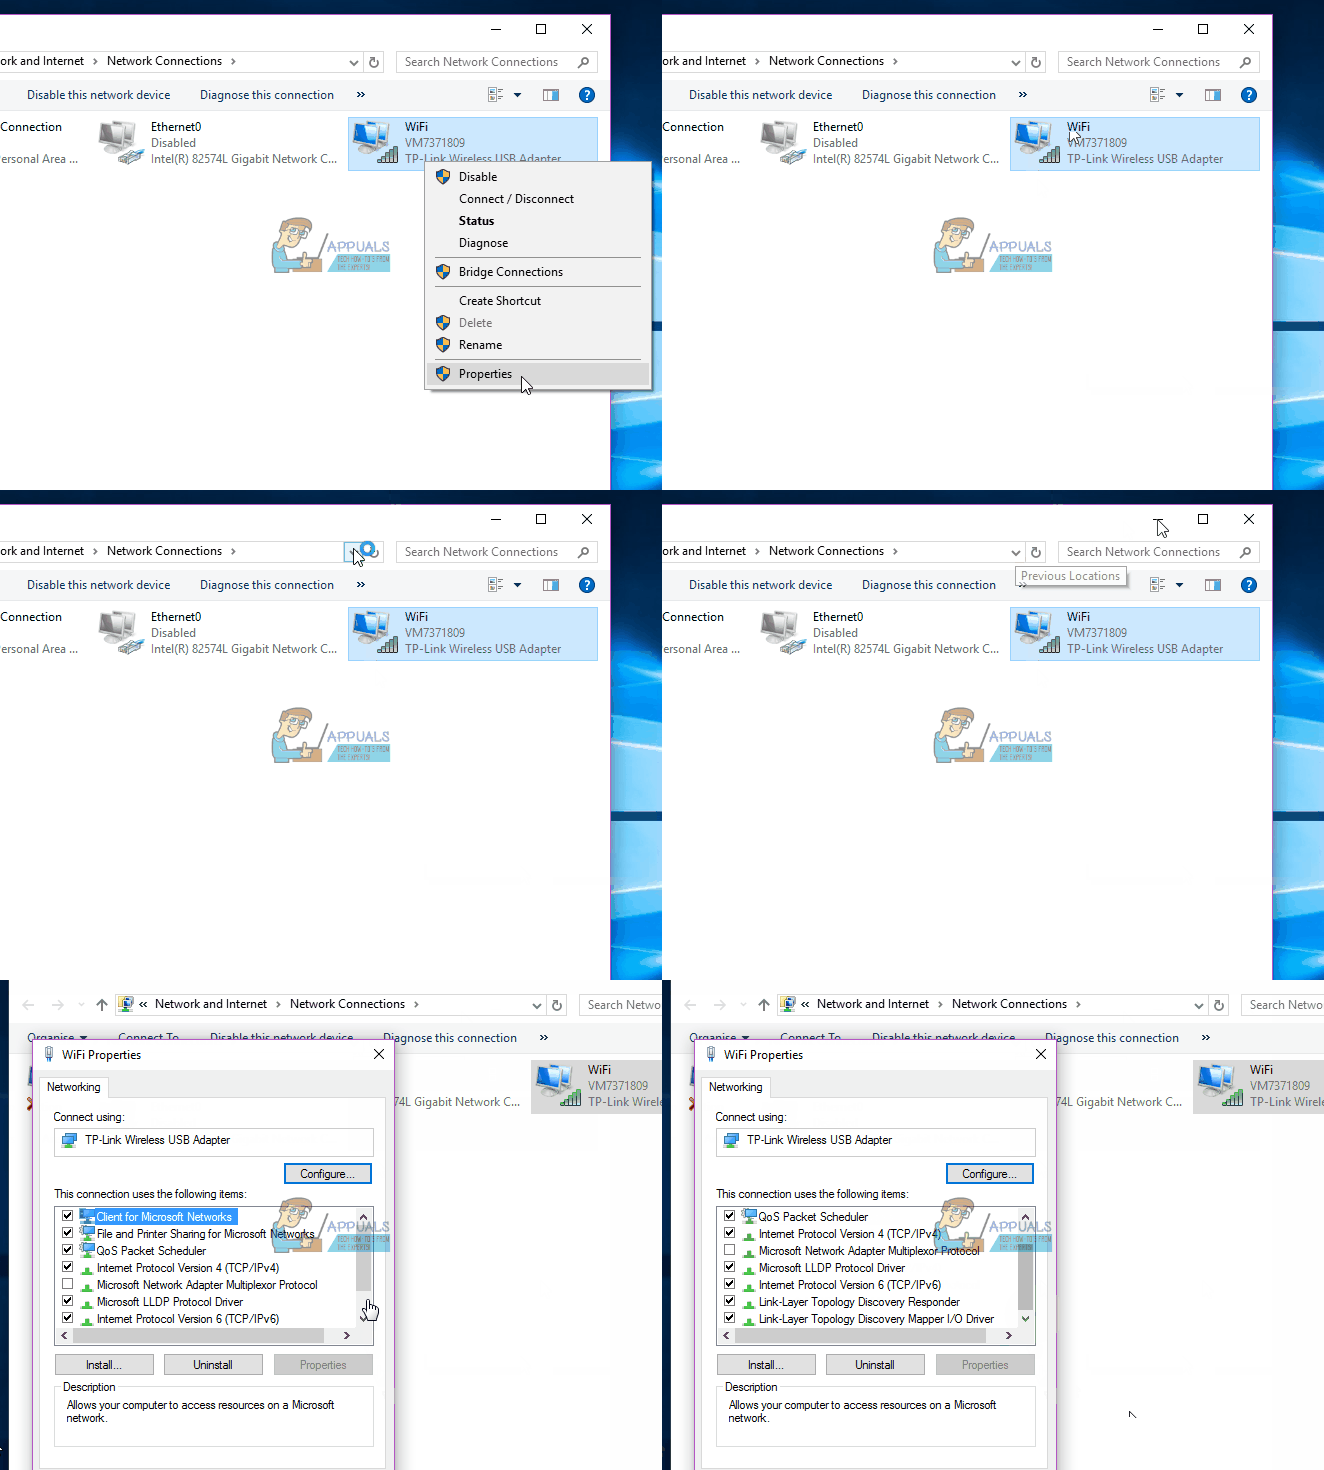
- Hold the Windows Key and Press R. Type ncpa.cpl and Click OK
- Choose your wifi connection, right-click and select Properties
- In the Wi-Fi Properties, in the “This connection uses the following items:” tab, you should check the following options:
Client for Microsoft Networks
File and Printer Sharing for Microsoft Networks
Link-Layer Topology Discovery Mapper I/O Driver
Internet Protocol Version 4 (TCP/IPv4)
Internet Protocol Version 6 (TCP/IPv6)
Link-Layer Topology Discovery Responder

2. Reset your connection to the internet
- Click on the Network icon in your computer’s notification area.
- Locate and click on the Wi-Fi network you are connected to that is affected by this problem, and click on Forget.
- Unplug any and all Ethernet cables plugged into the computer.
- Enable Airplane Mode on the computer.
- Restart the Wi-Fi router.
- Once the Wi-Fi router has booted up, disable Airplane Mode on the computer.
- Click on the Network icon in the computer’s notification area and connect to the Wi-Fi network.
- Wait for a few minutes, and your access to the internet should be restored. If the problem persists, however, simply move on to one of the other solutions listed and described below.
3. Update your network adapter’s driver software
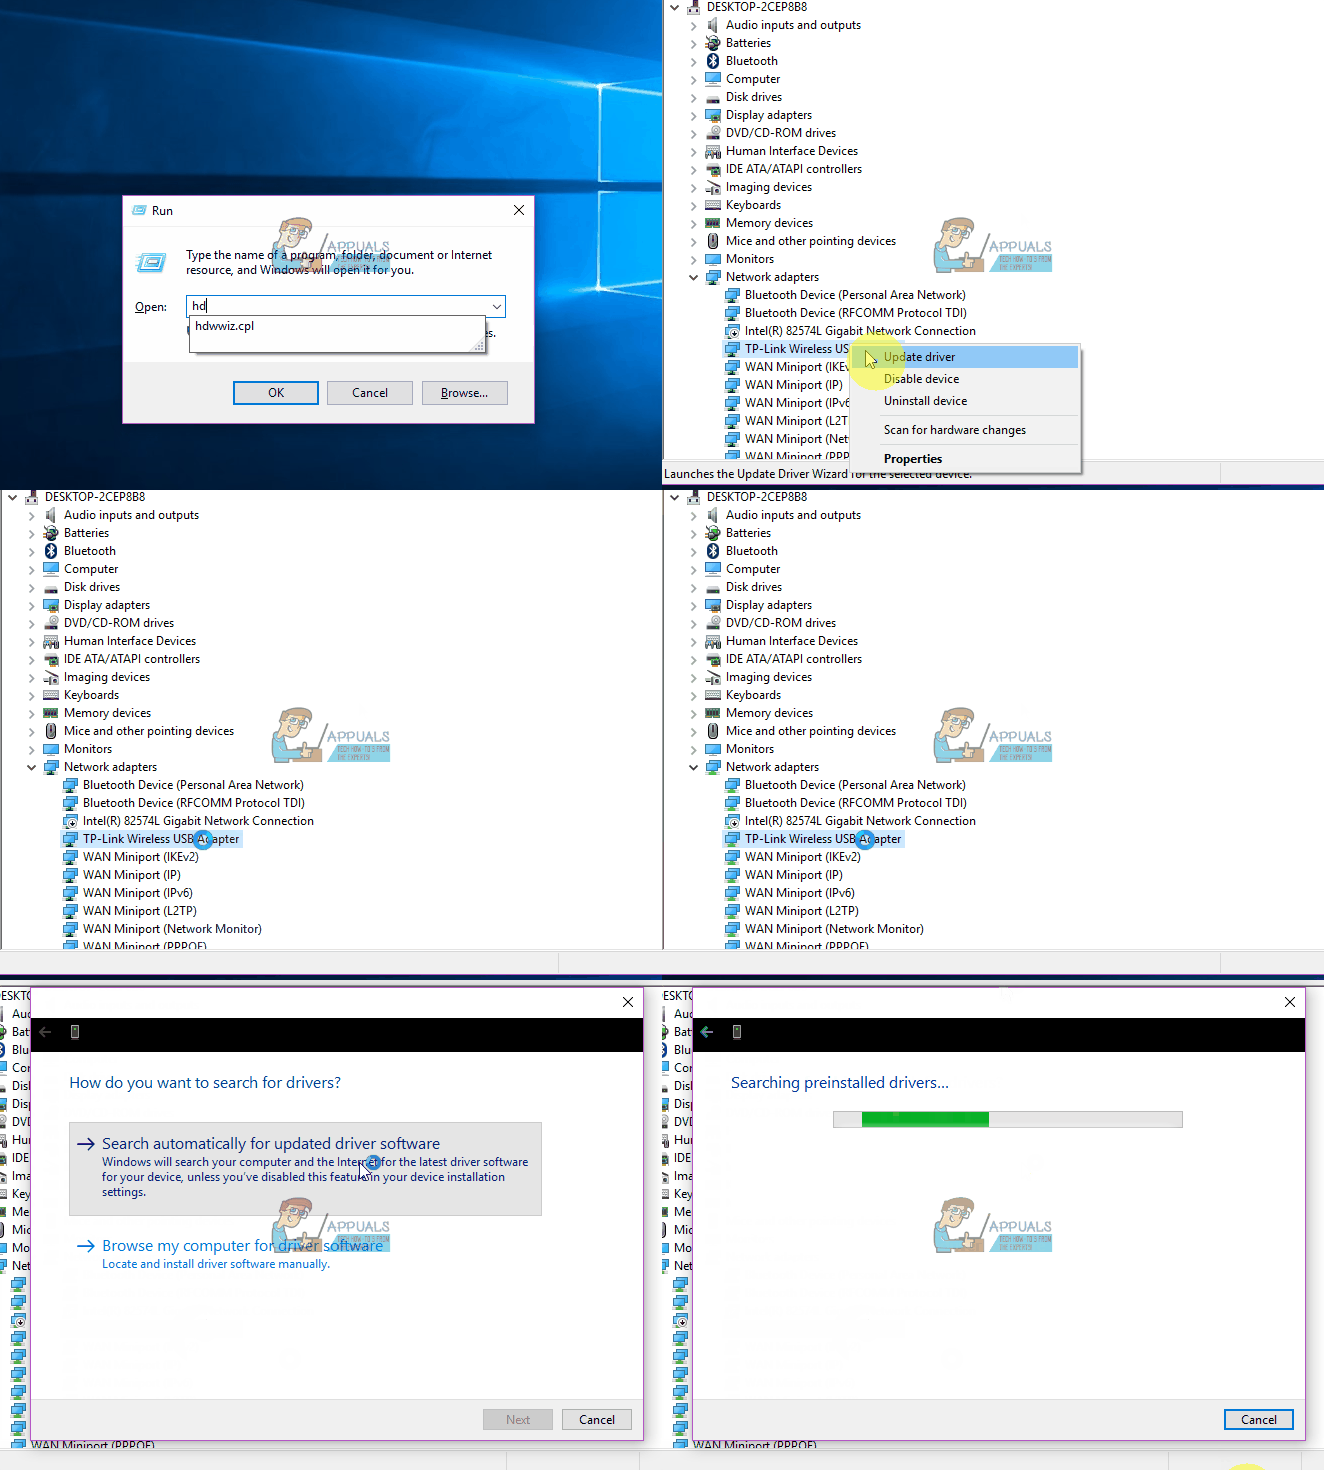
- Press the Windows Logo key + R to open a Run
- Type devmgmt.msc into the Run dialog and press Enter to launch the Device Manager.
- In the Device Manager, double-click on the Network adapters section to expand it.
- Locate the network adapter that your computer is currently using under the Network adapters section, right-click on it and click on Update Driver Software….
- Click on Search automatically for updated driver software, and wait for Windows to conduct the search.

If your computer finds updated drivers for your network adapter, it will automatically download and install them. Once that’s done, you can try accessing the internet and see whether or not the problem has been fixed. If Windows does not find any updated driver software for the network adapter, however, you should double-check to make sure that you have the latest driver software for your network adapter for Windows 10 by going to the official website of your network adapter’s manufacturer, navigating to the Downloads, Software or Drivers section and manually checking for updated driver software.
4. Change your network’s IP configuration
Since this issue is mostly caused by an invalid IP configuration, it can be fixed in most cases by simply changing the network adapter’s IP configuration. To change the IP configuration of your computer’s network adapter in an attempt to get rid of this issue, you need to:
- Right-click on the Network icon in your computer’s notification area and click on Open Network and Sharing Center.
- Click on Change adapter settings in the left pane of the Network and Sharing Center.
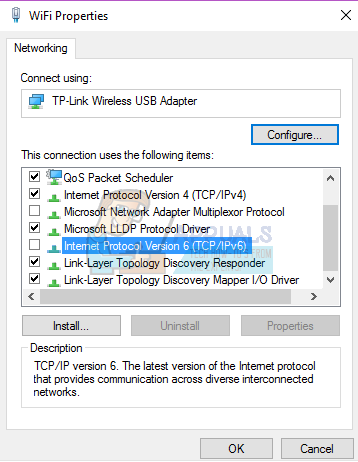
- Right-click on your wireless network, and click on Properties.
- Uncheck the checkbox beside the Internet Protocol Version 6 (TCP/IPv6) item to disable it, and click on OK.
- Close the Network Connections window, and restart your computer.

Wait for the computer to boot up, and then proceed to check whether or not your computer’s access to the internet has been restored.
5. Uninstall and reinstall your computer’s network adapter
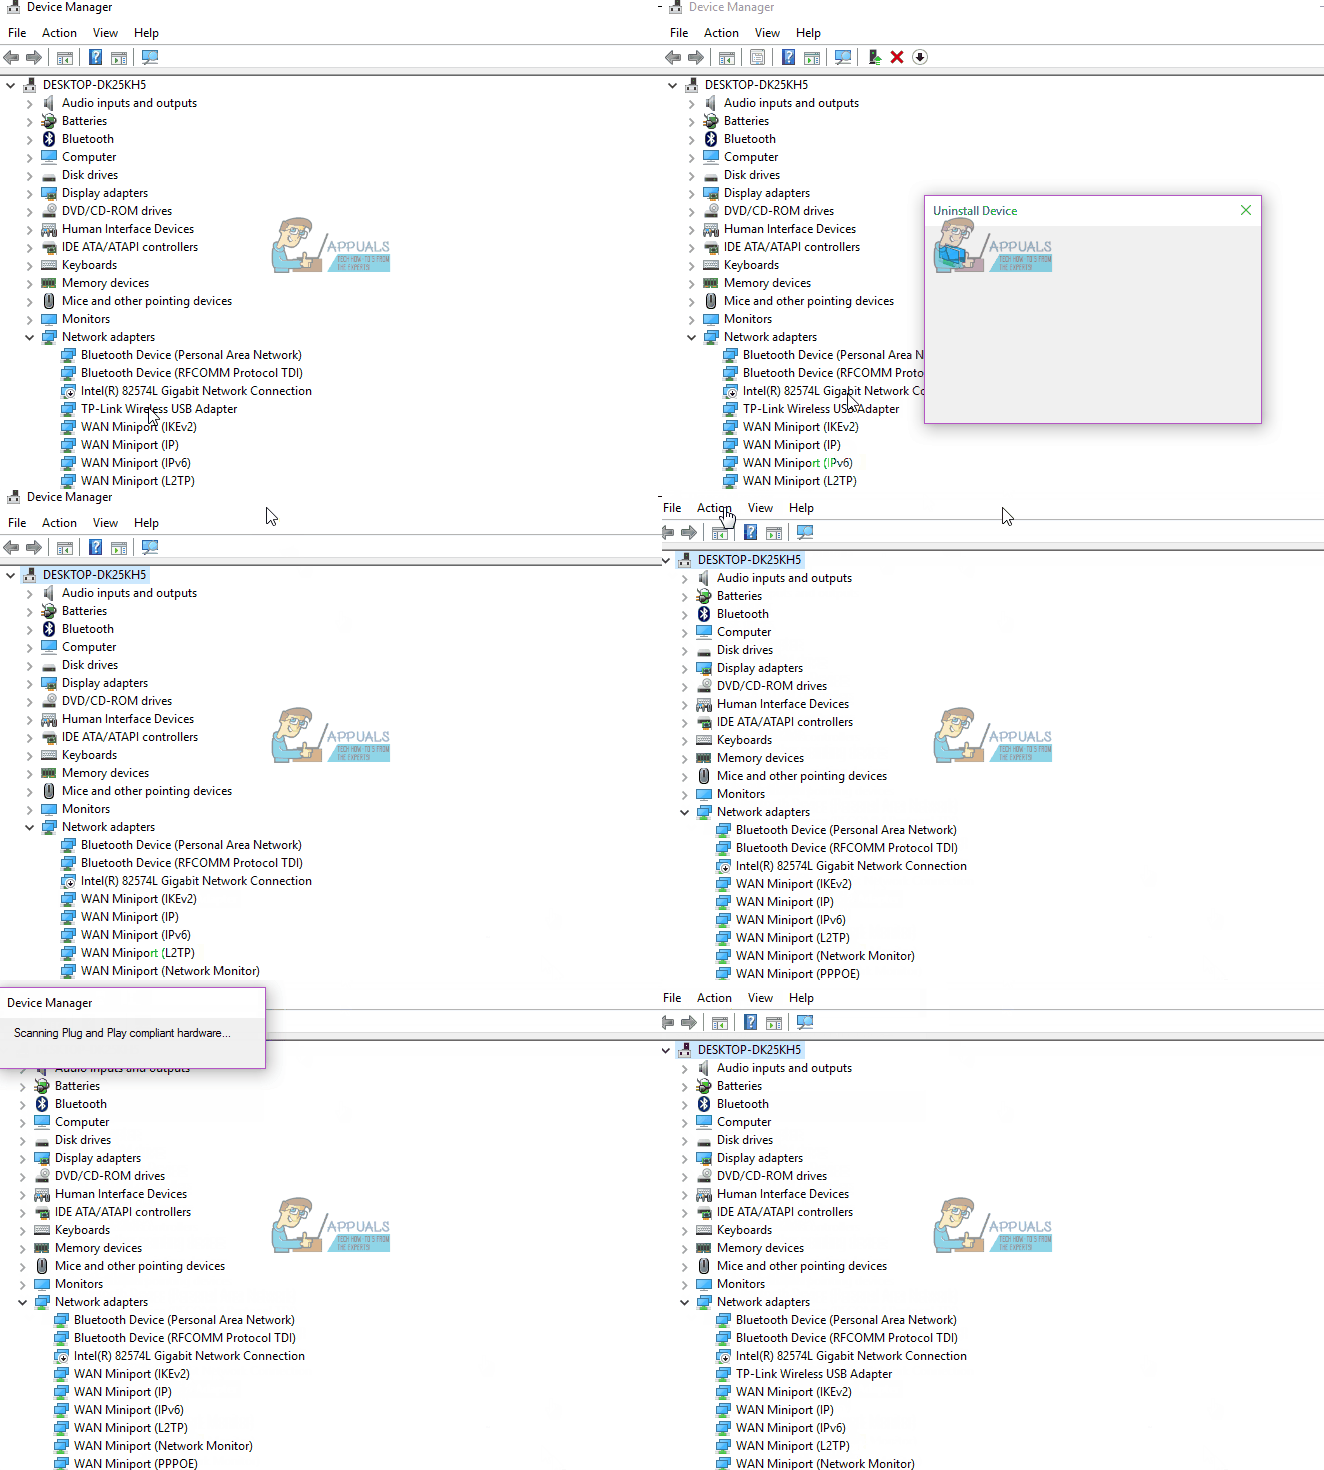
- Right-click on the Start Menu button to open the WinX Menu, and click on Device Manager in the WinX Menu.
- In the Device Manager, double-click on the Network adapters section to expand it.
- Locate the network adapter responsible for wireless connections on your computer under the Network adapters section, right-click on it and click on Uninstall.
- Enable the Delete the driver software for this device option by checking the checkbox beside it, and then click on OK.
- Wait for the network adapter and its driver software to be completely uninstalled.
- Once the network adapter has been uninstalled, click on Action > Scan for hardware changes. When you do so, Windows will automatically detect and reinstall the network adapter and its drivers.
- Wait for the network adapter and its drivers to be reinstalled, and then restart the computer. Be sure to check whether or not the problem has been fixed when the computer boots up.


