Fix: Netflix Error Code U7353 on Windows
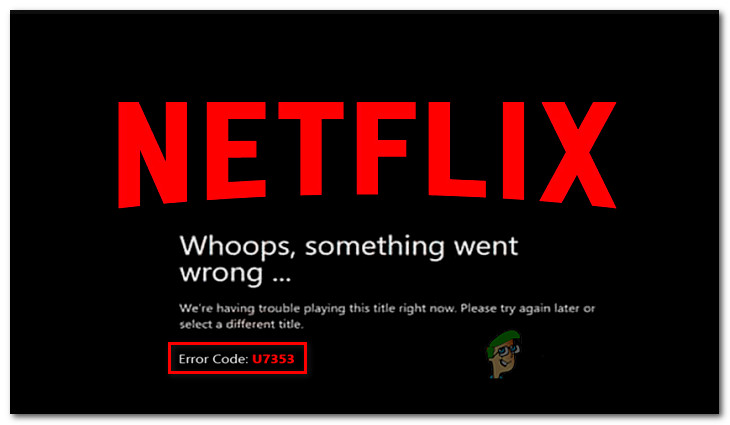
Several users with an active Netflix subscription are reportedly encountering the Error Code U7353 when trying to play certain titles from a Windows computer or tablet. In most cases, the issue is reported to occur with the UWP (Universal Windows Platform) application of Netflix downloaded from the Microsoft Store.
What is causing the Netflix Error U7353 issue?
We investigated this particular issue by looking at various user reports and the repair strategies that are commonly being used to fix this particular issue on Windows computers.
As it turns out, this error code points towards some corrupted/inexact information that is present on the computer and needs to be refreshed in order for the Netflix client to validate the account.
There are several potential culprits that might end up triggering this particular error code:
- Netflix UWP bug – As it turns out, there’s one recurring bug going around with the Microsoft Store version of Netflix. After more than a year, Netflix has released a hotfix for this particular error message. If this scenario is applicable to your situation, you will be able to resolve the issue by updating your Netflix UWP version to the latest via the Microsoft Store.
- Corrupted Netflix UWP application – Another possible culprit that might be responsible for this particular issue is corruption within the main application folder. If this scenario is applicable, you will be able to resolve the issue by either resetting the Netflix app or by uninstalling & reinstalling the UWP app from your computer.
- Improper DNS addresses – It’s a well-known fact that Netflix will not play well with certain DNS addresses generated by default. In this case, you can resolve the issue by changing the DNS addresses to Google’s DNS.
If you’re currently struggling to resolve this particular Netflix code and resolve the Error Code U7353 issue, this article will provide you with several troubleshooting steps. Down below, you’ll find several methods that other users in a similar situation have successfully used to fix the problem and revert to the default functionality of Netflix.
If you want to remain as efficient as possible, we advise you to follow the methods in the order that they are presented since the potential fixes are ordered by efficiency and difficulty. One of the methods is bound to resolve the issue in your case, regardless of the culprit that ends up causing the issue.
Method 1: Updating Netflix UWP to the latest version
As it turns out, this particular issue can also occur due to a recurring Netflix app bug that is only present with the UWP version of the application. The issue is known to occur with users that have previously downloaded content for offline use.
Fortunately, Netflix has already issued a hotfix for this particular issue via Microsoft Store. Normally, the update should have applied automatically, but if automatic updates are disabled on your machine, here’s what you need to do:
- Press Windows key + R to open up a Run dialog box. Then, type “ms-windows-store://home” and press Enter to open up the home page of the Microsoft Store.

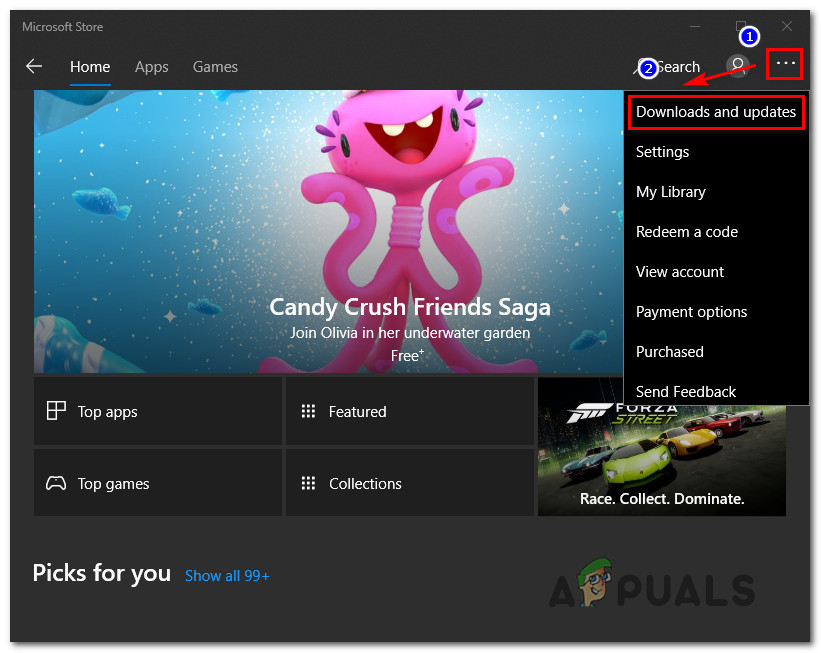
Opening the Microsoft store via Run box - Inside the Microsoft Store, click on the action button (top-right corner) and choose Downloads and updates from the list.
Download and Updates - From the Downloads and updates screen, click on Get updates and wait until the Netflix app is updated with the latest version.

Get updates - Once the update is installed, restart your computer and see if the issue is resolved at the next startup.
If the same issue is still occurring, move down to the next method below.
Method 2: Resetting the Netflix app
If you’re looking for a quick fix, your best chance would be to simply reset the Netflix app using the Apps & Features utility. Several affected users that after performing the steps below and restarting their machines, the issue was resolved and they were able to use the Netflix app without encountering the U7353 error code.
Here’s what you need to do:
- Press Windows key + R to open up a Run dialog box. Then, type “ms-settings:appsfeatures” and press Enter to open up the Apps & Features menu of the Settings app.
- Inside the App & features window, scroll down to the Apps & Features and scroll through the list of applications until you find the Netflix app.
- Once you see it, click on the Netflix entry once, then click on Advanced options.
- Scroll down to the Rest tab, then click on the Reset button below.
- Finally, click Reset once again to confirm the resetting process. Once you do this, the app will be reinstalled and be reverted to its default settings – this should end up resolving the U7353 error code.
- Once the process is complete, restart your computer and see if the issue is resolved at the next startup.
If the issue is still occurring, move down to the next method below.
Method 3: Uninstalling & redownloading the Netflix app
Some affected users have reported that the issue was only resolved after they uninstalled the Netflix app and redownloaded it from the Microsoft Store. However, several users that have used this method have reported that for them the fix was temporary as the error returned after a couple of days.
So be advised that until Netflix decides to fix its UWP app, you might need to repeat this process from time to time. Here’s what you need to do:
- Press Windows key + R to open up a Run dialog box. Then, type “ms-settings:appsfeatures” and hit Enter to open up the Programs & Features tab of the main Settings app.
- Inside the Programs & Features tab, scroll down to through the list of applications and locate the Netflix app.
- Once you see it, click on it once and then click on Advanced options.
- Inside the Advanced menu of the Netflix app, scroll down to the Uninstall section, click on Uninstall and then click on the next Uninstall button once again to confirm the process.
- Once the process is complete, restart your computer and wait until the next startup sequence is complete.
- Press Windows key + R to open up another Run box. Then, type “ms-windows-store://home” and press Enter to launch the home page of the Microsoft Store.
- Inside the Microsoft Store app, use the search function in the top-right section to search for Netflix.
- Then, click on Get to download & install the application.
- See if you’re still encountering the U7353 error code. If the same issue is still occurring, move down to the next method below.
Method 4: Changing the default DNS to Google’s DNS
This particular issue is often reported to occur with configurations that are using the default DNS. Several affected users have reported that the issue has been resolved after changing the DNS addresses to Google’s DNS and flushing the DNS.
Here’s a quick guide on how to do this:
Note: The guide below is applicable on every Windows version.
- Press Windows key + R to open up Run dialog box. Then, type “ncpa.cpl” and press Enter to open up the Network Connections tab.
- Right-click on the active network connection and choose Properties from the context menu.
- Inside the Properties of your network connection, go to the Networking tab, select the Internet Protocol Version 4 (TCP/IPv4) and click the Properties button below.
- From the next menu, select the General tab and select the Use the following DNS server addresses toggle.
- Set 8.8.8.8 as the preferred DNS server and 8.8.4.4 as the Alternate DNS server.
- Click Ok to save the configuration.
- Press Windows key + R to open up a Run dialog box. Then. type “cmd” and press Ctrl + Shift + Enter to open up an elevated Command prompt. When prompted by the UAC (User Account Control) window, click on Yes to grant administrative privileges.
- Inside the elevated Command Prompt, type the following command to flush the DNS cache:
ipconfig /flushdns
- Once you get the success message “Successfully flushed the DNS Resolver Cache“, close the elevated command prompt, open Netflix app and see if the issue has been resolved.