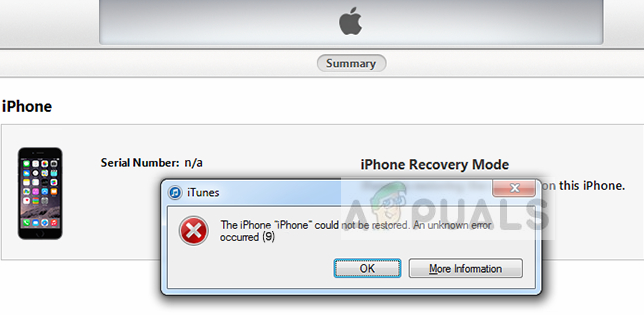
Fix: iTunes Unknown Restore Error 9
iTunes Error 9 occurs when users are unable to restore their iPhone device using the software. The full error message is “The iPhone “iPhone” could not be restored. An unknown error has occurred (9).”
Apple officials have recognized the error message and even released a documentation online on their site. According to them, this error occurs if your Apple device disconnects during an update or restore. We have put together a bunch of solutions which include basic fixes to help you circumvent your issue. Make sure that you move from the first one and work your way down.
What causes iTunes Error 9?
Error 9 is one of the most common errors encountered by users during their use of iTunes with their Apple device. Here are some of the most common reasons why you might encounter this error message on your computer:
- Bad USB Cable/Port: Since this error signifies that there was a problem with the connection, you might have a bad USB cable or port which may hamper the connection.
- Device in error state: Apple devices are known to get into error states all the time. A simple restart refreshes the configurations and fixes the issue.
- Security service on computer: Your computer may have overprotective security mechanisms which might block the connection with your iDevice.
- Older version of iTunes: Apple releases frequent updates for iTunes to fix bugs and improve new features. You should have the latest version of iTunes before attempting to use it for recovery/update.
Before we start the solutions, make sure that you are logged in as an administrator on your computer. Furthermore, you should have an open active internet connection. This means a network without proxies and VPNs.
Solution 1: Replacing Cable/Changing Port
If you have a faulty cable, chances are that the restore/update process of your iPhone might be interrupted by it. iTunes requires that the iPhone remains connected to the computer for the duration of the process. If at any time the connection is interrupted, the process will halt.
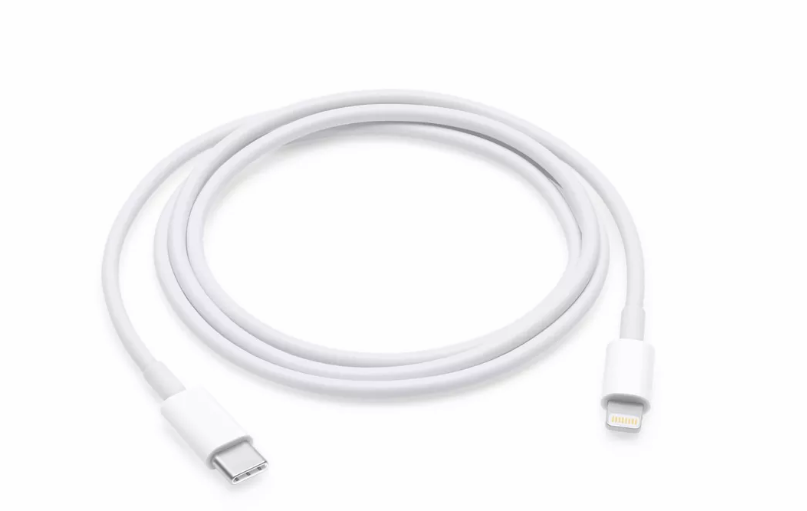
You should change the cable which you are using as a connection medium between your iPhone and iTunes. Furthermore, you should also try changing the port into which you have connected your cable. After changing the cable/port, initiate the process again and see if it goes through this time.
Do not proceed with the other solutions if you have a faulty cable/port.
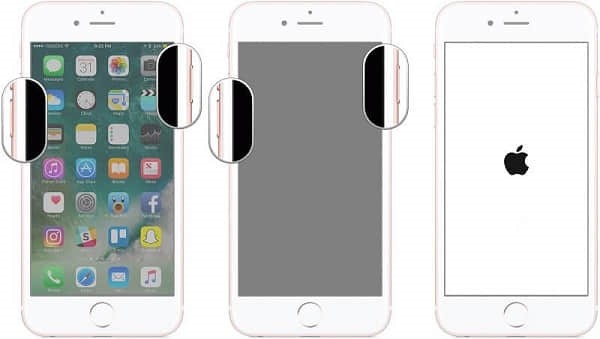
Solution 2: Force Restarting iOS Device
This error message might also occur on your iTunes if your device has some misconfiguration or bad settings stored in it. This is a very common culprit not just for iPhones, but for all other smartphone devices. With so many applications and modules, it is very common for the smartphone to go into error states. We will force restart your Device and see if this fixes the issue at hand.
For iPhone X/8/8 S/Plus:
Fast press your Volume up button, then immediately fast press the Volume down button and then press and hold the Power button until you see the Apple logo appear on the screen.

For iPhone 7/7 S/Plus:
Keep pressing your Wake/Sleep button and Volume down button together simultaneously until you see the Apple logo appear in the screen.
For iPhone 6/5/S earlier and iPad:
Press and hold the home button and the Power button until you see the Apple logo appear on the screen.
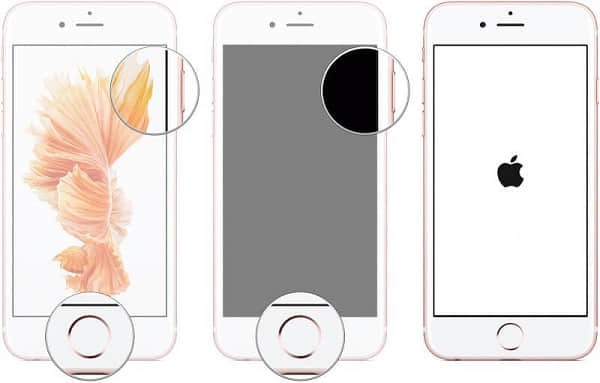
After the restart is successful, connect your iPhone again to your computer and check if the issue is resolved.
Solution 3: Disabling Antivirus Software and Firewall
If both the above methods don’t work for you, you can try disabling your Antivirus software and make sure that iTunes have proper permissions in your Firewall. Antivirus software often comes into conflict with applications and block them (false positive).
You can try to temporarily disable your Antivirus software and check if this fixes the issue at hand. You can check our detailed article on How to disable Antivirus and perform the steps according to the Antivirus utility installed on your computer. Make sure that you also disable Firewalls on your computer (if any).
Solution 4: Updating iTunes to the Latest Version
If all the above methods don’t work, it probably means that there is some issue with iTunes itself. Apple releases frequent updates to iTunes in form of versions to fix bugs and introduce improvements. If you are trying to perform a restore/update function through an older version of iTunes, you should update it immediately.
- Open your iTunes. Click on the button iTunes present at the top left corner of the screen and select Check for Updates.

- Now let the application connect with the remote servers and download the latest version. Restart your computer after the update and check if the issue is resolved.
Solution 5: Using Third-party Software
Another workaround to fix the iPhone giving an error code 9 when recovering or updating is using third-party software to do the job for you. There are several free applications out there which are developed to help you get your iPhone’s control back.
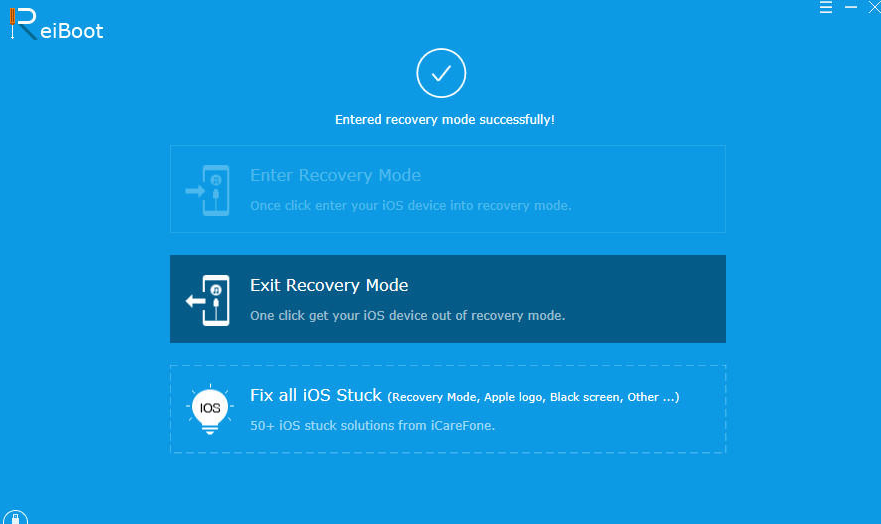
One of these applications is ReiBoot. We recorded some feedback and it seemed to be positive in the majority of the cases. You can look for other options but make sure that you have your data backed up beforehand.
Note: Appuals is not in any way associated with third-party software. Please use these applications at your own risk.
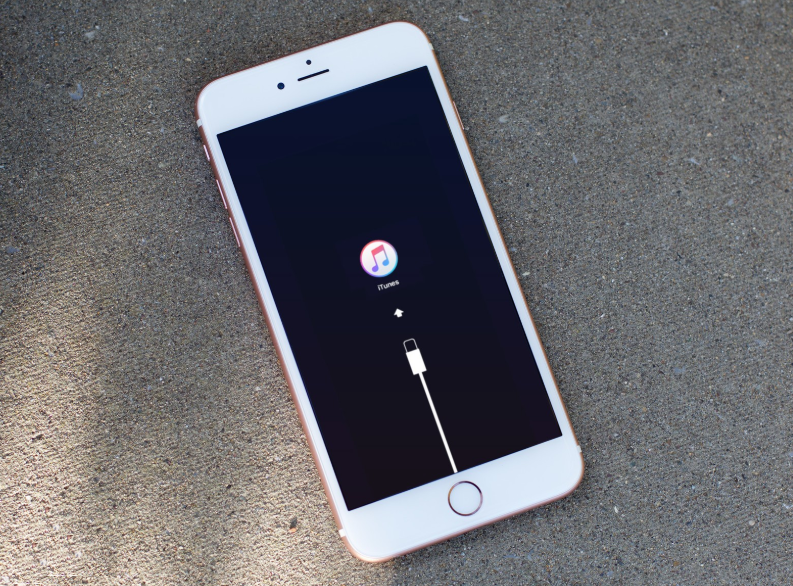
Solution 6: Using Recovery Mode
iTunes has a feature of recovery which allows a phone which is in recovery mode to connect to the computer and get basic operations done which include updating or recovering the iPhone. In this solution, your data will get erased which is why we gave it very low precedence. Only proceed if your important data is backed up elsewhere.
- Make sure that your iPhone is updated. Put your iPhone into Recovery mode. You can check our article on How to Put Your iPhone 4, 5, 6 and 7 into DFU Mode.
- Once the iPhone is in recovery mode, connect it to your computer and wait till iTunes detects it.
- Now when asked, select Update and wait for the process to finish. This might take a couple of minutes so make sure you are patient.