[FIX] iTunes Error 5105 on Windows (Your Request Cannot Be Processed)
The iTunes Error 5105 (Your Request cannot be processed) is encountered on Windows when users attempt to update the application when trying to re-download content that they previously deleted from their local library.

As it turns out, there are several different causes that might contribute to the apparition of this particular error code:
- Missing admin access – One of the most common instances where you’ll encounter this error is a case of missing admin permission which iTunes needs to update itself and verify content ownership. If this scenario is applicable, you should be able to fix the problem by closing iTunes and re-opening it with Admin access.
- Bonjour service is stuck in ‘limbo’ state – Under certain circumstances, you might expect to see this error while the main iTunes application is calling upon the supporting Bonjour service but the latter is not reachable. In this case, you should be able to fix the problem by restarting it via the Services screen.
- Corrupt Bonjour app – There are more sever circumstances that might prevent the Bonjour service from assisting the main iTunes application. For example, a quarantined item or a bat installation might render this service ineffective, in which case, you will need to force a repair via the Programs and Features screen.
- Outdated / corrupted iTunes version – An inconsistency with the main iTunes installation or an AV false positive might have crippled the functionality of this app. In this case, the best way of fixing the problem is to uninstall the current version and then reinstalling the latest build using the official channels. But keep in mind that the procedure of doing this will be different depending on if you’re using the desktop of the UWP app version.
- Too many authorized computers – As it turns out, this problem can also occur due to a DRM-facilitated issue where more than 5 computers are authorized for one Apple ID. In this case, you will receive the error code while attempting to download content locally until you remove at least an item from your Authorisation list.
- 3rd party Antivirus Interference – Both 3rd party AVs and the built-in solution (Windows Defender) are confirmed to interfere with the communication with the Apple server. In this case, you will need to either whitelist iTunes along with every supporting application or uninstall the 3rd party suite altogether.
- Missing QuickTime Player – iTunes still relies on the QuickTime infrastructure to perform certain actions that involve the playback of video content. Typically, the installation and updating of QuickTime player should be handled by Apple Software, but in case it doesn’t do its job, you will need to do the installation manually to fix the problem.
- Downloads folder contains corrupted files – Corrupted data that is currently stored by the Download folder (a subfolder of iTunes Media) can also be the root code of this particular error code. If this scenario is applicable, you can fix the problem by deleting the contents of the Download folder inside iTunes.
Method 1: Running iTunes with Admin Access
If you’re encountering this problem while attempting to update the iTunes application or while attempting to download content locally, chances are you’re dealing with a simple permission issue.
Keep in mind that whenever you want to perform an operation with the potential of changing the structure of the application, you need admin access. If you’re on Windows 10, your operating system should ensure that you have sufficient permissions to perform the operation.
But if you’re on Windows 8.1 or older or you have previously modified the default permissions on Windows 10, you might need to fore iTunes to open with admin access in order to get past the Error 5105.
To ensure that you open iTunes with admin access, right-click on the iTunes executable and choose Run as administrator from the newly appeared context menu.

Once you are sure that iTunes is opened with admin access, repeat the action that was previously causing the Your Request cannot be processed error and see if the problem is now fixed.
In case the same problem is still appearing, move down to the next potential fix below.
Method 2: Restarting the Bonjour sevice
As it turns out, one of the most common causes with the potential of causing this particular issue is the Bonjour service that is stuck in a limbo state (it’s neither opened nor closed). The Bonjour service is a key component that allows Apple application to share music libraries, device information, and more.
Several affected users that have been encountering the same iTunes Error 5105 have confirmed that they were able to fix the problem by using the Services menu to restart the service completely.
If this scenario is applicable, follow the instructions below to restart the Apple Bonjour service and fix the iTunes error code:
- Close iTunes and any associated instance – Make sure that no background service associated with iTunes is running in the background.
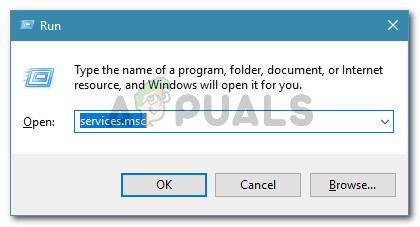
- Press Windows key + R to open up a Run dialog box. Next, type ‘services.msc’ inside the text box and press Enter to open up the Services screen.
Run dialog: services.msc - Once you’re inside the Services screen, scroll down through the list of active services and locate the Bonjour Service.
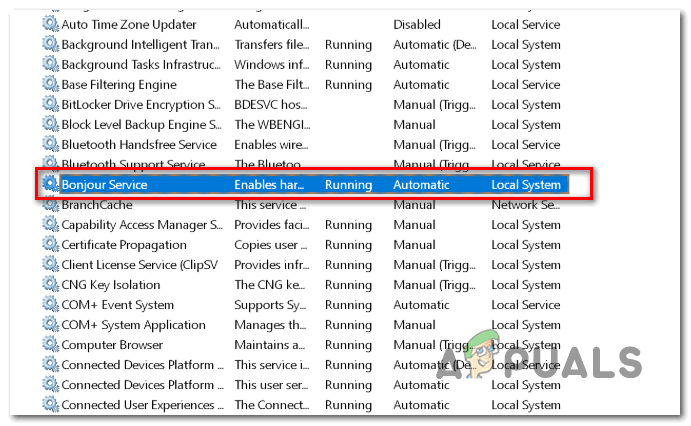
Locating the Bonjour service - Once you locate the Bonjour service, right-click on it and choose Properties from the newly appeared context menu.
- From the Bonjour Service screen, select the General tab from the vertical menu at the top. Next, scroll down to the Service Status screen – If the service is Running, click Stop and then click Start once again to restart the Bonjour service.
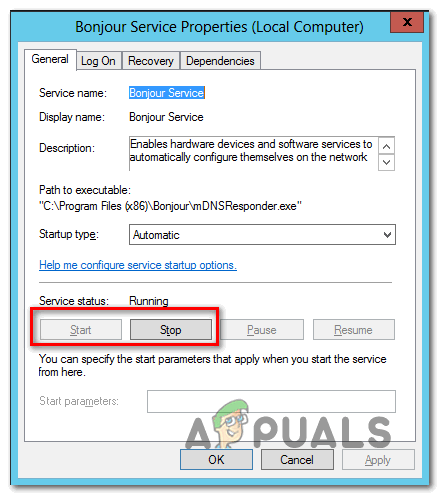
Restarting the Bonjour service - Once the service is restarted, click on Apply to save the modification, then launch iTunes once again and see if the problem is still occurring.
In case the same problem is still occurring, move down to the next potential fix below.
Method 3: Repairing the Bonjour App
Some affected users that have been seeing the iTunes Error 5105 error have confirmed that in their case, the problem was facilitated by a corrupted Bonjour supporting app. Furthermore, they confirmed that repairing this supporting app via the Apps and Features menu allowed them to finally eliminate the error and use the iTunes app without issues.
If this scenario is applicable to your particular scenario, follow the instructions below to force repair the Bonjour app:
- Press Windows key + R to open up a Run dialog box. Next, type ‘appwiz.cpl’ and press Enter to open the Programs and Features menu.

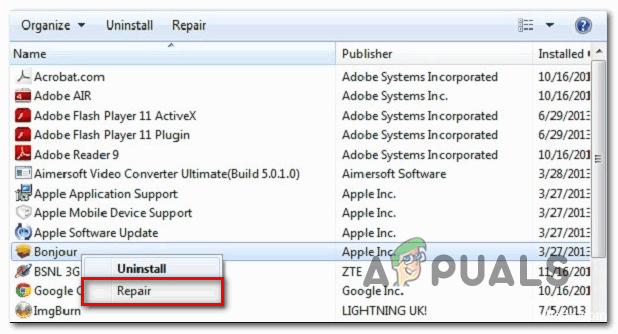
Type appwiz.cpl and Press Enter to Open Installed Programs List - Once you’re inside the Programs and Features menu, scroll down through the list of installed applications and locate the Bonjour app. Once you see it, right-click on it and choose Repair from the newly appeared context menu.
Repairing the Bonjour app - Inside the repair wizard, follow the on-screen prompts to complete the repair of the Bonjour app.
- Restart your computer and launch iTunes at the next startup to see if the problem is now fixed.
In case the same problem is still occurring, move down to the next potential fix below.
Method 4: Reinstalling the Latest Version of iTunes
In case you are unable to update your current iTunes version (or you’re already on the latest version) and you’re still encountering the same error code, chances are you are dealing with a corrupted or inconsistent installation that is affecting certain features in iTunes.
If this scenario is applicable, you should be able to fix the issue by uninstalling the current iTunes installation along with every supporting software and installing the latest version from scratch.
But keep in mind that there are two different versions of iTunes for PCs. The desktop version is the most popular, but if you’re on Windows 10, chances are you are using the UWP (Universal Windows Platform instead).
So depending on the iTunes version that you’re using, the steps of reinstalling this software will be different. Follow sub guide A if you’re using the desktop version or follow sub guide B if you’re using the UWP version.
A. Reinstalling iTunes for desktop
- Press Windows key + R to open up a Run dialog box. Next, type ‘appwiz.cpl’ inside the text box and hit Enter to open up the Programs and Features menu of the Classic Control Panel interface.
Type appwiz.cpl and Press Enter to Open Installed Programs List - Once you’re inside the Programs and Features screen, click on the Publisher column at the top to filter the list of installed programs via their publisher. This will make it easier to uninstall the main iTunes application along with every supporting software.
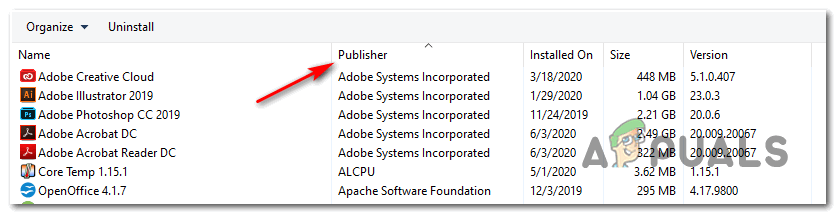
Ordering the installed applications via their publisher - Once you have a clear view of every product published by Apple Inc., go ahead and start uninstalling them systematically by right-clicking each entry, clicking Uninstall, and then following the on-screen prompts to complete the uninstallation.
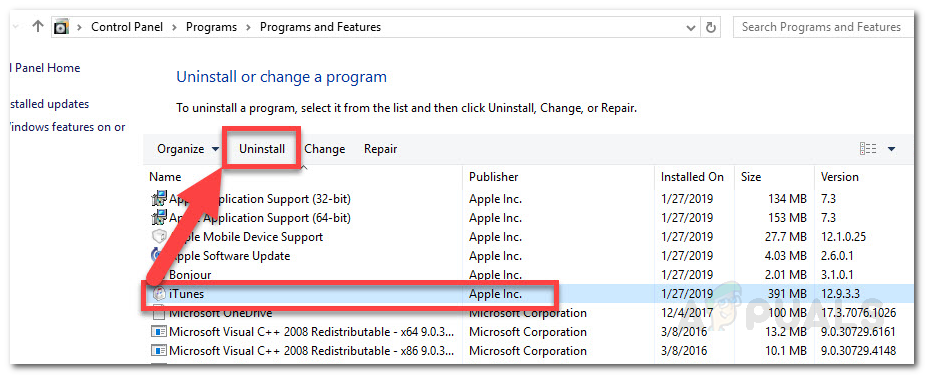
Uninstalling problematic application - After you uninstall iTunes along with every supporting software, restart your computer and wait for the next startup to complete.
- Once your Windows computer boots back up, open your browser and access this iTunes download page.
- Inside the download page, scroll down to the Looking for other versions section and click on Windows to download the latest version of iTunes.

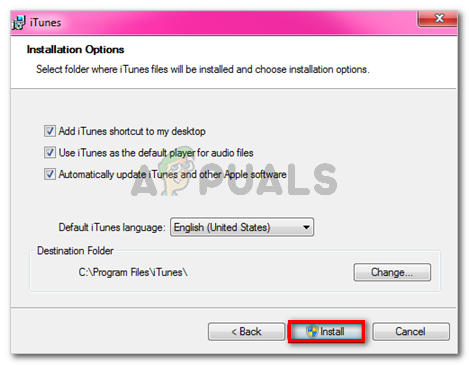
Downloading the desktop version of iTunes - After the installation is complete, open the installer and follow the on-screen prompts to install the latest version of iTunes on your computer. You will then be asked to install the supporting software.
Installing iTunes on your computer - Once the installation is complete, reboot your computer once again and see if the problem is fixed at the next computer startup.
B. Reinstalling iTunes UWP
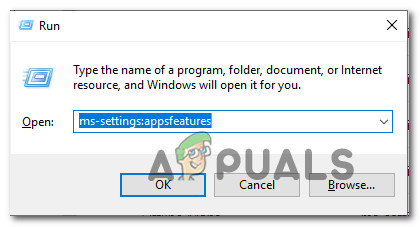
- Press Windows key + R to open up a Run dialog box. Next, type ‘ms-settings:appsfeatures‘ and press Enter to open up the Apps & Features tab of the Settings app.
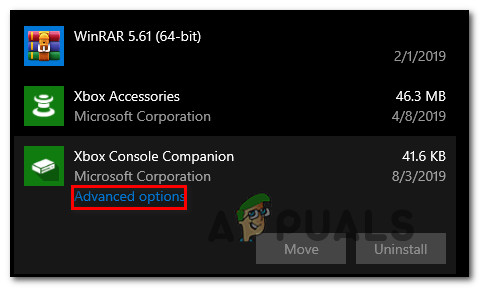
Accessing the Apps & Features Menu - Once you’re inside the Apps & Features menu, use the search function in the top-right corner to search for iTunes. Next, click on iTunes from the list of results, then click on Advanced Options hyperlink.
Accessing the Advanced Options menu of the Xbox app - Inside the Advanced Options menu, scroll all the way down to the Reset tab and click on the Reset button.
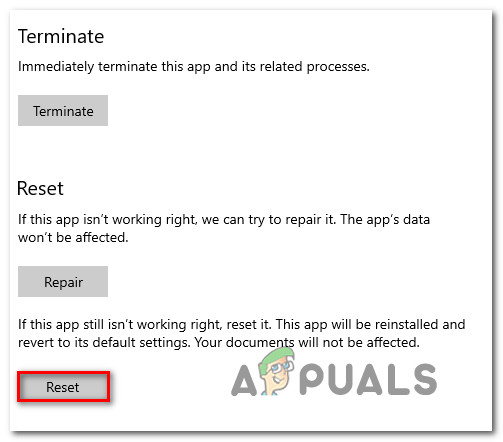
Resetting the iTunes app - When you get to the confirmation prompt, click on the Reset button once again, then wait for the process to complete.
Note: During this procedure, your iTunes state will be reverted back to the default state and every component will be reinstalled. But don’t be worried about this procedure affecting your existing library. You will still maintain ownership and you can re-download the content locally once the operation is complete. - Once you have reinstalled the UWP version of iTunes, repeat the action that was previously causing the problem and see if the problem is fixed.
In case you are still seeing the same problem, move down to the next potential fix below.
Method 5: Deactivating all Authorized PC or Devices in iTunes
As it turns out, the iTunes Error 5105 can also occur due to old computers you no longer have access to that are still linked to your iTunes account. Authorization on iTunes is a form of DRM (Digital Rights Management) that is applied locally.
Every Apple ID can have up to five computers authorized to play DRM-protected content from that particular account. If you have over 5 computers authorized for this account, or you have previously authorized a computer with a bad track record, you might expect to receive the Error 5105 until you clean your account of authorized computers.
If this scenario is applicable, follow the instructions below to deactivate all authorized PC for your iTunes account:
- Open iTunes on the affected computer and log in with your Apple ID.
- Once you have successfully signed in, use the ribbon at the top to go to Account and click on View My Account.
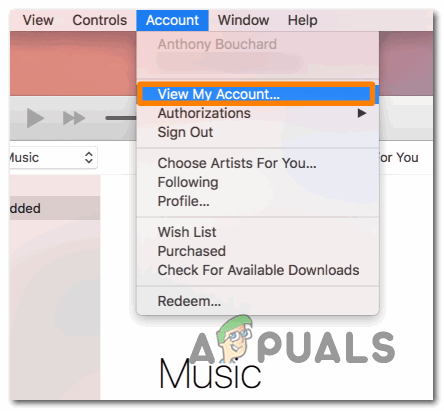
Access the Account settings menu - Once you’re inside the Account Settings menu, scroll down to the Apple ID Summary section and click on the Deauthorize All button.
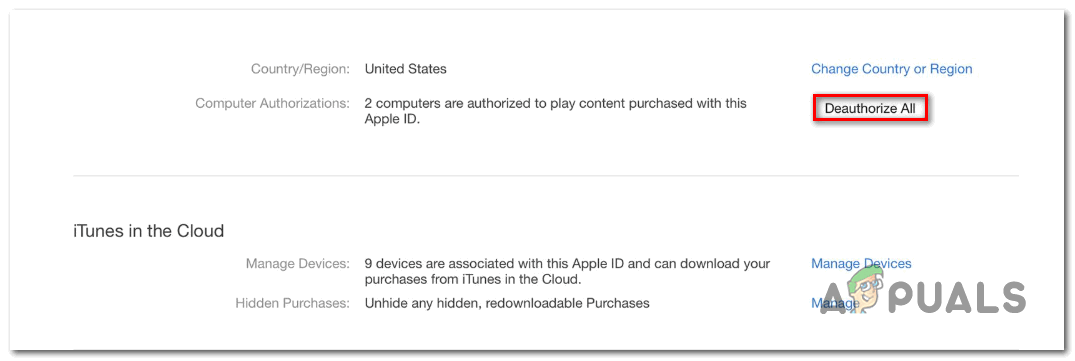
Reauthorizing every linked PC - At the next prompt, confirm your choice to deauthorized every connected computer, then restart iTunes and see if the problem has been fixed.
In case the same problem is still occurring, move down to the next potential fix below.
Method 6: Whitelisting iTunes or Uninstalling 3rd-Party Security Suite
As it’s been confirmed by several affected users, this problem can also occur due to some kind of interference caused by an overprotective firewall. This is confirmed to occur with both 3rd party utilities and the built-in Windows firewall (most commonly on Windows 7).
Note: If you’re using a third-party suite, you should search online for specific steps on whitelisting the iTunes app and complimentary services. Depending on the service you’re using, the instructions will be way different.
In case you’re using Windows Firewall, follow the instructions below:
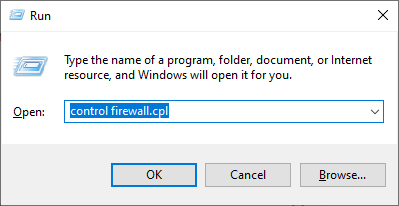
- Press Windows key + R to open up a Run dialog box. Next, type ‘control firewall.cpl’ inside the text box and press Enter to open up the classic interface of the Windows Firewall.
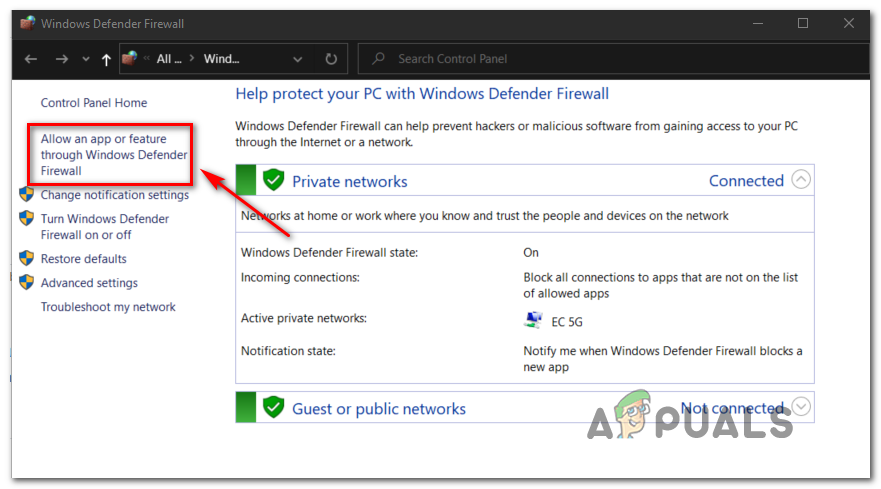
Accessing the Windows Defender Firewall - Once you’re inside the Windows Firewall menu, use the menu on the left to click on Allow and app or feature through Windows Defender Firewall.
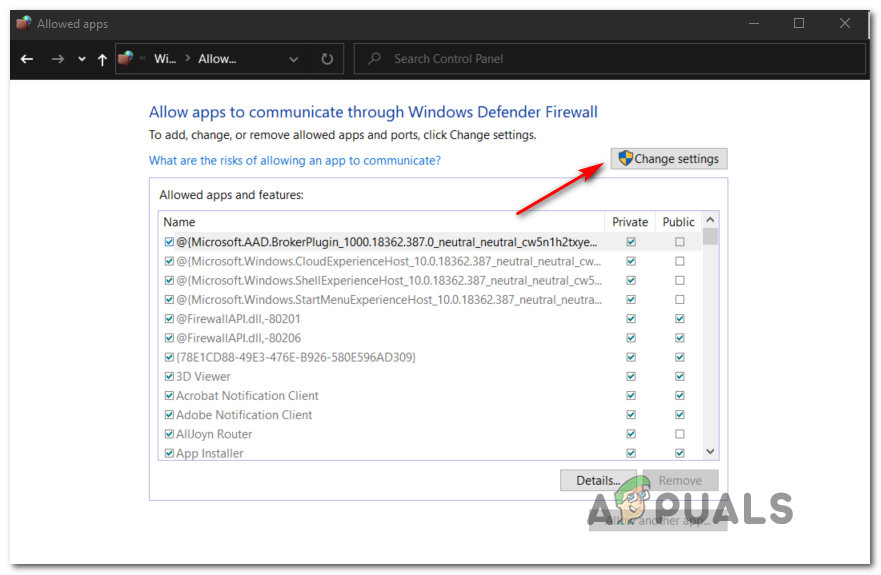
Allowing an app or feature through Windows Defender - Inside the Allowed Apps menu, click on the Change settings button, then click on Yes at the User Account Control prompt to grant admin access.
Changing the Settings of the Allowed Items in Windows Firewall - Once you have admin access, scroll down through the list of items and identify iTunes from the list of items. When you see it, check the associated boxes for both Private and Public before clicking Ok to save the changes.
Note: In case you don’t see iTunes in this list, click on Allow another app, then add the entry manually.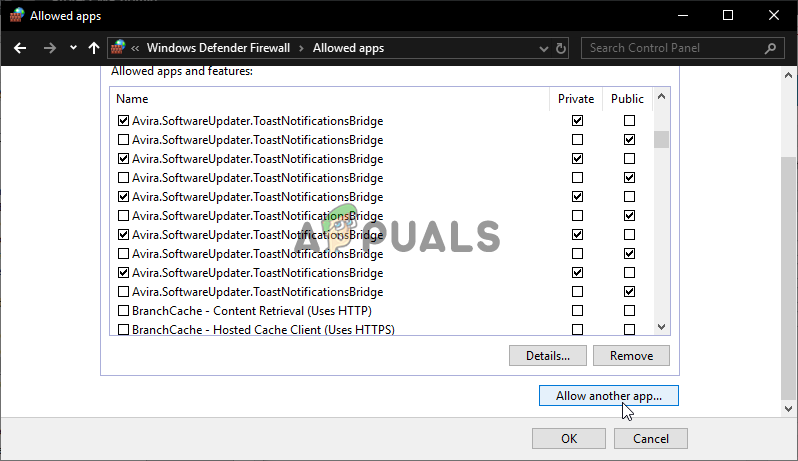
Allow another app in Windows Firewall - After iTunes has been successfully whitelisted, launch the application again, and see if the problem is now resolved.
In case you’re still encountering the iTunes Error 5105 error when trying to download content locally or attempting to update the application version, move down to the next potential fix below.
Method 7: Installing QuickTime Player
If you’re encountering this issue on Windows 10 when attempting to play or download video content locally, this problem can also occur due to a missing QuickTime Player installation. As it turns out, iTunes still relies on the QuickTime infrastructure for certain tasks and Apple Software should install the supporting software automatically.
However, if this didn’t happen, you should be able to fix the problem by forcing the installation of the QuickTime Player manually using the official channels. To do this, follow the instructions below to install the missing software and fix the iTunes Error 5105 error:
- Visit the QuickTime download page and click on the download button associated with the latest version of QuickTime for Windows.
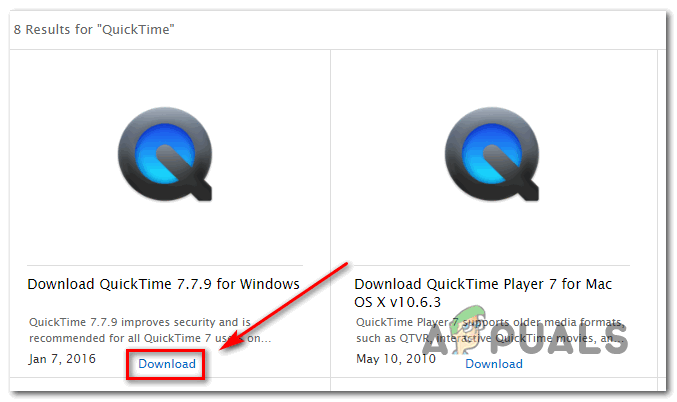
Downloading the latest version of QuickTime Player - Once the download is complete, open the installer and click Yes at the UAC (User Account Control) to grant admin access.
- Then, follow the on-screen instructions to complete the installation of the latest QuickTime Player version, then restart your computer.
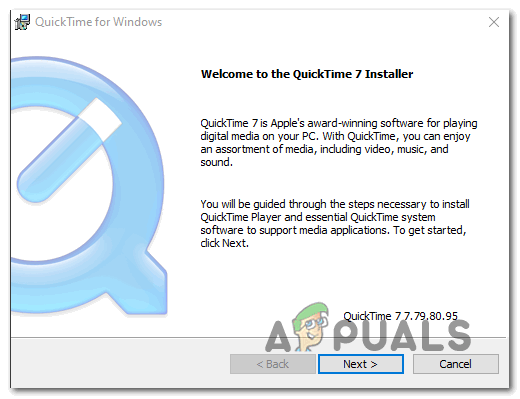
Installing QuickTime Player - After your PC boots back up, open iTunes and see if the problem is now fixed.
In case you’re still encountering the same error code or QuickTime was already installed, move down to the next potential fix.
Method 8: Deleting the Downloads Folder in iTunes Media
If none of the potential fixes presented above have worked for you, you are most likely dealing with some type of corrupted data that iTunes is storing locally. Some users that found themselves in a similar situation have confirmed that they managed to fix the problem by clearing the Downloads folder in the Tunes Media folder.
If this potential problem looks like it could be applicable to your particular scenario, follow the instructions below to delete the Downloads folder inside the iTunes Media folder:
- Open File Explorer (My Computer on older Windows version) and navigate to the location of the iTunes Media folder. By default, it should be located in :
C:\Users\*YourUsername*\Music\iTunes\ iTunes Media
Note: Keep in mind that *YourUsername* is just a placeholder. Replace it with the name of your Windows user account.
- Once you get to the correct location, double-click on the Downloads subfolder, press Ctrl + A (or select manually) to select everything, then right-click on a selected item and choose to Delete to remove everything inside.
- Once the Downloads folder in iTunes media has been cleared, restart your computer and s launch iTunes once the next startup is complete to see if the problem is now resolved.
In case you’re still seeing the same problem, move down to the next potential fix below.