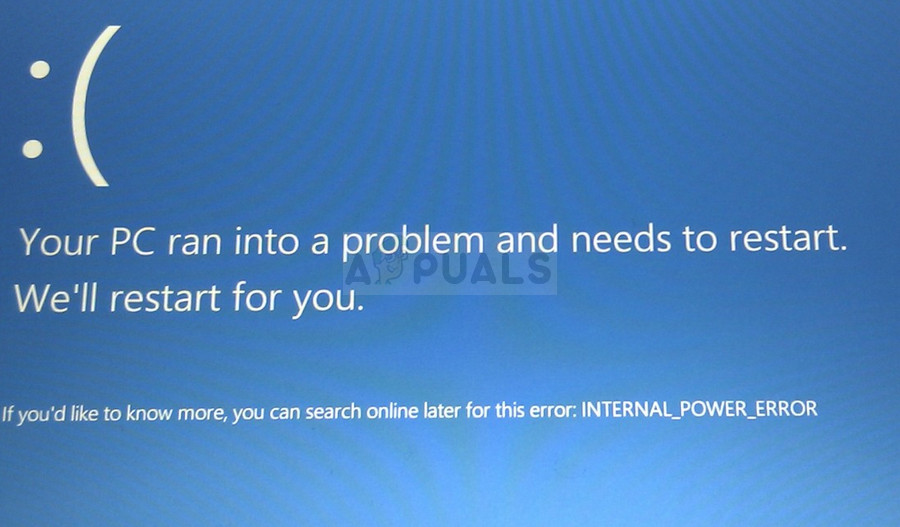
Fix: INTERNAL_POWER_ERROR Blue Screen on Windows 10
A Blue Screen of Death (BSoD) is a computer error screen which occurs after a fatal error after which the system can’t proceed. The message above indicates a blue screen caused by the INTERNAL_POWER_ERROR.
How to Fix the INTERNAL_POWER_ERROR Blue Screen on Windows 10
The main problem regarding this error is that it occurs way too fast in certain cases and users are almost unable to perform any serious troubleshooting steps before the computer displays this error and requires a restart. We have searched the Internet for working methods which were helpful to other users and we hope one of them will be able to help you as well!
Solution 1: Update Your AMD Catalyst Driver
This error was widely known as the issue related to a faulty AMD Catalyst driver and users were outraged that a display driver was capable on incapacitating their whole computers and making the troubleshooting process almost impossible since the BSOD appeared quickly as soon as your computer boots properly.
The instructions below are not your regular driver update instructions so make sure you pay attention to each step as each one carries a certain weight and benefits the troubleshooting process.
First of all, you will need to boot into Safe Mode on your computer since this will significantly increase the time you have available before the Blue Screen of Death appears on your computer. It can be done in two ways, depending on your operating system.
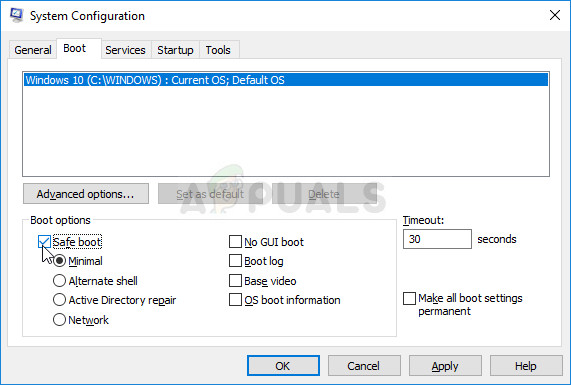
- This method is useful for version of Windows older than Windows 10. Use the Windows + R key combination on your keyboard in order to open the Run dialog box and type in “msconfig” before clicking OK.
- In the System Configuration window, navigate to the Boot tab and check the Safe Boot option click OK and restart your computer in order to boot into Safe Mode.
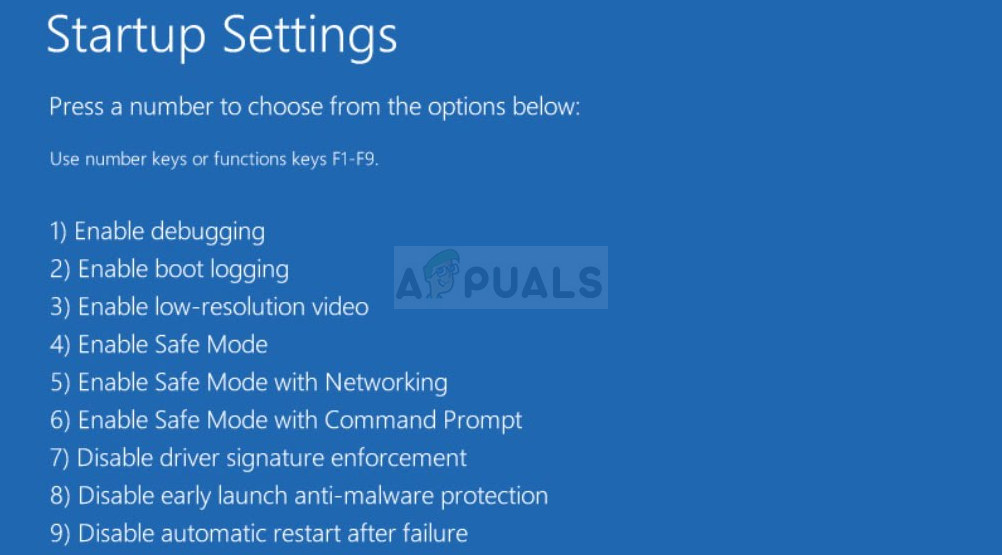
- If you are using Windows 10, there is another way to access Safe Mode on your computer. First of all, you will need to boot into safe mode by following these steps. Use the Windows Key + I key combination in order to open Settings or click the Start menu and click the gear key at the bottom left part.
- Click on Update & security >> Recovery and click the Restart Now option under the Advanced startup section. Your PC will proceed to restart and you will be prompted with the Choose an options screen.
- Click the number 4 key or F4 in order to start your PC in Safe Mode on Windows 10.
Now that you have successfully navigated to Safe Mode after restarting your computer, you will now have more time to perform the rest of the steps needed to troubleshoot this issue. That is why we recommend you first read the entire solution before executing it.
When you computer boots, you will have to use Task Manager to kill certain processes which will prevent the BSOD from occurring while you troubleshoot the issue.
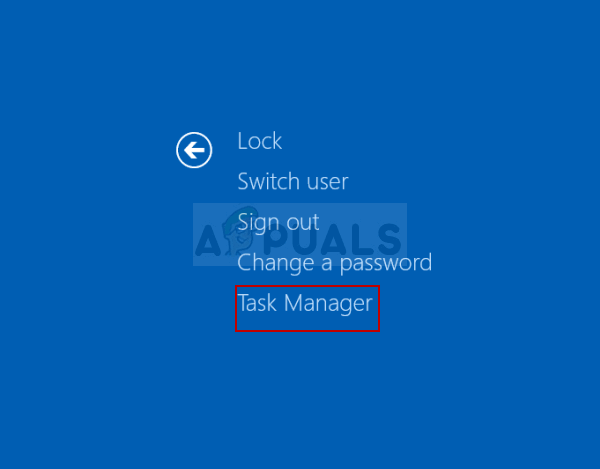
- Use the Ctrl + Shift + Esc key combination in order to open the Task Manager. Alternatively, you can use the Ctrl + Alt + Del key combination and select Task Manager from the blue full screen which opens. You can also search for it in the Start menu.
- Click on More details in order to expand Task Manager and search for all AMD-related entries displayed on the list in the Processes tab of Task Manager. They should be located right under Background processes. The processes are related to AMD software and drivers but your user experience shouldn’t change.
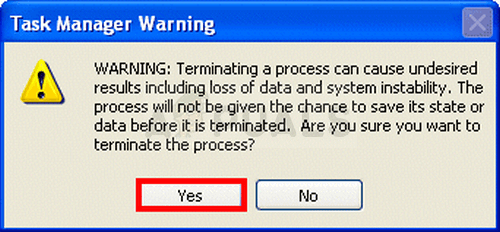
- Click Yes to the message which is going to be displayed: “WARNING: Terminating a process can cause undesired results including loss of data and system instability….” or any other warning popup, depending on the version of Windows you have installed.
- You should now have enough time to reinstall the AMD display driver on your computer and the BSOD shouldn’t appear now.
The last step consists of actually updating the driver on your computer and the process should not go uninterrupted. There are users who were lucky enough to solve the problem using only this last set of steps but the majority needed to both boot into Safe Mode and end AMD-related tasks in Task Manager. Good luck with the last part.
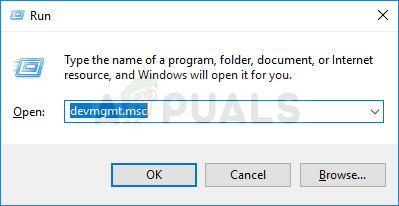
- Click on the Start menu button at the lower left part of your screen, type in “Device Manager” with Start menu open, and select it by simply clicking on the first result. You can also use the Windows Key + R key combo in order to open the Run dialog box. Type in “devmgmt.msc” in the box and click OK in order to run it.
- Since it’s the graphics card driver we want to update on your computer, expand the Display adapters category, right click on your graphics card and select the Uninstall Device option.
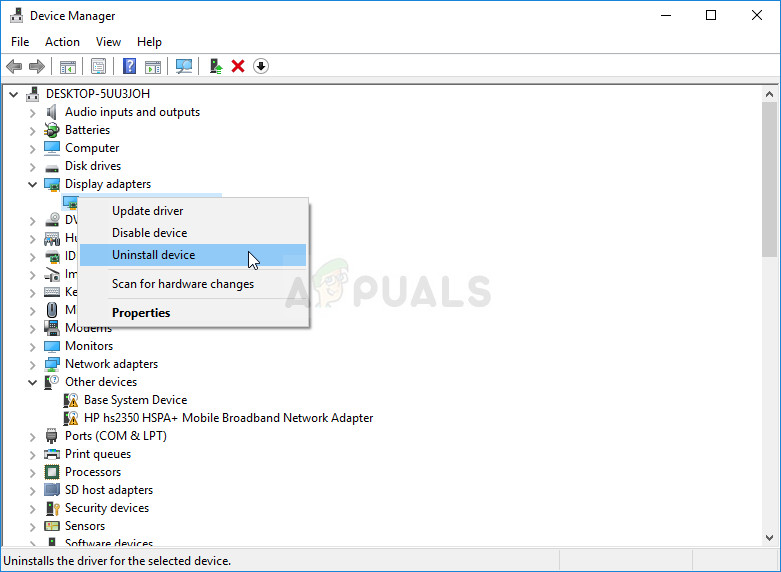
- Confirm any dialogues which may ask you to confirm the deletion of the current device driver and wait for the process to finish.
- Look for your graphics card driver on the card’s manufacturer’s website and follow the instructions which should be available on the website. Save the installation executable file on your computer and run it from there. Your computer may restart several times during the installation.
- You should also gather some basic information about your computer in order to download the proper driver suitable for your setup. Below, you will be able to find links which should help NVIDIA and AMD users.
Nvidia Drivers — Click Here!
AMD Drivers — Click Here!
The final part is to prevent Windows from accidentally uninstalling this driver with the one which is sometimes installed alongside Windows Update. New drivers found by Microsoft are not always the same as the ones on your manufacturer’s website and the Microsoft one seems to be problematic.
This can be done in a number of different ways but the easiest way to do so would be via Group Policy Editor so follow the steps below.
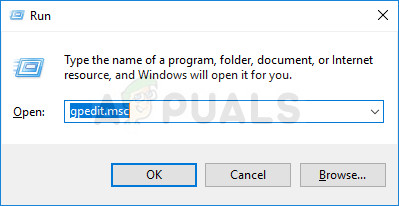
- Use the Windows Key + R key combination (tap the keys simultaneously) to open the Run dialog box. Enter “gpedit.msc” in the Run dialog box, and press the OK button in order to open the Local Group Policy Editor tool. On Windows 10, you can try simply type Group Policy Editor in the Start menu and click the top result.
- On the left navigation paneof Local Group Policy Editor, under Computer Configuration, double click on Administrative Templates, and navigate to the Windows Components >> Windows Update section.
- Select the Windows Update folder by double-clicking on it and check out its right side section.
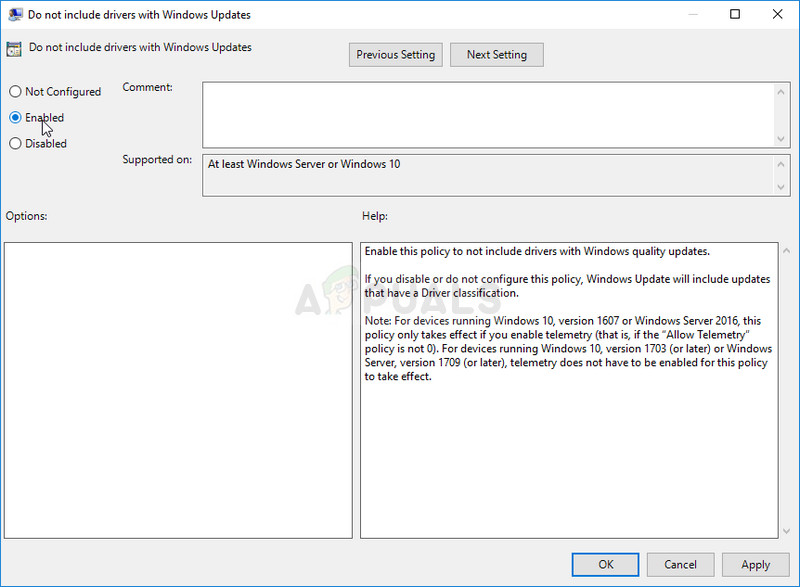
- Double click on the “Do not include drivers with Windows Updates” policy option, check the radio button next to the “Enabled” option, and apply the changes you have made before exiting. The changes won’t be applied until you restart.
- Finally, reboot the computer to save the changes and check to see if you are still being targeted with the BSOD.
Note: Windows 10 Home users don’t have the ability to use Group Policy Editor so if you struggle with finding it, there is a registry hack you can use to activate the same option.
- Since you will need to add a key to the registry in order to follow through this solution, we highly advise you to check out this article we have prepared in order to backup your registry to prevent other problems which can occur.
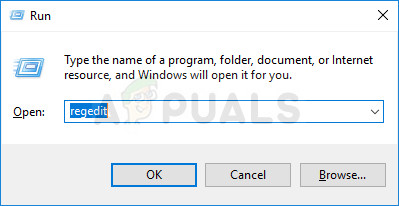
- Open the Registry Editor utility by typing “regedit” in either the search bar window, the Start menu or the Run dialog box on your Windows PC. Navigate to the following key in Registry Editor by using the left pane navigation.
HKEY_LOCAL_MACHINE\SOFTWARE\Policies\Microsoft\Windows\WindowsUpdate
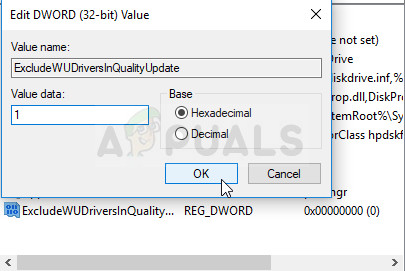
- Right-click on the blank right side of the Registry Editor screen with the WindowsUpdae key being the last selected key in the address bar and choose New >> DWORD (32bit) value or QWORD (64bit) depending on the architecture of your Windows operating system. Right-click on the key you have just added and click on Rename.
- Set the name of the key to ExcludeWUDriversInQualityUpdate. Right-click on it once more and choose the Modify option from the context menu. Under the value data, set it to 1 and change the Base option to Hexadecimal. Click on the OK button, restart the computer and check to see if the BSOD persists.
Solution 2: Update BIOS
Sometimes this Blue Screen of Death can be completely blamed on your computer’s BIOS, especially if you have recently performed a system upgrade or if you have installed new devices. Updating BIOS can be a tricky process and the thing is that it differs vastly from manufacturer to manufacturer. That is why you should follow the steps carefully if you want to solve the problem.
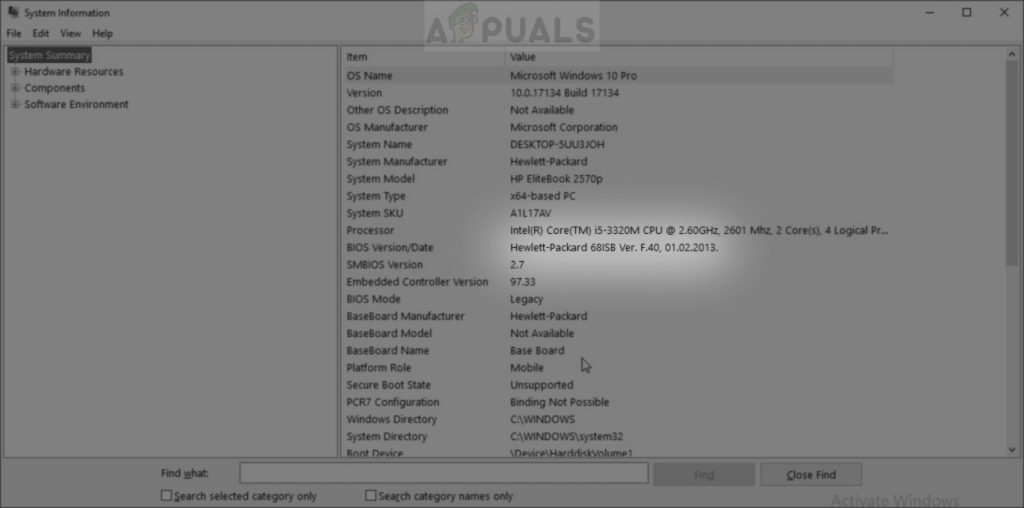
- Find out the current version of BIOS utility you have installed on your computer by typing “msinfo” in the Search bar or the Start menu.
- Locate the BIOS version data just under your Processor model and copy or rewrite anything to a text file on your computer or a piece of paper.
- Find out whether your computer was bundled, pre-built or assembled manually. This is very important because you don’t want to use BIOS made for just one component of your PC when it won’t apply to your other devices and you will overwrite BIOS with a wrong one, leading to major errors and system problems.
- Prepare your computer for the BIOS update. If you are updating your laptop, make sure its battery is fully charged and plug it in the wall just in case. If you are updating a computer, it’s advisable to use an Uninterruptible Power Supply (UPS) to make sure your computer doesn’t shut down during the update because of a power outage.
- Follow the instructions we prepared for various desktop and laptop manufacturers such as Lenovo, Gateway, HP, Dell, and MSI.
Solution 3: If This Occurs After Waking up From Sleep
If you get the BSOD after your computer went to sleep and you are now trying to get it started again, it’s advisable that you try and use this specific method in order to solve the problem. It has helped countless users and it’s easy to perform it as it’s a single command in Command Prompt.
- Search for “Command Prompt” right there in the Start menu (just start typing) or by pressing the search button next to it and typing then. Right-click on the first result at the top of search result list and select the “Run as administrator” option.
- Users who are using an older version of Windows (older than Windows 10) can do the same if theyuse the Windows Logo Key + R key combination in order to open the Run dialog box. Type in “cmd” in this box and use the Ctrl + Shift + Enter key combination in order to run Command Prompt with admin privileges.
- Copy and paste the command below. Click Enter in order to execute it and wait for the message saying to which size the hibernation file is set to.
powercfg /hibernate /size 100
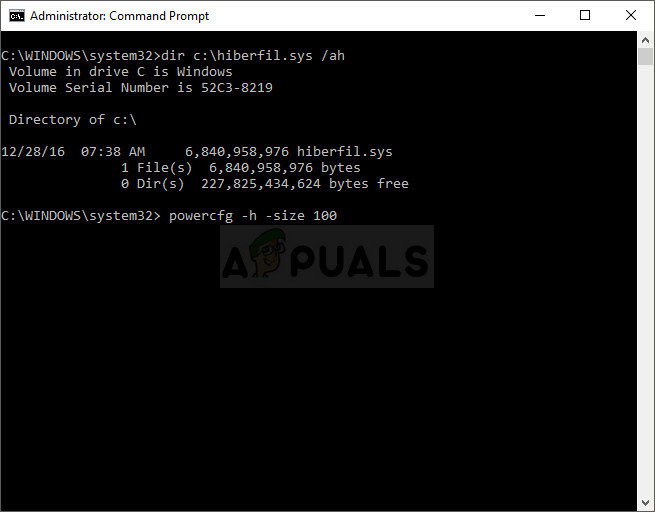
- Type “exit” in Command Prompt, make sure restart your computer, and try checking to see if the Internal Power Error BSOD still appears.
Solution 4: Perform a Clean Install of Windows 10
If you are using Windows 10, a clean install is no longer a thing to be afraid of, but rather a fix and a reasonably easy method to perform if you start experiencing a serious error such as the Internal Power Error BSOD. This can be fixed by a clean install but you should definitely try the methods above, especially if you are an AMD graphics card user.
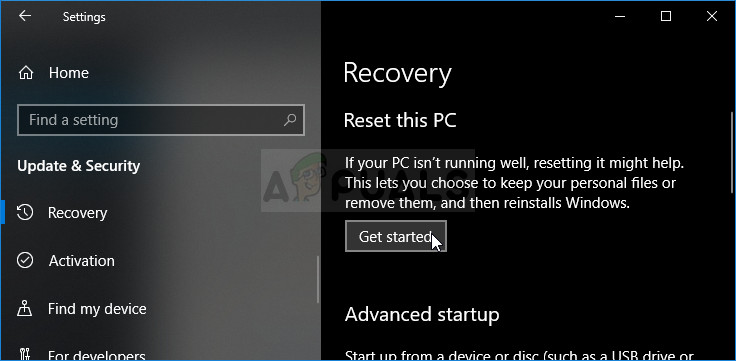
- Navigate to the Settings app on Windows 10. You can get there by clicking the gear icon in the lower left part of the Start menu. Select the “Update & security” option and click on Recovery tab in the left pane.
- Windows will display three options: Reset this PC, Go back to an earlier build and Advanced startup. Reset this PC is the ultimate option for starting again with minimal losses to your files if you follow our instructions properly.
- Click either “Keep my files” or “Remove everything,” depending on what you want to do with your files. Either way, all of your settings will return to their defaults and apps will be uninstalled. We recommend you choose the Keep my files option as the problem probably doesn’t lie with your documents or similar.
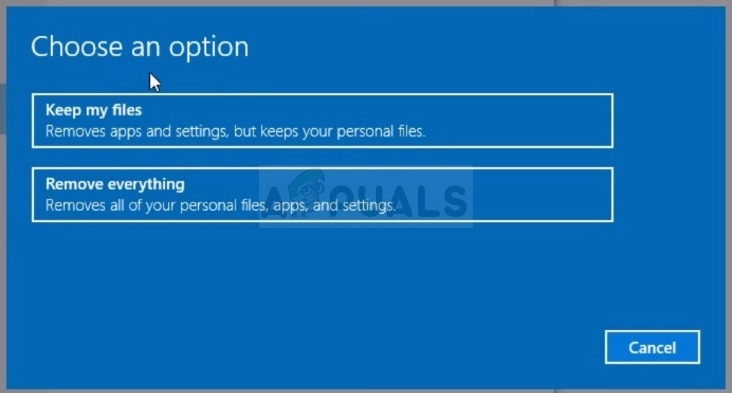
- Select “Just remove my files” or “Remove files and clean the drive” if you chose to “remove everything” in the prior step (not recommended). Cleaning the drive option usually takes a lot longer but it will make sure that the next person who will own your computer will have a hard time recovering your erased files. If you are keeping the computer for yourself, you should choose “Just remove my files.” If you chose to keep your files, skip this step.
- Click Next if Windows warns you that you won’t be able to roll back to a prior version of Windows. Click Reset when you are asked to do so and wait for Windows to complete the resetting process. Click Continue when prompted and boot your computer. Check to see if the BSOD still appears


