How to Fix Intelppm.sys BSOD on Windows 7,8 or 10
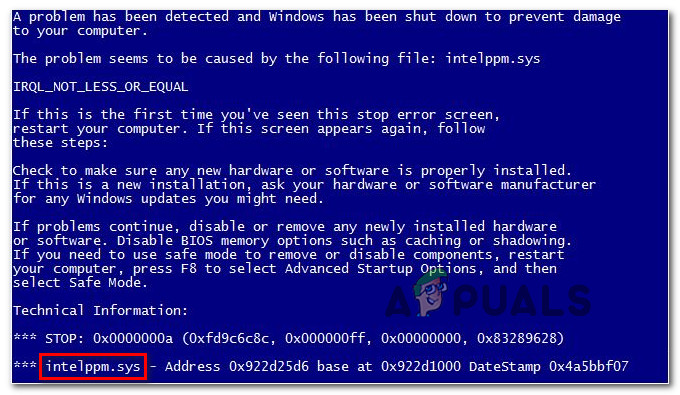
The BSOD (Blue Screen of Death) pointing towards the intelppm.sys appears for some Windows users when trying to install a new driver update or when trying to run a resource-demanding game or application. Looking at the error code, it pertains to an issue with the device processor driver.
When troubleshooting this particular issue, you should start by running a series of utilities capable of fixing system file corruption. Several affected users have confirmed that they managed to fix this problem after running SFC and DISM scans in quick succession. In more severe circumstances, you might need to resort to more drastic measures such as clean installing or repair installing your Windows version.
In case you’re using a 3rd party AV (especially AVG Antivirus), temporarily uninstall it and see if the BSODs stop. A couple of users have reported that in their case, the 3rd party antivirus was causing the problem due to a false positive (on crypto-mining suspicions).
Of course, there might be other 3 party programs that might cause this behavior after interfering with the CPU driver. This is why you should also take the time to achieve a clean boot state and monitor the situation to see if the problem is still occurring. If the crashes stop, you can selectively re-enable the disabled startup items and processes to figure out which culprit is causing the problem.
If you manually overclocked your CPU voltage and frequency, return them to the default values. Higher than normal temperatures or insufficient power delivered by the PSU are both valid reasons why you might see crashes associated with the intelppm.sys.
With some models, a BIOS glitch can also be responsible for this unexpected BSOD. In this case, installing the latest available firmware for your GPU should take care of the problem for you. Also, if you’ve never done this before, you should also clear the CMOS battery to ensure that there aren’t any nested logs that might cause this problem.
Running DISM and SFC scan
As it turns out, you might see a BSOD pointing towards the intelppm.sys due to some type of system file corruption that ends up affecting the chipset driver. If this scenario is applicable, chances are you will be able to resolve this instability by relying on a couple of built-in utilities capable of fixing corrupted instances (DISM and SFC).
If you suspect that you’re dealing with some time of corrupted data, you should start with a thorough System File Checker Scan. This utility is perfectly capable of functioning without an Internet connection. It uses a locally stored archive to compare the potentially corrupted files against a list of healthy equivalents.
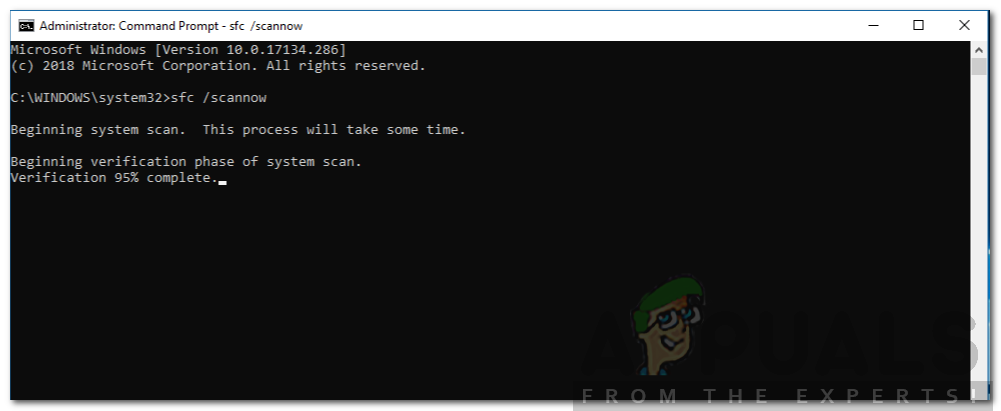
Note: If you start this type of scan, do not interrupt it until the operation is complete. Closing the elevated CMD in the middle of the operation might create additional logical errors that might spawn other problems.
Once the operation is complete, reboot your computer and wait for the next startup to complete. After your computer boots back up, move forward with a DISM scan.
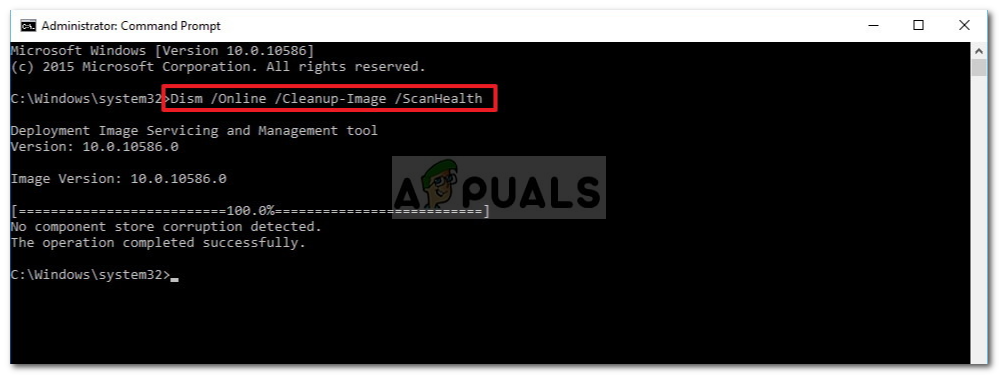
Note: Keep in mind that the Deployment Image Servicing and Management uses a sub-component of Windows Update in order to download healthy copies that will be used to replace corrupted instances.
After the DISM scan is finished, restart your computer once again and monitor the situation once the next startup is complete. In case the same problem is still occurring, move down to the next potential fix below.
Removing the 3rd party AV
As it turns out, a couple of users that were frequently encountering the intelppm.sys while performing a resource-demanding application that requires a lot of CPU power have discovered that in their case the problem was actually caused by an overprotective AV suite.
It turns out that certain AV suites might end up triggering a BSOD pointing towards intelppm.sys after a false-positive having to do with suspicions of crypto mining. In most cases, AVG Antivirus is identified as a 3rd party AV suite that triggers this type of behavior.
If this scenario is applicable and you’re certain that you’re not actually dealing with crypto-mining malware, the only way you will be able to fix this problem is to install your current AV suite or open a bug ticket with your 3rd party antivirus.
Keep in mind that on most 3rd party AV suites, is no way to block them from inspecting & monitoring CPU usage & kernel processes. So if your AV is indeed causing this, the only way to stop the critical crashes from occurring is to uninstall the 3rd party AV suite altogether and see if the BSODs stop occurring:
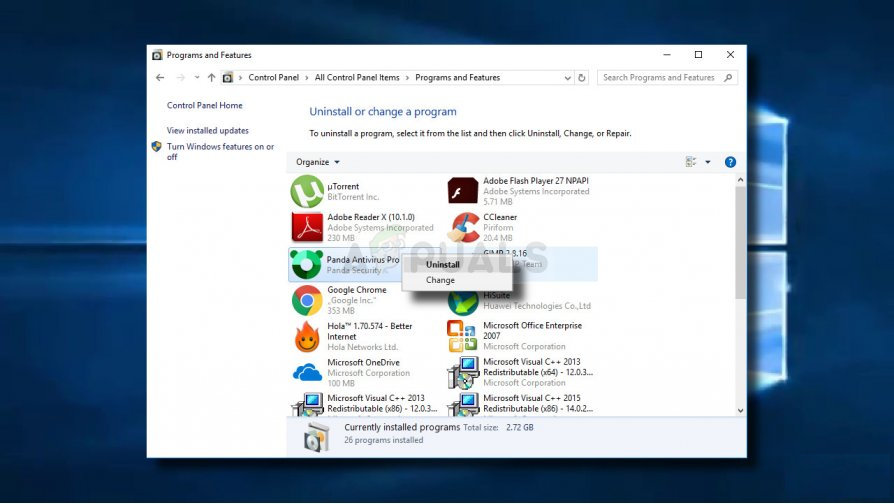
- Press Windows key + R to open up a Run dialog box. Next, type ‘appwiz.cpl’ and press Enter to open up a Programs and Features menu.

Type appwiz.cpl and Press Enter to Open Installed Programs List - Once you’re inside the Programs and Features menu, scroll down through the list of installed items and locate the 3rd party security suite that you want to uninstall.
- Once you manage to locate the problematic AV suite, right-click on it and click on Uninstall from the context menu to commence the uninstallation process.
Uninstalling your antivirus - Follow the on-screen prompts to complete the uninstallation, then restart your computer.
Note: If you want to ensure that you’re not leaving behind any leftover files that might be causing further conflicts, go ahead and remove any remnant AV files left behind by the uninstallation.
In case you are still dealing with frequent BSODs pointing towards the intelppm.sys file, move down to the next potential fix below.
Performing a Clean boot
As some affected users have reported, this problem can also occur due to some type of 3rd party conflict that occurs between two processes or applications that end up causing a critical crash. If this scenario is applicable, making a list of potential culprits is almost impossible considering that the list of potential conflicts is virtually endless.
However, there is a procedure that will allow you to determine either this problem is indeed being caused by a 3rd party conflict. By booting your computer into a clean boot state, you will ensure that no 3rd party item is permitted to run, so if the intelppm.sys crashes stop, you’ll know for sure that the problem was caused by a 3rd party item.
By booting your computer in a clean boot state, you will ensure that only native Windows processes and startup items are permitted to run.
If the critical BSOD crash pointing towards the intelppm.sys fine no longer occurs, you have successfully confirmed that a 3rd party conflict was previously causing the problem. In this case, systematically re-enable every process and startup items that you previously disabled and see if the problem is now fixed.
In case the same problem is still occurring, move down to the next potential fix below.
Resetting Overclocked Frequencies (if applicable)
As it turns out, you might also see this error in an instance where you’re using overclocked frequencies and voltages for your CPU. Higher than normal temperatures coupled with an improper cooling unit might create instances where the CPU is forced to cut power in order to prevent damage caused by excessive heat.
Another possibility is that your PC is using a sub-par PSU and it’s unable to supply enough power to meet the demand facilitated by a higher voltage.
If this scenario is applicable and you have previously overclocked the default values of your CPU, revert back to the default values and repeat the actions that were previously causing the BSOD pointing toward the intelppm.sys file.
In case the critical crashes are no longer occurring while overclocking is disabled, play with the values until you get to a stable state, or invest in a more efficient cooling system for your CPU.
In case this problem is not applicable, move down to the next potential fix below.or/
Update BIOS Version (if applicable)
As it turns out, BSODs pointing toward the CPU drive can also be caused by a BIOS glitch. This was confirmed to occur on Lenovo laptops, but there might be other manufacturers with the same behavior.
If you plan on updating your BIOS version in an attempt to fix this issue, keep in mind that the process of doing so will vary a lot depending on your motherboard manufacturer. Nowadays most manufacturers have their own flashing utilities that will make this process easier.
If you want to go through with this, open a search engine and do a query like ”*Your motherboard model* + BIOS Update. From the list of results, look for the official documentation and read it carefully, understand the risks, and grasp the whole process before starting this process.
Important: Installing a BIOS update has the potential of bricking your motherboard in case you don’t stick to the steps outlined in the documentation. If you never updated your BIOS before, our recommendation is to stay away from this potential fix.
If you’re already using the latest BIOS version or you don’t want to update, move down to the next potential fix below.
Clearing the CMOS
If you haven’t cleared your CMOS battery before, you should do so and see if the BSOD crashes stop occurring. It’s possible that nested logs left behind by your CPU activity are causing this type of instability. If this scenario is applicable, you should be able to fix the instance by clearing the CMOS (Complementary Metal Oxide Semiconductor) battery.
On desktops and laptops, the CMOS battery also known as RTC or NVRAM is responsible for storing various information related to your computer’s processes. Clearing it with force the booting sequence to start fresh (without leveraging any data stored from previous sessions).
If you want to clear your CMOS in an attempt to fix critical errors associated with the intelppm.sys, follow the instructions below:
- If your computer is currently turned on, turn it off completely, then ensure that the power cable is unplugged from the power outlet.
- Next, equip yourself with a static wrist remove the side cover of your computer.
Note: A static wristband will ground yourself to the frame of your computer so static energy you’re storing will not end up producing damage to your PC’s component. - Once you’re ready, take a look at the motherboard and see if you can identify the CMOS battery. With most models, it’s located near the CPU.
- Once you manage to locate it, use your fingertip or a non-conductive object (preferably screwdriver) to remove it from the slot.
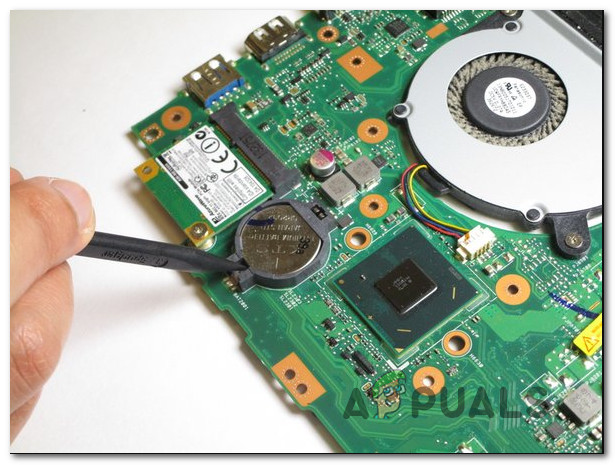
Removing the CMOS battery - Once you manage to take it out, wait for 10 seconds or more before putting it back to ensure that you give your motherboard enough time to drain the power capacitors.
Note: Once you take the CMOS battery out, clean the sloth thoroughly to ensure that you’re not dealing with any dirt that’s inhibiting the connectivity with the motherboard. If you have a spare battery, it’s a good idea to swap the current one with a new equivalent. - Put the side case back, plug the power cable back into the power outlet, and start your computer. Once it boots back up, try to recreate the same scenario in which the BSOD crash was previously occurring to see if the problem is now fixed.
In case the problem is still occurring, move down to the next potential fix below.
Resetting every Windows component
If none of the potential fixes above have allowed you to fix the problem and you’re still seeing frequent BSODs pointing towards the intelppm.sys file, chances are you might be dealing with some type of corruption that cannot be resolved conventionally. If this scenario is applicable, you should go ahead and reset every Windows-related file.
If this operation works and critical error stops occurring, you have successfully confirmed that the problem was software related.
In order to reset every relevant Windows component, you generally have 2 different ways forward:
- Repair install (in-place repair) – This is the preferred approach if you’re looking to preserve personal files that you’re currently storing on the OS drive. But keep in mind that you will need a compatible installation media in order to complete the operation. But the major advantage is that you will be able to preserver personal media, apps, games and even some user preferences.
- Clean install – In case you’re not currently storing any important files on the OS drive, you should go for a clean install instead. This operation will not require you to use a compatible installation media and the operation can be started directly from the Windows settings menu.
If you already performed a clean install/repair install and you’re still experiencing the same type of BSOD, there’s a very high chance that you’re actually dealing with a hardware issue (most likely with a faulty Intel CPU). In this case, you should take your computer to a qualified technician.


