How to Fix Mic Not Working on Discord Issue?
If you are unable to hear your voice when testing the microphone from settings, it suggests that Discord is not detecting your headset microphone. The most common reason for this issue is that Discord lacks the necessary access to your microphone.
There are various potential causes for this issue, and we’ve listed the most common ones below:
- Discord Does Not Have Microphone Access – The problem often occurs when Discord does not have permission from Windows Privacy settings to use external devices such as a microphone. If the access is disabled, you will be unable to use the microphone for Discord or any other applications.
- Incorrect Discord Voice Settings – Issues can occur if you modify Discord voice settings, such as input or output devices and other related settings. Often, the problem lies in the incorrect selection of the input device.
- Outdated or Corrupted Audio Driver – Outdated or corrupted audio drivers can cause problems as they facilitate the communication between the application and the hardware.
- Turned On Advanced Voice Settings – While Discord’s Advanced Voice Activity feature is designed to improve microphone quality, it sometimes contributes to microphone issues.
- Corrupted Discord Files – Corrupted Discord files can lead to issues which usually persist until you perform a clean reinstallation.
If you are also unable to hear other users on Discord, please visit our dedicated article to find the perfect fix for you.
1. Check Your Microphone
Checking your microphone basically verifies the functionality of your microphone at the most fundamental level. By speaking into the mic and observing the response of the volume meter in your sound settings, you can figure out whether the issue is with Discord’s software settings or if it’s a more basic hardware connectivity or driver issue.
- Right-click the Sound Icon and select Sounds.
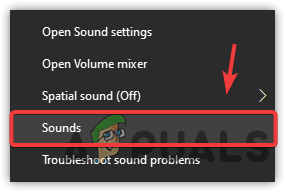
Navigating to Sound Settings - In the Recording tab, speak to see if the green volume meter moves. If it does, your microphone is working. If not, consider reinstalling the audio drivers or checking the microphone for potential hardware damage.

Checking Microphone
2. Give Microphone Access to Discord
When you allow microphone access, you’re basically informing your operating system to trust and facilitate the interaction of Discord with your microphone. This method makes sure that no restrictions are in place, preventing Discord from capturing your voice, thus potentially resolving the issue at hand.
- Right-click the Start menu and select Settings.
- Go to Privacy Settings.
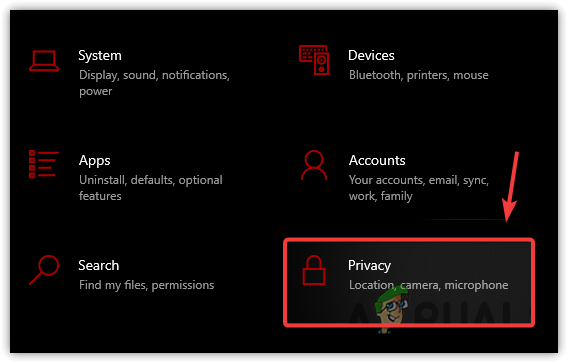
Navigating to Privacy Settings - Select Microphone from the sidebar on the left.
- Enable Allow Apps to Access Your Microphone by toggling the button on.
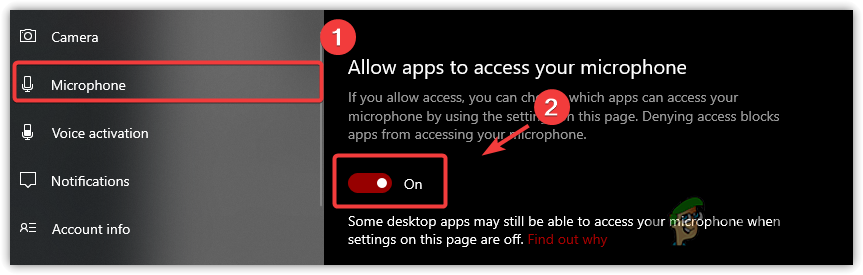
Allowing Microphone Access for Applications - Check if the issue has been resolved.
3. Reset Discord’s Voice Settings
Incorrectly configured voice settings within Discord can cause issues. When selected, this option systematically clears all your custom adjustments and reverts the settings back to their original defaults. This action often resolves problems coming from misconfigurations that might have occurred over time, whether from a user’s manual changes or software updates.
- Open Discord and access Settings.
- Navigate to Voice & Video in the left sidebar.
- Scroll down and click Reset Voice Settings.
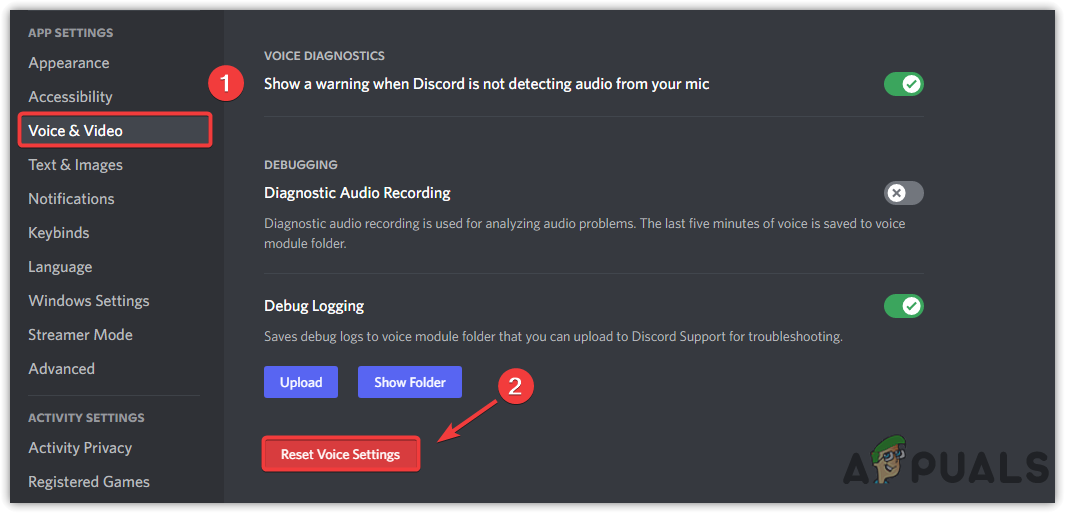
Resetting the Voice Settings - Check if the microphone starts working after this reset.
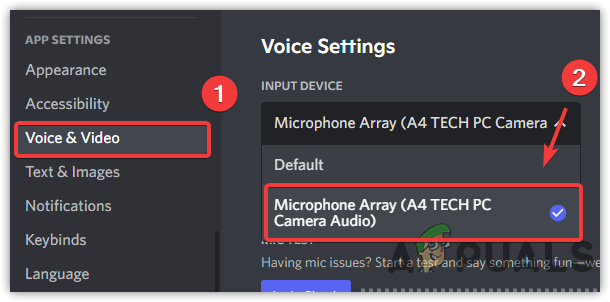
4. Change the Input Mode
Channing the Input Mode, guides Discord to use the correct microphone. Sometimes, the app might mistakenly select the wrong audio device, which leads to silence on your end. By manually selecting the proper microphone in Discord’s settings, you’re making sure that your voice is channeled through the right device, thus fixing the issue.
- Open Discord and go to the Settings.
- Select Voice and Video from the left sidebar.
- If Default or another device is listed as the Input Device, switch to your actual microphone.
Changing Input Device - To confirm your microphone, right-click the speaker icon on the taskbar and select Sounds.
- Navigate to Recording, speak into your mic, and observe the green volume meter for movement.
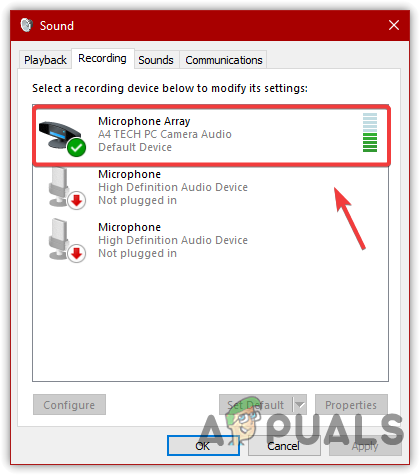
Testing Microphone - Return to Discord and select your microphone device.
- Test to see if the microphone is now operational in Discord.
5. Disable Exclusive Mode in Windows
Exclusive mode, when activated, allows a single application to command your audio device, preventing others from using it simultaneously. By deactivating this option, you grant Discord – and any other app you might be using – an equal opportunity to utilize the microphone, potentially clearing up any conflicts and restoring your mic’s functionality in Discord chats.
- Right-click the Sound Icon on the bottom-right of your screen and select Sounds.
- In the Recording tab, right-click your microphone and select Properties.
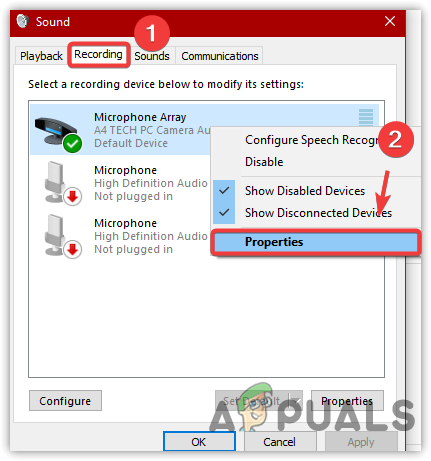
Opening Microphone Properties - Go to the Advanced tab and uncheck Allow applications to take exclusive control of this device.
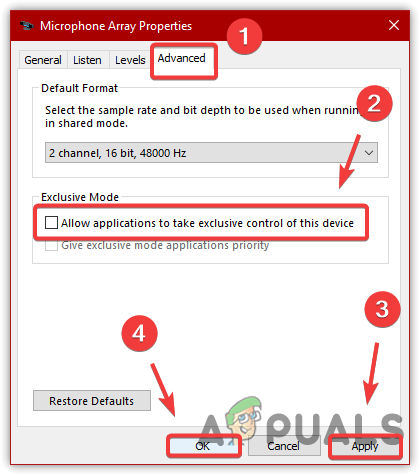
Disabling Exclusive Mode of the Driver - Confirm if this resolves the microphone issue.
6. Reinstall Microphone Driver
When you reinstall your microphone driver, you basically refresh the software that enables your microphone to communicate effectively with your system’s hardware. Corrupted or outdated drivers can often lead to microphones failing to function properly.
By reinstalling, you make sure that the latest and most compatible driver version is in place, which can fix any glitches and restore your microphone’s performance to its finest state.
- Press Win + R, type devmgmt.msc, and press Enter.
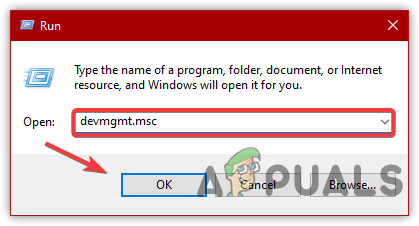
Opening Device Manager - Expand the Audio Inputs and Outputs section and right-click your microphone driver.
- Select Uninstall Device.
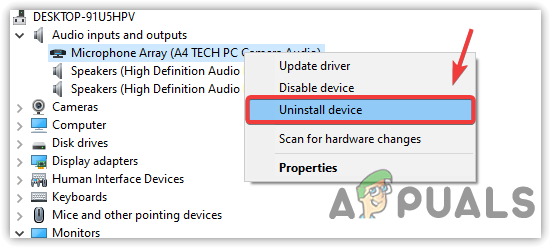
Uninstalling Microphone Driver - Confirm the uninstallation and restart your computer. Windows should automatically download the driver upon restart. If it doesn’t, manually download the driver from the manufacturer’s website.
7. Run Speech Troubleshooter
Windows Speech troubleshooter is a built-in Windows tool specially designed to diagnose and resolve issues related to your system’s speech recognition capabilities. When you encounter microphone challenges, especially with Discord, this troubleshooter scans and identifies potential service or driver issues that could be blocking your microphone’s performance.
By fixing these identified concerns, it can restore your microphone’s functionality, enabling Discord to pick up your voice once again.
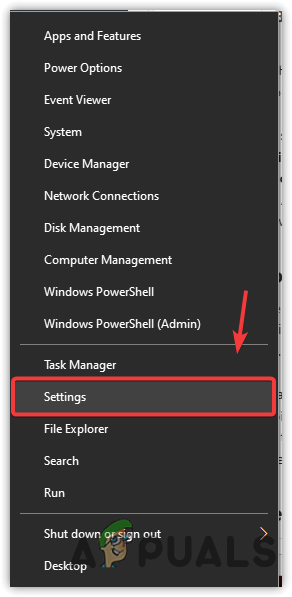
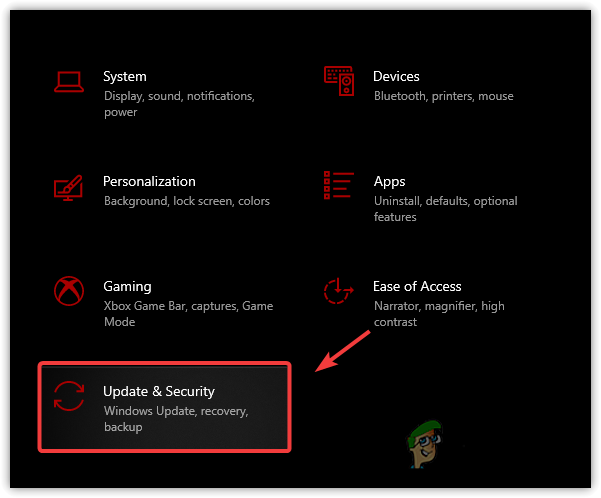
- Right-click the Start Menu icon and select Settings.
Opening Settings - Go to Update & Security.
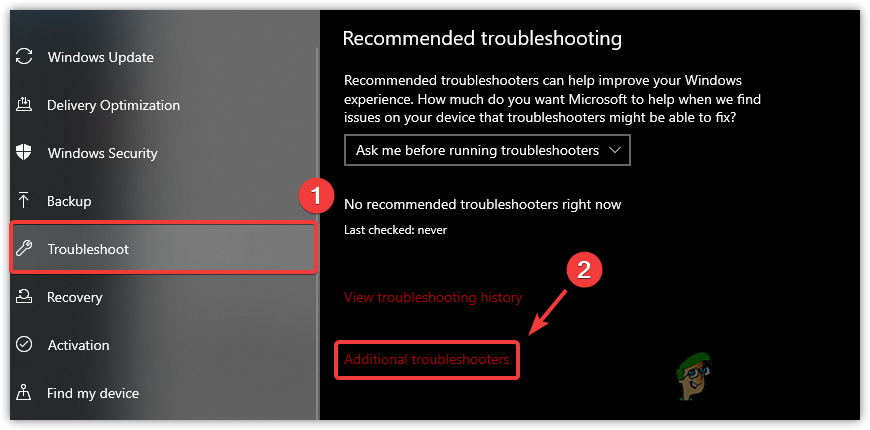
Head to Update & Security - Select Troubleshoot and then Additional Troubleshooters.
Head to the Additional Troubleshooters - Scroll down and choose Speech troubleshooter.
- Click Run the Troubleshooter.
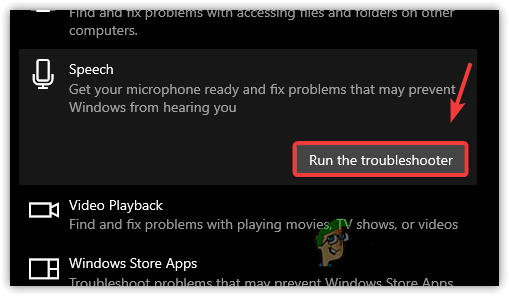
Run the Speech Troubleshooter - Test your microphone with Discord once the troubleshooter completes its process.
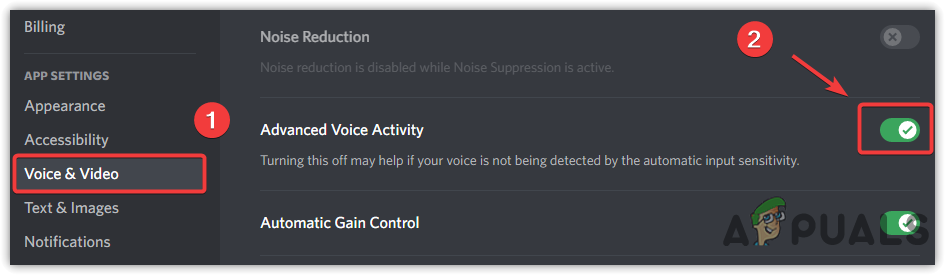
8. Turn Off Advanced Voice Activity Settings
While this feature is engineered to enhance your vocal clarity by automatically detecting when you’re speaking, it can, at times, be overly sensitive or not properly adjusted to your specific microphone. By turning off this specialized setting, Discord reverts to a more basic form of voice detection—one that might be more compatible with your hardware.
- Launch Discord and click the Settings icon in the bottom-left corner.
Navigating to Discord’s Settings - Navigate to Voice & Video and scroll down to Voice Processing.
- Turn off Advanced Voice Activity and verify if the microphone issue is resolved.
Turning Off Advanced Voice Activity Settings
9. Change the Audio Ports
Different audio ports on your computer may offer different levels of functionality or may have technical issues. Upon switching to an alternative port, there’s a possibility for your system to properly recognize and later-on utilize your microphone, thereby resolving any detection issues within Discord.
This simple action can reinstate communication between your microphone and the PC, potentially resolving the persistent mute state of your mic within the app.
10. Disable QoS (Quality of Service)
Although beneficial for ensuring stable voice connections, in some instances, it may conflict with the way Discord handles its data packets. Deactivating QoS takes away these network preferences, allowing Discord to transmit voice data uninterrupted, potentially resolving microphone glitches caused by network prioritization issues. Disable this feature if it is enabled and check if that fixes the microphone problem.
- Open Discord and go to Settings.
- Select Voice & Video.
- Scroll down and turn off Enable Quality of Service High Packet Priority.
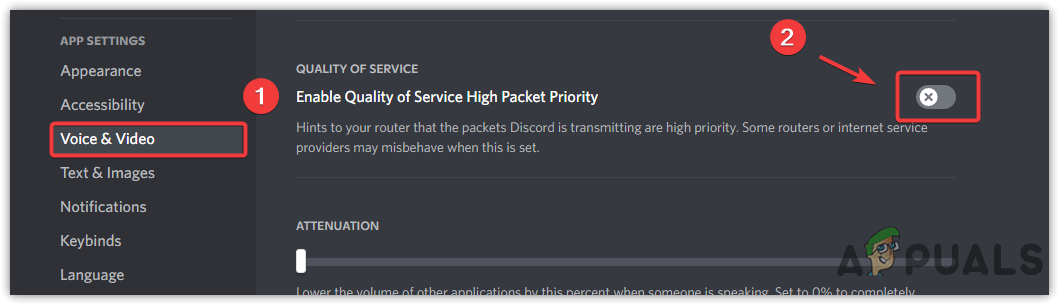
Disabling Quality of Service - Test your microphone within Discord to see if the issue has been resolved.
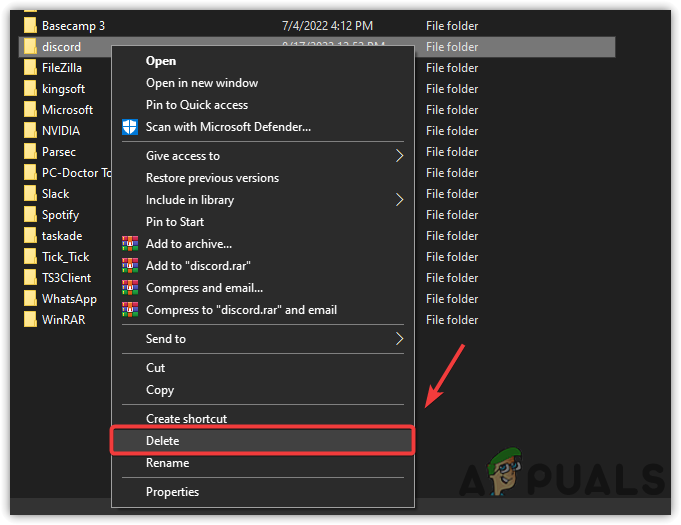
11. Perform a Clean Reinstallation of Discord
A clean reinstallation of Discord gets rid of any remaining corrupted files or glitches that could be blocking the microphone’s functionality. By removing and then freshly installing the latest version of Discord, you’re making sure that the app is in its best state, potentially resolving any persistent microphone detection issues.
- Press the Windows key and type Add or Remove Programs, then hit Enter.
- Find Discord, select it, and click Uninstall.
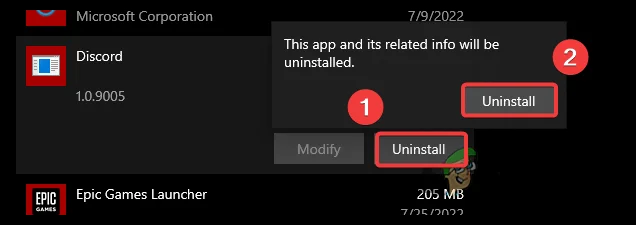
- Confirm the uninstallation.
- Press Win + R, type %appdata%, and press Enter.
- Navigate to the Local folder and delete the Discord folder.
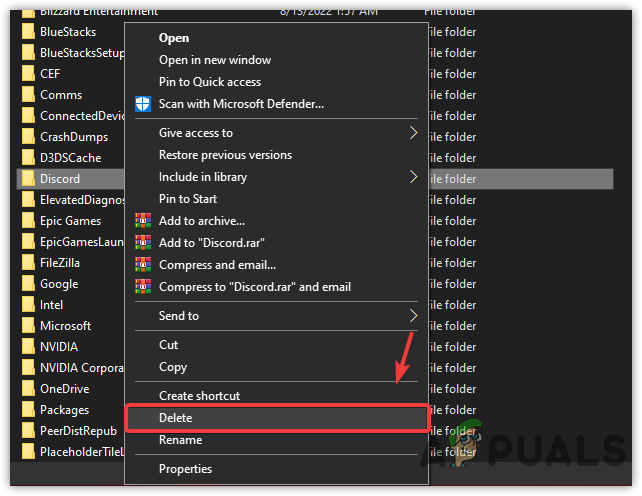
Deleting Discord’s Cache - Return to the previous folder and navigate to Roaming.
- Delete the Discord folder by right-clicking on it and selecting Delete.
- Finally, download the latest version of Discord from the official website and install it.
Thanks for this. I was in a group last night where Discord worked in the guild channel but when I switched to the PUG Raid group it stopped picking up the mic. The worst part is that I would hear mic-binds (push-to-talk) like I was actually making noise…