Fix: Discord Download Error
Discord came out as a free alternative for TeamSpeak and Skype and it offers a great solution for voice-chat options gamers need to fulfill their gaming experience. The program itself is, however, not so perfect and there are quite a few errors users have to deal with in order to get the program to start properly.
There are quite a few ways users manager to get through the installing error which usually appears when a new version of the tool comes out. It’s recommended that you try out all of the methods below and we are certain that one of them will work for you.
Solution 1: Delete a Couple of Folders
Deleting the Discord folders located on your PC at certain locations is actually one of the best ways to temporarily solve the issue and get through the installations process without receiving errors. The process itself is quite simple so make sure you follow the steps below carefully.
- Close Discord from running completely by quitting it from the system tray at the bottom right part of your screen and make sure there are no running processes related to it in the Task Manager. The Task Manager can be opened by using the Ctrl + Shift + Esc key combination.
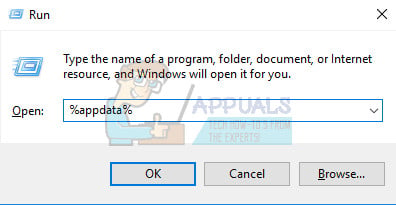
- Either click the Start button or the search button next to it and type “Run” or use the Windows Key + R key combination in order to bring up the Run dialog box. Type in “%appdata%” and click Enter.
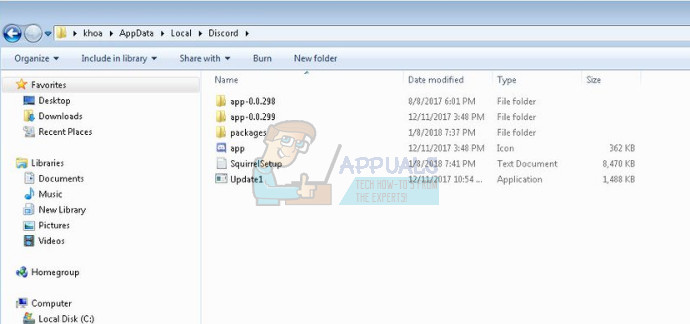
- Locate the Discord folder in the folder which opens, right-click on it, and choose the Delete option.
- Navigate back to the Run dialog box and type in “%localappdata%”, click Enter and locate the Discord folder which you should delete as well.
- Check to see if you are able to go through the installing process without errors after restarting your computer.
Solution 2: Run the Update Manually
Since this error usually occurs when a new version of the app emerges, it’s logical to think that there is something wrong with the updating process. This can sometimes be fixed by engaging the updating process manually and with administrator permissions, which is an easy thing to try out so make sure you don’t skip this solution.
- Navigate to the following folder on your computer by clicking the Libraries icon on your taskbar and pasting the location shown below:
C:\Users(Name)\AppData\Local\Discord
- Locate the updater file which should be named accordingly, right-click on it, and choose the Run as administrator option.
- Choose the version of the app which you had installed before the updating process engaged. If you are not certain about it, you can even choose an older version. After you finish, run the Discord app as admin as well and check to see if the issue is gone.
Solution 3: Update Everything on Your Computer
Updating your OS and some of the essential components installed on it is crucial if you want the program to start working. Additionally, it’s in your best interest to keep your PC up to date with the latest updates so following through this solution is sure to help your PC and probably your Discord installation as well.
Windows 10 usually updates itself automatically but, if there was something wrong with this process, you can always check for updates manually.
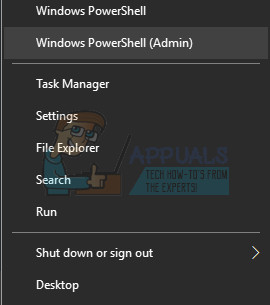
- Hold the Windows Key and press X in order to open this special context menu. You can also right-click on the Start menu. Choose Windows Powershell (Admin).
- In the Powershell console, type cmd and wait for Powershell to switch to the cmd-like environment.
- In the “cmd” console, type in the following command and make sure you click Enter afterward:
wuauclt.exe /updatenow
- Let this command run for at least an hour and check back to see if any updates were found and/or installed successfully.
It’s also vital to update and verify the integrity of your Microsoft .NET Framework installation, which should be updated fully. Even if you have the latest version installed on your PC, you will need to test its integrity and even repair it if it’s necessary.
Navigate to this link and click the red download button in order to download the latest version of the Microsoft .NET Framework. After the download has finished, locate the file you downloaded and run it. Note that you will need to have constant access to the Internet.
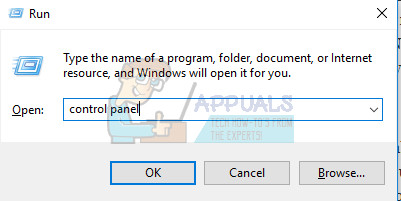
- After installing the latest version, it’s time to check its integrity. On your keyboard, use the Windows Key + R key combination to open the Run dialog box.
- Type in Control Panel and click OK in order to open it.
- Click the Uninstall a Program option and click Turn Windows features on or off. Make sure you locate the .NET Framework 4.x entry and make sure it’s enabled.
- If the checkbox next to .NET Framework 4.x is not enabled, enable it by clicking the box. Click OK to close the Windows Feature window and reboot the computer.

- If .Net Framework 4.x is already enabled, you can repair .Net Framework by clearing the box and rebooting the computer. After the computer has restarted, re-enable .Net Framework and restart the computer again.
- Verify that .NET Framework 3.5 SP1 is enabled by locating it on the same list and checking the box next to it.
- If the checkbox next to .NET Framework 3.5 SP1 is not enabled, enable it by clicking the box. Click OK to close the Windows Feature window and reboot the computer.
Solution 4: Disable the Real-Time Scanner on Your Respective Antivirus
Disabling real-time scanning is definitely the top solution for users who have any antivirus installed on their computer and it solves the problem immediately almost every time. It appears that their Real-Time Scanning feature does not cooperate well with Discord and its services and it prevents it from connecting to the Internet properly. That is why you must disable it for a couple of minutes until the update is installed properly.
The option is different for each antivirus tool so make sure you visit your antivirus program’s website for complete instructions on how to disable it.
Solution 5: Add the Discord Folder to Your Antivirus Exceptions List
Some antivirus tools sometimes prevent the programs from connecting to the Internet properly and they block it under false suspicion. The whole confusion can be avoided while disabling your antivirus but then you are leaving your computer unprotected from external threats which are definitely not recommended for anyone as a permanent solution.
That is why you can add Discord to exceptions on the antivirus tool you are using.
- Open your antivirus user interface by double-clicking on its icon on the Desktop or by double-clicking on its icon in the bottom right part of your taskbar.
- The Exception setting is located in different places according to different antivirus tools. It can often be found simply without much hassle but here are some location on the most popular antivirus tools:
Kaspersky Internet Security: Home >> Settings >> Additional >> Threats and Exclusions >> Exclusions >> Specify Trusted Applications >> Add.
AVG: Home >> Settings >> Components >> Web Shield >> Exceptions.
Avast: Home >> Settings >> General >> Exclusions
- In each case, make sure you choose the folder location properly. The default location to the required folder is usually the same on all Windows operating systems and it goes like:
C:\Users(Name)\AppData\Local\Discord
Solution 6: Connecting to the Hotspot on Your Phone
If you are not using your home network to download and install Discord, it’s quite possible that the administrator of the network you are connecting to has blocked several ports used by Discord to connect to its servers. If that is the case, you can avoid this issue by generating a hotspot on your mobile phone in order to connect to it and avoid the restrictions.
Android Users:
- First of all, you need to possess an Android mobile phone with an active mobile data connection. Make sure you have enough data to cover the updating process or else you might run into trouble and spend more money than you are supposed to.
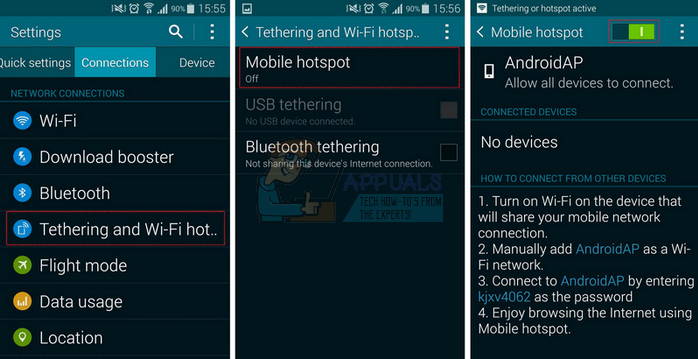
- Pull down the menu on your Android phone and click the gear icon at the top-right corner in order to open Settings.
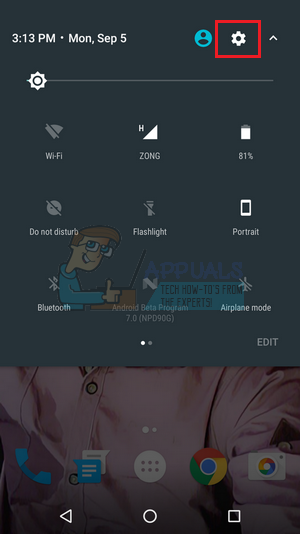
- In the Settings app, click the Mobile hotspot and tethering option and click on Mobile hotspot. Choose the password you want by clicking the current one and click on the slider at the top right part of the screen to turn on the hotspot.
iOS Users:
- Open Settings on your iOS device and click on the Cellular option.
- Click under the Wi-Fi Password if you wish to change it and slide the slider next to the Personal Hotspot text to ON.
Solution 7: Delete Everything Discord-Related and Retry
The steps in this solution are quite simple to follow if you are careful and it helped several users fix their problem, even though some of the steps may look weird and unnecessary. Good luck!
- Close Discord from running completely by quitting it from the system tray at the bottom right part of your screen and make sure there are no running processes related to it in the Task Manager. The Task Manager can be opened by using the Ctrl + Shift + Esc key combination.
- Open Libraries and navigate to this PC. Click the search button at the top right part of the window and search for Discord. Delete all files which are displayed as results.
- Restart your computer, create an account on Discord and download the latest version. Instead of clicking the downloaded file immediately, right-click on it in the bottom tray in your browser and click on Show in folder.
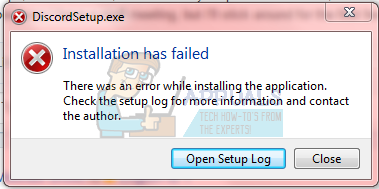
- Locate the file named DiscordSetup and open it. Check to see if the problem is resolved.
Download the free CC Cleaner version and use it to clear any remaining files and then reinstall Discord.
Solution 8: Fix the Broken Package
It appears that a broken package that fails to extract itself is causing these issues in some cases and this can be fixed manually by extracting the file yourself using a special tool such as IZArc. The process is actually simple enough but be careful.
- Run the DiscordSetup.exe installation file you downloaded and wait for the error message to appear.
- After the error has appeared, either click the Start button or the search button next to it and type “Run” or use the Windows Key + R key combination in order to bring up the Run dialog box. Type in “%localappdata%\SquirrelTemp” and click Enter.

- Locate the file named “Discord-0.0.291-full.nupkg” and copy and paste it to the directory where you wish to install Discord. After that, open the file with an archive tool such as IZArc (confirmed to work) and extract its content.
- Open the “lib\net45\” folder in the same location and run Discord.exe to see if it will open.
Solution 9: System Restore
Unfortunately, this last method is a sort of a last resort that worked for users who have tried out all of the other options and still failed to fix the problem. Make sure you restore your computer to a restore point before the error started to occur which will bring back the original version without errors.
Note: Make sure that you try to run the installer as an administrator and if that has been done as well, try to download and install Java from here.