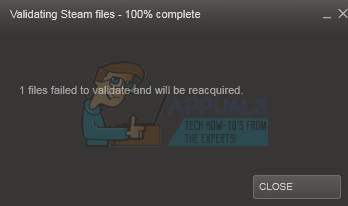
Fix: 1 file failed to validate and will be reacquired Steam
Players using Steam face a problem where after validating Steam files and the file doesn’t get reacquired at the end of the process. This is a very common problem with a lot of fixes available. There is no specific “one” fix for this solution as the software and hardware configuration of the user may vary.
Solution 1: Deactivating all mods
In many cases, the installed mods for a game may conflict with your Steam client and cause you unexpected errors. Like the error states, it found something that it shouldn’t or the mods caused a file to be changed.
What verifying integrity of a game does is check the manifest of your game with that present at the Steam servers. A manifest is a list of files present on your computer. The manifest on the Steam servers contains the list of all the files which are supposed to be there according to the most recent update.
If the manifests don’t match, Steam declares that there is an error and one (or more) files failed to validate and will be reacquired. In the ideal case, the files should be replaced or removed. If not, you should try running the verification check again.
If you get an error still, it means that the installed mods on your computer are tampering with the client’s performance. Disable all mods, restart Steam and check again if the error persists.
Solution 2: Opening from the main game folder
Another remedy is to open the game you are playing directly from its installation folder. We can try bypassing the Steam client. All the games that you install are independent applications present with their executable present in the local files. We can try running them from there. If there is still an error, you can proceed with the other solutions listed below.
- Open your Steam directory. The default location of it is C:\Program Files (x86)\Steam. Or if you installed Steam in another directory, you can browse to that directory and you will be good to go.
- Navigate into the following folders
Steamapps<common
- Now you will see different games which are installed in your PC. Select the game in which is causing the verification error.
- When inside the game folder, open the folder named “game”. When inside the folder, open another folder named “bin”. Now you will see two folders named win32 and win64. Open win32 if your computer has a 32-bit configuration or win64 if it has a 64-bit configuration.
The final address would look something like this.
![]()
- Here you will find the game’s main launcher for example like “dota2.exe”. Right-click it and select the option Run as administrator. Check if the error still persists.
Solution 3: Ending all Steam processes
It may be the case where Steam downloaded and installed an update. After every update, it requires that you restart the client properly. Or there can be some incorrect configuration with your client and a complete restart would fix it. Save your progress if needed and proceed with the following steps.
- Press Windows + R button to launch the Run application and in the dialogue box type “taskmgr”. This will launch the task manager.
- Once in the task manager, browse for all the Steam processes. Start by closing the process “Steam Client Bootstrapper”. After ending this process, end all of the remaining ones.

- Now launch Steam using administrator privileges and check if the verification error still persists.
Solution 4: Checking for bad sectors
Many users reported that bad sectors in their hard drives were causing the problem. A bad sector on a computer hard drive is a sector which is unwritable or inaccessible due to permanent damage. Usually, permanent damage refers to the physical damage done to the drive. You can easily run the utility of chkdsk developed by Microsoft to search for bad sectors.
If bad sectors are found in your drive, these programs flag these sectors as unusable and the operating system skips them in the future. Your game may be installed in a drive that contains bad sectors. Because of this, you are experiencing the error. Follow the steps below to ensure using the utility chkdsk.
Chkdsk is short for Check Disk. It checks for any errors present on your drive and tries to correct them using the resources available. It is very useful in troubleshooting for errors that we can’t pinpoint. There are two main ways you can run the chkdsk command. Refer below to the solutions below.
Using File Explorer.
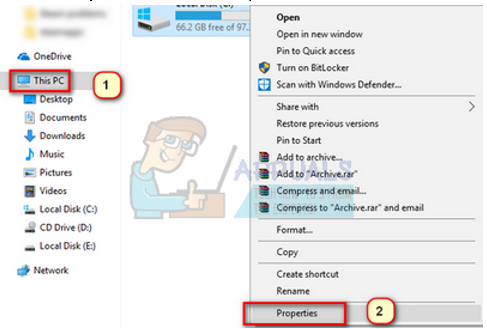
- Open your file explorer and navigate to This PC (My computer) present on the left side of the screen.
- Here all the connected hard drives will be shown. Right-click on the hard drive you wish to check and click on Properties from the drop-down menu.
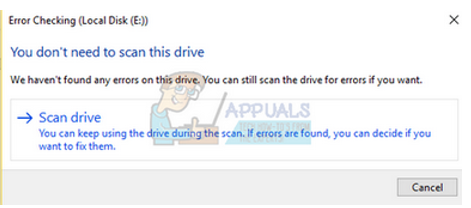
- Click on Tools tab present on the top of the new windows that come after clicking properties. Here you will see a button named Check under the column of Error checking. Press the button and let chkdsk run completely. Don’t interrupt the process.
Using command prompt
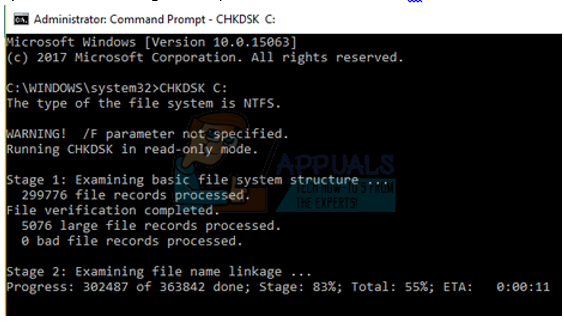
- Press Windows + R to launch the Run application. In the dialogue box, type cmd. This will launch the command prompt.
- In the command prompt, write “CHKDSK C:”. Here we are checking the disk drive C. If you want to check any other drive, replace the C with that drives name.
For example, if I am checking drive D, I will write “CHKDSK D:”.
Solution 5: Disconnecting your controller and other related software
This error can also be triggered by your controllers being connected to your PC. These controllers include all kinds of devices which are not a keyboard or standard mouse, for example, joysticks, controller pads and mouse with controller pads, etc. Disable these devices and stop their dedicated software from running forcefully using the task manager and restart Steam.
You should also disable third-party applications. There is numerous software available on the internet claiming to monitor or clean your disk drives to provide a much faster performance such as CCleaner. Disable these third-party applications from the task manager and launch Steam again.
Solution 6: Disabling Firewall and adding an exception to antivirus
It is a well-known fact that Steam conflicts with the Windows Firewall. As we all know, Steam tends to download updates and games over the background while you are using Windows for something else. It tends to do so you don’t have to wait for the download to finish when you want to play your game or use the Steam client. Steam also has access to a number of system configuration and it alters it so you can get the best experience available for your gaming. Windows Firewall sometimes marks some of these processes as malicious and tends to block Steam. There may even be a conflict going where the Firewall is blocking Steam’s actions in the background. This way you won’t know it’s even happening so it’ll be hard to pinpoint it out. We can try disabling your Firewall temporarily and checking if the error dialogue goes away or not.

Like in the case of firewalls, sometimes your antivirus can also quarantine some of Steam’s actions as potential threats. The obvious solution would be to uninstall your antivirus but it isn’t wise to do so. If you uninstall your antivirus, you will be exposing your computer to a number of different threats. The best way is to add steam in the exceptions scanning. The antivirus will treat Steam as if it wasn’t even there.
Solution 7: Deleting cfg file
It is possible that your game’s configuration file is corrupted and is refusing to be replaced. This can be the same file that your Steam client is pointing towards. We can try to delete the config file and launch Steam again and verify the integrity of the game.
Steam will detect that the configuration file is deleted and will attempt to replace it with a fresh copy present in Steam’s servers.
- First of all, navigate to your Steam directory.
- Open the folder userdata. All the Steam IDs will be listed which are registered to this computer. Select yours and click it.
- Now delete all the folders present in the directory and relaunch Steam.
- Steam has cloud activated and the moment it notices that there are no configuration files present, it will attempt to download them again with the saved ones present in its servers.
Note: If you have Steam cloud disabled, don’t follow this method as it is possible you will lose access to all your saved content or progress related to any game.
Solution 8: Deleting local file content
Another solution is to delete all the local file content of your game to start the download again. Make sure that your Steam cloud is enabled before you start this process. Deleting the local file content won’t make you lose your progress or achievements. It will only delete the game’s installation data so we can download it again.
- Open your Steam client and click on the Library tab present at the top of your screen. All of your installed games will be listed here.
- Right-click on the game which is giving you the error and select Properties from the list of options available.
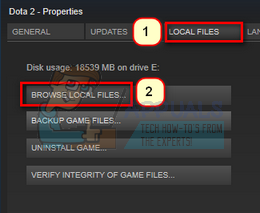
- Navigate to the Local Files tab. Here you will see a button which says “Browse Local Files”. Click it.
- You will be navigated to the game’s local files using the Windows file explorer. Delete everything in this folder.
- Now stop all Steam services and processes before launching it again.
Either Steam will automatically start downloading the game files which you just deleted or the game wouldn’t be there in your library. You can browse the Steam store if this is the case and download it again. Do note that your purchase would still be safe as that information is stored on Steam’s cloud servers; not on your local content.
Launch the game and check if the error still persists.
Final Solution: Refreshing Steam files
Now there is nothing left except to reinstall Steam and see if that does the trick. When we refresh your Steam files, we will preserve your downloaded games so you won’t have to download them again. Furthermore, your user data will also be preserved. What refreshing Steam files actually do is delete all the configuration files of the Steam client and then force it to install them again. So if there were any bad files/corrupt files, they will get replaced accordingly. Do note that after this method, you would need to log in again using your credentials. Don’t follow this solution if you don’t have that information at hand. The process may take a while so avoid canceling once you start the installation process.
thanx step 3 worked