[FIX] Fatal Error C0000034 when Applying Windows Update
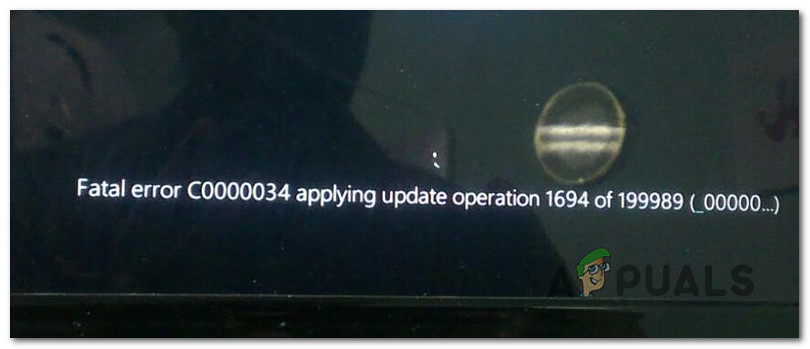
Several Windows users are reportedly getting the Fatal Error C0000034 after installing a pending Windows update and restarting their computer as instructed. The error message below appears after the next failed system startup. This issue is confirmed to occur on Windows 8.1 and Windows 10.
After investigating this particular issue, it turns out that there are several different causes that might be triggering this error. Here’s a shortlist of potential culprits that might be responsible for this issue:
- Bad data blocks – This issue is quite widespread with traditional HDD that are beginning to fail. If your computer is no longer able to boot after a botched Windows Update, you should do a CHKDSK scan and replace the bad data sectors with unused equivalents.
- Corrupted Windows Update files – Some users that were dealing with the same issue have confirmed that they were finally able to fix the issue after running System File Checker and Deployment Image Servicing and Management scans in quick succession (using the Recovery Menu).
- Unsalvageable Windows Update component – Under certain special circumstances, your system might be unable to boot due because the initial check detected an underlying issue with Windows Update. In this case, you might be able to boot successfully without repairing your Windows installation by opening the MSconfig utility before the booting sequence and disabling the Windows Update service.
- Unidentified 3rd party Conflict – Some users have begun dealing with this issue after updating an existing driver or replacing a generic driver with the dedicated equivalent from a 3rd party. In this case, you can use System Restore to revert your computer back to a healthy state in which this issue was not occurring.
- System File Corruption – In case you are dealing with an underlying type of system file corruption and none of the other fixes allow you to bypass this error, the only viable fix at this point is to refresh every Windows component with a procedure like clean installing or repair install.
Not that you know every potential instance that might be responsible for the apparition of this issue, here’s a list of methods that other affected users have successfully used to fix the issue:
Method 1: Performing CHKDSK, SFC, and DISM scans
Since this issue is most likely related to some kind of system file corruption, you should start this troubleshooting guide by running a couple of utilities that are designed to tackle corrupted Windows files. Fortunately, every recent Windows version is equipped with CHKDSK (Check Disk utility) ( SFC (System File Checker) and DISM (Deployment Image Servicing and Management).
Our recommendation is to run both utilities in quick succession in order to maximize your chances of fixing the corrupted files without having to clean install your Windows installation.
However, since you won’t probably be able to boot normally, you will need to run these scans from the Advanced Startup menu by opening an elevated CMD prompt.
To make things easier for you, we’ve put together a step-by-step guide through the entire process:
- Insert a compatible installation media, start your computer normally and press any key when you get asked if you want to boot from the installation media.

Boot from the Windows installation media - Once you get to the initial Windows installation screen, click on Repair your Computer to open up the Recovery Menu.

Repair your Computer via the Installation media Note: Keep in mind that even if you don’t have access to compatible installation media, you can still force the Recovery menu to appear by forcing 3 unexpected shutdowns while your computer is in the middle of the startup procedure. Additionally, you can create your own installation media that’s compatible with your Windows installation.
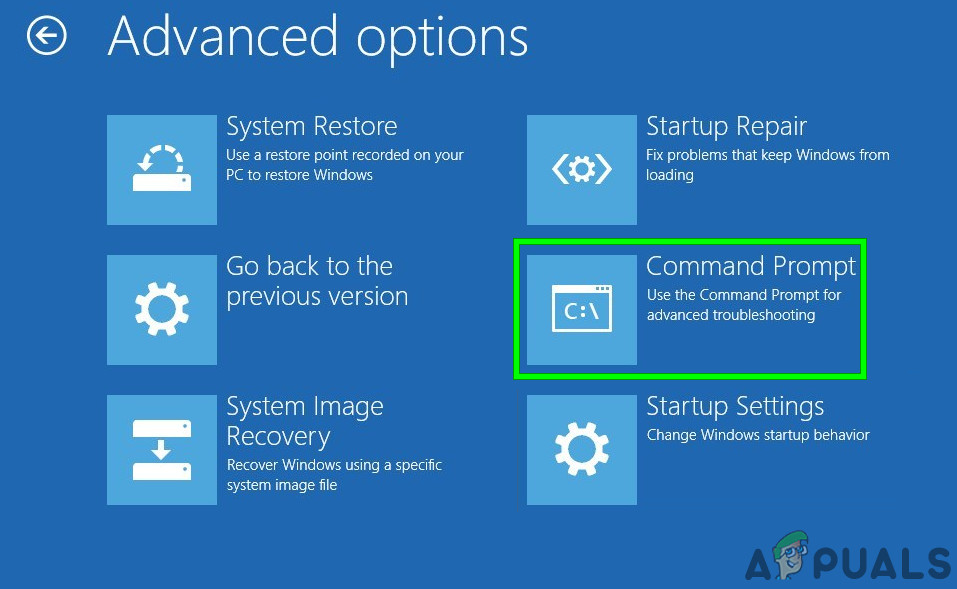
- Once you finally arrive inside the Recovery Menu, click on Troubleshoot from the list of available options, then click on Command Prompt from the list of available options.
Opening the Command Prompt via Recovery Menu - Once you are inside the elevated Command Prompt, type the following command and initiate a CHKDSK scan:
CHKDSK X:
Note: Keep in mind that X is just a placeholder for the driver that currently stores your Windows installation. Make sure to replace the letter with the drive that contains your Windows installation. Most commonly, that letter is C.
- Wait until the operation is complete, then restart your computer as instructed, then follow steps 1 to 3 above again to open another elevated CMD prompt via the Recovery menu if you still can’t boot.
- If the issue is still not resolved, type the following command and press Enter to initiate an SFC scan:
sfc /scannow
Note: Keep in mind that this utility might freeze during random times. When this happens, don’t interrupt the operation as you run the risk of creating additional logical errors.
- Once the operation is complete, reboot your computer and see if you are able to boot normally. In case you still run into the same kind of issues, follow steps 1 to 3 once again to open another elevated Command Prompt.
- Next, type the following command and press Enter to run a DISM scan:
DISM.exe /Online /Cleanup-Image /RestoreHealth /Source:C:\RepairSource\Windows /LimitAccess
Note: Before you start the DISM scan, ensure that you have a stable connection to the internet. This is important because DISM uses a sub-component of Windows Update to download healthy copies in order to replace corrupted system files.
- Once the DISM scan is finished, restart your computer one final time and see if you are able to boot normally.
In case you still see the same c0000034 fatal error after a failed boot attempt, move down to the next potential fix below.
Method 2: Disabling Windows Update via the Recovery Menu
According to some affected users, you might see this issue occurring due to a corrupted instance of Windows Update. If this is the main reason why your computer can’t boot, you might be able to fix the issue by opening MSConfig from the Recovery Menu and disabling the Windows Update component remotely.
Several affected users have confirmed that this method was the only thing that allowed them to bypass the Fatal Error C0000034. Users that managed to do this successfully have them managed to repair the broken Windows Update component by running the Windows Update troubleshooter.
Follow the instructions below to boot from the Recovery Menu and disable the Windows Update component:
Note: The instructions below are universal and will work on every recent Windows version including Windows 7, Windows 8.1, and Windows 10.
- Insert a compatible installation media, start your computer normally and press any key when asked if you want to boot from the Windows Setup disk.
Boot from the Windows installation media Note: If your computer doesn’t boot from the installation media by default, you might need to change the boot priority list from the BIOS or UEFI menu.
- Once you get to the initial Windows installation media, click on Repair your Computer to open up the Recovery menu.
Repair your Computer via the Installation media Note: If you don’t have access to a compatible installation or you don’t have the means to create one from scratch, you can also force the Recovery menu to appear by forcing 3 consecutive system interruptions during the booting sequence – You can do this by physically shutting down your computer right after the error pops up. After doing this a couple of times, your PC should restart directly in the Advanced Options menu.
- Once you’re inside the Advanced Options menu, access the Troubleshoot menu, then click on Command Prompt to open a prompt with admin access.
Opening the Command Prompt via Recovery Menu - Inside the elevated CMD prompt, type the following command to navigate to the System32 folder:
CD Windows\System32
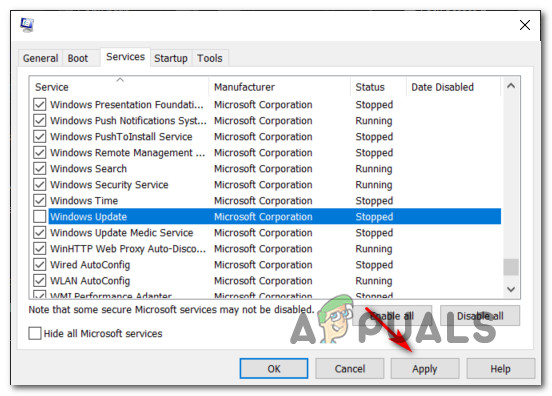
- Next, type ‘msconfig’ and press Enter to open up the System Configuration menu.
- Once the System Configuration menu pops up, click on the Services tab from the horizontal menu at the top, then search from the list of services and locate the Windows Update service.
- When you manage to locate it, simply uncheck the box associated with Windows Update and click Apply to save the changes.
Disabling the Windows Update Service - Close the CMD prompt, exit the Recovery menu and see if you are able to boot normally.
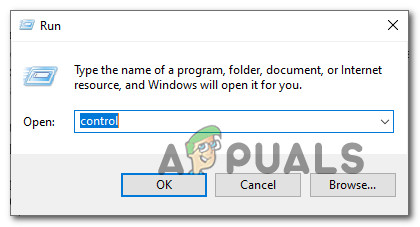
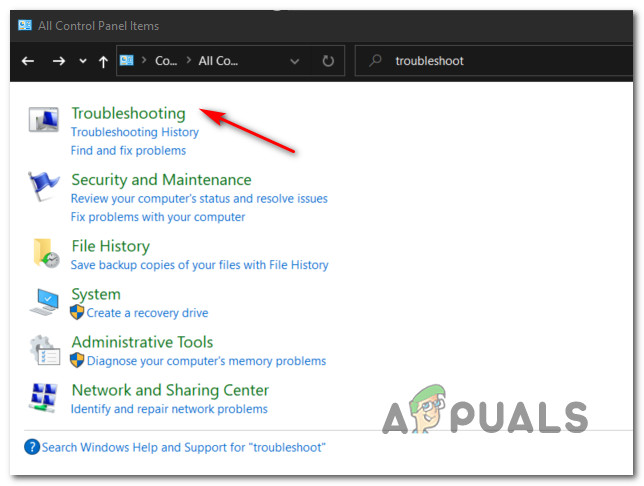
- In case this workaround allowed you to bypass the c0000034 fatal error, press Windows key + R to open up a Run dialog box. Once you’re inside, type ‘control’ inside the text box and press Enter to open up the Classic Control Panel interface.
Accessing the classic Control Panel interface - Once you’re inside the classic Control Panel interface, use the search function in the top-right corner to search for ‘troubleshooter’ and press Enter. Next, from the list of results, click on Troubleshooting.
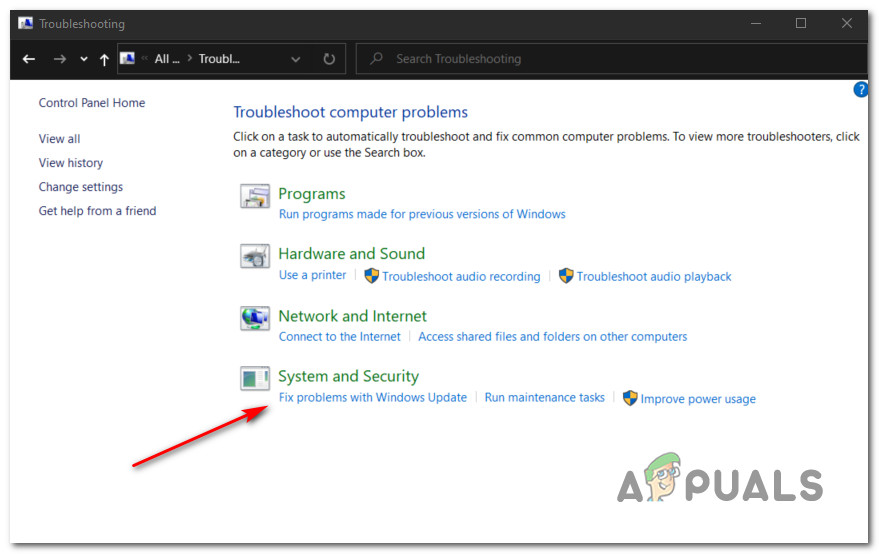
Accessing the Troubleshooting tab - Once you’re inside the Troubleshooting tab, click on the hyperlink named Fix problems with Windows Update (under System and Security).
Opening the Windows Update Troubleshooter Note: If you are prompted by the UAC (User Account Control) prompt, click Yes to grant admin access.
- Once you get to the first screen of the Windows Update troubleshooter, start by clicking on the Advanced hyperlink, then ensure that the box associated with Apply repairs automatically is checked before clicking Next.
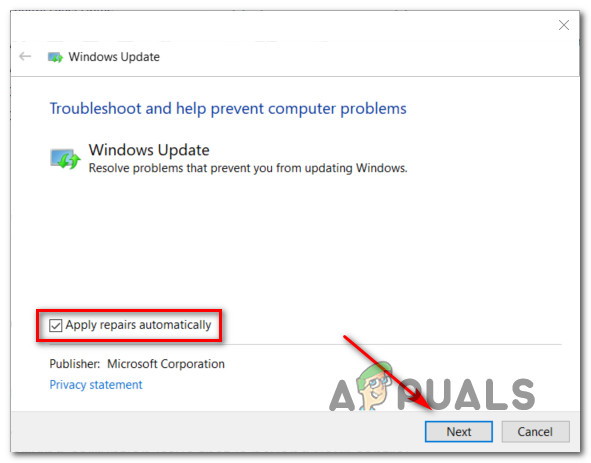
Configuring the Windows Update utility - Wait until the scan is complete as the troubleshooter tries to detect underlying issues with your Windows Update component. If a viable repair strategy is found, follow the on-screen instructions to enforce the recommended fix.
- Restart your computer and see if you are able to boot normally at the next computer startup.
Note: Once you are finished with the steps above, take the time to re-enable the Windows Update component by enabling the service via MSConfig.
In case you still end up seeing the c0000034 fatal error while attempting to boot normally, move down to the next potential fix below.
Method 3: Using System Restore via Recovery menu
If you only started to see this error after installing a Windows Update or after a botched installation attempt, you might be able to revert your computer back to a healthy state by using the System Restore utility.
Keep in mind that System Restore is configured by default to create a new system restore snapshot during important system events. This includes the installation of new Windows Updates, the installation of 3rd party utilities, security updates, etc. So unless you modified the default behavior of Windows Update, you should have plenty of restore points to choose from.
However, since you are probably unable to boot normally, you will need to launch the System Restore utility from the recovery menu. Here’s a step-by-step guide on how to do so:
- Start your computer normally and insert / mount / plug in a Windows Installation media that is compatible with your Windows version.
Boot from the Windows installation media Note: If you don’t have access to an installation media, you can force the Recovery menu to show up by forcing 3 consecutive startup interruptions.
- At the first Windows installation setup screen, click on Repair your computer from the bottom-left corner of the screen to bring up the Advanced Options menu.
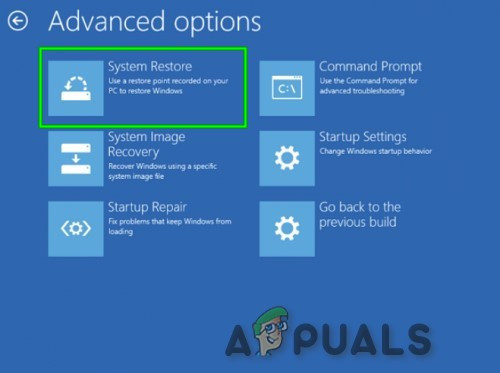
Repair your Computer via the Installation media - Once you’re inside the Advanced Options menu, click on System Restore from the list of available options.
System Restore in Advanced Options - Once you’re inside the System Restore utility, start by checking the box associated with Show more restore points. Once you get an overview with every available restore snapshot, select one that was created right before the apparition of this issue, click on it once to select it, then click on Next to advance forward.
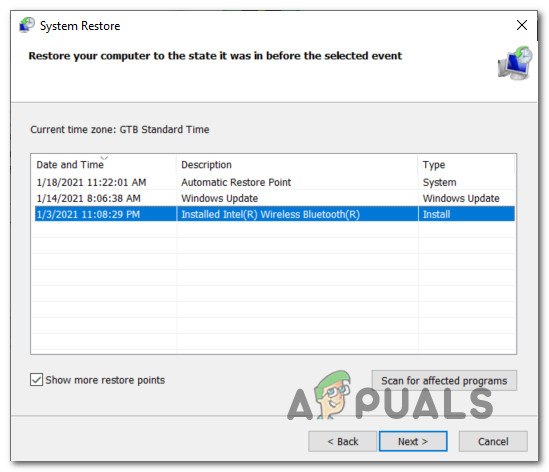
Using a System Restore snapshot - On the next page, click on Finish and wait patiently until the utility will restore your computer back to a state in which the issue was not occurring.
- Boot normally and see if are still encountering the same error message.
In case you still see the same Fatal Error C0000034, move down to the next potential fix below.
Method 4: Performing an Install Repair / Clean install
If none of the methods above have worked for you, you should seriously consider the possibility that you might be dealing with some kind of underlying corruption issue that is beyond your control.
f this scenario is applicable, you should be able to fix the problem by refreshing every Windows component by performing a clean install or a repair install procedure. Since the potential drawbacks of both methods are different, we’ve created 2 separate guides:
- Repair install (in-place repair) – This should be the preferred approach if you have a Windows-compatible installation at the ready. Even though this procedure is a little tedious, the main advantage is that you get to preserve your personal files included on the OS drive (this includes personal media, applications, games, and even user preferences)
- Clean install (in-place repair) – If you’re looking for a quick and easy procedure and you already backed up your data or you don’t care about wiping your OS drive, this should be your choice. This operation can be performed directly from the GUI menu and will not require you to use compatible installation media.


