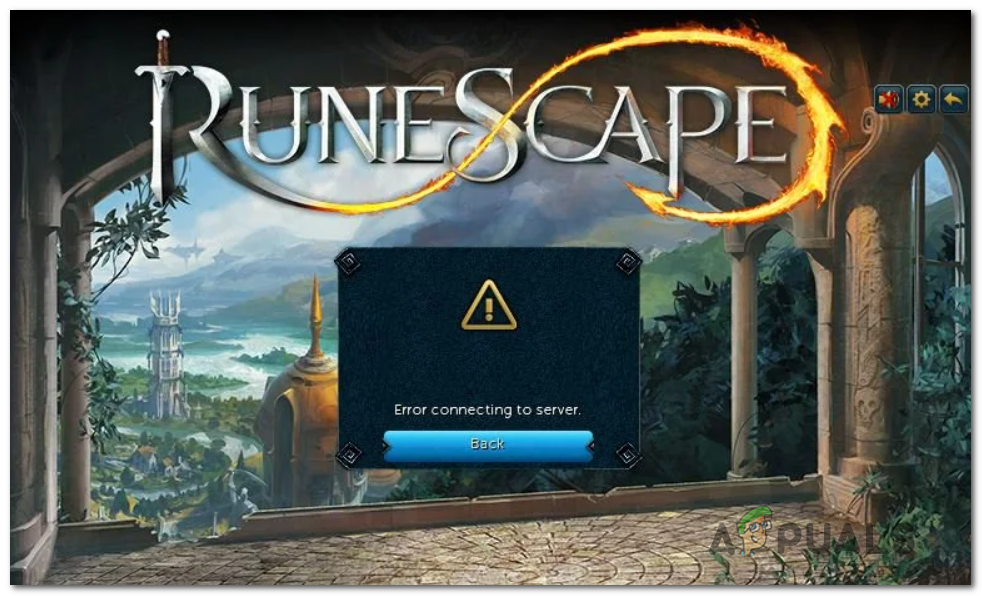
[FIX] ‘Error Connecting to Server’ in Runescape
The ‘Error connecting to the server error‘ typically appears when Runescape players get to the first login screen. Most affected users are reporting that they see the same error when attempting to launch the game from the browser or the dedicated game launcher.
As it turns out, several different potential culprits might ultimately cause this particular error message. Here’s a list of potential instances where the Error Connecting to a server in Runescape error might occur:
- Underlying server issue – It’s possible that you’re encountering this error due to an unexpected server outage period or due to a maintenance period that is now in full effect. In this case, you should start by seeing whether other users are currently encountering similar issues with Runescape.
- Conflicting network adapters – As it turns out, it’s possible that you’re seeing this problem due to a conflict between two network adapters that you currently have installed on your computer. To fix this problem, you should disable every non-essential network adapter.
- DNS Inconsistency – If you\re using the default allocated DNS, chances are you’re currently using a range that gets rejected by the game server. If this scenario is applicable, you should be able to fix the problem by making the switch to the DNS values provided by Google.
- Bad Windows Update – As it turns out, this problem can also occur due to a recently installed Windows Update that ends up conflicting with the RuneScape client. If this scenario is applicable, you would be able to fix this problem by uninstalling the problematic update and hide it in order to prevent your OS from reinstalling it at the next computer startup.
Method 1: Checking for a Server Issue
Before you try any other fixes that might resolve this issue, you should start this troubleshooting guide by checking whether Runescape is currently having a server issue that ends up affecting other users in your area.
To test whether this scenario might be appliable, you should check web directories like DownDetector or IsItDownRightNow to see whether other users in your area are also encountering the same error when attempting to launch Runescape.

Note: In case you see multiple reports from users in your area claiming server issues with Runescape, chances are you’re seeing the error due to an outage issue or a maintenance period that is now in full effect. In this case, the only viable fix is to wait patiently until the game developer (Jagex) is finished with the operation.
In case your investigations have revealed that there are no underlying server issues for other users in your area, you can proceed down to the next potential fix below.
Method 2: Disabling Unnecessary Network Adapters
As it turns out, this problem can also occur due to an interfering network adapter that ends up conflicting with the active adapter. Some affected users that were previously struggling with the same problem have confirmed that they managed to fix this problem by accessing the Network and Sharing Center window and disabling every unnecessary adapter.
In most cases, interference of this kind is triggered by virtual adapters belonging to Hamachi or VirtualBox. But as it turns out, the problem is much more likely to occur on Windows 7 and Windows 8.1 than it is on Windows 10.
If you think this scenario is applicable, follow the instructions below to disable every unnecessary adapter and ensure that no other network item is causing the conflict with Runescape:
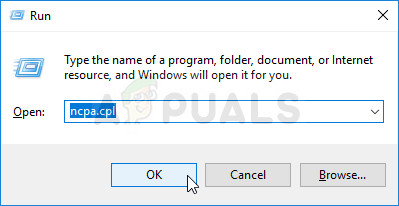
- Press Windows key + R to open up a Run dialog box. Next, type ‘ncpa.cpl’ and press Enter to open up the Network Connections tab.
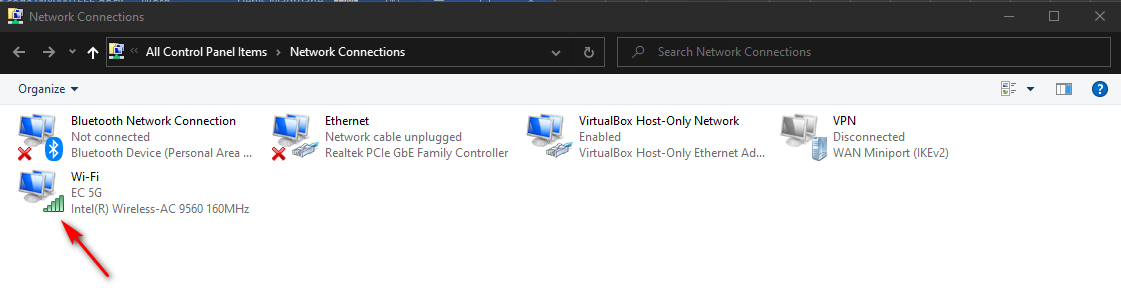
Run this in the Run dialog box - Once you’re inside the Network Connections tab, you’ll see a list of network adapters that are currently installed on your computer. First, determine which adapter is active at this moment – By seeing which one has the signal icon.
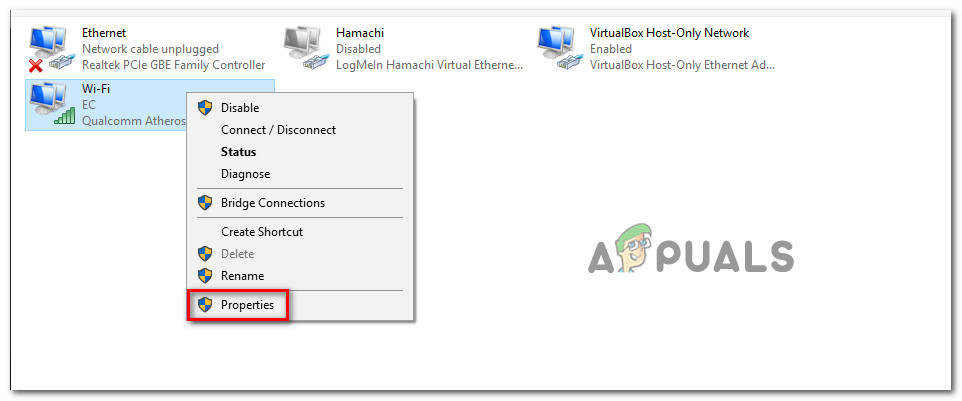
Determining which adapter is active - After you know which adapter you’re using, go ahead and disable every unnecessary adapter by right-clicking on it and choosing Disable from the newly appeared context menu.
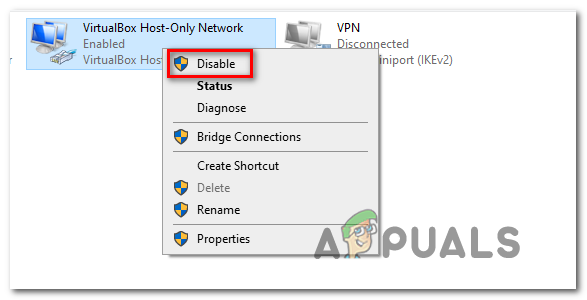
Disabling the unnecessary adapters - When prompted by the UAC (User Account Control), click Yes to grant administrative privileges.
- Do this with every network adapter that is not currently in use, then restart your computer and wait for the next startup to complete.
- Once the next startup is complete, launch Runescape again and see if the problem is now resolved.
In case you’re still encountering the same Error Connecting to a server in Runescape error, move down to the next potential fix below.
Method 3: Making the Switch to Google DNS
If none of the potential fixes above have worked for you, it’s possible that you’re actually dealing with an ISP inconsistency facilitated by a bad Domain Name Address (DNS). Using a bad DNS range might mean that the RuneScape game server ends up rejecting the connection and trigger the Error Connecting to a server prompt.
If this scenario is applicable, you should be able to fix this problem swiftly by migrating to the DNS provided by Google. Google DNS for IPv4 and IPv6 is known to be a lot more stable than the majority of default DNS that your ISP might assign.
In case you’re suspecting that a bad DNS is actually causing the problem, follow the instructions below to make the switch to the DNS provided by Google:
- Open up a Run dialog box by pressing Windows key + R. Next, type ‘ncpa.cpl’ inside the text box to open up the Network Connections window.
Run this in the Run dialog box - After you manage to get inside the Network Connections menu, go ahead and right-click on the active network adapter that you’re currently using – Wi-Fi (Wireless Network Connection) or Ethernet (Local Area Connection), depending on if you’re using a wireless ore wired connection. Next, click on Properties from the context menu.
Opening the Properties screen of your network - Once you’re inside the Properties menu, click on the Networking tab, then go to the This connection uses the following items section, click on Internet Protocol Version 4 (TCP / IPv4), and click on the Properties button.
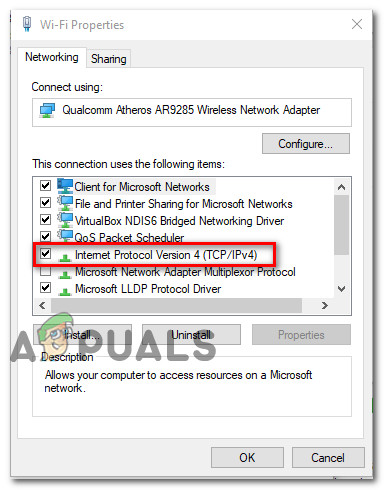
Accessing the Internet Protocol Version 4 settings - Once you’re inside the next menu, go ahead and click on the General tab, then check the box associated with Use the following DNS server address. Next, replace the current values of the Preffered DNS server and Alternate DNS server with the following:
8.8.8.8
8.8.4.4
- Once the values have been changed, click Apply to save the changes. Once this operation is complete, return to the initial Properties screen, and select Internet Protocol Version 6 (TCP / IPV6) this time. Next, click on Properties, check Use the following DNS server address and paste the following values for IPV6 in the Preferred DNS server and Alternate DNS server in their respective boxes:
2001:4860:4860::8844
2001:4860:4860::8888
- Once the values for IPv6 have been adjusted, click Apply to save the changes, then restart your computer and see if the problem is resolved once the next system startup is complete.
In case you’re still seeing the same Error Connecting to a server in Runescape error, move down to the next potential fix below.
Method 4: Uninstall Recent Windows Update
As it turns out, this problem can also be introduced by a bad Windows Update that ends up introducing a compatibility issue with Runescape. This particular scenario is pretty common on Windows 10 and can most likely be resolved by uninstalling the problematic Windows Update and hiding it in order to prevent your OS from reinstalling it.
If you think this scenario is applicable as the Error Connecting to a server in Runescape error only started occurring after a Windows Update was installed, follow the instructions below to uninstall the problematic update and hide it in order to prevent the operating system from uninstalling it:
- Open a Run dialog box by pressing Windows key + R. Next, type ‘ms-settings:windowsupdate‘ inside the dialog box, then press Enter to open up the Windows Update screen of the Settings app.
- Inside the Windows Update screen, use the section on the left to click on View Update History.
- After you do this, wait until the list of recently installed updates is fully populated, then scroll down and locate the update that was most recently installed.
- Once you see the problematic update, right-click on it and choose Uninstall from the newly appeared context menu. When you get to the confirmation prompt, click Yes to start the operation.
- Once the uninstallation is complete, download the latest version of the Microsoft Show or Hide troubleshooter tool.
Note: We’ll use it to hide the problematic update in order to prevent your operating system from reinstalling it in the near future. - After the download is complete, open the .diagcab file and wait for the troubleshooter to load. Once you get to the first window, start by clicking on Advanced button, then check the box associated with Apply Repairs Automatically.
- Once you do this, click on Next, then wait for the utility to finish the initial scan. Once the operation is finished, click on Hide Updates, then check the box associated with the update that you want to uninstall and hit Next to initiate the operation of hiding the update.
- After the operation is complete, reboot your computer and see if the problem is fixed at the next computer startup.


