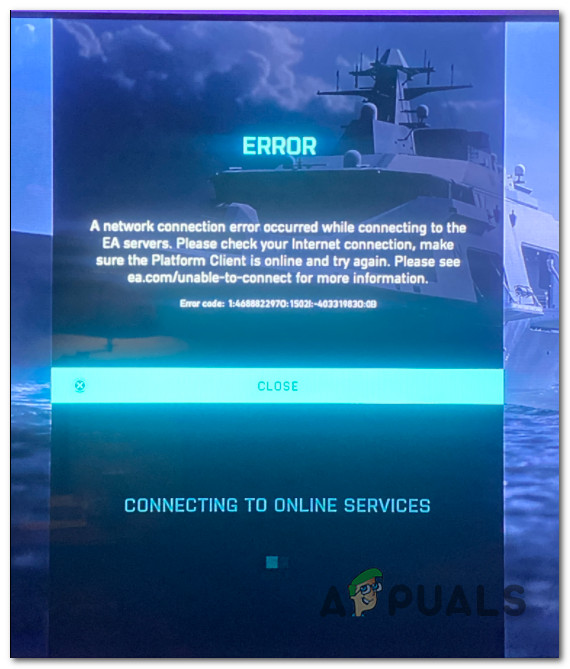
Fix: Error Code 1:468822970:1502l:-403319830:0B in Battlefield 2042
Battlefield 2042 has seen a rocky launch, and things seem to improve at a slower pace than what the community expects. Most of the widespread issues have since been packed, but the notorious Network Connection Error Code 1:468822970:1502l:-403319830:0B is still very much present on both Playstation and Xbox consoles.
Update: Some variation of this error is also encountered on PC.
We’ve investigated this problem thoroughly and we noticed that this problem is actually rooted in several different causes. Here’s a list of culprits that are most likely triggering the 1:468822970:1502l:-403319830:0B error when you attempt to connect to the BattleField 2042 servers:
- Ongoing server issue – As it turns out, you can expect to see this issue in a scenario where EA is currently busy mitigating a server issue or is in the middle of a maintenance period. In this case, all you can do is confirm the server problems and wait until the issue is resolved.
UPDATE: You might be able to bypass a local server issue by changing your preferred matchmaking server to New Zealand, as some affected users have reported. - Insufficient Internet Bandwidth – Under certain circumstances, you can expect to experience this issue in scenarios where you’re connected to a 4G WI-FI network and the available bandwidth doesn’t meet the minimum requirements. In this case, you should test the capability of your bandwidth and move to a LAN connection if possible.
- Temporary file glitch – If you’re experiencing this issue on the console, you should proceed by doing a power cycle procedure. This fix is confirmed to be effective on both the last-gen (Xbox One and Playstation 4) and current-gen (Xbox Series X and Playstation 5 and should be effective in scenarios where a temporary file is causing the issue.
- Bad DNS Range – If you’re using an ISP that relies on a Level 3 node, chances are you’ll experience this issue on and off as the game server is incapable of maintaining a reliable connection with your PC or console due to an inconsistent DNS Range. In case this is the source of the issue, you should be able to fix it by migrating towards a DNS range supplied by Google.
Now that we went over every potential fix that is likely causing this problem, here’s a list of methods that should allow you to fix or at least pinpoint the problem that’s causing the Network Connection Error Code 1:468822970:1502l:-403319830:0B error with BattleField 2042.
1. Check for an ongoing server issue
Before you try any of the other fixes below, you should start this troubleshooting guide by verifying whether DICE is currently busy trying to resolve a server issue. Another possible scenario is scheduled maintenance that makes the connection with the game server impossible.
To check if this scenario is applicable, you can start by accessing a website like Down Detector or Is the Service Down and see if any users in your area are currently reporting the same type of issue.
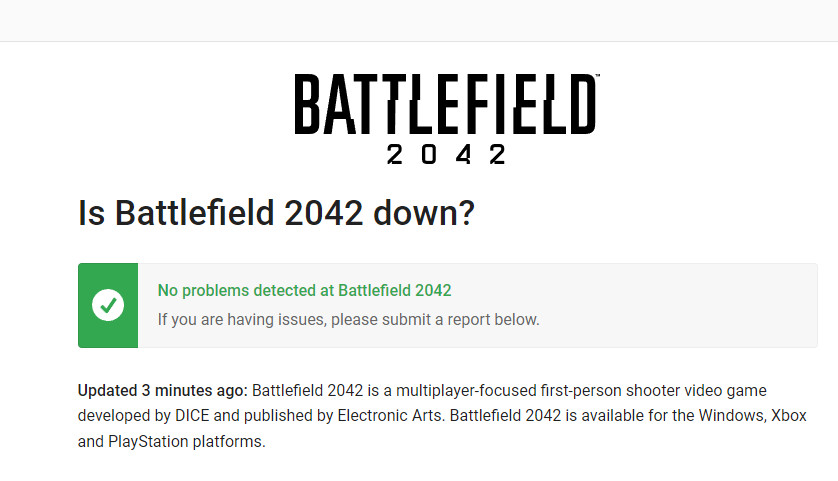
Note: Make sure to scroll down to the comment section and check whether other users are currently reporting the same issue.
In case your investigation has revealed that Battlefield 2042 is currently dealing with a server issue, there’s nothing you can really do other than wait for the problem to be fixed by the game developer (Dice).
On the other hand, if you haven’t uncovered any evidence of a server issue, move down to the next potential fix below.
2. Switch to a LAN connection
If you’re forced to use a Wi-Fi connection when playing BattleField 2042, make sure you’re connected on a 5G network if you want to avoid issues like the Network Connection Error Code 1:468822970:1502l:-403319830:0B.
DICE recommends an Internet connection of at least 512 KBPS. This is the bare minimum, but in order to play stability, you’ll need at least 5 MB for Upload and Download.
If you want to ensure that you meet this threshold, follow the instructions below:
- First things first turn every non-essential program and service that might how your available network bandwidth.
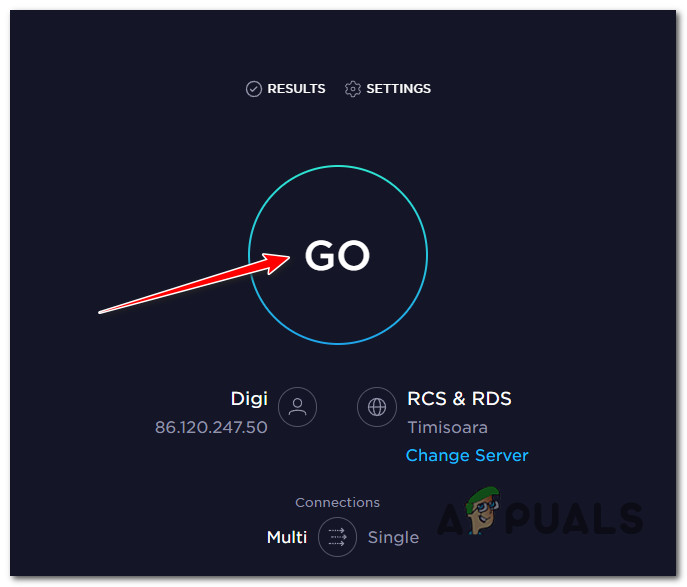
- Next, access the home page of SpeedTest and wait until the speed test script is loaded.
- Once you are ready to start your speed test, click on Go and wait until the test is complete.
Deploy the Internet Speed test - Once the operation is complete, check the results and see if the Upload and Download are larger than 5 Mbps.
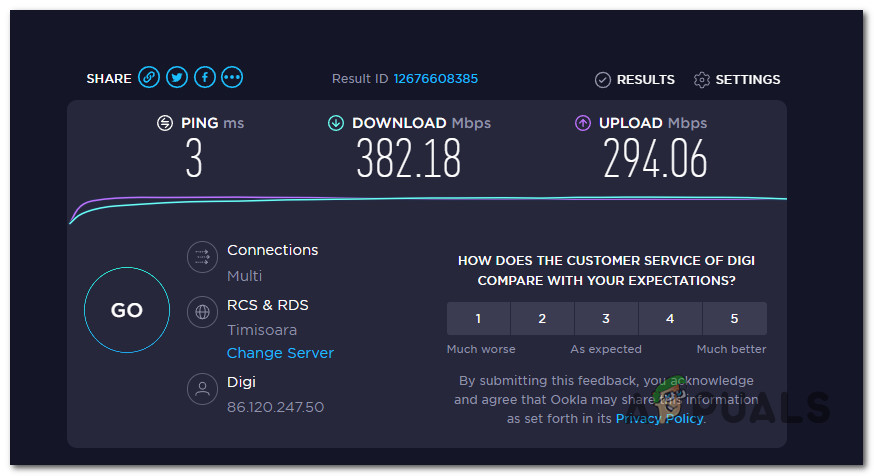
Check Download and Upload speeds Note: You might want to repeat the test a couple of times to see if the Upload and Download values are stable.
If the test you just did above confirmed that you meet the minimum network requirements but the error still occurs, you should migrate over to a LAN connection.
If you have the possibility to connect your PC or console with an ethernet cable instead of WiFi, you should definitely do it. It will definitely improve your online gaming experience.
In case you were already on a LAN cable or your Internet connection is more than enough to handle a connection with Battlefield 2042 servers, move down to the next potential fix below.
3. Power cycle the console (if applicable)
As Dice has confirmed on their support forums, the Network Connection Error Code 1:468822970:1502l:-403319830:0B the error can also be caused by a cache issue. Most likely, the temporary files generated by this game version are preventing your console or PC from whitelisting the connection with the game server.
In this case, you should be able to fix the issue swiftly by power-cycling your console or by clearing the cache of the game launcher on PC.
Note: The instructions for doing so will be different depending on which console you’re using or if you’re on PC using Steam or Battle.Net.
We’ve put together a series of sub-guides that will walk you through the entire process of power-cycling your console or clearing the cache of the Steam launcher.
Follow one of the sub-guides below (the ones applicable to your platform of choice).
Power-cycle your PlayStation 4 console
Since the old-gen PlayStation OS doesn’t have a specific menu that will allow you to clear the cache of your console, you’ll need to do a power-cycling procedure instead to ensure that the power capacitors are drained and that temporary data files are let go.
Here’s what you need to do:
- Start by turning your Playstation 4 console on and make your way to the home screen.
- Once you’re on the home screen, press and hold on to the power button (on your console) and keep it pressed until you hear a beep.
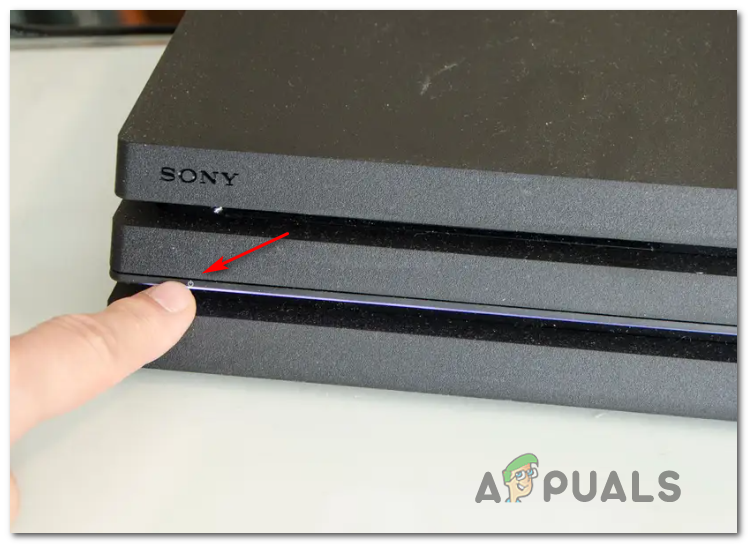
Power-cycling the Ps4 console Note: Turn your console off and not put it into Rest Mode (Hibernation Mode). If you do this, the procedure will fail.
- After you hear the beep and the light indicator on the Playstation 4 console has stopped blinking, unplug the power code from the back of your console.
- Wat for at least 30 seconds to give the power capacitors enough time to drain themselves. After you pull this though, the temporary data that is currently cached will be cleared.
- After this time period passed, plug the power code back in, then start your console normally and see if you are able to launch Call of Duty Modern Warfare Multiplayer mode.
Power-cycle your Playstation 5 console
Likewise, the next-gen version (Playstation 5) also doesn’t have a specific menu that will allow you to clear the cache. You’ll have to do it manually (by unplugging the cord from the back of your Playstation 5) after deploying a power-cycle procedure.
On Ps4, the procedure is slightly different since the power capacitors on Playstation 5 are bigger and take more time to fully discharge.
Here’s what to do to power cycle your Playstation 5 console:
- Start by turning Playstation 5 console fully turned ON.
- Next, long press the power button on your console until you hear a beep. Once you hear the sound queue, wait until it powers down.
Power Cycle Playstation 5 Note: Don’t short press the button because you’ll enter rest mode instead and you’ll not be able to complete the procedure below.
- After the lights on your Playstation 5 console are fully turned off, go ahead and unplug the power cord from the back of your console.
- Wait for 2 minutes or more. This ensures that’s you give your power capacitors enough time to clear themselves.
Note: By doing this you’ll force your console to make your console ‘forget’ the cached data. - Next, plug the power code back into your Playstation 5 console hit the power button, and wait until the next startup sequence is complete.
- Once your console boots back up, launch Call of Duty Modern Warfare once again and see if you can access the multiplayer component.
Power-cycle your Xbox One Console
In case you’re experiencing this issue on an Xbox One console, you can use this method to clear the cache and resolve the issue that is currently preventing you from accessing the multiplayer component of Call of Duty Modern Warfare.
This operation allows you to go into the ‘no-power mode before unplugging the power cord in order to clear the currently stored cached data.
Here’s what you need to do to power cycle your Xbox One:
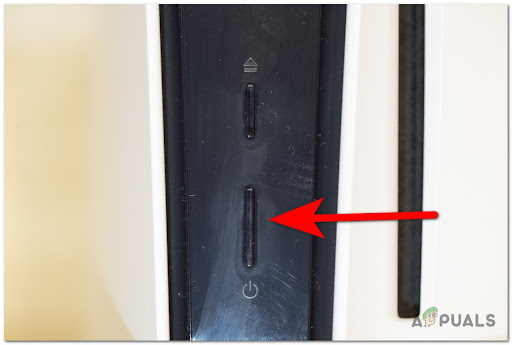
- Start by making sure that your Xbox One console is powered on and not in hibernation mode.
- Next, press and hold the power button (on your console).
 Power cycle your Xbox ConsoleNote: Keep it pressed until the LED on the front of your console turns itself off.
 - After the console no longer shows any signs of life, unplug the power cable from your Xbox console.
- Wait for 30 seconds or more to give the power capacitors enough time to clear themselves and remove the cached data.
- After the power capacitors are cleared, go ahead and plug the power brick back into your Xbox One console before you turn it back on.
- Start Battlefield 2042 once again and see if you are able to access the multiplayer component without getting the same error.
Power-cycle your Xbox Series X or S Console
If you’re already using the next-gen console from Microsoft, I have good news:
There’s an easier way to clear the cache of your console without the need to physically unplug the power cord.
On Xbox Series S and Xbox Series X, Microsoft has implemented a software method that will allow you to clear the persistent cache storage.
Here’s how to do it:
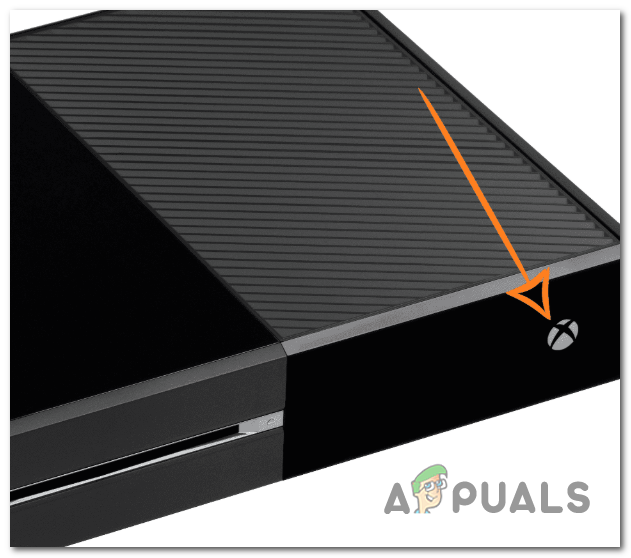
- Inside the home screen of your Xbox Series console, press the glowing Xbox button in the middle of your controller.
- Once you’re inside the guide men, scroll to the right to the Profile & System.
- Inside the Profile & System tab, select Settings, then press the A button to access them.

Accessing the Settings menu - Inside the Settings menu, go to the Device & Connections tab, then select Blu-Ray from the list of available options.
- Once you get to the Blu-Ray dedicate menu, go to Persistent Storage, then use the Clear Persistent Storage button to get rid of your current cache cluster.
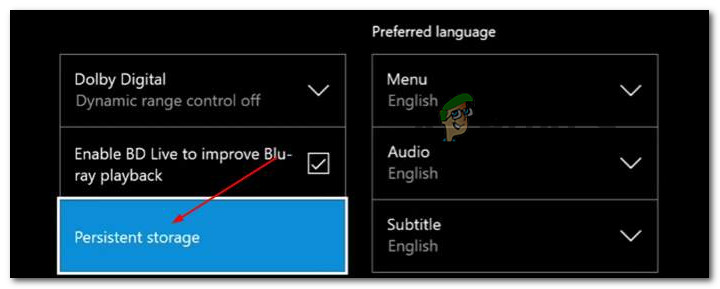
Accessing the Persistent Storage menu - Finally, reboot your console and see if the problem is fixed by attempting to launch BattleField 2042.
Clear the cached data on Steam (PC)
If you’re attempting to play BattleField 2042 on PC and you’re launching it through Steam, you can expect to face this issue due to a cache issue that is inhibiting the multiplayer component.
Depending on the cache issue, Steam might have trouble recognizing that you actually have ownership of the game.
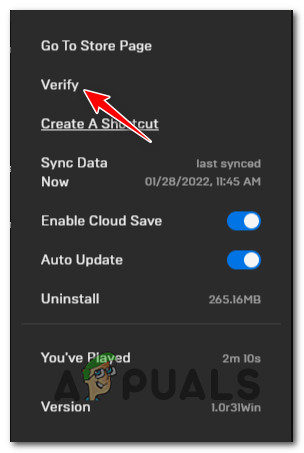
To fix this issue, you’ll need to verify the integrity of the game files.
Note: On top of checking for any missing game files and replacing the file corruption, this procedure will also clear the current cache associated with the game.
Here’s how to clear the cached data of Battlefield 2042 on Steam:
Note: Don’t go for this operation if your system performs another intensive task in the background (such as virus scanning, rendering, or defragmenting). Wait until the other scan is complete before deploying this integrity check.
- Start by making sure you are signed with the account that you’re having issues with.
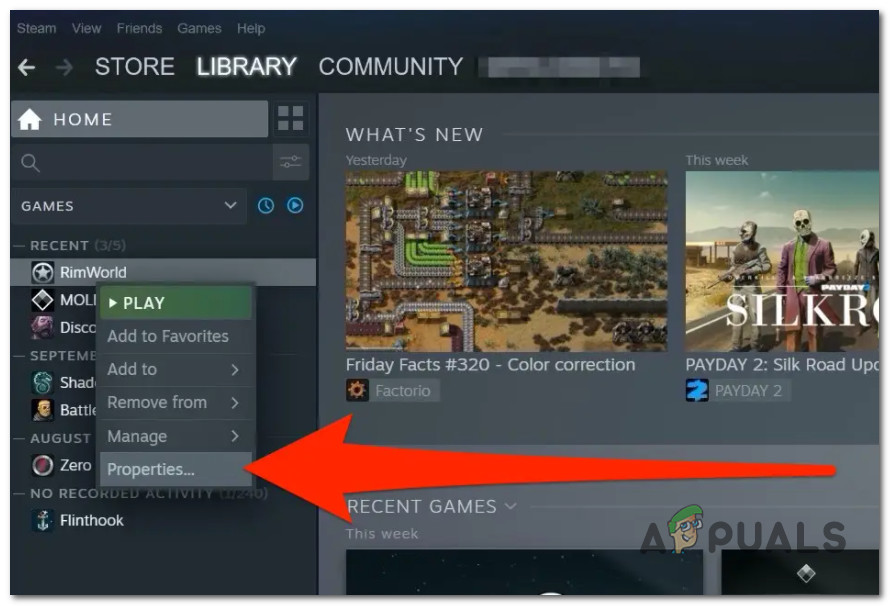
- Next, select Library from the menu at the top.
- Locate BattleField 2032 inside the vertical menu on the left and right-click.
- From the context menu that just appeared, click on Properties from the context menu.
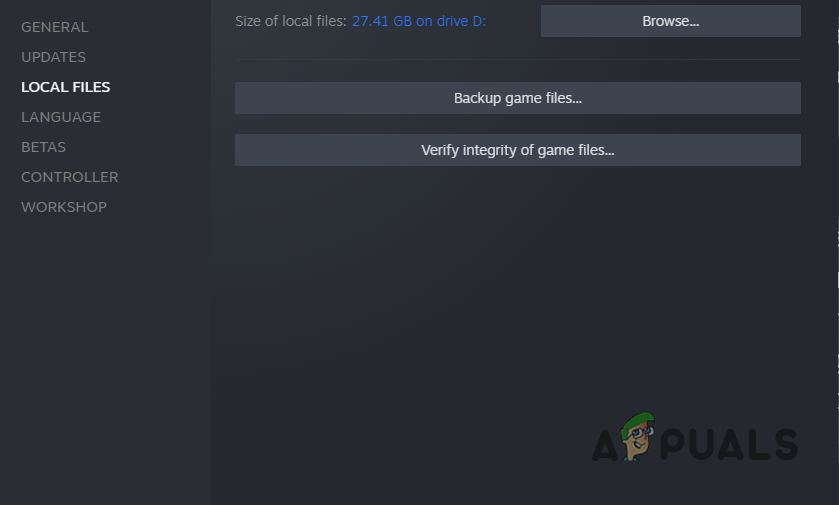
Access the Properties screen of Battlefield 2042 - Inside the Properties Menu of Call of Duty Modern Warfare, choose Local files from the vertical menu on the left, then click on the Verify integrity of game cache button.
Initiating an integrity check - At the confirmation prompt, click Yes and wait until the operation is complete.
Note: It’s not unusual for one or more files to fail once this scan is initiated. This is normal for most games including Battlefield 2042. - After the integrity scan is complete, reboot your PC and see if the issue is fixed once the next startup is complete.
Clear the cached data on Origin (PC)
If you’re using Origin to launch Battlefield 2042, the only way to clear the related cached data is to perform a repair using the in-launcher listing of the game.
This might seem like a counter-intuitive thing to do for a game that is actually launching, but a lot of users have confirmed that this operation was the only thing that helped them avoid the Network Connection Error Code 1:468822970:1502l:-403319830:0B error.
Here’s what you need to do:
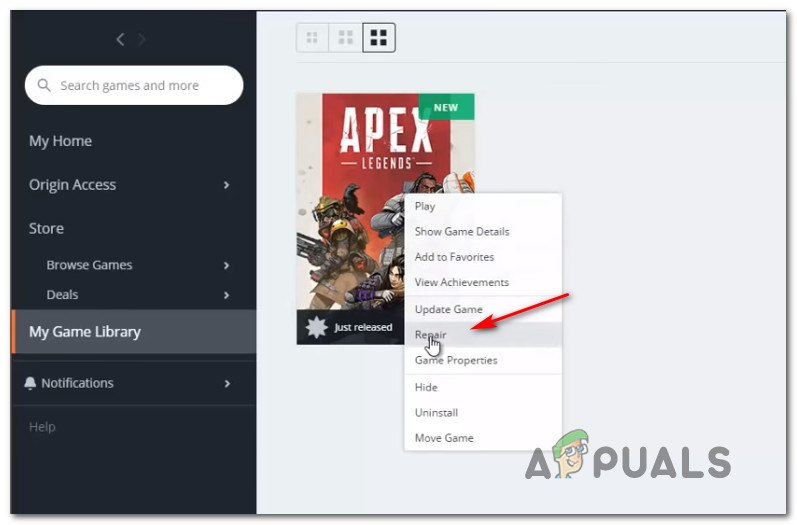
- Open the Origins launcher and go to My Game Library.
- Right-click on the Battlefield 2042 listing and click on Repair.
Repairing Apex Legends - After the launcher verifies the game files and replaces the corrupted one with fresh copies. But do keep in mind that you’ll need a stable Internet connection in order for this process to be successful.
- As soon as the process is complete, restart your computer and launch the game once the next startup is complete.
Clear the cached data on Epic (PC)
If you brought the game from the Epic Store, you should also take the time to verify the integrity of the game.
On top of checking every game file for file corruption, this operation will also clear the temporary cache folder associated with the game.
Here’s how to clear the cached data of Battlefield 2042 on the Epic store:
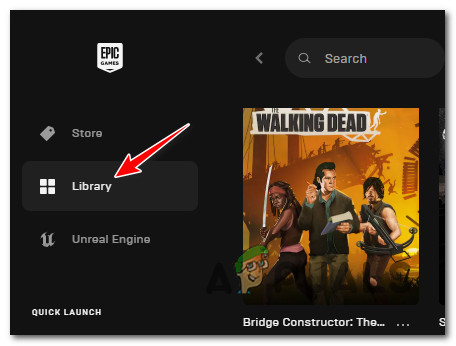
- Start by signing up with the Epic account that contains ownership of the game.
- Once you have successfully signed in, click on the Library icon from the left-hand side of the screen.
Accessing the Library menu - Once you’re inside the Library menu, move over to the right-hand section and click on the action button associated with Battlefield 2042.
- From the context menu that just appeared, click on Verified.
Verifying the game on the Epic store - Wait until the operation is complete. During this procedure, the cache folder associated with the game will also be cleared.
- After the operation is complete, launch the game once again and see if the problem is now fixed.
If the same kind of issue is still occurring, move down to the next potential fix below.
4. Change DNS to Google Equivalents
If none of the potential fixes above have helped you fix the error in your case, you should also start to consider an inconsistent DNS range as a potential culprit that’s causing the Network Connection Error Code 1:468822970:1502l:-403319830:0B error.
Fortunately, if you’re dealing with this problem, you can easily eliminate the problem and allow your PC or console to communicate with the EA game server by migrating your default DNS (Domain Name Address) range to a range supplied by Google.
Note: The steps of doing the DNS migration will be different depending on your platform of choice. To cover every possible scenario, we’ve created a series of sub-guides that will guide you through this process on PC, Xbox One, Xbox Series, PS4, and PS5.
Follow one of the sub-guides below to make the transition from your current DNS to the Google DNS range and hopefully fix the Network Connection Error Code 1:468822970:1502l:-403319830:0B error:
Switch to Google DNS on PC
In order to adjust the DNS range of your PC, you’ll need to access the Network Connections window from the classic Control panel menu. Only from that menu, you can establish a custom DNS range for the network that you’re currently connected to.
Important: If you’re using IPV6, you will also need to establish custom DNS values for this protocol too.
Here’s what you need to do to change the default DNS to Google equivalents on PC:
- Start by opening up a Run dialog box by pressing Windows key + R.
- Next, type ‘ncpa.cpl’ and press Enter to open up the Network Connections window.
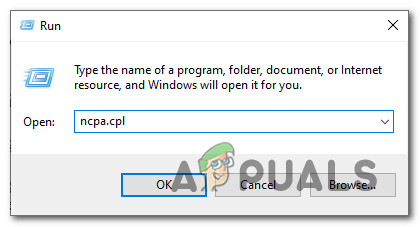
Open the Network Connections windows - At the User Account Control (UAC) prompt, click Yes to grant administrative privileges.
- Inside the Network Connections tab, locate the connection that you’re currently using as the gateway to the internet. Next, right-click on it and choose Properties from the context menu.
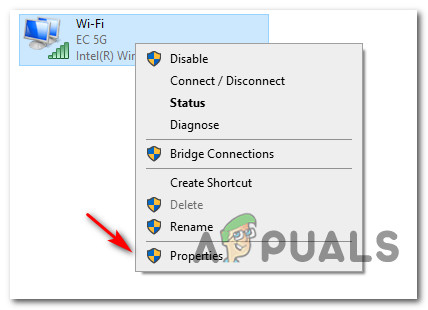
Accessing the properties menu of the network - At properties screen for your Wi-Fi or Ethernet connection, go to the Networking tab and then turn your attention to the settings under This connection uses the following items.
- Next, choose Internet Protocol (TCP / IP4) and click on Properties.
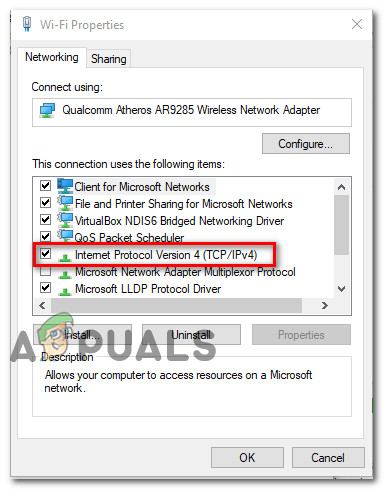
IPv4 settings - Go to the General tab, then check the toggle associated with Use the following DNS server address.
- Replace Preferred DNS server and Alternate DNS Server with the following values:
8.8.8.8
8.8.4.4
- Next, it’s time to change the values for IPV6. Do this by returning to the previous menu and accessing the Properties screen of Internet Protocol Version 6 (TCP/IPv6).
- Replace the Preferred DNS server and Alternate DNS server with the following values:
2001:4860:4860::8888
2001:4860:4860::8844
- Save the changes that you just enforced, then reboot both your PC and your router before you attempt to launch Battlefield 2042 once again and see if the error is fixed.
Switch to Google DNS on Xbox One and Xbox Series X
It doesn’t really matter if you’re on the last-gen console from Microsoft (Xbox One) or on the next-gen. The instructions for changing the default DNS are almost one for one since the operating system of both consoles is almost identical.
You’ll need to access the Advanced Settings menu of the network that you’re currently connected to and go for the manual configuration approach to be given the option to set a Custom DNS.
Here’s what you need to do:
- Start by making your way to the main dashboard of your Xbox One menu, then press the guide menu.
- From the side menu that just appeared, choose All Settings.
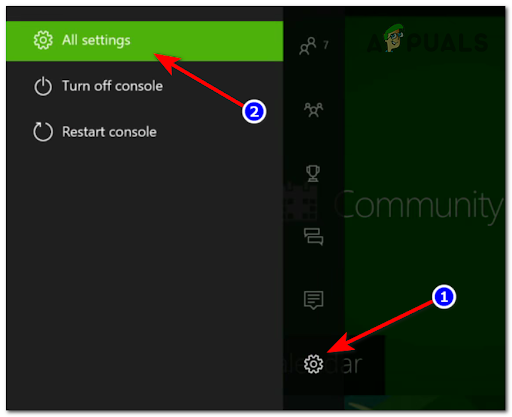
Accessing the All Settings menu - In the Settings menu, move down to Network and press A to access the setting cluster.
- Once you’re inside the Network menu, tap on Advanced settings from the list of available options.
- Next, choose DNS settings, then select Manual from the next cluster of menus.
- Next, set 8.8.8.8 as the Primary DNS and 8.8.4.4. as the Secondary DNS and then hit Save the changes.
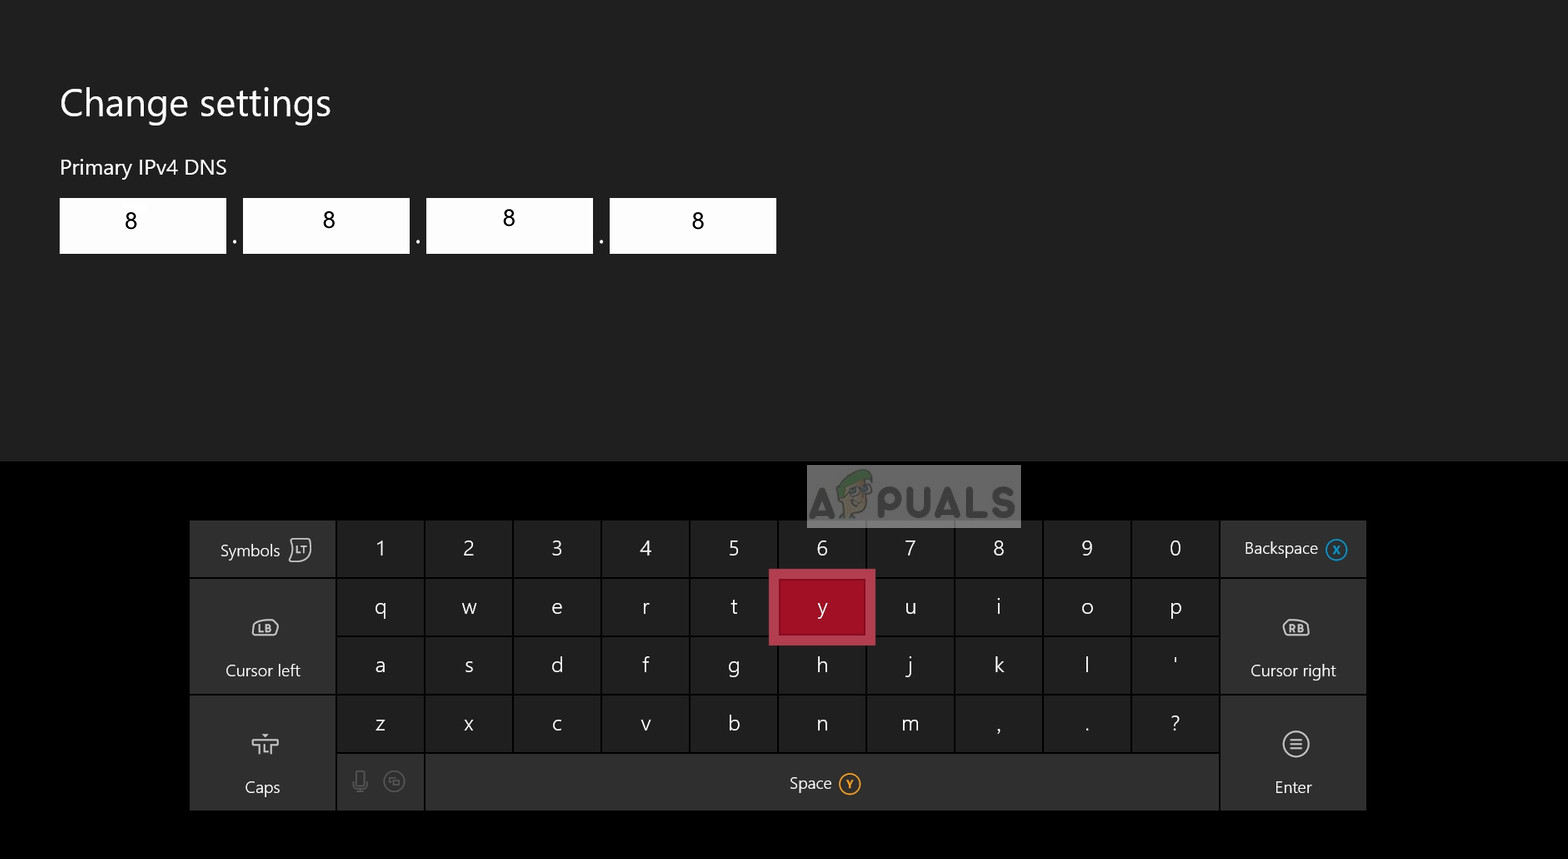
Change the DNS settings - Finally, save the changes before restarting both the Xbox One or Series X console and your router.
- Once your console boots back up and is connected to the Internet, launch Battlefield 2042 once again and see if the Error Code 1:468822970:1502l:-403319830:0B is now fixed.
Switch to Google DNS on PlayStation 4
The PS os will not allow you to change the currently used DNS unless you go through the troubles of configuring a new Internet Connection with Custom parameters.
Follow the instructions below for step-by-step instructions on changing the default DNS settings with equivalents from Google:
- Start from the home screen of your PlayStation 4 system.
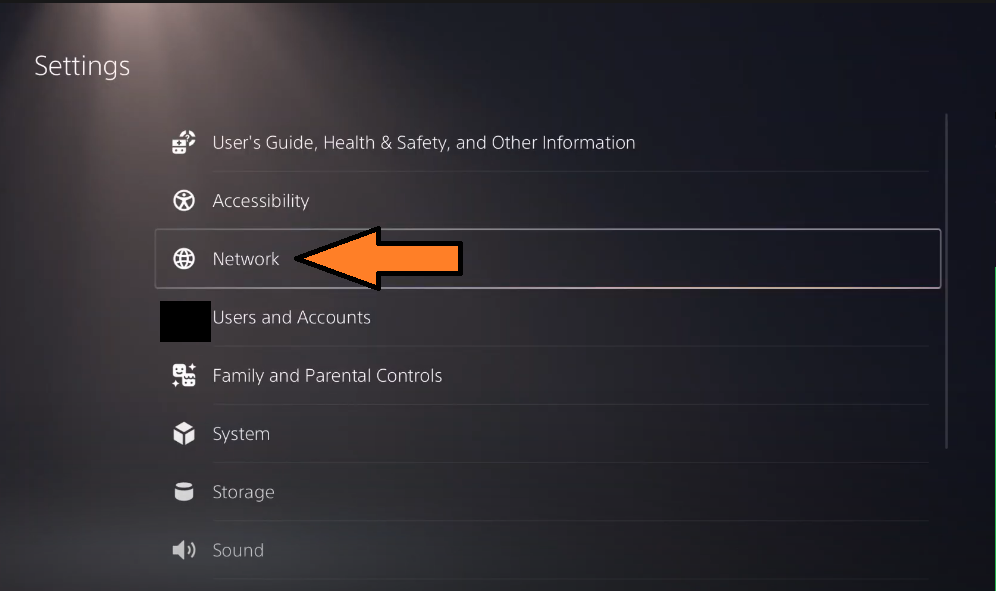
- Go through the vertical menu at the top and access the Settings menu.
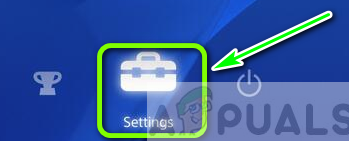
Access the Settings menu - Inside the Settings screen, access the Network menu from the list of available options.
- Once you’re inside the Network settings, choose Set up Internet Connection.
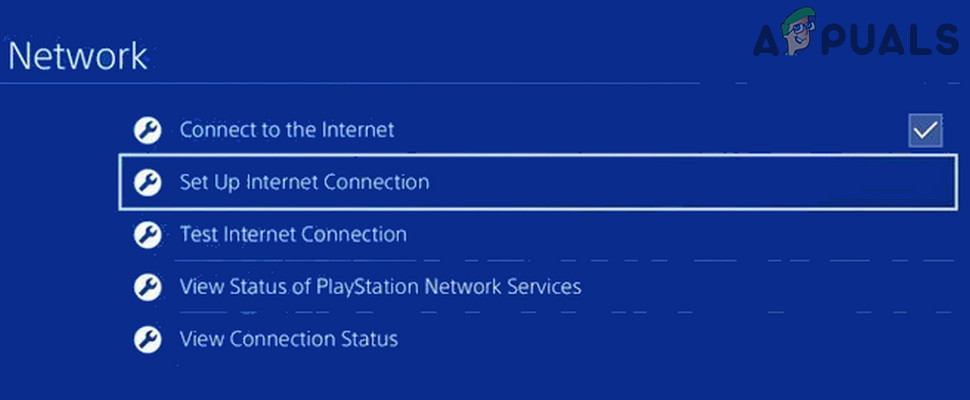
Set up Internet Connection - From the next window, choose either Wi-Fi or LAN (depending on the type of connection that you’re using), then select Custom to avoid receiving a default DNS.
- When you’re prompted about the address you want, choose Automatic.
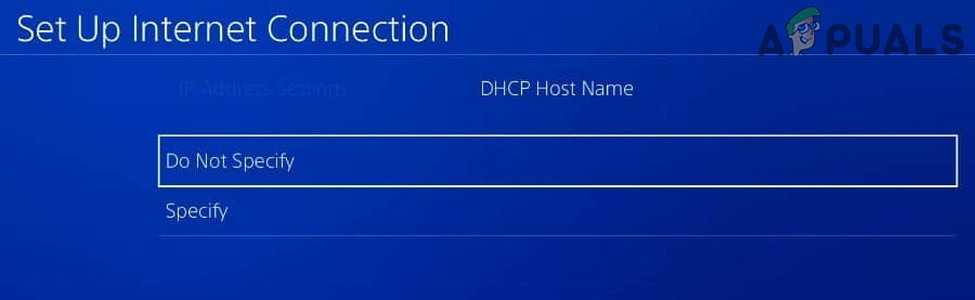
- At the next window, select the DHCP Host Name to Do not specify.
Do Not Specify - Once you’re inside the DNS Settings prompt, choose Manual, then change the Primary DNS to 8.8.8.8. and Secondary DNS to 8.8.4.4.
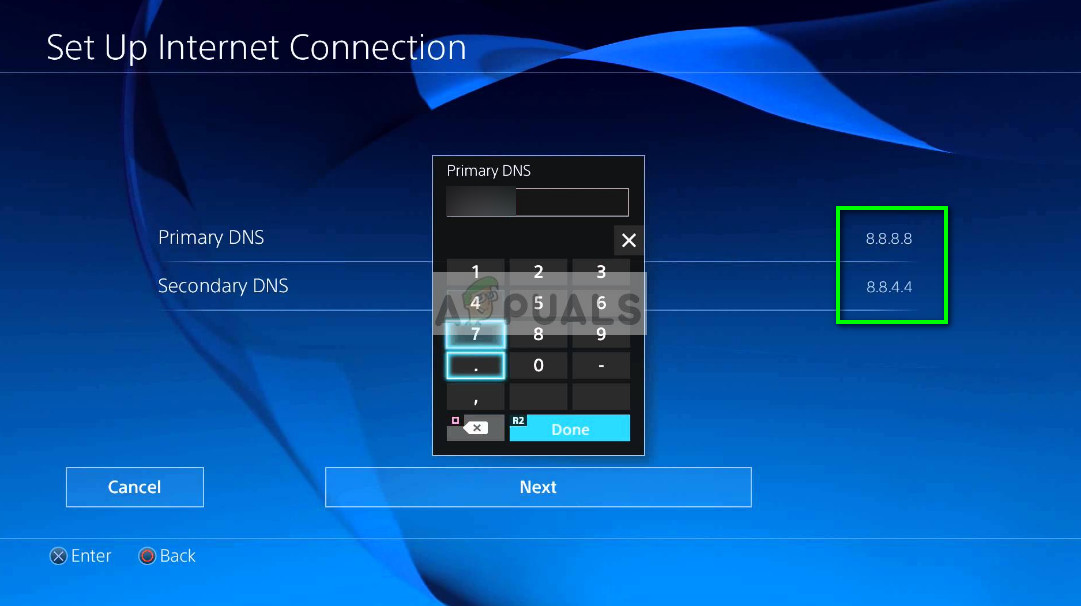
Change the Primary and Secondary DNS Note: If you want to use IPV6 instead of IPV4, use the following values instead:
Primary DNS - 208.67.222.222
Secondary DNS - 208.67.220.220
Switch to Google DNS on PlayStation 5
If you’re attempting to play Battlefield 2042 on Playstation 5 when you’re experiencing this issue, you’ll need to change the DNS settings by accessing the Settings menu. From there, you can start modifying the Network settings by opting for the setup of a new Internet Connection.
Follow the instructions below for complete steps on how to do this:
- Inside your PS5 Home screen, select the Settings icon (top-right section of the screen) and press the X button to access the settings.
Accessing the Settings menu on PS5 - Inside the Settings menu, access the Network settings, then choose Settings once again.
Accessing the Network settings on PS5 - Next, choose Set up Internet Connection, then choose Set Up Manually from the next cluster of options.
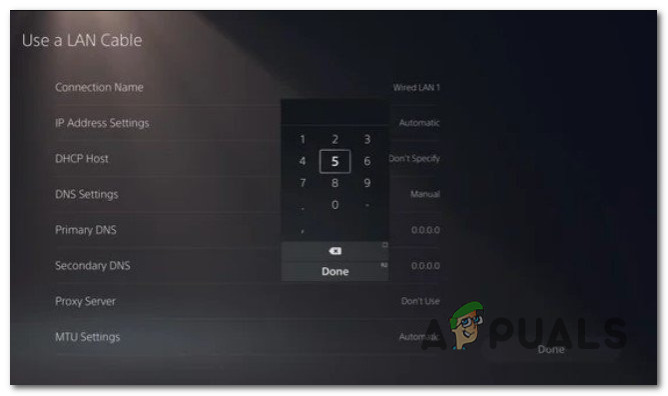
- From the next menu, choose Wi-Fi or LAN Cable (depending on the type of connection that you’re using) and choose DNS at the next prompt.
- Once you’re inside the correct menu, set the Primary DNS to 8.8.8.8 and the Secondary DNS to 8.8.4.4. and hit Done to save the changes.
Change the DNS range - After the DNS has been successfully changed, launch Battlefield 2042 once again and see if the error is now resolved.
If the 1:468822970:1502l:-403319830:0B error is still preventing you from connecting to the BattleField servers, move down to the final potential fix below.
5. Change Region to New Zealand
As it turns out, if Dice is busy mitigating an issue affecting matchmaking in a certain region, you might get away with playing the game without experiencing the Network Connection Error Code 1:468822970:1502l:-403319830:0B error by changing the matchmaking region of your EA account to New Zealand.
This works because the usage of the New Zealand servers is still low and they’re usually much more stable than Europe or North America.
If you find yourself in a scenario where none of the fixes presented above have worked, follow the instructions below to change your EA region to New Zealand:
- While you’re inside the game, access your Account Settings.
- Next, go to Settings, then select EA Account from the list of sub-menus.
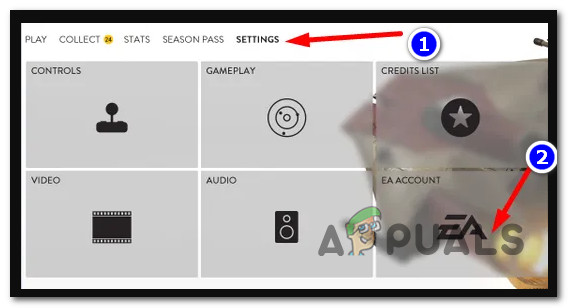
Accessing the EA account settings - From the next menu, change the MatchMaking region to New Zealand, then save the changes.
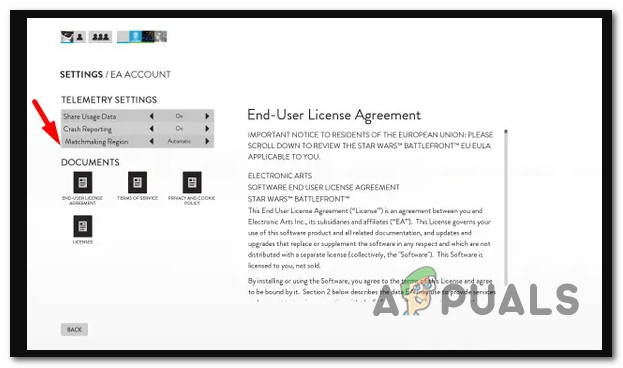
Change the Matchmaking region - Restart the game and see if the problem is now fixed.


