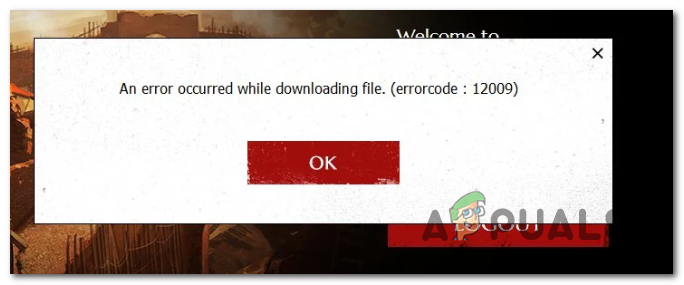
How to Fix Error Code 12009 in Black Desert Online
The Error Code 12009 is typically encountered when Black Desert Online players attempt to install the game or when attempting to install a new patch or game version for the game. This problem is only reported to occur by PC players and the installation usually stops at 97% or 99%.
As it turns out, there are multiple causes that might cause this particular issue with Black Desert Online:
- Remnant version.dat file – One of the most common instances that will cause this problem is when the installer ends up relying on an old version.dat file when cross-checking the current version against the version that’s currently being installed. In this case, you should be able to fix the problem by renaming the version.dat file to something different in order to force the installer to create a new file.
- DNS Inconsistency – In case you’re stuck with a tier 2 ISP, you can expect to see this error if there’s a communication problem between your end-user client and the game server. In this case, you should be able to fix the problem by performing a DNS flush from an elevated Command Prompt.
- 3rd party Firewall or Antivirus interference – An overprotective 3rd party suite (antivirus or firewall) can also be responsible for this particular error. In this case, you can resolve this problem either by disabling real-time protection or by uninstalling it completely from your system.
- The connection is denied due to Proxy or VPN – Although the main game has no issues with this, the game’s launcher is notoriously known for encountering a plethora of issues when forced to work through a Proxy or VPN network. To remedy this problem, you need to disable or uninstall the proxy server or system-level VPN.
- Ports used by the game are closed – Another fairly common instance that will trigger this error is a case where the 3 main port ranges used by the game (specifically the updating utility) are closes, so communications with the download server are interrupted. In this case, you can resolve the issue either by enabling UPnP (if your router supports it) or forwarding the ports manually from your router settings.
- Interference caused by Ping Booster – According to some affected users, this problem can also occur in instances where you’re using a ping booster servicer like WTFast, Haste, or Ping Booster. As it turns out, you might need to turn these utilities off while updating the game to the latest build available.
Method 1: Renaming the version.dat File
If you’re encountering the Error Code 12009 while attempting to download a new patch for Black Desert Online, the problem is most likely occurring due to the fact that the installer is still relying on the old version.dat file when cross-checking the current version against the version that is being installed.
If this scenario is applicable, you should be able to fix the problem by navigation to the location where you installed Black Desert Online and modifying the name of the version.dat file to something different so that the installer will be forced to compare a new file.
Here’s a step by step guide on how to do this:
Note: The steps below should work regardless of your Windows version.
- Ensure that both the game and the game launcher are completely closed and not running in the background.
- Open File Explorer (or My Computer) and navigate to the location where you installed Black Desert Online. Here is the default location:
C:\Program Files\x86\Black Desert Online
- Once you arrive at the correct location, scroll down through the list of files belonging to the game installation, and locate the file named version.dat. When you see it, right-click on it and choose Rename from the newly appeared context menu.
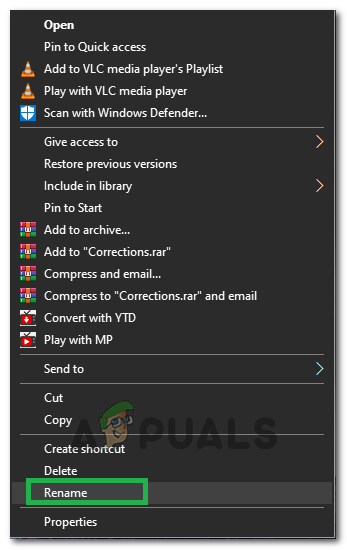
Selecting Rename - How you rename the file is not important as long as it ends up different from the current name.
Note: This operation will ensure that the installer will disregard this file and create a new equivalent by looking at the version of the patch instead. - Once the version.dat file is renamed, retry the installation of the new patch for Black Desert Online and see if the problem is now resolved.
In case the same problem is still occurring, move down to the next potential fix below.
Method 2: Flushing your DNS
In case the first potential workaround didn’t work for you, you should focus your attention on your DNS (Domain Name Address). An inconsistent DNS can very well be the party responsible for affecting the communication between your end-user client and the game server.
Several affected users have reported that the problem was fixed after they successfully reset the DNS cache from an elevated Command prompt.
If this scenario is applicable and you suspect that an inconsistent DNS might be causing the problem, follow the instructions below to flush your current DNS values:
- Open up a Run dialog box by pressing Windows key + R. Inside the text box, type ‘cmd’ and press Ctrl + Shift + Enter to open up an Elevated Command Prompt. When you’re prompted by the UAC (User Account Control), click Yes to grant administrative privileges.

Running the Command Prompt - Once you’re inside the elevated Command Prompt, type the following command and press Enter to initiate the flushing of your current DNS:
ipconfig/flushdns
Note: This operation will effectively remove every bit of information that’s currently stored in the DNS cache, forcing your router to assign new DNS information.
- Once the operation is complete, you will receive a confirmation message. When this happens, close the elevated command prompt.
- Next, open up Black Desert Online and repeat the patching attempt to see if you still end up seeing the same Error Code 12009 error code.
Note: If you have other DNS related issues, you should also consider switching over to the DNS provided by Google.
In case the same problem is still occurring, move down to the next potential fix below.
Method 3: Disabling your 3rd party Antivirus or Firewall (if applicable)
If you’re using a 3rd party suite and none of the potential fixes above have worked for you, it’s possible that a false positive is actually interfering in the communications between the game server and your end-user computer.
As it turns out, most instances that will trigger this problem are spawned when the security suite ends up quarantining some files used by the game installer.
I this scenario is applicable, you should be able to fix this problem by disabling the real-time protection of your antivirus or firewall. The instructions of doing so will be different depending on the 3rd party suite you’re using, but in the vast majority of cases, you can do this directly from the tray icon of your security suite.

However, if you’re using a 3rd path firewall, chances are that just disabling real-time protection might not be enough to fix the problem since the same security rules will remain in place even after you ensure that there’s no active network surveillance.
In this case, follow the instructions below to uninstall the 3rd party firewall and see if the Black Desert Online problem goes away:
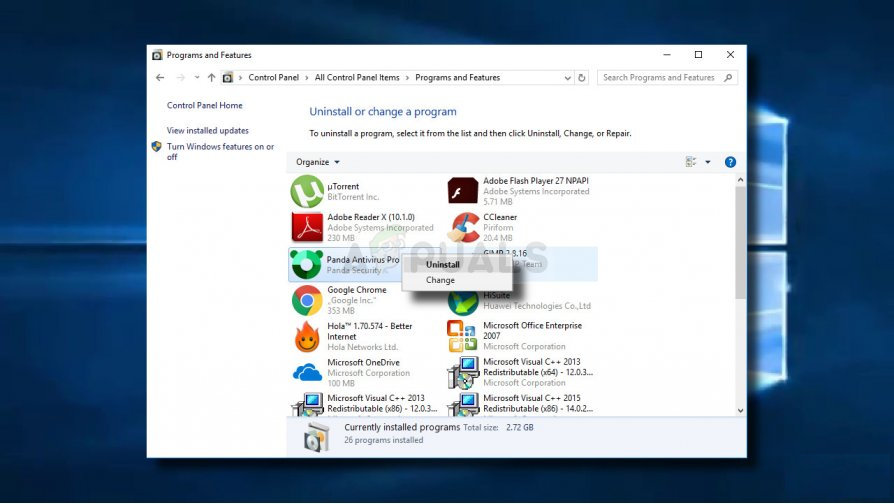
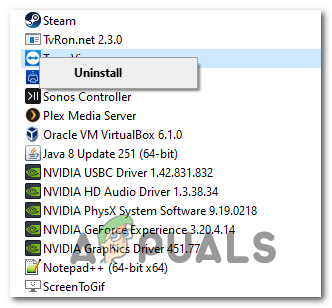
- Press Windows key + R to open up a Run dialog box. Next, type ‘appwiz.cpl’ inside the text box and press Enter to open up the Programs and Files menu.

Type appwiz.cpl and Press Enter to Open Installed Programs List - Inside the Programs and Files menu, scroll down through the list of installed applications and locate the 3rd party firewall that you suspect might be causing this problem.
- When you manage to locate it, right-click on it and choose Uninstall from the context menu to initiate the uninstallation process.
Uninstalling antivirus tool - Inside the uninstallation screen, follow the on-screen prompts to complete the uninstallation, then restart your computer.
Note: If you want to ensure that you don’t leave behind any leftover files that might still cause these security restrictions, ensure that you remove any remnant files left behind by your antivirus suite. - Once you have removed your 3rd party firewall and any remnant files, reboot your computer and launch the game once again at the next startup to see if you’re still encountering the same Error Code 12009.
If this scenario was not applicable or you followed the instructions above to no avail, move down to the next potential fix below.
Method 4: Disabling Proxy or VPN client (if applicable)
As it turns out, the Black Desert Online launcher is known for being picky when it has to upload the game on a network that’s being funneled through a proxy server or a VPN network. If this is the case with your current network, you’re better off disabling any Proxy server or system-level VPN and then attempt to update the game once again.
Several affected users have confirmed that this operation successfully allowed them to update the game version to the lastest without encountering the same Error Code 12009. Once you successfully manage to update, you can re-enable the VPN or Proxy that you previously had in place.
Depending on the type of online anonymity technology you’re using, follow sub guide A to disable a proxy server or sub guide B to uninstall a system-level VPN:
A. Disabling 3rd party Proxy server
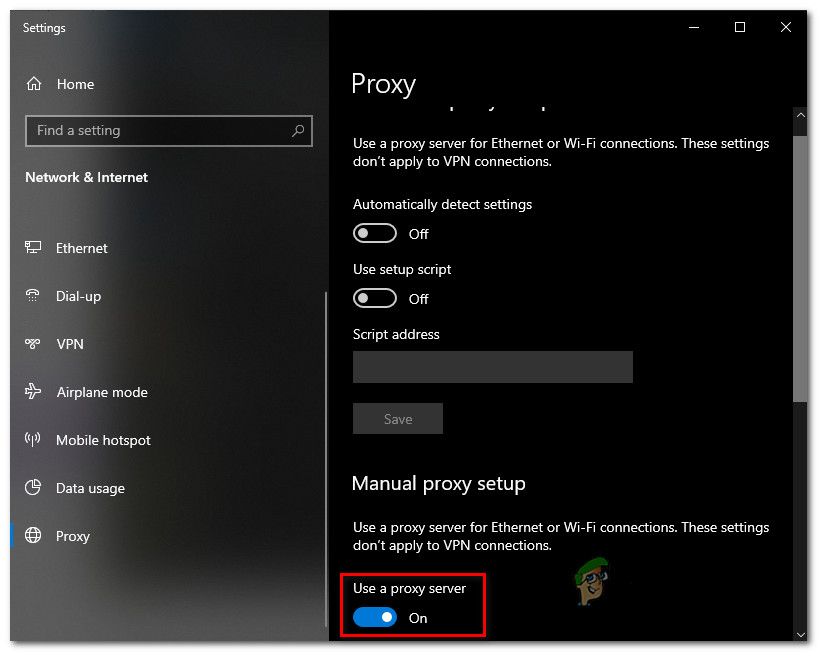
- Open up a Run dialog box by pressing Windows key + R. Inside the text box, type ‘ms-settings:network-proxy’ inside the text box and press Enter to open up the Proxy tab of the Settings tab.
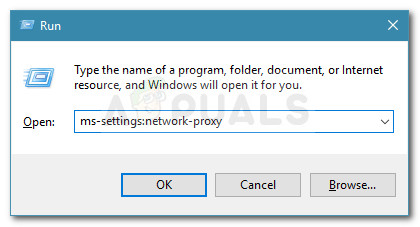
Run dialog: ms-settings:network-proxy - Once you’re inside the proxy tab, move over to the section on the right, then scroll down to the Manual Proxy setup section. When you get there, disable the toggle associated with Use a Manual Proxy setup to effectively disable the proxy server.
Disabling the use of a proxy server - Once you have effectively managed to disabled the proxy server, close the Settings menu and restart your computer to see if the problem is now resolved.
- After your computer boots back up, open Black Desert Online and repeat the action that was previously causing the error code.
B. Uninstalling System-Level VPN
- Press Windows key + R to open up a Run dialog box. Next, type ‘appwiz.cpl’ and press Enter to open up the Programs and Features screen.
Type appwiz.cpl and Press Enter to Open Installed Programs List - Once you’re inside the Programs and Features screen, scroll down through the list of the installed applications and locate the problematic VPN client that you want to uninstall.
- When you see it, right-click on it and choose Uninstall from the newly appeared context menu.

Uninstalling a VPN tool - Inside the uninstallation screen, follow the on-screen prompts to complete the uninstallation, then restart your computer and see if the problem is fixed at the next computer startup.
In case this scenario is not applicable or you followed the instructions above to no avail, move down to the next potential fix.
Method 5: Forwarding the Required Ports
Black Desert Online uses 3 main ports on PC that need to be opened in order for the game to be able to communicate with the game server and update your game version to the latest version available.
The easiest way to ensure that the 3 main ports (ports 8888, 9991, and 9993) used by the game are open and accessible is to enable UPnP – but this is only applicable if your router supports it.
However, if you’re using an older router model, chances are it might not support Universal Plug and Play – In this case, the only way to ensure that your computer is allowed to use those ports is to forward them manually from your router settings.
If this scenario is applicable, we’ve created a universal step-by-step guide that should guide you through the process of manually forwarding the ports required by the game:
- Open your default browser, type your router address, and press Enter to access the settings menu. In most cases, your router address will be one of those generic addresses:
192.168.0.1
192.168.1.1
Note: In case none of these addresses work for you, you’ll need to find the IP address of your router.
- At the login screen, insert custom credentials if you previously established any. In case it’s the first type you get to this screen, try to use the default login credentials (admin or 1234 on for both username and password) and see if you are able to login successfully.
Accessing your router settings Note: In case you are not able to log in and find the correct credentials, search online for specific steps according to your router model.
- Once you’re finally inside your router settings, access the Advanced (Expert) settings and expand the submenu named NAT Forwarding or Port Forwarding.

Port forwarding steps are slightly different for different routers - Next, go ahead and forward the ports used by Black Desert Online and save the changes before exiting your router settings:
TCP / UDP 8888
TCP / UDP 9991
TCP / UDP 9992
TCP / UDP 9993
- Launch the game once again and see if the problem is now resolved.
In case the same problem is still occurring, move down to the next potential fix below.
Method 6: Disabling Any Ping Booster service (if applicable)
In case you’re using some type of ping boosting service like WTFast, Ping Booster, or Haste, that’s probably the reason why Black Desert Online is unable to download and install the new game version.
If this scenario is applicable, you should be able to fix the problem simply by uninstalling the ping booster tool to ensure that the game doesn’t end up rejecting the connection.
If you are currently using a ping booster, follow the instructions below to uninstall it from your computer:
- Press Windows key + R to open up a Run dialog box. Inside the text box, type ‘appwiz.cpl’ and press Enter to open up a Programs and Features menu.
Type appwiz.cpl and Press Enter to Open Installed Programs List - Inside the Programs and Features menu, scroll down through the list of installed programs and locate the ping booster utility that you want to uninstall.
- Once you finally manage to locate it, right-click on it and choose Uninstall from the newly appeared context menu.
Uninstalling the ping booster utility - Follow the on-screen prompts to complete the uninstallation, then restart your computer and see if the problem is now resolved at the next computer startup.


