How to Fix Error Code 0X800701B1 on Windows 10
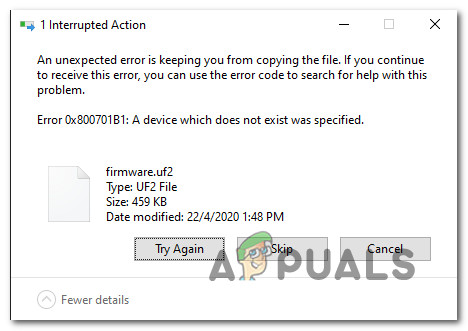
Some Windows 10 users are regularly encountering the 0x800701b1 error code (A device that does not exist was specified) when trying to copy, paste, or replace files using File Explorer. This error code is also reported in instances when users attempt to install Windows 10 on a hard drive connected through a USB port.
As it turns out, there are several different causes that might end up producing this particular error code. Here’s a shortlist of potential culprits that might be responsible for the apparition of the 0x800701B1 (A device which does not exist was specified):
- USB 2.0 port is insufficient – Depending on what type of HDD / SSD drive you’re encountering this issue with, you might need to connect it to a USB 3.0 port in order to ensure that you meet the required transfer speeds and power output.
- Inconsistent / Incompatible driver – According to some affected users, you can expect to see this error code if you’re using a generic driver for the external drive that is triggering this error code. In this case, you might be able to fix the problem by reinstalling the dedicated driver.
- Insufficient PSU Output – If you have an average PSU and a lot of connected peripherals that are currently drawing power, you should consider the fact that your power source might not be enough to handle every device. In this case, you can fix the issue either by upgrading your PSU or by disconnecting some non-essential peripherals.
Method 1: Plugging the HDD / SSD in a different USB Port
As it turns out, a lot of affected users have managed to avoid the 0x800701b1 error code by connecting the affected drive to a USB 3.0 port instead of the classic 2.0 port. This change will be effective in those instances where the problem is occurring due to insufficient power or insufficient transfer speed – USB 3.0 is capable of superior transfer speeds and it’s capable of supplying more power to connected devices.
If your computer has a USB port, go ahead and use it to connect the HDD or SSD that is triggering this particular error code.

Once you have successfully made the change, repeat the operation that has previously caused the 0x800701b1 error code and see if the problem is now resolved.
I the same problem is still occurring, move down to the next potential fix below.
Method 2: Perform a Rescan of the Disks
The device not specified issue could be a result of a temporary glitch of the OS modules and it can be cleared by performing a rescan of the disks in the Disk Management.
- Right-click Windows and select Disk Management.
- Now expand the Action menu and choose Rescan Disks.

Rescan Disks in the Disk Management - Once the scan is complete, check if the system is clear of the device does not exist issue (if the issue reappears after a restart, repeat the above steps).
Method 3: Reinstalling Drivers
According to some affected users, this problem can also occur due to a driver inconsistency. This problem is typically reported to occur with external HDD and SSD and is typically the result of an incompatible generic driver.
If this scenario is applicable, you should be able to fix this problem by using Device Manager to force your OS to install a compatible version for your external HDD or SSD.
Here’s are the step by step instructions on how to do this:
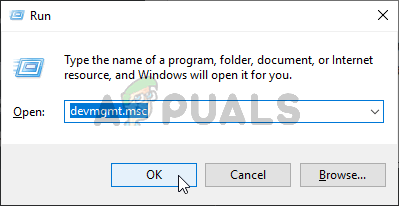
- Press Windows key + R to open up a Run dialog box. Next, type ‘devmgmt.msc’ inside the text box and press Enter to open up Device Manager.
Opening the Device Manager - Once you’re inside Device Manager, expand the drop-down menu associated with Disk Drives and right-click on the drive that’s triggering the error code, and click on Uninstall Device.
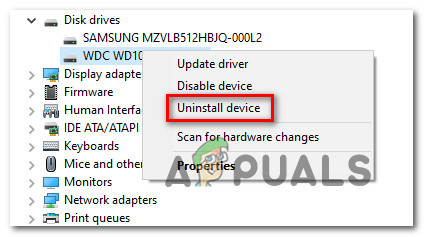
Uninstalling the SSD / HDD device driver - Confirm the uninstallation of your drive driver, then wait for the operation to complete. This will uninstall the current driver and make your Windows switch over to the generic driver the next time you restart your computer.
- Repeat the action that was causing the 0x800701b1 once the next startup is complete and see if the problem is fixed.
Note: If the problem is fixed, you can either leave the generic driver or download the dedicated driver (from your manufacturer website and install that instead)
If reinstalling the SSD / HHD drive didn’t fix the issue, move down to the next potential fix below.
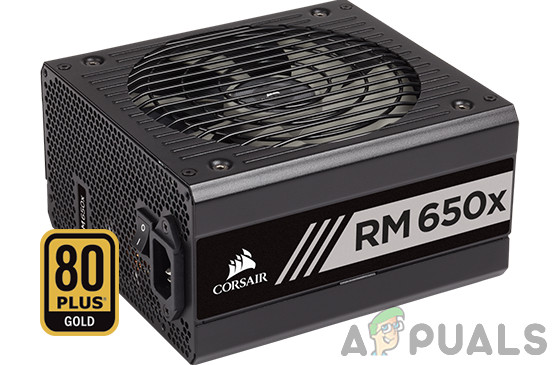
Method 4: Upgrading your PSU (Desktop only)
If none of the methods above have worked for you, you might start investigating your PSU (Power Supply Unit). If you’re encountering this problem on a desktop device, the power that your PSU can supply might be insufficient to maintain the demands of all your PC components.
Keep in mind that an SSD will take around 3 watts, while normal 3.5 HDDs will take around 10 watts of power. Depending on the rest of your components (particularly if you have a demanding video card), your PSU might be unable to cover it.
If you have an extra peripheral currently connected, remove every non-essential one and see if the problem stops occurring.
In case the error code stops occurring while non-essential peripherals are disconnected, it’s clear that you’re dealing with a PSU issue – In this case, you need to go for a PSU of over 500W (real capacity). Here’s how to ensure that you end up getting a good PSU for your system.
Method 5: Take the Ownership of the Problematic Drive in the Security Settings
The USB flash drive may show the device does not exist error if the security permissions of the drive do not allow you to access it. In this context, taking ownership of the problematic drive in its security settings may solve the problem (the Security tab might not show for some of the users).
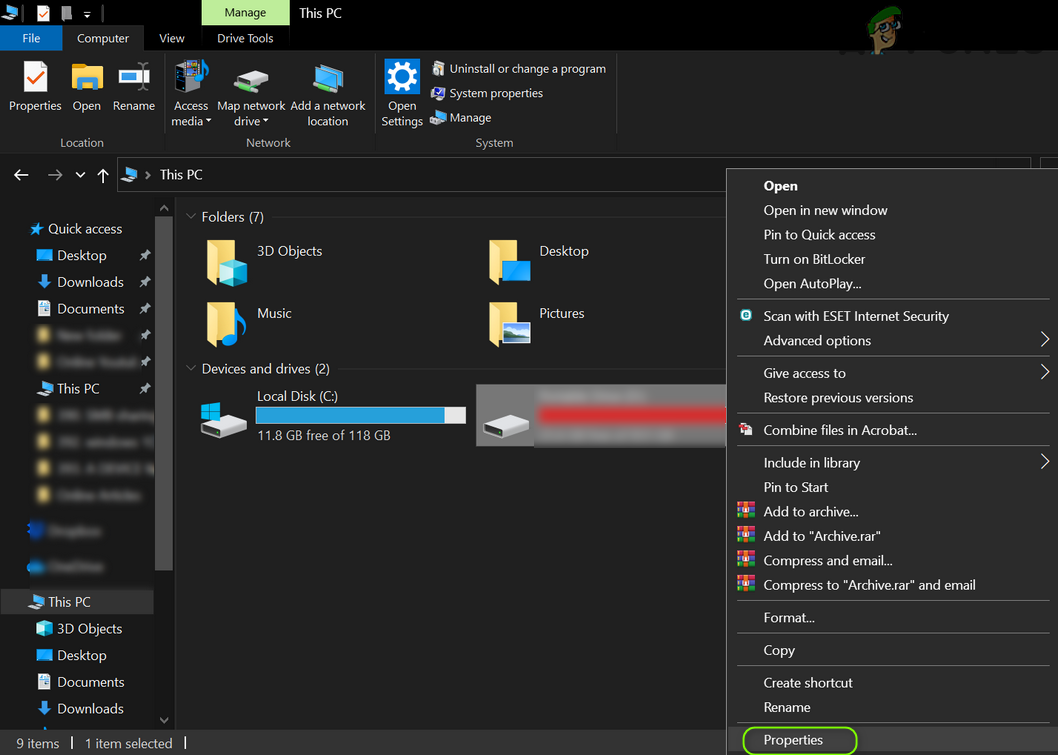
- Right-click Windows and open File Explorer.
- Now, in the left pane, choose This PC and right-click on the USB drive (in the right pane).
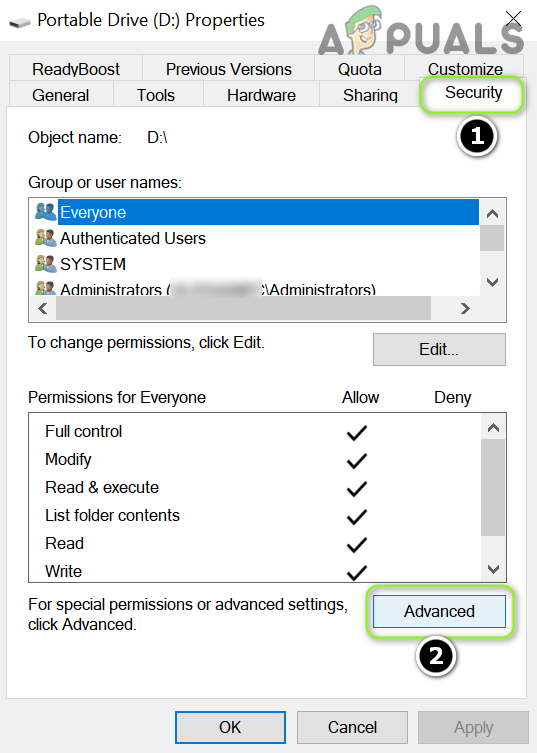
- Then choose Properties and head to the Security tab.
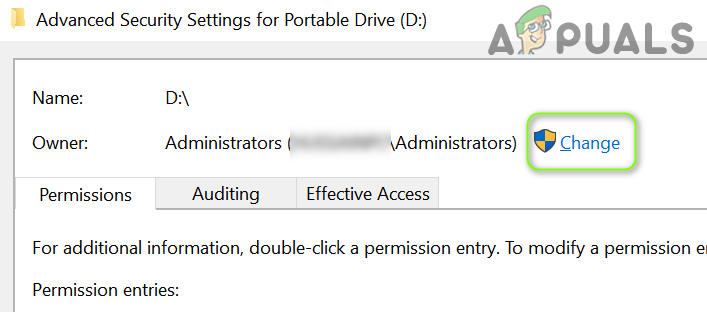
Open Properties of the USB Drive - Now click on the Advanced button (near the bottom of the screen) and click on Change (in front of Owner).
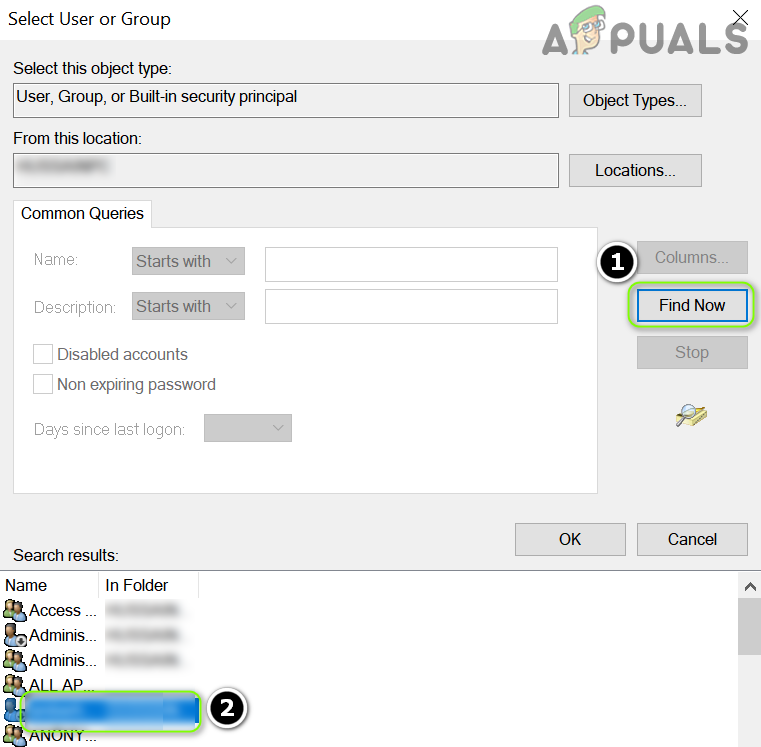
Open Advanced Properties of the USB Drive - Then click on the Advanced button (near the left bottom of the window) and click on Find Now.
Click on the Change in the Advanced Security Settings - Now double-click on your user’s name and then click on OK.
Add Your User as the Owner of the USB Driver - Then checkmark the option of Replace All Child Object Permission Entries with Inheritable Permission Entries from This Object and apply your changes.

Checkmark the Option of Replace All Child Object Permission Entries with Inheritable Permission Entries from This Object - Once the permissions are applied, check if the USB flash drive is clear of the device not specified issue.
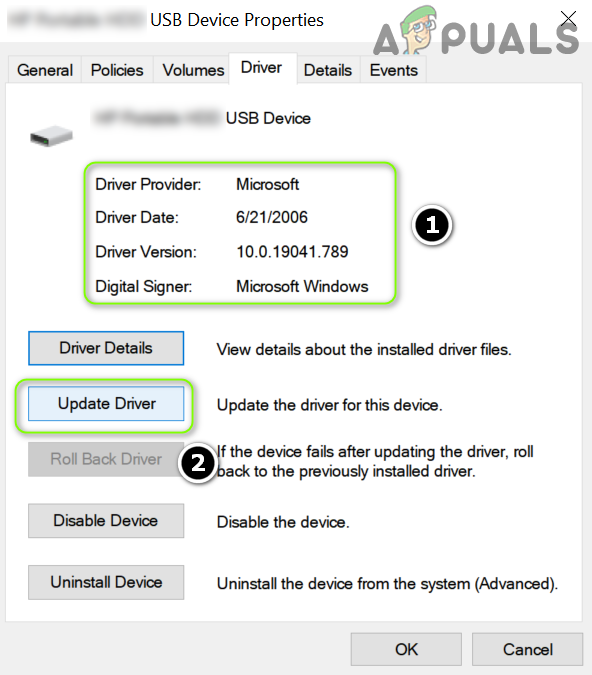
Method 6: Use an Older Driver for the USB Flash Drive
The USB flash drive may show the not specified error if the latest Windows driver is incompatible with the drive. In this case, using an older driver for the USB flash drive may solve the problem.
- Right-click Windows and choose Device Manager.
- Now, expand USB Serial Bus Controllers (or Disk Drives) and right-click on the USB drive.
- Then select Properties and head to the Driver tab.
- Now note down the driver currently being used and click on the Update Driver button.
Note down the USB Driver and Click on Update Driver - Then select Browse My Computer for Drives and open Let Me Pick from a List of Available Drivers on My Computer.
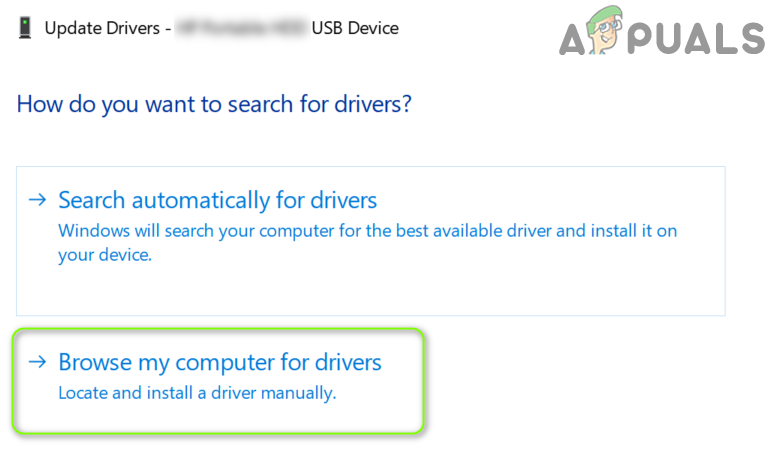
Browse My Computer for Drives for the USB Drive - Now click on the Next button and select any of the drivers (but not the one currently installed).

Let Me Pick from a List of Available Drivers on My Computer - Then click on the Next button and let the driver installation complete.
- Now check if the USB flash drive is working fine.
- If not, then you may try the drivers one by one, shown in step 6, (you may uncheck the Show Compatible Hardware option), and check if any of those drivers resolve the device not specified issue.
Method 7: Perform a Check Disk Scan of the USB Drive
The USB flash drive may show the device not specified error if the drive has logical file system errors. In this case, performing a Check Disk (CHKDSK) scan of the drive may solve the problem.
- Perform a CHKDSK scan of the drive and let the process complete (this may take some time to complete).
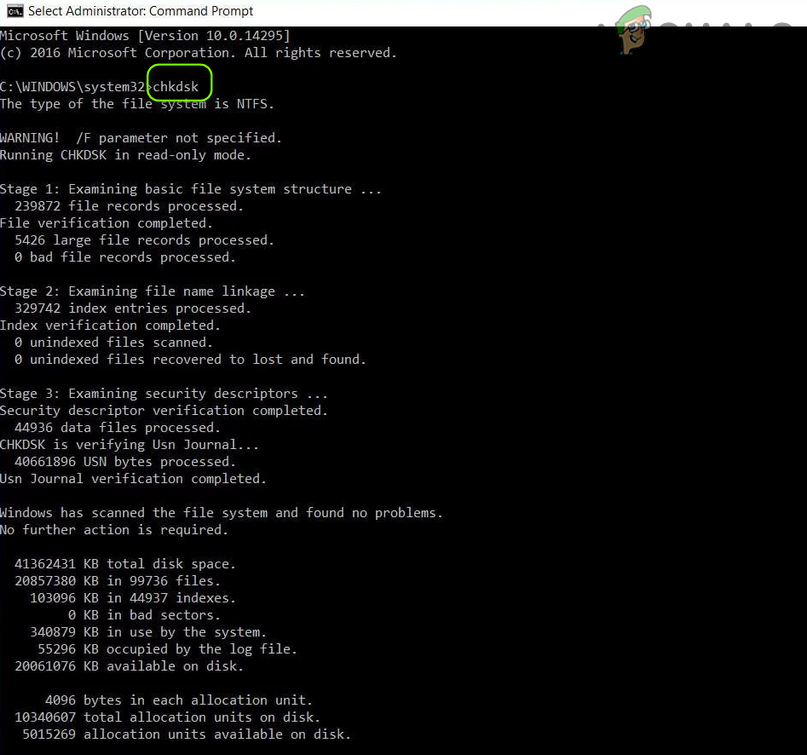
Run the CHKDSK Command - Once the CHKDSK process is complete (without any issues), then check if the system is clear of the flash drive error.
- If the issue persists, unplug the USB drive and shut down your system (not reboot).
- Then power on the system with the bare minimums and plug back the USB to check if the USB drive is functioning normally.
If the issue persists, then check if the drive works fine on another system (preferably with a different OS), if so, then format it at that system and then try on your system. If the issue is still there, then you may try a 3rd party application (e.g., Diskinternals Uneraser) to solve the problem or otherwise get the USB drive checked for hardware errors (you may change the USB controller to solve the issue).


I have a brand new MSI gen10 PC with B640 Tomahawk motherboard with 3.0, 3.1, 3.2 usb extensive port controllers.
Just bought a pny 256GB thumbdrive and its failing as per above errors. (maybe it should be called PHONY)
I tried everything possible to fix this error and found no solution so far.
All other USB devices are working flawlessly without errors – now I’m forced to get a refund on that USB thumbdrive and evaluate it as being faulty – But I have this feeling that it’s not.
The guy that sold me that USB said he’s sold over 100 and no problems…
PC recognizes the USB no probs – then each time I try to put a file into the USB it fails then USB drive dissappears then more errors appears.
theres only a few things that are possible for this failure and thats
1. Companies don’t certify the products for the operating system and they fail. chinese rippoffs and companies that don’t follow rules of certifications.
2. Drivers – don’t think they are to blame since all other expensive USB devices work perfectly.
3. Malfunction in USB device – quite possible but don’t think so – it always works until you try to put a file into it.
4. Windows – yeah I could very well blame them… quite easily : )
I will not buy another USB stick unless its fully genuine also not above 64GB unless its a M.2 with a case (there are USB sticks over 1TB now) exFAT32 format which I don’t trust. all 1TB USB sticks have failed for me and have errors. USB sticks are know to be unstable as it is…