How to Enable and Disable a Webcam in Linux
A decent graphical hardware manager is one of the few things that many mainstream Linux distributions still lack, which can make it difficult to enable and disable a webcam. You might think that Linux refuses to recognize your laptop’s internal webcam when in actuality it’s simply turned off. Almost distributions that have a directory at ![]() let you easily turn your camera on and off by simply editing a text file.
let you easily turn your camera on and off by simply editing a text file.
You may want to run lsusb from a command prompt before proceeding to make sure that your system recognizes your camera. You should find a line that gives a bus number with a specific brand name. If you can’t find it, then you might want to restart and enter the BIOS or U/EFI setup menu. You generally need to push F2 for this on most modern laptops. Check to make sure the camera is enabled here if you want Linux to get access to it. You can also disable it from here if you want to turn it off, but for security reasons it’s best to still disable it from inside the operating system as well.
Method 1: Disabling the Webcam
Users of distributions with the ![]() directory will find that the process for enabling and disabling the camera is almost identical. Hold down the Super or Windows key and push R to open up a run box. You may also with to either hold down Ctrl, Alt and T to open a terminal or select Terminal from the System Tools menu in the Dash, Whisker or KDE pop-up. Ubuntu users may also wish to type terminal in the Dash search or hold down alt and F2 to get a quick Application Menu line.
directory will find that the process for enabling and disabling the camera is almost identical. Hold down the Super or Windows key and push R to open up a run box. You may also with to either hold down Ctrl, Alt and T to open a terminal or select Terminal from the System Tools menu in the Dash, Whisker or KDE pop-up. Ubuntu users may also wish to type terminal in the Dash search or hold down alt and F2 to get a quick Application Menu line.
There are a few ways to edit the file in question, but the easiest is to type gksu mousepad ![]() and push enter. You’ll get prompted for your administration password. If you’re a user of the MATE or GNOME3 desktops or the Ubuntu desktop, then you’ll want to replace mousepad with gedit. Those who use the KDE Plasma desktop will want to use kdesu instead of gksu. You may prefer to use gvim, leafpad or another graphical editor.
and push enter. You’ll get prompted for your administration password. If you’re a user of the MATE or GNOME3 desktops or the Ubuntu desktop, then you’ll want to replace mousepad with gedit. Those who use the KDE Plasma desktop will want to use kdesu instead of gksu. You may prefer to use gvim, leafpad or another graphical editor.
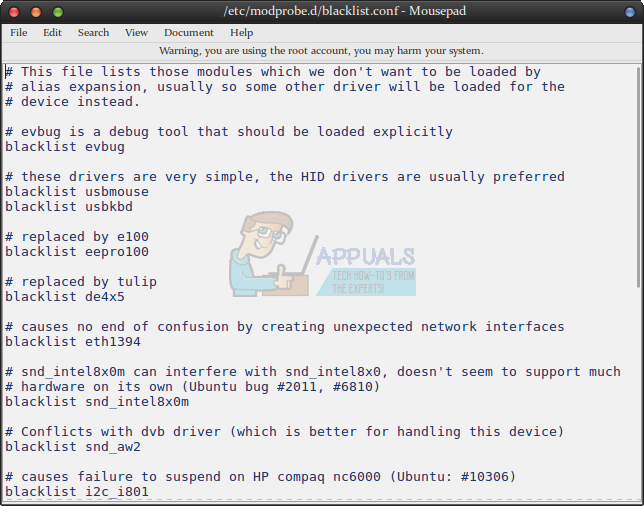
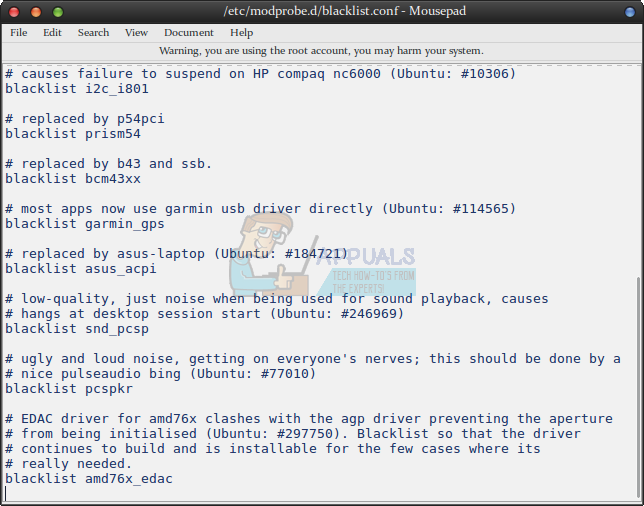
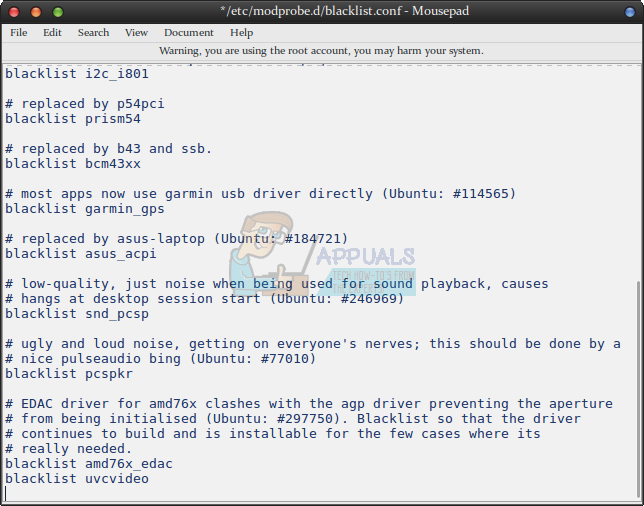
Your text editor may warn you that you’re using the root account, but this is perfectly normal as you need root access to disable the webcam. Scroll all the way to the bottom of the document and add blacklist uvcvideo then push the enter key to add an extra line. Ubuntu users may have a blacklist line with some comments down there while those using Fedora might have an entirely different set. Simply add the line beneath any other text and then save the file. Make sure to close the text editor quickly to avoid making any other changes.
Either use File and Save to save the document or hold Ctrl and push S then quit the text editor. If you didn’t do this graphically and instead used ![]() to edit the file, then push the escape key and type :wq to save and exit. Linux will disable the webcam the next time you reboot, though you can type sudo modprobe -r uvcvideo at the terminal to disable the service right away. You can force its removal with sudo rmmod -f uvcvideo if you received any sort of error message.
to edit the file, then push the escape key and type :wq to save and exit. Linux will disable the webcam the next time you reboot, though you can type sudo modprobe -r uvcvideo at the terminal to disable the service right away. You can force its removal with sudo rmmod -f uvcvideo if you received any sort of error message.
Method 2: Enabling the Webcam
If you’ve disabled the webcam in the BIOS or UEFI setup screen, then you’ll need to reboot and hold down F2 or another key to access the menu. Change the “Camera” setting to [ Enabled ] before saving and quitting. You may then boot Linux as normal. You’ll need to load ![]() for editing again. You can use any of the editors above, or you might want to use
for editing again. You can use any of the editors above, or you might want to use ![]() for a more keyboard-oriented experience. Graphical text editor users will want to select the Find function from the menu or hold down Ctrl and F. Those using nano should hold down Ctrl and W. In either case, type blacklist uvcvideo to find the line that this code is on. Put a # character in front of it to comment it out before saving the file and closing it.
for a more keyboard-oriented experience. Graphical text editor users will want to select the Find function from the menu or hold down Ctrl and F. Those using nano should hold down Ctrl and W. In either case, type blacklist uvcvideo to find the line that this code is on. Put a # character in front of it to comment it out before saving the file and closing it.
Linux will enable your camera after the next restart, though you could force the kernel to load support for the hardware with sudo modprobe uvcvideo in the same manner as disabling. You’ll need to perform a restart if you receive an error message from this command.
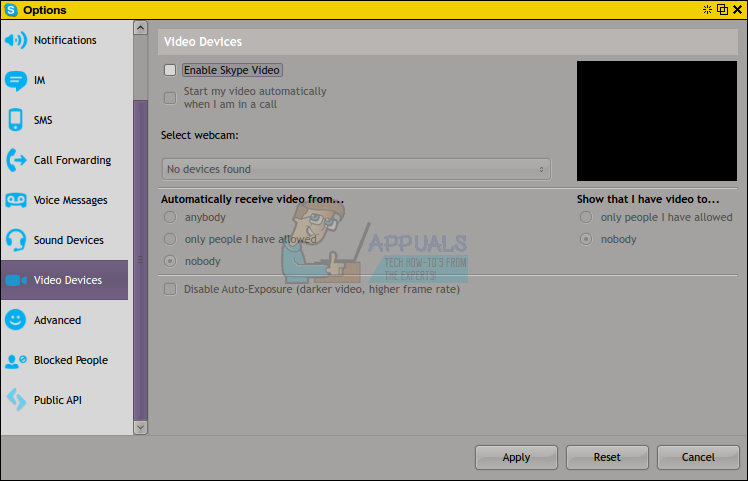
If you find that you still can’t use your webcam in Skype after enabling it and you’re sure you’ve enabled it in the BIOS screen, then open up native Linux Skype. You may find it in the Internet folder on the Dash or Whisker menu. You could alternatively start it by searching for Skype or using the LXMenu depending on which desktop environment you’re using. Open the Options menu and then select Video Devices. Make sure that “Enable Skype Video” is checked. The black rectangle above “Show that I have video to…” should then turn into a view from your webcam. If it doesn’t, then select your webcam from the drop-down box.
You’ll have to restart again if it wasn’t able to find one. Open Skype options on the second reboot and then head back to Video Devices. Select your webcam and then push Apply to enable it. Video calls should now work like normal from here on out. If you’re using any version of Web Skype, then you’ll need to click on the approve button when making your first video call in order to allow Skype to take control of your webcam. This is a security feature that kicks in after Linux finally recognizes your webcam got enabled all over again.
If you’re using an external webcam, then make sure that it’s attached properly and give it a few moments before starting Skype up again. You can check if Linux recognizes it by running lsusb from a command line once it’s attached, but if lsusb seems to hang then it’s probably searching through new devices to locate it.
That seems a lot of complex stuff just to switch off the damn camera.
Linux has its pluses, but jeez it’s got some detractors.