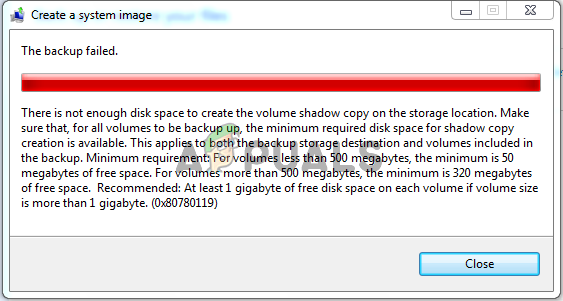
Fix Disk Space Error 0x80780119 when creating System Image
The 0x80780119 error mostly occurs due to storage issues on the drive where you want to create a system image. The System Reserved partition’s free space is probably not large enough to create a system image. You can create a new System Reserved partition or expand the current one. If the partition is large enough but there is not enough free space, it could be its USN Journal that has gotten too big.
Analysis of these causes can significantly contribute to the relative ease at which the problem can be resolved.
What triggers the error 0x80780119 when creating a System Image?
- Not enough free space in the System Reserved partition – This partition needs to have at least 40 MB of free space if you want to create a system image on that drive. The solution is to either expand this partition or to create a new one.
- SSD usage combined with improper parameters – If you are updating from Windows 8 to a newer version of Windows, certain parameters need to be properly configured for the process to complete smoothly. They can be changed easily using Command Prompt.
- USN Journal has grown too big – USN Journal keeps track of certain information regarding the partition. It can grow in size significantly and not enough space is left to create a system image. Deleting this journal can resolve the problem.
- Old drivers – Your storage device drivers should be updated to the latest version if you wish that this process completes smoothly.
- System protection is turned off – Many users have reported that they were unable to create a system image on their drive before enabling system protection for it.
- Too many language packs – If you have installed language packs you are not using at the moment, you should try uninstalling them in order to resolve this problem.
How to Fix the ‘Not Enough Disk Space’ Error 0x80780119 when creating a System Image on Windows 7/8/10?
1. Set up a Partition Properly
There are quite a few rules that apply when you intend to create a system image on Windows and one must always follow these rules if you don’t want to receive errors such as the 0x80780119 error. The problem often appears then the System Reserved partition doesn’t have enough space to store a shadow copy. First, you will need to check if there is enough space!
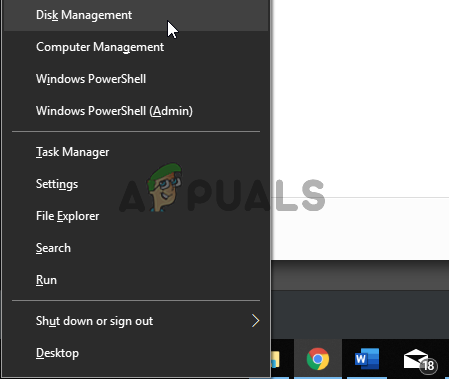
- Use the Windows Key + X key combination or right-click on the Start menu in order to open a menu of different tools. Choose the Disk Management option in order to open its window.
- You can also right-click the This PC icon from your Desktop and choose the Manage option from the context menu which will appear. Under the Storage section, left-click the Disk Management
- Left-click the System Reserved volume in the list which will appear, right-click its entry and choose Properties from the context menu which will appear. Note that the size of the System Reserved partition should be at least 100 MB.
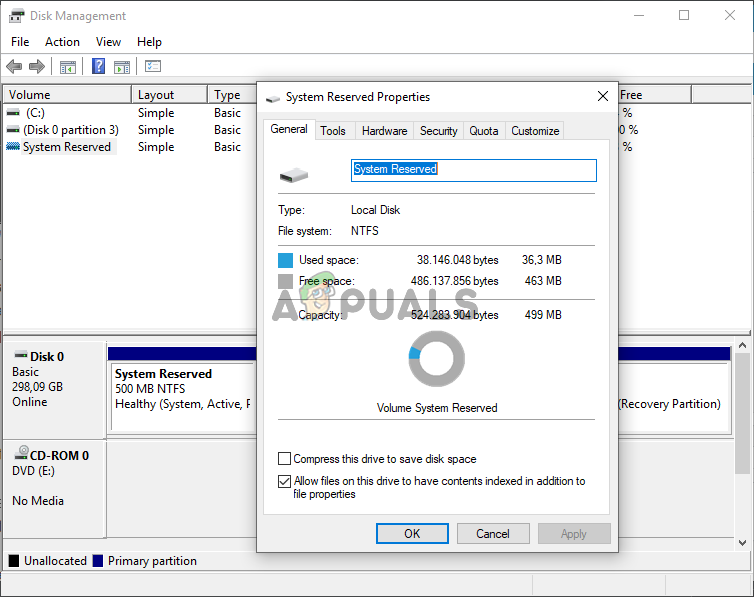
- Check the available free space and make sure it’s above 40 MB.
Since it’s impossible to extend the System Reserved partition, a useful workaround is to simply create a new system volume. It’s a great workaround to resolve the problem so make sure you check it out below!
- You will need to settle to where you want to have your system volume. Note that a system volume can only be created on a primary partition of an MBR disk. Let’s say that the name of the new volume is “F:”.
- Click the Start menu button at the bottom left part of your screen or tap the Windows Key on your keyboard. Type “cmd” inside and wait for a Command Prompt result to appear.
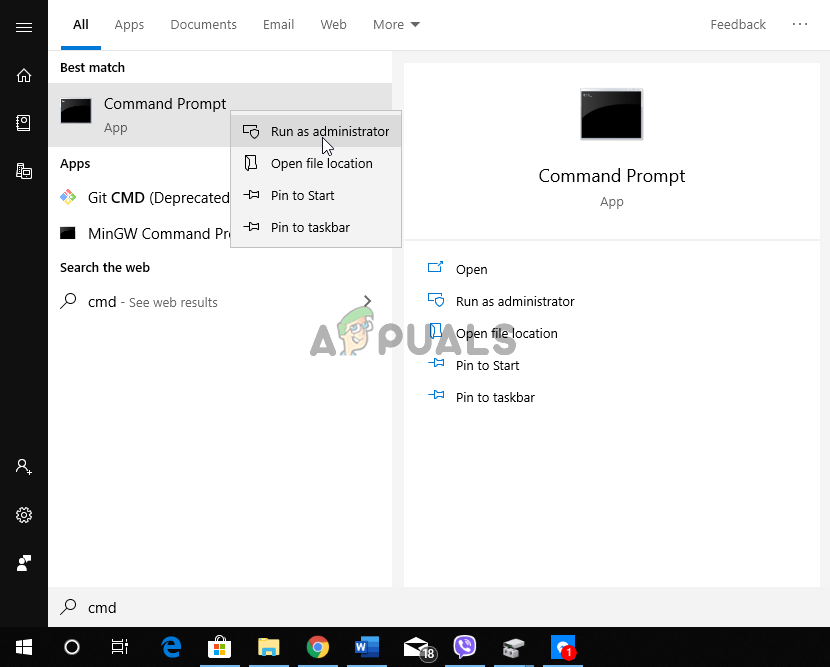
- Right-click its entry and choose Run as administrator from the context menu. Alternatively, you can use the Windows Key + R key combination in order to open the Run dialog box.
- Type “cmd” inside the box and use the Ctrl + Shift + Enter key combination in order to open an administrative command prompt!

- Once inside, make sure you type the command below and click the Enter key afterwards. This command assumes that your Windows installation folder is “C:\Windows”. If it’s not, make sure you change it accordingly. If the “F” letter is occupied, feel free to use a different letter:
bcdboot.exe /s C:\Windows /s F:
- This should create a new “F:” volume. After that, you will need to open DISKPART and make sure the “F:” volume is active. You can do that with the three commands presented below. Make sure you type Enter after each one!
DISKPART
DISKPART> select volume F
DISKPART> active
- After performing these steps, restart your computer and F: should become the system volume. Check to see if the 0x80780119 error still appears!
2. Set up Certain Parameters
In a certain situation where users are trying to update from Windows 8 to 8.1 and if their storage drive is an SSD, there are certain parameters that need to be changed as they are set up incorrectly for the update. The parameters are Prefetch, Superfetch, and ReadyBoot. Resolving the problem is quite easy though and it only requires that you run a certain command. Check it out below!
- Click the Start menu button at the bottom left part of your screen or tap the Windows Key on your keyboard. Type “cmd” inside and wait for a Command Prompt result to appear.
- Right-click its entry and choose Run as administrator from the context menu. Alternatively, you can use the Windows Key + R key combination in order to open the Run dialog box.
- Type “cmd” inside the box and use the Ctrl + Shift + Enter key combination in order to open an administrative command prompt!
- Once inside, make sure you type the command below and click the Enter key afterwards. Wait for its process to complete before exiting command prompt by clicking the ‘x’ button or by typing “exit” inside.
winsat formal -v
- Make sure you reboot your computer 3 times After that, your computer will be configured correctly to use an SSD drive and the problem should cease to appear from now on!
3. Delete the USN Journal from the System Reserved Partition
The USN Journal (Update Sequence Number Journal) is a feature available for NTFS drives. It keeps a record of all changes made to the volume. This journal can grow quite large over a short period of time and it can occupy plenty of space on your System Reserved partition. We recommend you delete the USN Journal from this partition in order to resolve the problem!
First of all, you will need to assign a letter to your System Reserved partition!
- Use the Windows Key + X key combination or right-click on the Start menu in order to open a menu of different tools. Choose the Disk Management option in order to open its window.
- You can also right-click the This PC icon from your Desktop and choose the Manage option from the context menu which will appear. Under the Storage section, left-click the Disk Management
- Left-click the System Reserved volume in the list which will appear, right-click its entry and choose Change Drive Letter and Paths from the context menu which will appear.
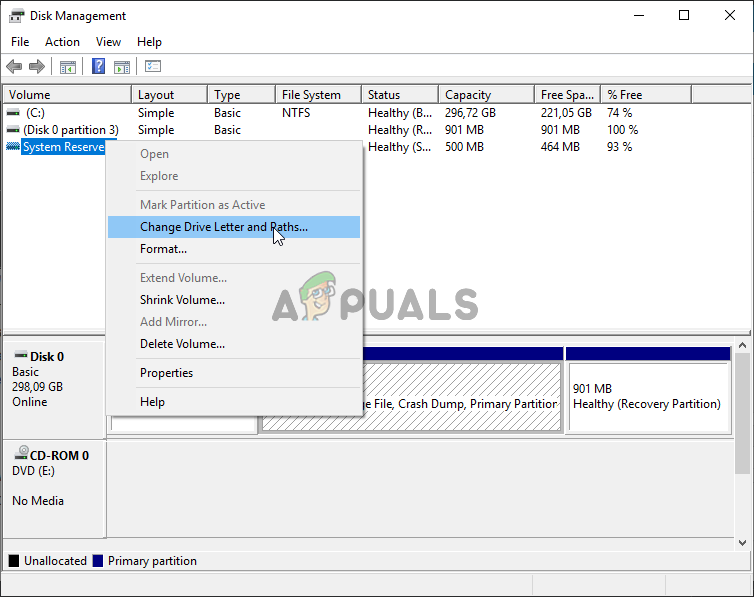
- Click the Add button in the new window which will appear and make sure the radio button is set to Assign the following drive letter. Make sure the letter you’ve chosen hasn’t already be assigned to a different drive. Click the OK button afterwards.
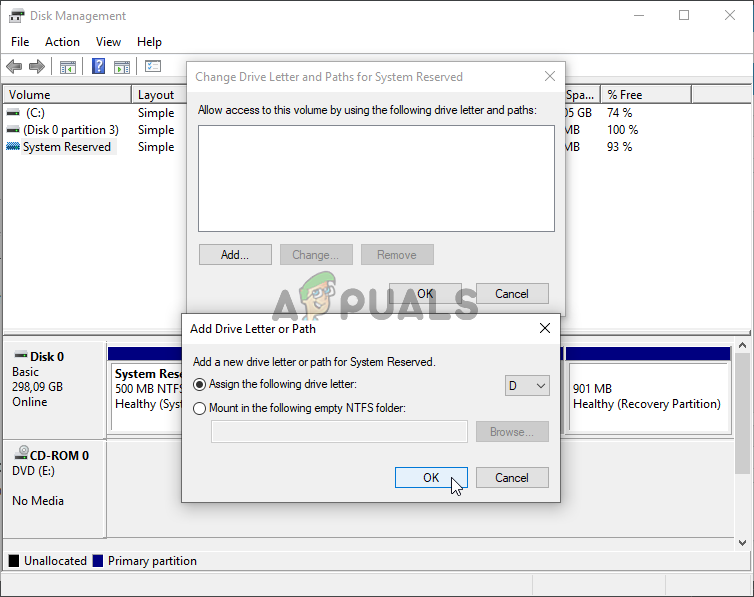
- Click OK again in order to confirm your choice.
- After that, you can open the Command Prompt by following the steps 1-3 from the Solution 2 Make sure you provide administrator permissions. Inside Command Prompt, type the two commands displayed below. Make sure you tap Enter after each one!
fsutil usn queryjournal F:
fsutil usn deletejournal /N /D F:
- This should free up space on your System Reserved partition and the 0x80780119 error should cease to appear from now on!
4. Increase the Size of the OEM Partition
Certain configurations may allow you to change the size of the recovery partition without having to create a new one. If that is the case in your scenario, you should definitely try it out as this method is quite easy to perform. Check out the required steps below!
- Use the Windows Key + X key combination or right-click on the Start menu in order to open a menu of different tools. Choose the Disk Management option in order to open its window.
- You can also right-click the This PC icon from your Desktop and choose the Manage option from the context menu which will appear. Under the Storage section, left-click the Disk Management
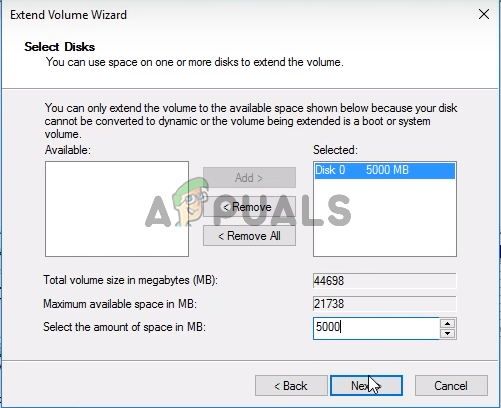
- Left-click the System Reserved volume in the list which will appear, right-click its entry and choose Extend Volume from the context menu which will appear.
- The Extend Volume Wizard should appear promptly. Click Next in order to proceed to the next screen. The drive you have chosen should be selected automatically.
- Once inside, set the Select the amount of space in MB to your required value in order to expand the drive.
- Check to see if the same problem still appears when trying to create a system image!
5. Check Your Drivers
If you are trying to create a system image on your drive, you should know that your storage device’s drivers must be updated to the latest version if you want this process to work properly. This can be achieved quite easily simply by following the set of steps we have prepared below!
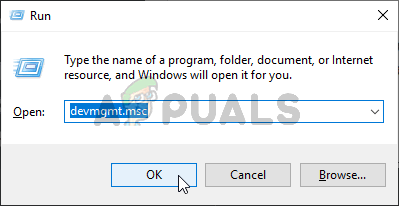
- Open up Device Manager by using the Windows Key + R key combination in order to open the Run dialog box. Type “devmgmt.msc” in the Run box and click OK in order to open the Device Manager.
- You can also click the Start menu button or the Windows Key on your keyboard to open the Start menu. Simply type “Device Manager” inside and left-click the first result.
- Either way, locate your main storage device after expanding the Disk drives section in Device Manager by clicking the arrow icon next to it.
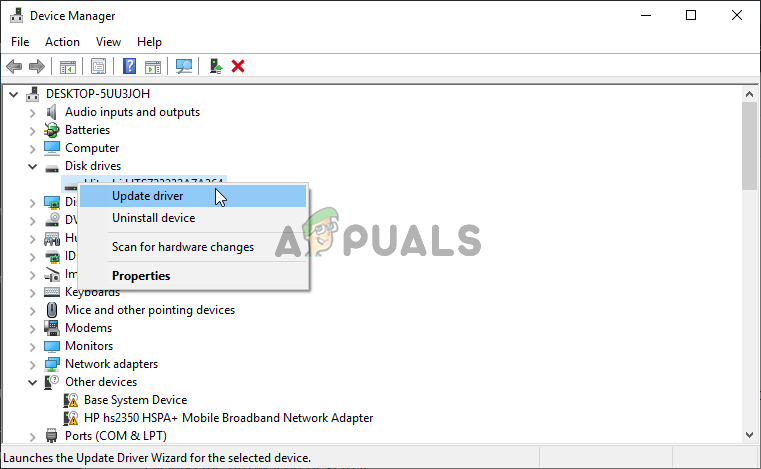
- Right-click your drive and choose the Update driver option from the context menu which will appear. Select the Search automatically for updated driver software option from the window which will appear and wait for the wizard to search for new drivers.
- If a new driver is available, confirm that you want to install it and follow the instructions which will appear on the screen.

- Check to see if the 0x80780119 error still appears!
6. Enable System Protection for Your Drive
In certain cases, users reported that they needed to enable system protection for the drive where you want to create the system image. This should be enabled by default but it may also be turned off for various reasons. Follow the set of steps we have prepared below in order to enable it!
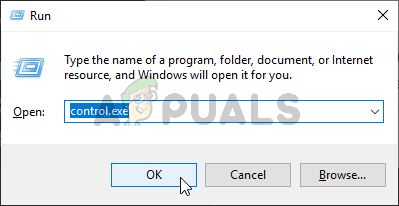
- In order to check if the system protection is disabled or not, click the Start menu button at the bottom-left part of the screen and type Control Panel.
- Click the first result in order to open it. You can also use the Windows Key + R key combination to open the Run After that, type “control.exe” in the box and click OK to open Control Panel.
- Click on System to navigate to the Control Panel’s System set of settings.
- At the left side of the screen, you will see System protection settings. Click on it to open System Properties. Navigate to the System Protection tab and you will see the Protection Settings.
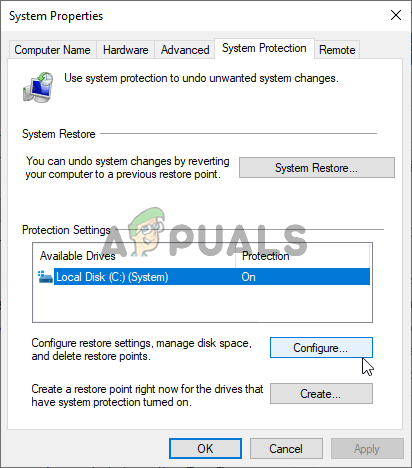
- Check to see if the Protection option is switched to On for the drive you are using to create the system image on.
- If the option is set to off, select the drive you want to turn system protection on for and click on the Configure
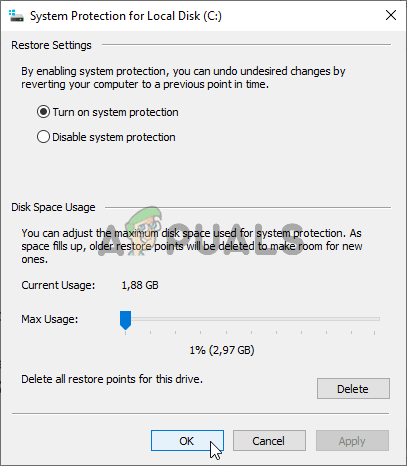
- The System Protection Settings for Windows 10 will open so check under Restore Settings for the “Turn on system protection” radio button. Make sure that this option is selected and click OK.
7. Uninstall Language Packs in the Control Panel
Even though this method appears to be totally unrelated to the issue at hand, many users have reported that uninstalling language packs you don’t use on your computer may help you prevent the error 0x80780119 from appearing when creating a system image. Follow the instructions below based on your operating system.
Windows 10:
- Use the Windows Key + I key combination in order to open Windows 10 Settings. You can also click the Start menu button or the Windows Key in order to open the Start menu. After that, click the cog icon in order to open Windows 10 Settings.
- Locate the Time & Language section and left-click to open it. Navigate to the Language tab from the left-side navigation menu.
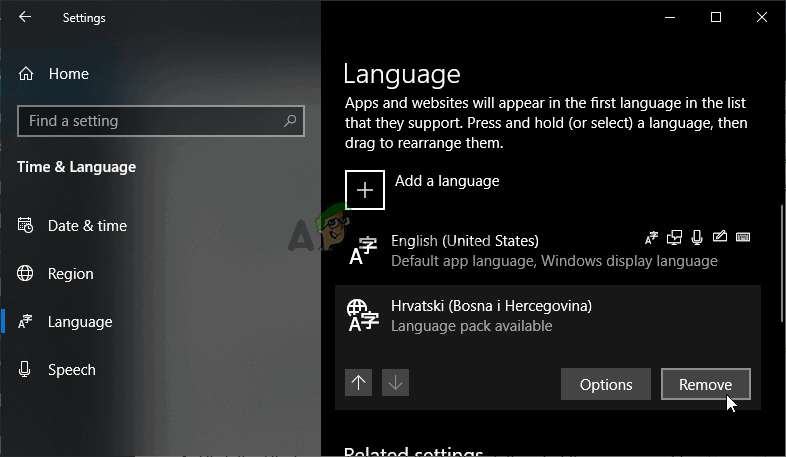
- Scroll down to the Preferred languages section and check the list of installed language packs. Left-click the one you want to remove and click the Remove Confirm any prompts which may appear.
Older versions of Windows:
- Click the Start menu button at the bottom-left part of the screen and type Control Panel.
- Click the first result in order to open it. You can also use the Windows Key + R key combination to open the Run After that, type “control.exe” in the box and click OK to open Control Panel.
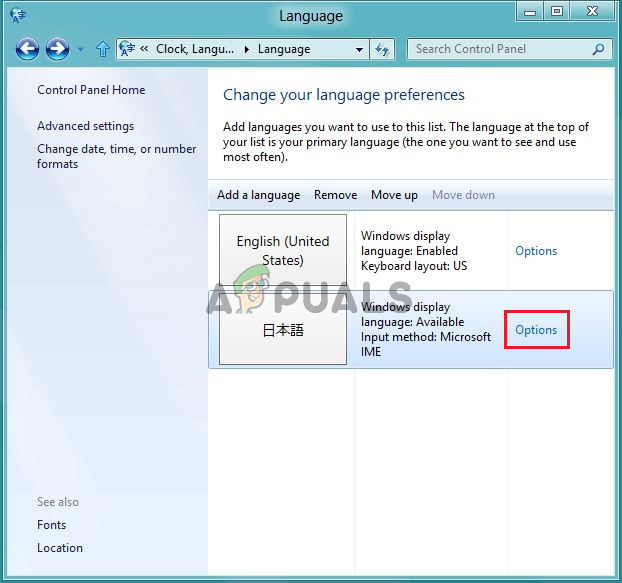
- Left-click the View by option from the top right part of the window and make sure you set it to Category. Under the Clock, Language, and Region section left-click the Add a language option in order to open language settings.
- A list of installed languages will appear. Click the Options button next to the language pack you wish to remove.
- Left-click the Uninstall display language option from the screen which will appear in order to fully remove this language pack. Note that you won’t be able to uninstall the language pack which is currently used as the display language.
- Check to see if the problem persists after performing these steps.


bcdboot.exe /s C:Windows /s F: doesn’t work.