FIX: Couldn’t Update the System Reserved Partition Error
When trying to upgrade their computers to Windows 10 (or Windows 8 or 8.1, for that matter), countless Windows 7 users received an error message stating “We couldn’t update the system reserved partition”. The upgrade would fail and this error message would be displayed no matter how many times an affected user would try upgrading their computer. This issue seems to be localized to computers running on Windows 7 and computers running on Windows 8/8.1 that have been upgraded from Windows 7, although cases of this issue affecting computers that came with Windows 8/8.1 out of the box are not unheard of.
This issue is, in almost all cases, related somehow to the system reserved hard disk partition that all Windows 7 (and Windows 8/8.1) computers have by default, and this partition is also the key to fixing this problem and getting your upgrade to go through without fail. The following are the most effective solutions that you can use to try and fix the “We couldn’t update the system reserved partition” issue:
Solution 1: Free up space on your System Reserved partition
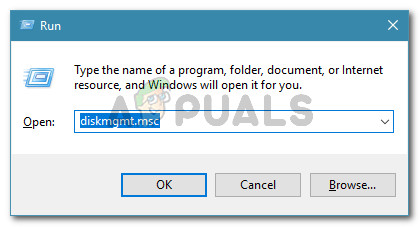
- Press the “Windows logo” key + R. Type diskmgmt.msc into the Run dialog and press Enter.
- Under the list of mounted volumes in the Disk Management window is a partition map.
- In this partition map, the first partition will be named System Reserved or Data and will (most likely) be 100 Megabytes in size.
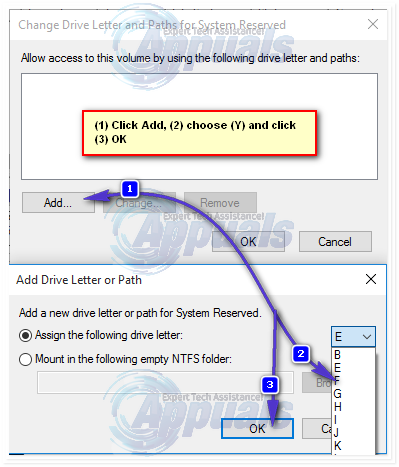
- Right-click on this hard disk partition and click on Change drive letters and paths.
- Click on Add. Open the drop-down menu in front of the Assign the following drive letter option, select Y as the drive letter and click on OK.
- If you’re using Windows 7, search for cmd in the Start Menu, right-click on the result titled cmd and click on Run as administrator.
- If you’re using Windows 8/10, simply press the Windows Logo key + X to open the WinX Menu and click on Command Prompt (Admin). This will open an elevated Command Prompt that has administrative privileges.
- Type the following commands into the elevated Command Prompt, pressing Enter after typing in each one in order to execute it:
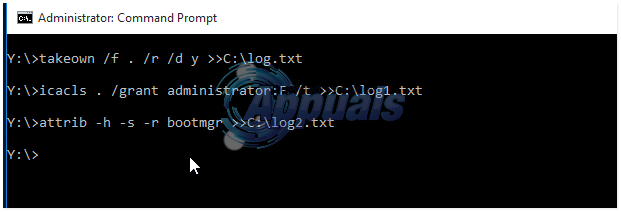
Y:
takeown /f  . /r /d y
icacls . /grant administrator:F /t
attrib -h -s -r bootmgr
Note: In the icacls command, substitute administrator with your username. To find out your username, type whoami into a Command Prompt and press Enter. For example, if your username is home, the icacls command will look something like the following:
icacls . /grant home:F /t
You can ignore >>log.txt in the commands above, I did it so I could show them all in one place to skip results.
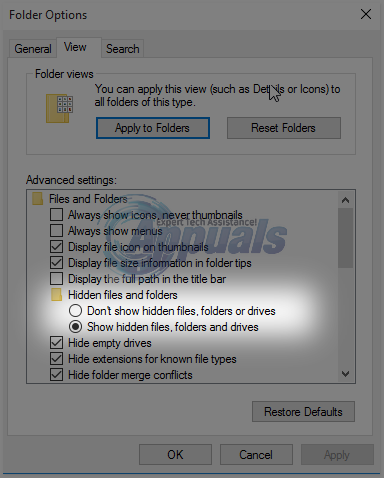
Open a Windows Explorer window and navigate to the Y drive. Make sure that both the Don’t show hidden files, folders or drives option and the Hide protected operating system files (recommended) option in Organize > Folder and search options > View are disabled.
Navigate to the Boot folder in the Y drive. Delete all of the languages in the Boot folder except for en-US and any other language(s) that you actually use and need on your computer. Once done, empty the Recycle bin to make sure that they have been deleted permanently. Open a new elevated Command Prompt (a Command Prompt with administrative privileges). Type the following command in the elevated Command Prompt and then press Enter:
chkdsk Y: /F /X /sdcleanup /L:5000
Once the command stated in the last step has been executed, the NTFS log file of the System Reserved partition will have been trimmed down to around 5 Megabytes, leaving at least 50 Megabytes of free space on the partition(which is half the amount of storage space the partition has be default!).
Once the process described above has been completed without any missteps, you can go on and try to upgrade your computer once again, and it should be successful this time. Once the updates you want have been downloaded and installed, you can open the Disk Management utility once again and remove the Y drive letter from the System Reserved hard disk partition.
If you think that this solution is a bit too lengthy, complicated or time consuming for you or if this solution does not manage to get rid of the problem and allow you to successfully upgrade your computer, simply move on and try the next one.
Solution 2: Expand the System Reserved partition using Disk Management
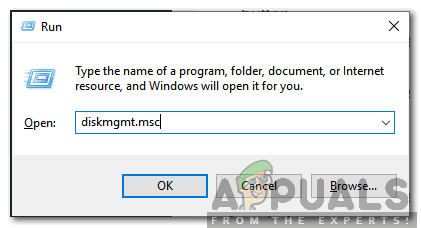
- Press the Windows Logo key + R. Type diskmgmt.msc into the Run dialog and press Enter.
Run dialog: diskmgmt.msc - In partition map located near the bottom of the Disk Management window, right-click on the C: drive and click on Shrink Volume. Shrink the C: drive by 300-350 Megabytes.
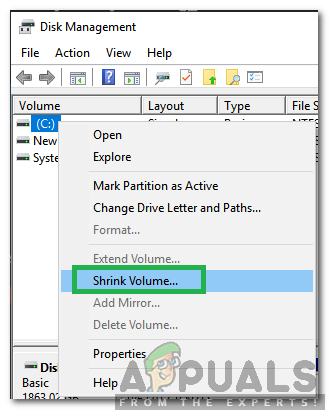
Clicking on the “Shrink Volume” button - Right-click on the System Reserved partition and click on Expand Volume. Expand the System Reserved partition so that it incorporates the 300-350 Megabytes you freed up on your hard drive as unallocated space by shrinking the “C:” driver.
- Once this has been done, restart your computer, and doing so will save the changes to your hard disk partitions.
- Once your computer boots up, try upgrading your computer once again, and it the upgrade should go through successfully if this solution managed to fix the “We couldn’t update the system reserved partition” issue.
Solution 3: Expand the System Reserved partition using the MiniTool Wizard
The MiniTool Partition Wizard is a piece of freeware that is designed specifically to allow inexperienced Windows users to easily play around with their hard disk partitions using an extremely simple and easy-to-get-used-to User Interface. Whether you are an experienced Windows users or a mere rookie, you will certainly be able to use the MiniTool Partition Wizard in order to expand your System Reserved hard disk partition in hopes that doing so will get rid of the “We couldn’t update the system reserved partition” problem.
Go here and download, install and run the MiniTool Partition Wizard. Find your computer’s C: drive in the utility’s partition map and choose “Move/Resize Partition“. Carefully and gradually drag C: drive partition, just enough to shrink the partition by 300-350 Megabytes.
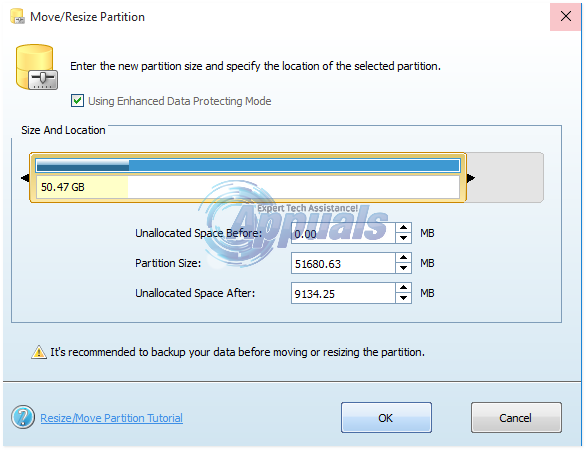
Expand the System Reserved partition to requisition and incorporate this now unallocated 300-350 Megabytes of hard disk space. Apply the changes. Allow the MiniTool Partition Wizard to complete the process of saving the changes, restart your computer when asked to do so, wait a little bit more for the utility to finalize the changes and when the changes have finally been made and you get back full control of your system, try upgrading your computer, and if the solution worked, the upgrade will be successful.
Solution 4: Turn Local Disk C into an Active partition
Turning the C: drive into your active hard drive partition is an EXTREMELY simple solution for the “We couldn’t update the system reserved partition” issue that has worked for quite a lot of the Windows users who have been affected by this dreadful problem in the past.
- Press the Windows Logo key + R. Type diskmgmt.msc into the Run dialog and press Enter.
Typing in “diskmgmt.msc” and pressing Enter - In the partition map located at the bottom of the Disk Management window, right-click on your C: Click on Mark Partition as Active to turn the C: drive into your active hard disk partition.
- Restart your computer and try upgrading your system once your computer boots up.
is it administrator or administrators (you typed both) …please don’t mess up my computer system.