FIX: Windows Update Fails with Error 0x80070643
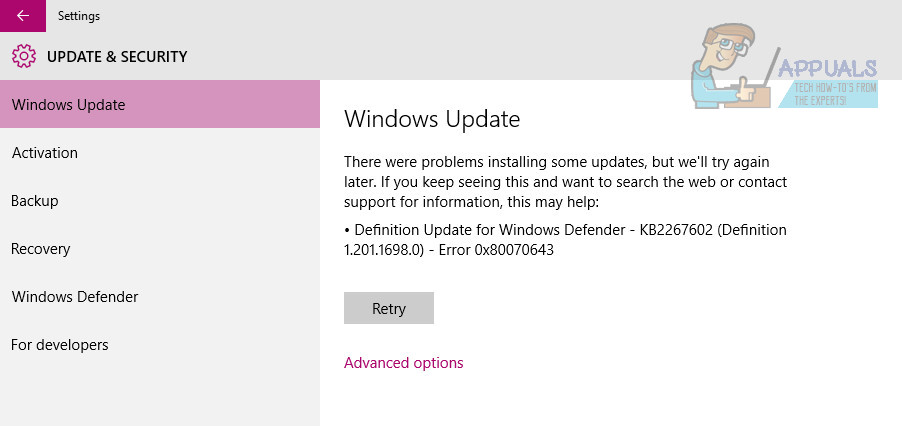
When installing updates for their computers from Windows Update, many users have reported a single update – a Definition Update for Windows Defender – failing, with the error code 0x80070643 being associated with the issue. Definition Updates for Windows Defender come with new and updated definitions for all known viruses and malware, which is why these updates are absolutely critical for optimum Windows Defender performance and why not being able to install even one of these updates can be a pretty big problem. Also, other users have reported not only Windows Defender updates failing, but many other pending updates for Microsoft Office, Windows Live Essentials, Skype, Microsoft Silverlight, etc. Though this issue is prevalent among Windows 10 users, it has also been reported on earlier operating systems as far back as Windows Vista.
While there is no official word of the cause of this issue, many of the wisest Windows 10 users who have been affected by this issue speculate that it is caused by both Windows Update and Windows Defender trying to download and install the Definition Update in question at the same time. Thankfully, though, this issue is not among the many Windows 10 issues that cannot be fixed. To fix this issue, all an affected user needs to do is download the Definition Update in question through Windows Defender itself, uninstalling 3rd party antiviruses, updating Windows with administrative permissions, removing existing definition updates, running the SubInACL tool, resetting Windows Update components or fixing Silverlight. Performing any of these methods will save the user from seeing error code 0x80070643.

Method 1: Installing the Update From Windows Defender
In order to fix this problem and successfully download the failing Definition Update, you need to:
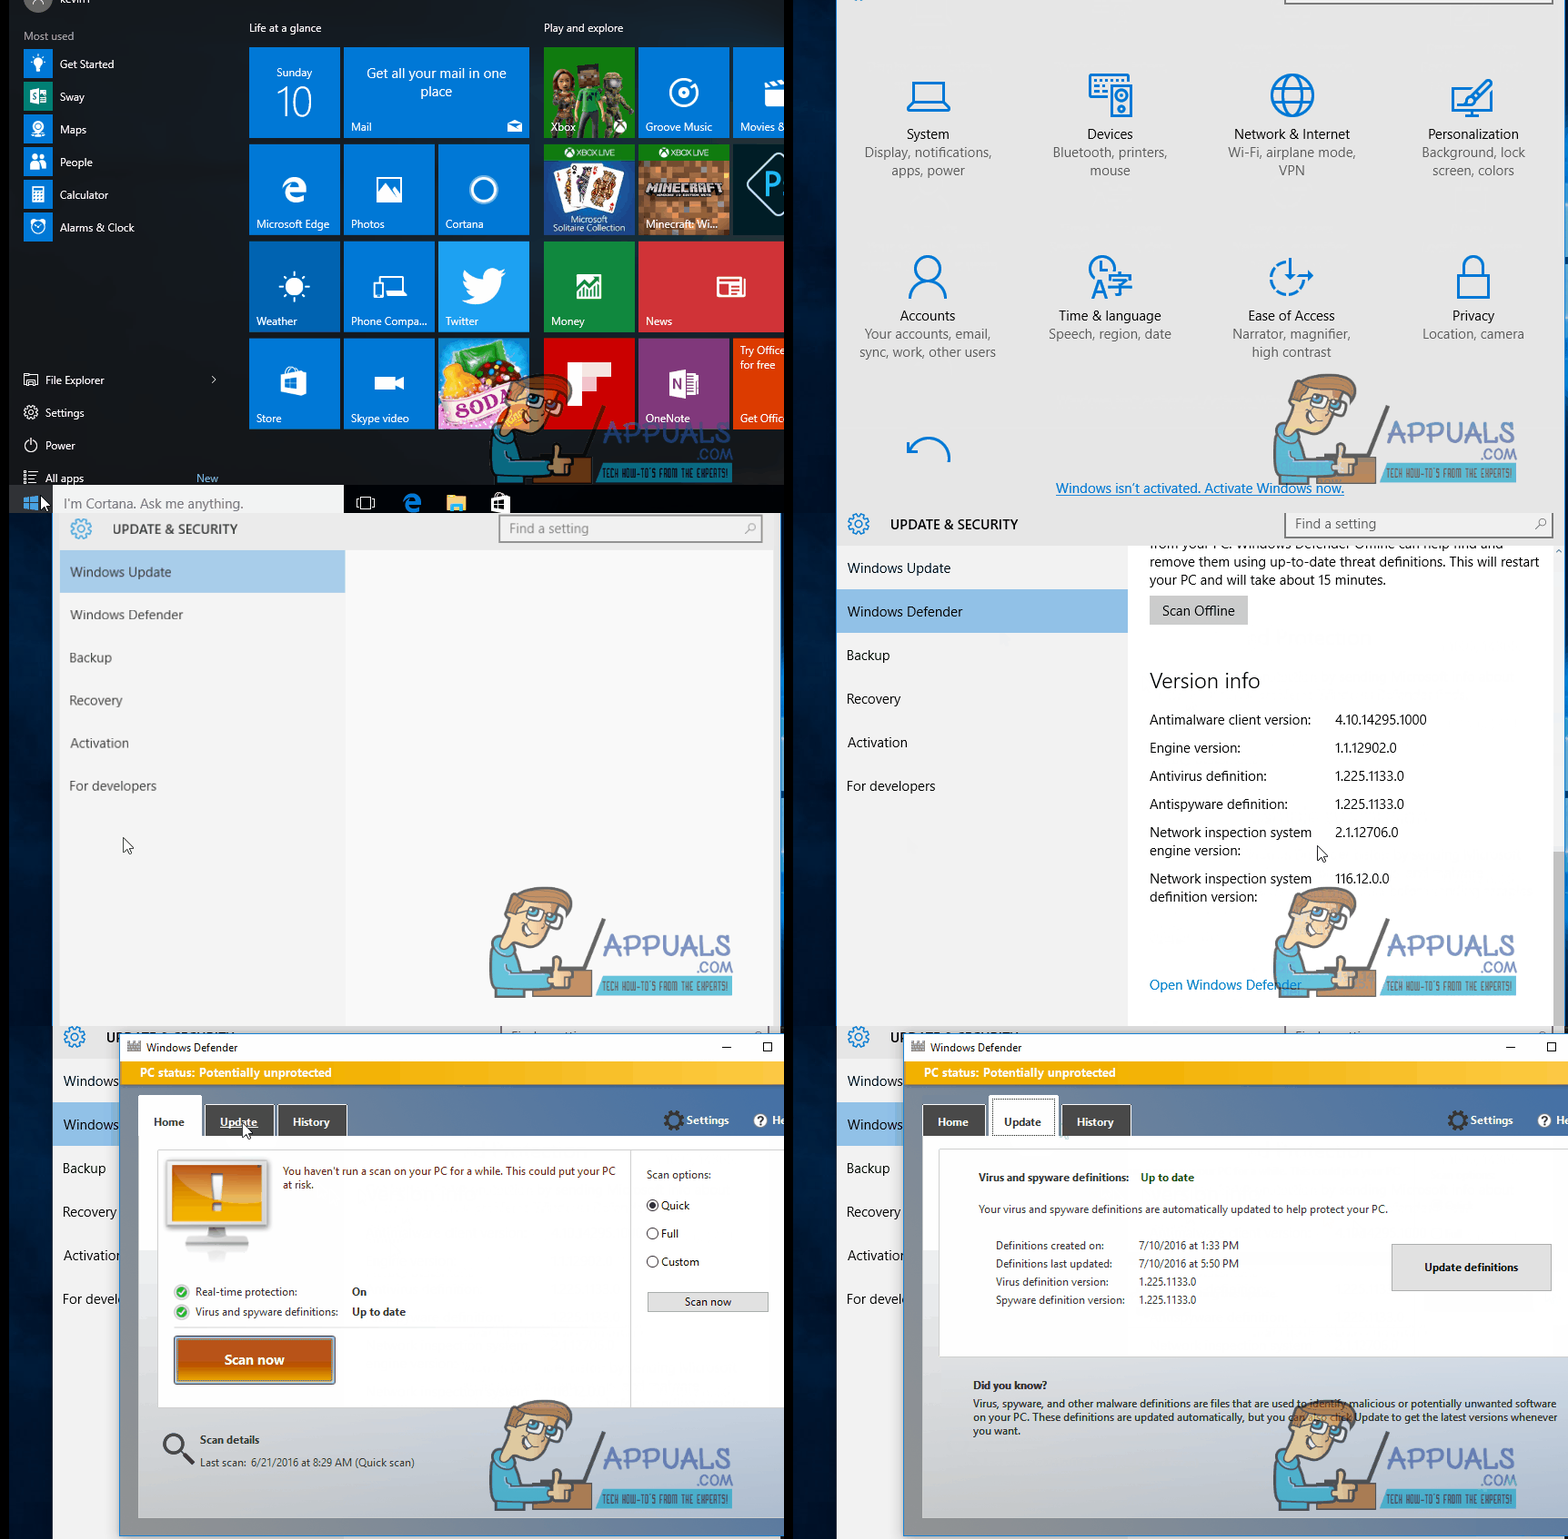
- Open the Start Menu.
- Click on Settings.
- Click on Update & Security.
- Click on Windows Defender in the left pane.
- In the right pane, scroll down to the Version info section and click on Open Windows Defender to launch the desktop Windows Defender app.
- Once in the Windows Defender app, navigate to the Update
- Click on Update.

Wait for Windows Defender to check for, download and install any and all available Definition Updates.
Once Windows Defender is done downloading and installing any and all available Definition Updates, you can navigate to Windows Update, and you will see that no pending Definition Updates for Windows Defender are reported, and neither will you see error code 0x80070643.
Method 2: Uninstall 3rd Party Antiviruses
For most people who had this issue, uninstalling or disabling other anti-malware products fixed the products. It is not advisable to have more than one antivirus software on your PC as it may cause conflicts with unfavorable consequences. You quickly uninstall an existing antivirus by going to Control Panel > Programs and Features, selecting the software and then clicking Uninstall and following the prompts or use the steps below for a thorough uninstall.
- Download the removal tool for your antivirus software using the corresponding links below.
You can also use the AppRemover OESIS Endpoint Assessment Tool to remove antivirus products otherwise note listed here.
- Launch the downloaded utility and follow its prompts to completely remove the anti-malware application from your system.
- Reboot your PC.
- Open or enable Windows Defender and then try to install the update from Windows Update.
Method 3: Updating with Administrative Permissions
Some updates require administrative permissions in order to be installed. If you are using a guest or lesser privileged account, sign in to your PC. If your PC belongs to a domain, you should contact your system administrator to assist you.
Method 4: Use the command prompt
There are a few commands that you can run from an Administrator Command Prompt that help with this issue.
- Press the Windows key and type in Right-click the result, and choose Run as administrator. Or, press simultaneously the Windows and X keys on your keyboard, and choose Command Prompt (Admin) from the menu.
- In the Administrator command prompt type in the following commands, and press Enter after each one to execute them. Make sure that you wait for a finished message from the first command before you write and execute the second one. Also, make sure not to make any typos with the commands.
"%PROGRAMFILES%\Windows Defender\MPCMDRUN.exe" -RemoveDefinitions -All
"%PROGRAMFILES%\Windows Defender\MPCMDRUN.exe" -SignatureUpdate
- After both commands are done running, you can close the command prompt.
- Try running the updates now, you should be able to do this both from Windows Update as well as within Windows Defender
Method 5: Fixing Microsoft Silverlight
If error 0x80070643 on your system is related to the Security Update for Microsoft Silverlight, you can fix this easily by cleaning the corrupted Silverlight installation and then reinstalling Silverlight.
- Download Microsoft’s Fix It utility which automatically uninstalls Microsoft Silverlight. Alternatively, you can download this script and Run as Administrator
- Once the uninstall has completed, visit http://www.microsoft.com/getsilverlight/get-started/install/default to install the latest version of Microsoft Silverlight.
Method 6: Resetting Windows Updates Components
- Open the Start menu and type ‘cmd’. Right-click on the Command Prompt icon and click on ‘Run as Administrator’. Accept the UAC prompt when it comes up.
- In the command prompt, type the following commands and press enter after each command.
Net stop wuauserv
net stop cryptSvc
net stop bits
net stop msiserver
- Rename the SoftwareDistribution and Catroot2 folder by typing the following commands in the Command Prompt.
ren C:\Windows\SoftwareDistribution SoftwareDistribution.old ren C:\Windows\System32\catroot2 Catroot2.old
- Start the Windows Update services again by typing these commands.
net start wuauserv
net start cryptSvc
net start bits
net start msiserver
- Try running Windows Update again to confirm if the error is gone.
Method 7: Running the SubInACL Tool
For older operating systems like Windows Vista, there was a bug involving .NET Framework 2.0 which caused by incorrect access control list permissions on some registry hives which causes certain applications to not install. The SubInACL fixes this issue by repairing the file and registry permissions that are needed to install .MSI based setups.
- Download the SubInACL tool and install it. This utility will be installed to C:\Program Files\Windows Resource Kits\Tools.
- Download this script and edit it with Notepad or any other text editor. Replace the values named YOURUSERNAME to the Windows user account that you’re logged in with and save. You can find your username by looking at the username listed in the Username column of the Processes tab or the Users tab in the Windows Task Manager.

- Right-click on the script and Run as Administrator.
- After the reset.cmd script completes, try to install the software that previously failed to install on your system.
Method 8: Install Definitions Manually
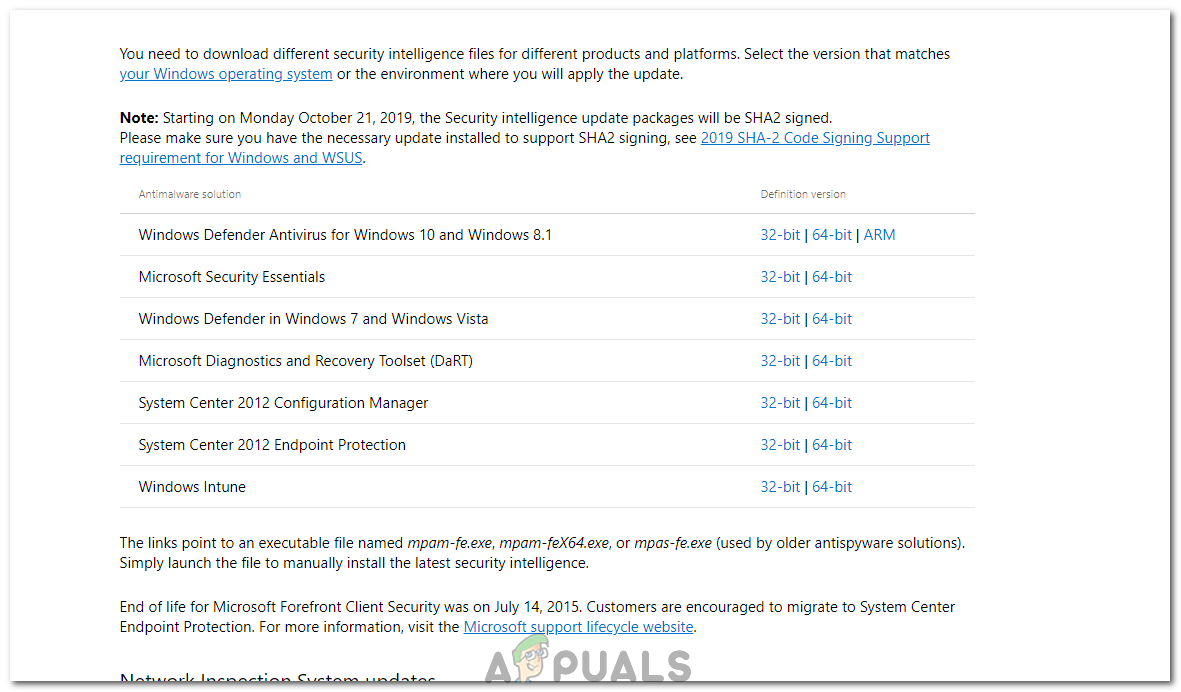
In some cases, the error might not be solved and as a workaround, you can get the definitions directly from the Microsoft website and then run the executable to install them on your computer. In order to do so, follow the guide below.
- Navigate to this site.
- Select the appropriate architecture of your computer.

Selecting the Appropriate version - Run the executable and follow the on-screen prompts to install it.