Fix: Black Screen With Cursor (BSOD) on Windows 7, 8 and 10
After starting Windows, the screen goes completely black except for the mouse pointer. You can’t see the desktop, taskbar, or login screen. This problem is not a Blue Screen of Death (BSOD), but happens when Windows cannot load its normal display.

The most common reason is a problem with the explorer.exe process, which shows your desktop and files. This can happen because of unfinished Windows updates, problems with drivers, or a damaged user profile.
Quick Test for Windows 8/8.1/10 (Laptops with Batteries)
If you’re using Windows 8 or 8.1, try this quick test first:
- Remove the battery from your laptop, then reinsert it.
- Turn on the computer, and immediately start tapping the F8 key repeatedly while also holding down the Shift key.
- See if Windows starts up normally. If the problem persists, continue with the steps below.
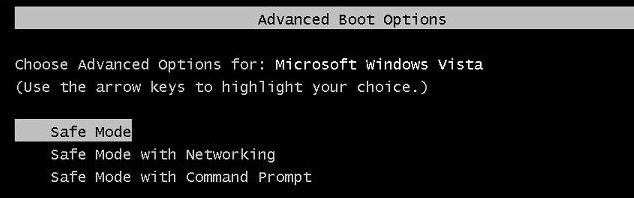
How to Enter Safe Mode on Windows 8, 8.1, 10, 7, and Vista
For most of the following solutions, you’ll need to start your system in Safe Mode. This section explains how to boot into Safe Mode, which is a diagnostic mode for troubleshooting issues in Windows. When you first get into Safe Mode, it’s a good idea to back up your important files to an external disk, USB, or thumb drive.
To enter Safe Mode, restart your computer. If you can’t see any menu or button options, perform a force restart by holding down the power button until the computer shuts off. Turn it back on and begin tapping the F8 key continuously until you see the advanced boot menu. From this menu, select ‘Safe Mode with Networking’.
1. Run a System File Checker Scan in Safe Mode (Windows 8/8.1/10/7/Vista)
Once you are in Safe Mode with Networking:
- Hold the Windows key and press R to open the Run dialog box.
- Type ‘cmd‘ and click OK.
- In the Command Prompt window, type SFC /scannow and press Enter.
The System File Checker (SFC) will scan your Windows installation for any corrupted or missing files, and attempt to repair them. Please wait until the scan completes. When finished, restart your computer and check if the issue is resolved. If you still see the black screen, return to Safe Mode and proceed to the next method (System Restore).

2. Use System Restore in Safe Mode (Windows 8/8.1/10/7/Vista)
Assuming you’ve returned to Safe Mode, follow these steps:
- Click the Start button, type ‘system restore‘ into the Start Menu search box, and press Enter. Alternatively, open Run (Windows key + R), then type ‘rstrui.exe’ and click OK.
- From the search results, click System Restore. Once it loads, place a checkmark next to ‘Show More Restore Points‘, and click ‘Next’.
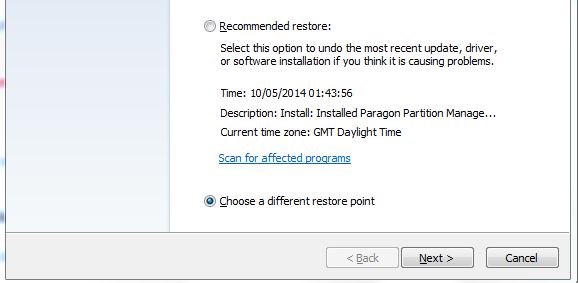
- Choose a restore point from a date when your computer was working properly. Click ‘Next‘ and then ‘Finish‘.
This will start the System Restore process and your computer will restart when it’s done. If you still encounter the black screen after the restore, move on to the next method.
3. Remove and Reinstall VGA/Display Driver in Safe Mode (Windows 8/8.1/10/7/Vista)
Boot into Safe Mode again. Once you have logged in, do the following:
- Hold the Windows key and press R to open the Run window.
- Type “hdwwiz.cpl” and click OK.
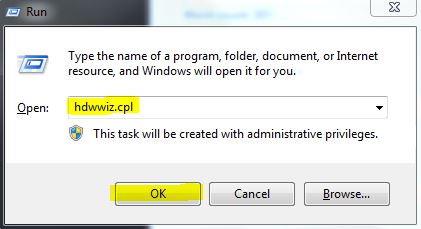
Typing in hdwwiz.cpl - Find and expand Display Adapters. Make a note of your display adapter’s name.
- Right-click your adapter and select Uninstall.
- Once uninstalled, restart your PC and allow Windows to start normally. Afterward, download and install the latest graphics drivers from your manufacturer’s website.
4. Restore Registry Hives Using RegBack
In some cases, restoring the Windows registry from backup may solve the black screen problem. Here’s how to do it:
- Restart your system and repeatedly tap F8 and F12. When the Advanced Boot Options menu appears, choose the command to start Startup Repair for your Windows version.
- Press Enter as needed (select your preferred language and enter your password if prompted).
- From the menu, select Command Prompt. This window will have administrative privileges and usually shows as the X:\ drive, which is a temporary environment created for repairs.
We need to switch to your actual Windows drive, most commonly C:\. - Type
C:\and press Enter. You should now seeC:\at the prompt. - Type
cd..and press Enter to ensure you are in the root directory. - Next, type
dir /o/pand press Enter. This lists your directories. When you see <dir> Windows, you’re on the correct drive. - Type
cd C:\Windows\System32\configand press Enter. - Type
dir /o/pto look for the RegBack directory. - Type
cd Regbackand press Enter. - Type
dir. You should see files named DEFAULT, SAM, SECURITY, SOFTWARE, SYSTEM, along with recent dates and file sizes. If their dates are recent, proceed to the next step. - Type the following command, then press Enter:
xcopy C:\Windows\System32\config\RegBack C:\Windows\System32\config
- When prompted (Y/N/A), type A (for All) to overwrite all files.
- When the files have been copied, type
exitand press Enter to close Command Prompt. - Exit out of any open screens and restart your computer. Your Windows system should now start up normally.
Just had this and MAN this was frustrating, LOL.
Long time “computer nerd” here and I fixed this in about 3 hours of frustration, before it “hit me”.
The problem is a corrupt Windows environment boot up issue and therefore, it needs to be fixed in the registry. Without getting complicated in the details, I’m going to give you the instructions that I GUARANTEE will fix this… ready?
Reboot your system and start hitting F8 and F12 repeatedly. When you get your Windows Safe Boot Screen, choose the top most command to Startup Repair your windows. Click enter on keyboard (usually defaults to US or whatever country you’re in) and then for Login, hit enter the same (password if applicable).
From inside here, click down to the bottom most option for Command Prompt. A window should open and should have Administrative Rights assigned to it. You will also notice the letter X: as the drive you are on. That’s because you are in a virtual or rather, boot alternative to your true operating system. So, we need to get to your real copy of Windows.
At the command prompt, type: C: and hit enter. You should see C: as such and you are on your C: drive.
Type cd.. and hit enter. You are now on the root directory to see all of your folders from here.
Type: dir /o/p and hit enter. This will now show a list of directories from your computer. They should look familiar to you and so, as this list scrolls by (hit the space bar to continue as the /p makes it pause so you can read them all), until you get to the bottom where the Windows directory is. If you see a
Now type the following: cd C:WindowsSystem32config and hit enter. From here you are going to want to type dir /o/p again.
We are looking for the RegBack directory so type: cd Regback and hit enter. Type dir and you should see the following files in CAPS: DEFAULT SAM SECURITY SOFTWARE SYSTEM and with that, a date and file size next to each of them. If the dates listed next to them are within the past few days or weeks, this is where you want to be. Now for the fix!
Type: xcopy cd C:WindowsSystem32configRegBack C:WindowsSystem32config and you will get a prompt asking you (Y/N/A)? Hit A for All. It’s the SYSTEM file we are really after to change, but, it doesn’t hurt to change them all. You should now get a reply stating that all 5 files were copied. At this point, you can type: exit and hit enter and it will bring you out of the Command Prompt.
Exit each screen and reboot your computer and you should be seeing your Windows 7/8/10 again, simple as before the problem started. 🙂
Let me know how it goes… I just fixed this and am posting this reply everywhere that has it listed as a problem.
Good luck!
Johnathan